Page 290 of 334

! If you tow or tow-start another vehicle, its
weight must not exceed the maximum per-
missible gross vehicle weight of your vehicle.
It is better to have the vehicle transported than
to have it towed away.
If the vehicle has suffered transmission damage,
have it transported on a transporter or trailer.
The automatic transmission must be in position
N when the vehicle is being towed.
The battery must be connected and charged.
Otherwise, you: R
cannot turn the SmartKey to position 2 in the
ignition lock. R
cannot shift the automatic transmission to
position N .
In the event of damage to the electrical sys-
tem
If the battery is defective, the automatic trans-
mission will be locked in position P . To shift the
automatic transmission to position N , you must
provide power to the vehicle's electrical system
in the same way as when jump-starting
( Y
page 285).
Have the vehicle transported on a transporter or
trailer.
Disarm the automatic locking feature before the
vehicle is towed ( Y
page 82). You could other-
wise be locked out when pushing or towing the
vehicle.
Installing/removing the towing eye
Installing the towing eye
G WARNING
The exhaust tail pipe may be very hot. There is
a risk of burns when removing the rear cover.
Do not touch the exhaust pipe. Take particular
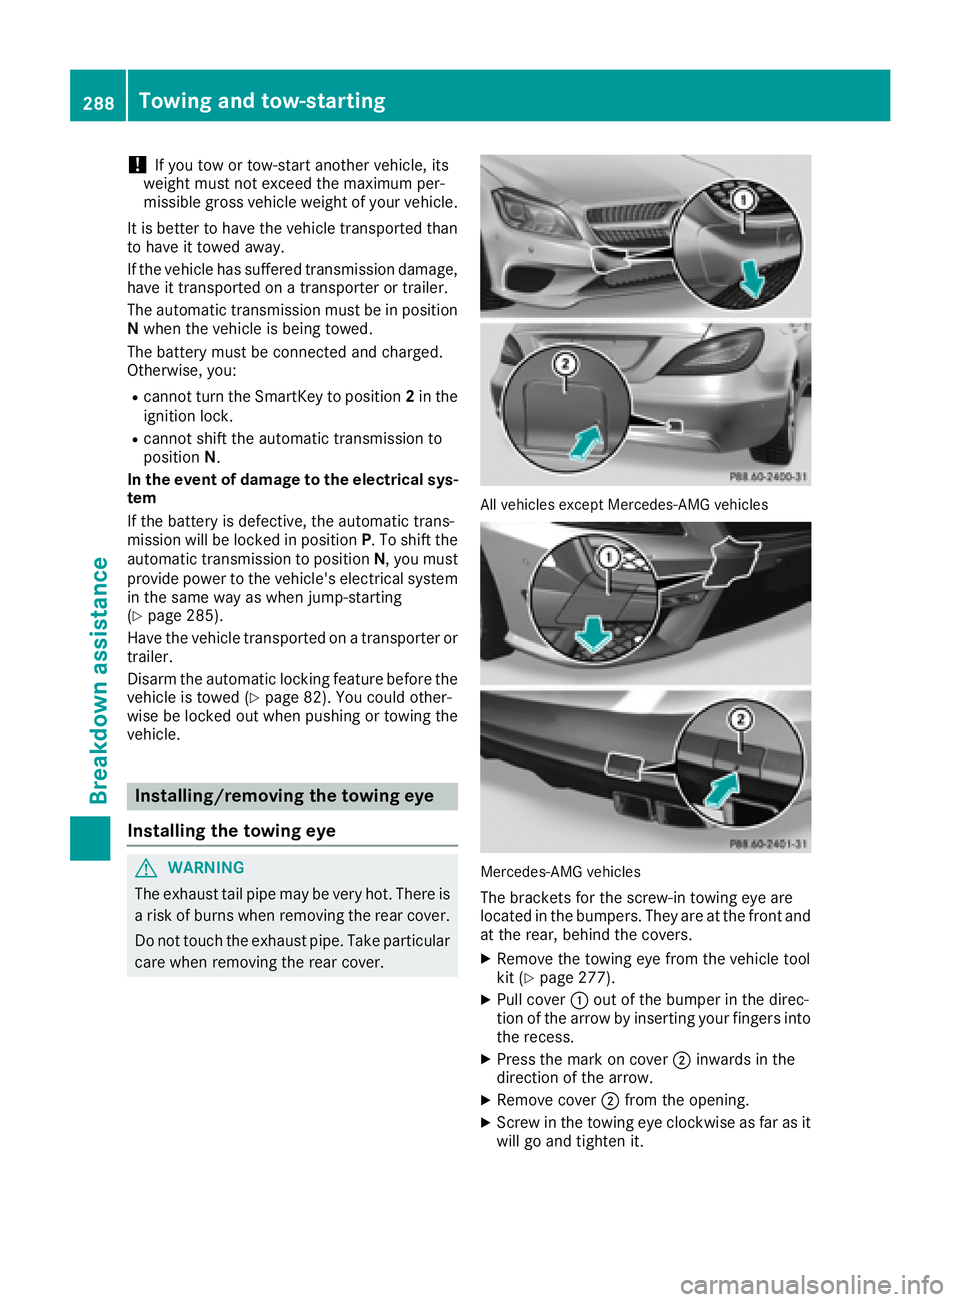
care when removing the rear cover. All vehicles except Mercedes-AMG vehicles
Mercedes-AMG vehicles
The brackets for the screw-in towing eye are
located in the bumpers. They are at the front and
at the rear, behind the covers. X
Remove the towing eye from the vehicle tool
kit ( Y
page 277). X
Pull cover �C out of the bumper in the direc-
tion of the arrow by inserting your fingers into
the recess. X
Press the mark on cover �D inwards in the
direction of the arrow. X
Remove cover �D from the opening.X
Screw in the towing eye clockwise as far as it
will go and tighten it.288
Towing and tow-starting
Breakdown assistance
Page 318 of 334

Always pay attention to the instructions and
safety notes in the "Changing a wheel" section
( Y
page 312).
Only use wheel bolts that have been designed
for the wheel and the vehicle. For safety rea-
sons, Mercedes-Benz recommends that you
only use wheel bolts which have been approved
for Mercedes-Benz vehicles and the respective
wheel.
! Mercedes-AMG vehicles with ceramic-
brake disc: during removal and repositioning
of the wheel, the wheel rim can strike the
ceramic-brake disc and damage it. Therefore,
you should proceed carefully and get a sec-
ond person assist to you. Alternatively, you
can use a second alignment bolt.
! To prevent damage to the paintwork, hold
the wheel securely against the wheel hub
while screwing in the first wheel bolt.
X
Clean the wheel and wheel hub contact sur-
faces. X
Slide the wheel to be mounted onto the align-
ment bolt and push it on. X
Tighten the wheel bolts until they are finger-
tight. X
Unscrew the alignment bolt. X
Tighten the last wheel bolt until it is finger-
tight. X
Vehicles with a collapsible spare wheel:
inflate the collapsible spare wheel
( Y
page 319).
Only then lower the vehicle. Lowering the vehicle
G WARNING
The wheels could work loose if the wheel nuts
and bolts are not tightened to the specified
tightening torque. There is a risk of accident.
Have the tightening torque immediately
checked at a qualified specialist workshop
after a wheel is changed.
! Vehicles with a collapsible spare wheel:
before lowering the vehicle, inflate the col-
lapsible spare wheel with the tire inflation
compressor. The wheel rim could otherwise
be damaged. X
Turn the crank of the jack counter-clockwise
until the vehicle is once again standing firmly
on the ground. X
Place the jack to one side.
X
Tighten the wheel bolts evenly in a crosswise
pattern in the sequence indicated ( �C to �
Page 320 of 334

R
do not switch ESP ®
off.R
have a spare wheel or emergency spare
wheel of a different size replaced at the
nearest qualified specialist workshop.
Observe that the wheel and tire dimensions
as well as the tire type must be correct.
When using an emergency spare wheel or spare
wheel of a different size, you must not exceed
the maximum speed of 50 mph (80 km/h).
Snow chains must not be mounted on emer-
gency spare wheels.
General notes You can ask for information regarding permitted
emergency spare wheels at an authorized
Mercedes-Benz Center.
You should regularly check the pressure of the
emergency spare wheel, particularly prior to
long trips, and correct the pressure as neces-
sary ( Y
page 295). The value on the wheel is
valid.
An emergency spare wheel may also be moun-
ted against the direction of rotation. Observe
the time restriction on use as well as the speed
limitation specified on the emergency spare
wheel.
Replace the tires after six years at the latest,
regardless of wear. This also applies to the
emergency spare wheel.
i When you are driving with the collapsible
spare wheel mounted, the tire pressure loss
warning system or the tire pressure monitor
cannot function reliably. Only restart the tire
pressure loss warning system or tire pressure
monitor when the defective wheel has been
replaced with a new wheel.
Vehicles with tire pressure monitor: after
mounting an emergency spare wheel, the sys-
tem may still display the tire pressure of the
removed wheel for a few minutes. The value
displayed for the mounted emergency spare
wheel is not the same as the current tire pres-
sure of the emergency spare wheel. "Minispare" emergency spare wheel/
collapsible spare wheel
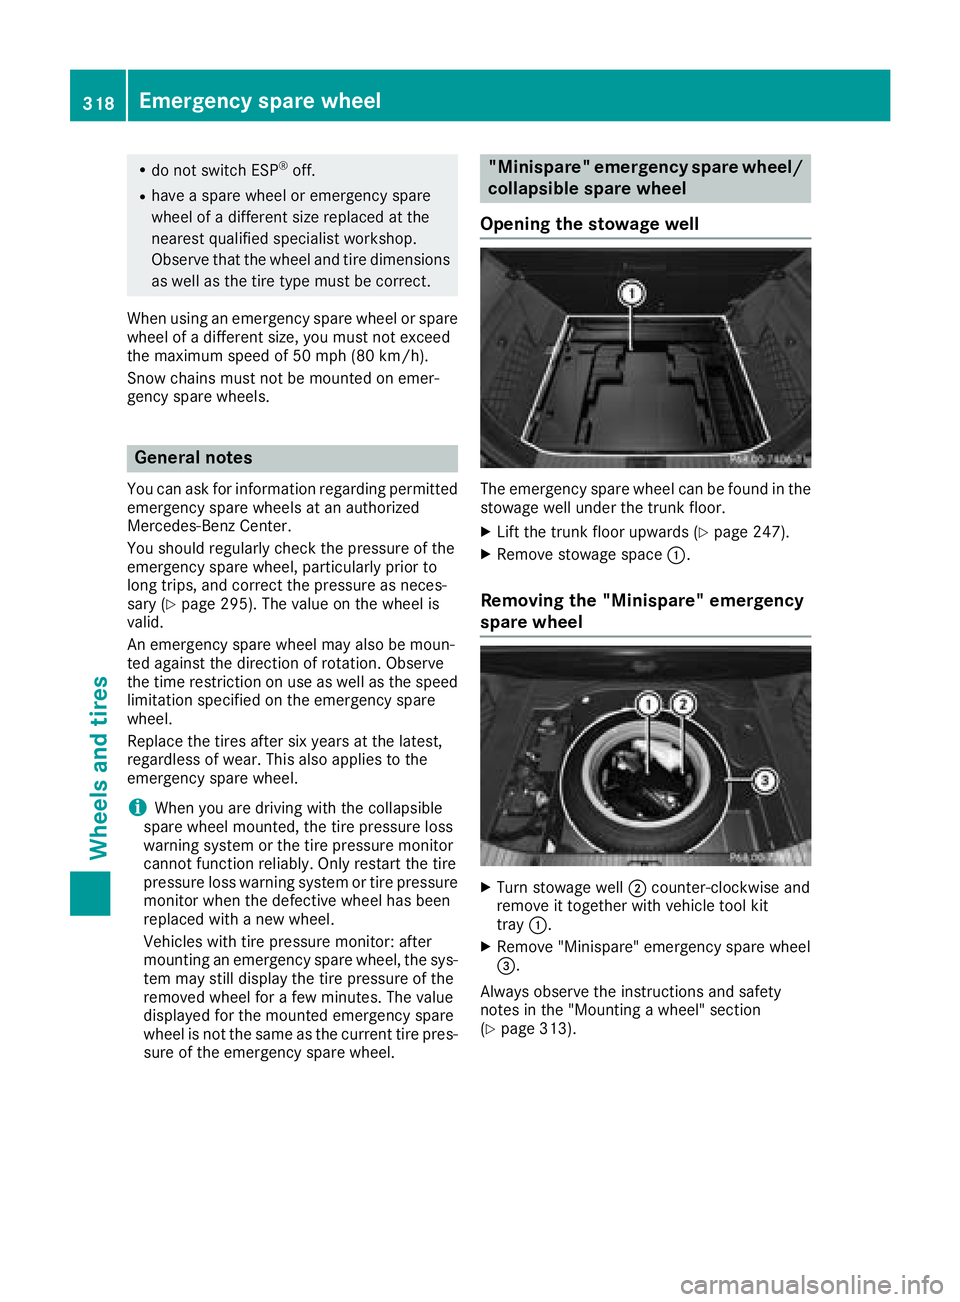
Opening the stowage well
The emergency spare wheel can be found in the
stowage well under the trunk floor. X
Lift the trunk floor upwards ( Y
page 247).X
Remove stowage space �C .
Removing the "Minispare" emergency
spare wheel
X
Turn stowage well �D counter-clockwise and
remove it together with vehicle tool kit
tray �C . X
Remove "Minispare" emergency spare wheel
�