2018 MERCEDES-BENZ CLS ECO mode
[x] Cancel search: ECO modePage 148 of 334
Have the brake system checked immediately.
Consult a qualified specialist workshop to
arrange this.
! Vehicles with 4MATIC: function or per-
formance tests may only be carried out on a 2-
axle dynamometer. If you wish to operate the
vehicle on such a dynamometer, please con-
sult a qualified specialist workshop in
advance. You could otherwise damage the
drive train or the brake system.
! Vehicles with 4MATIC: as the ESP ®
sys-
tem operates automatically, the engine and
the ignition must be switched off (SmartKey in
position 0 or 1 in the ignition lock or Start/
Stop button in position 0 or 1 ) while the park-
ing brake is being tested on a brake dyna-
mometer.
Braking maneuvers triggered automatically
by ESP ®
may seriously damage the brake sys-
tem.
! Vehicles with 4MATIC: as the ESP ®
sys-
tem operates automatically, the engine and
the ignition system must be switched off
(SmartKey in position 0 or 1 in the ignition
lock or Start/Stop button in position 0 or 1 )
when: R
testing the parking brake on a brake dyna-
mometer. R
you intend to have the vehicle towed with
one of the axles raised.
Braking maneuvers triggered automatically
by ESP ®
may seriously damage the brake sys-
tem.
All checks and maintenance work on the brake
system must be carried out at a qualified spe-
cialist workshop.
Have brake pads installed and brake fluid
replaced at a qualified specialist workshop.
If the brake system has only been subject to
moderate loads, you should test the functional-
ity of your brakes at regular intervals. To do so,
press firmly on the brake pedal when driving at a
high speed. This improves the grip of the brake
pads.
You can find a description of Brake Assist (BAS)
on ( Y
page 65) or of BAS PLUS on ( Y
page 65). The braking characteristics of the vehicle can be
seriously impaired if: R
brake pads other than those recommended
are installed R
the recommended brake fluid is not used
Safe braking can no longer be guaranteed.
AMG high-performance and ceramic
brakes The high-performance brake system is only
installed on the Mercedes-AMG
CLS 63 S 4MATIC model.
The AMG brake systems are designed for heavy
loads. This may lead to noise when braking. This
will depend on: R
Speed R
Braking force R
Environmental conditions, such as tempera-
ture and humidity
The wear of individual components of the brake
system, such as the brake pads/linings or brake
discs, depends on the individual driving style
and operating conditions.
For this reason, it is impossible to state a mile-
age that will be valid under all circumstances. An
aggressive driving style will lead to high wear.
You can obtain further information about this
from your authorized Mercedes-Benz Center.
New and replaced brake pads and discs only
reach their optimum braking effect after several
hundred kilometers of driving. Compensate for
this by applying greater force to the brake pedal.
Keep this in mind, and adapt your driving and
braking accordingly during this break-in period.
Excessive heavy braking results in correspond-
ingly high brake wear. Observe the brake wear
warning lamp in the instrument cluster and note
any brake status messages in the multifunction
display. Especially for high performance driving,
it is important to maintain and have the brake
system checked regularly.146
Driving tips
Driving and parking
Page 179 of 334
Exiting 360° camera display mode The 360° camera display is stopped: R
when you select transmission position P , orR
when you are driving at moderate speeds
The previous display appears in the multimedia
system display. You can also switch the display
by selecting the �9 symbol in the display and
pressing 7 the controller to confirm.
ATTENTION ASSIST
General notes ATTENTION ASSIST helps you during long,
monotonous journeys, such as on highways. It is
active in the 37 mph (60 km/ h) to 125 mph
(200 km/h) range. If ATTENTION ASSIST
detects typical indicators of fatigue or increas-
ing lapses in concentration on the part of the
driver, it suggests taking a break.
Important safety notes ATTENTION ASSIST is only an aid. It might not
always recognize fatigue or increasing inatten-
tiveness in time or fail to recognize them at all.
The system is not a substitute for a well-rested
and attentive driver.
The functionality of ATTENTION ASSIST is
restricted and warnings may be delayed or not
occur at all: R
if the length of the journey is less than approx-
imately 30 minutes R
if the road condition is poor, e.g. if the surface
is uneven or if there are potholes R
if there is a strong side wind R
if you have adopted a sporty driving style with
high cornering speeds or high rates of accel-
eration R
if you are predominantly driving at a speed
below 37 mph (60 km/h) or above 124 mph
(200 km/h) R
if you are driving with the DISTRONIC PLUS
Steering Assist activated R
if the time has been set incorrectly R
in active driving situations, such as when you
change lanes or change your speed The attention level evaluation is deleted and
restarts when the journey is continued, if: R
you switch off the engine R
you take off your seat belt and open the driv-
er's door, e.g. for a change of drivers or to
take a break
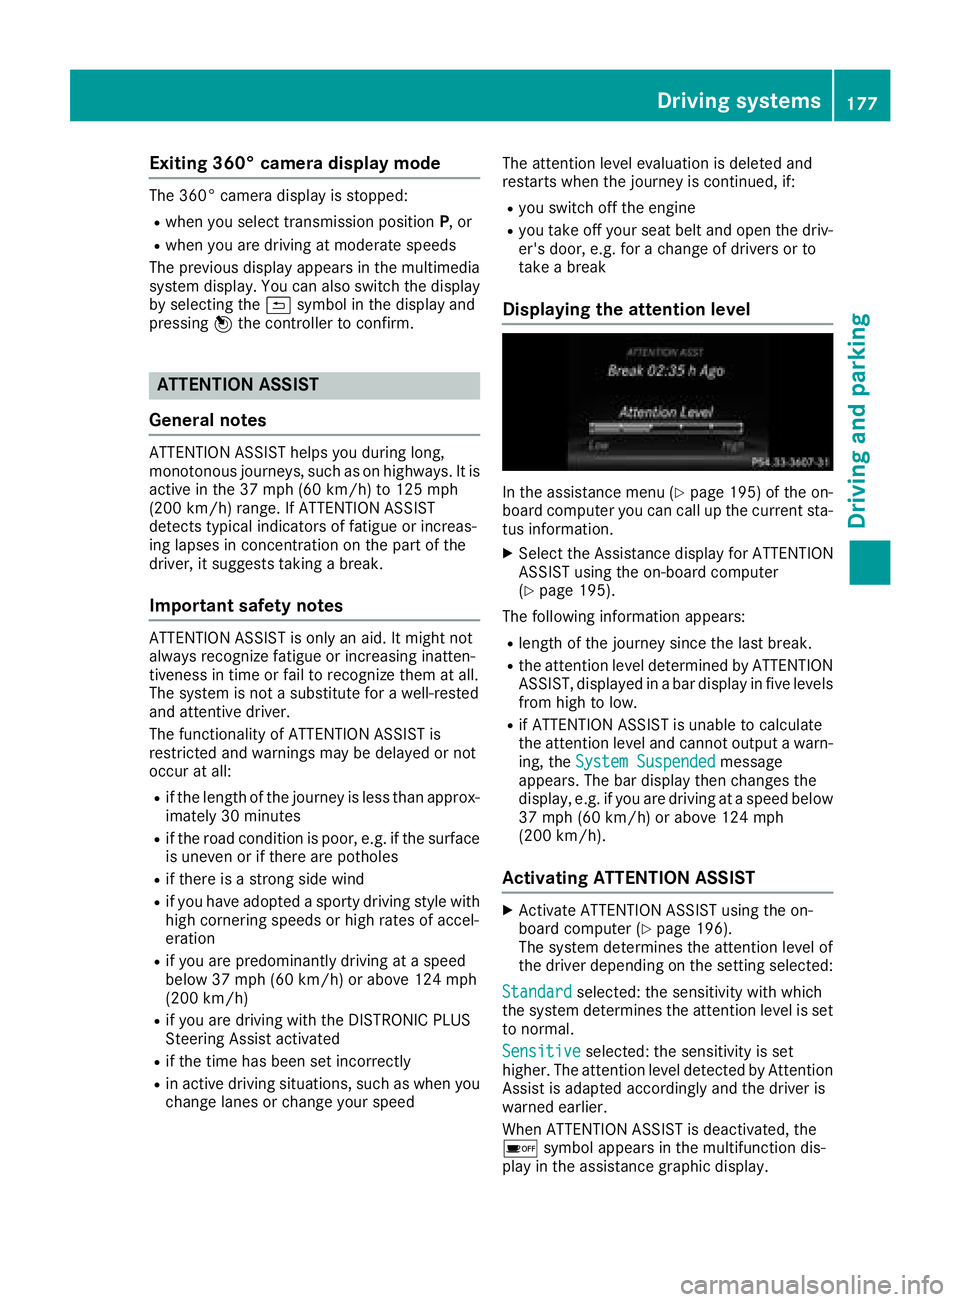
Displaying the attention level
In the assistance menu ( Y
page 195) of the on-
board computer you can call up the current sta-
tus information. X
Select the Assistance display for ATTENTION
ASSIST using the on-board computer
( Y
page 195).
The following information appears: R
length of the journey since the last break. R
the attention level determined by ATTENTION
ASSIST, displayed in a bar display in five levels
from high to low. R
if ATTENTION ASSIST is unable to calculate
the attention level and cannot output a warn-
ing, the System Suspended message
appears. The bar display then changes the
display, e.g. if you are driving at a speed below
37 mph (60 km/h) or above 124 mph
(200 km/h).
Activating ATTENTION ASSIST X
Activate ATTENTION ASSIST using the on-
board computer ( Y
page 196).
The system determines the attention level of
the driver depending on the setting selected:
Standard selected: the sensitivity with which
the system determines the attention level is set
to normal.
Sensitive selected: the sensitivity is set
higher. The attention level detected by Attention
Assist is adapted accordingly and the driver is
warned earlier.
When ATTENTION ASSIST is deactivated, the
�
Page 195 of 334
able to complete the next two changes of direc-
tion without changing lane.
Other status indicators of the naviga-
tion system
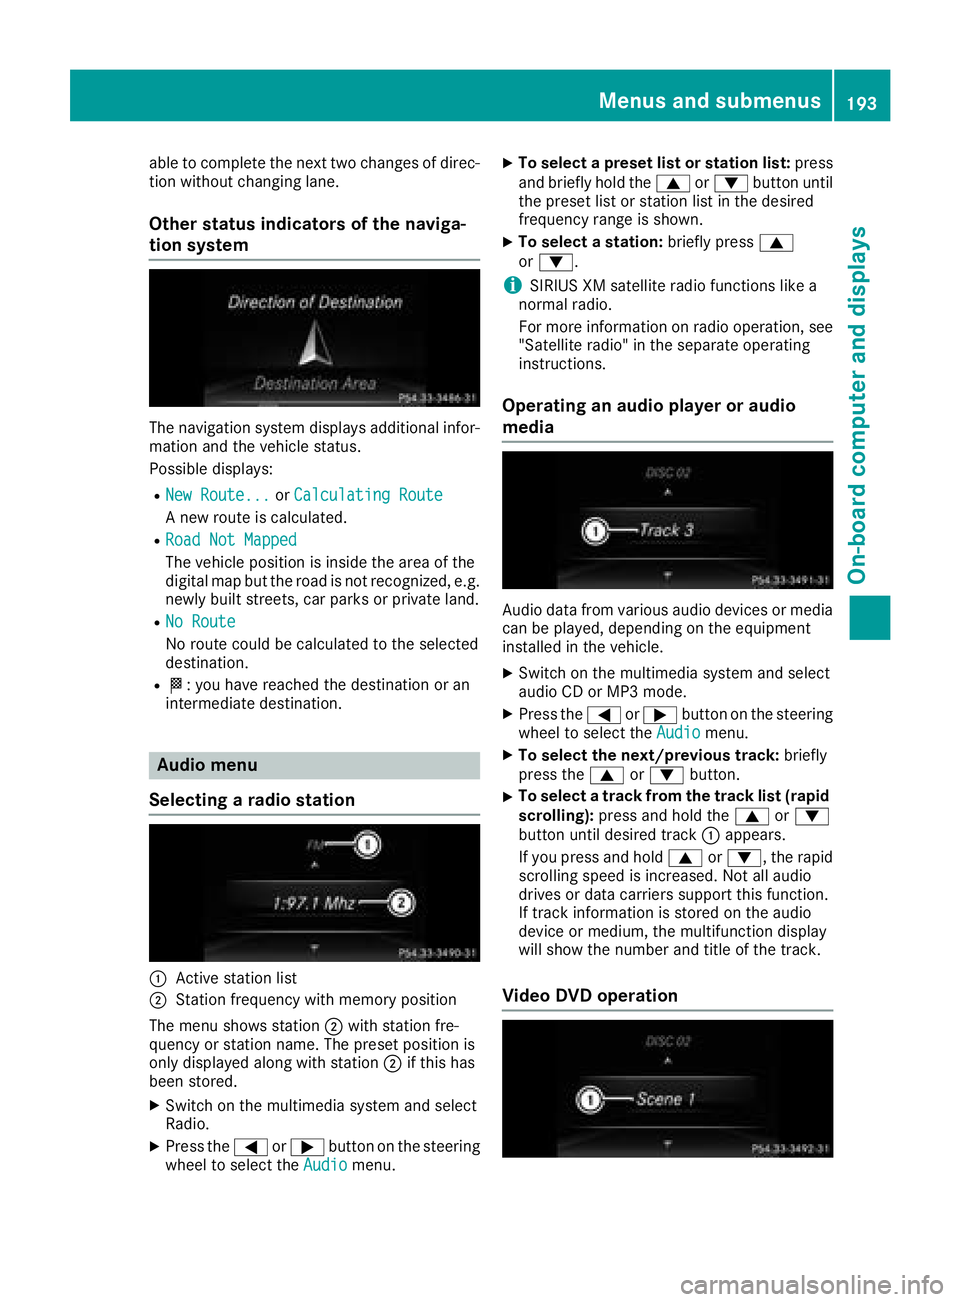
The navigation system displays additional infor-
mation and the vehicle status.
Possible displays: R
New Route... or Calculating Route
A new route is calculated. R
Road Not Mapped
The vehicle position is inside the area of the
digital map but the road is not recognized, e.g.
newly built streets, car parks or private land. R
No Route
No route could be calculated to the selected
destination. R
�K : you have reached the destination or an
intermediate destination.
Audio menu
Selecting a radio station
�C
Active station list
�D
Station frequency with memory position
The menu shows station �D with station fre-
quency or station name. The preset position is
only displayed along with station �D if this has
been stored. X
Switch on the multimedia system and select
Radio. X
Press the �Y or �e button on the steering
wheel to select the Audio menu. X
To select a preset list or station list: press
and briefly hold the �c or �d button until
the preset list or station list in the desired
frequency range is shown. X
To select a station: briefly press �c
or �d .
i SIRIUS XM satellite radio functions like a
normal radio.
For more information on radio operation, see
"Satellite radio" in the separate operating
instructions.
Operating an audio player or audio
media
Audio data from various audio devices or media
can be played, depending on the equipment
installed in the vehicle. X
Switch on the multimedia system and select
audio CD or MP3 mode. X
Press the �Y or �e button on the steering
wheel to select the Audio menu.X
To select the next/previous track: briefly
press the �c or �d button.X
To select a track from the track list (rapid
scrolling): press and hold the �c or �d
button until desired track �C appears.
If you press and hold �c or �d , the rapid
scrolling speed is increased. Not all audio
drives or data carriers support this function.
If track information is stored on the audio
device or medium, the multifunction display
will show the number and title of the track.
Video DVD operationMenus and submenus 193
On-board computer and displays Z
Page 201 of 334

Deactivating delayed switch-off of the exterior
lighting temporarily: X
Before leaving the vehicle, turn the SmartKey
to position 0 in the ignition lock.X
Turn the SmartKey to position 2 in the ignition
lock.
The exterior lighting delayed switch-off is
deactivated.
Delayed switch-off of the exterior lighting is
reactivated the next time you start the engine.
If you have activated the Surround Lighting
function and the light switch is set to the �X
position, the following functions are activated
when it is dark: R
surround lighting: the exterior lighting
remains lit for 40 seconds af ter unlocking
with the SmartKey. If you start the engine, the
surround lighting is switched off and auto-
matic headlamp mode is activated
( Y
page 105). R
exterior lighting delayed switch-off: the
exterior lighting remains lit for 60 seconds
after the engine is switched off. If you close all
the doors and the trunk lid/tailgate, the exte-
rior lighting goes off after 15 second s.
i Depending on your vehicle's equipment,
when the surround lighting and delayed
switch-off exterior lighting are on, the follow-
ing light up: R
Parking lamps R
Side marker lamps R
Surround lighting in the exterior mirrors
Activating/deactivating the interior light-
ing delayed switch-off
If you activate the Light. Delay function, the
interior lighting remains on for 20 second sa fter
you remove the SmartKey from the ignition lock. X
Press the �Y or �e button on the steering
wheel to select the Sett. menu.X
Press the �d or �c button to select the
Lights submenu.X
Press �v to confirm.X
Press the �d or �c button to select the
Light. Delay function.
When the Light. Delay function is activa-
ted, the vehicle interior is displayed in orange
in the multifunction display. X
Press the �v button to save the setting. Vehicle Activating/deactivating the automatic
door locking mechanism X
Press the �Y or �e button on the steering
wheel to select the Sett. menu.X
Press the �d or �c button to select the
Vehicle submenu. X
Press �v to confirm. X
Press the �d or �c button to select the
Auto. Door Locks function.
If the Auto. Door Locks function is switched
on, the multifunction display shows the vehi-
cle's doors in orange. X
Press the �v button to save the setting.
If you activate the Auto.
Door Locks function,
the vehicle is centrally locked above a speed of
around 9 mph (15 km/h).
For further information on the automatic locking
feature, see ( Y
page 82).
Activating/deactivating the acoustic
locking verification signal If you switch on the Acoustic Lock function, an
acoustic signal sounds when you lock the vehi-
cle. X
Press the �Y or �e button on the steering
wheel to select the Sett. menu.X
Press the �d or �c button to select the
Vehicle submenu. X
Press �v to confirm. X
Press the �d or �c button to select the
Acoustic Lock function.
If the Acoustic Lock function is activated,
the �7 symbol in the multifunction display
lights up orange. X
Press the �v button to save the setting.
Comfort
Activating/deactivating the EASY-
ENTRY/EXIT feature
G WARNING
When the EASY-ENTRY/EXIT feature adjusts
the steering wheel, you and other vehicle
occupants – particularly children – could
become trapped. There is a risk of injury.
While the EASY-ENTRY/EXIT feature is mak-
ing adjustments, make sure that no one hasMenus and submenus 199
On-board computer and displays Z
Page 239 of 334
Operating system
Overview
General notes
! Do not use the space in front of the display
for storage. Objects placed here could dam-
age the display or impair its function. Avoid
any direct contact with the display surface.
Pressure on the display surface may result in
impairments to the display, which could be
irreversible.
Wearing polarized sunglasses may impair your
ability to read the display.
The display has an automatic temperature-con-
trolled switch-off feature. The brightness is
automatically reduced if the temperature is too
high. The display may temporarily switch off
completely.
Cleaning instructions
! Do not touch the display. The display has a
very sensitive high-gloss surface; there is a
risk of scratching. If you have to clean the
screen, however, use a mild cleaning agent
and a soft, lint-free cloth.
The display must be switched off and have
cooled down before you start cleaning. Do not
apply pressure to the display surface when
cleaning it, as this could cause irreversible dam-
age to the display.
Switching the multimedia system
on/off X
Press the �C control knob.
Adjusting the volume X
Turn the �C control knob.
The volume is adjusted: R
for the currently selected media source R
during traffic or navigation announcements R
in hands-free mode during a phone call
Switching the sound on or off X
Press the �c button on the control panel.
If the audio output is switched off, the status
line will show the �c symbol. If you switch the media source or set the volume, the sound
is automatically switched on.
i Navigation announcements will be heard
even if the sound is muted.
Functions The multimedia system has the following func-
tions: R
Radio mode R
Media mode with media search R
Sound systems R
Navigation system
COMAND: navigation via the hard drive
Audio 20: navigation via SD card R
Communication functions R
SIRIUS Weather (COMAND) R
Vehicle functions with system settings R
Favorites functions
Controller The controller in the center console lets you: R
select menu items on the display R
enter characters R
select a destination on the map R
save entries
The controller can be: R
turned 3 R
slid left or right 1 R
slid forwards or back 4R
slid diagonally 2 R
pressed briefly or pressed and held 7
Back button You can use the �8 button to exit a menu or to
call up the basic display of the current operating
mode. X
To exit the menu: briefly press the �8
button.
The multimedia system changes to the next
higher menu level in the current operating
mode. X
To call up the basic display: press the �8
button for longer than two seconds.
The multimedia system changes to the basic
display of the current operating mode.Operating system 237
Multimedia system Z
Page 280 of 334
i Example: equipment and country-specific
variations possible.
Vehicles with alloy wheels and hub caps On vehicles with alloy wheels and hub caps, a
socket is also provided.
Flat tire
Preparing the vehicle Your vehicle may be equipped with: R
MOExtended tires (tires with run-flat proper-
ties) ( Y
page 278)
Vehicle preparation is not necessary on vehi-
cles with MOExtended tires R
a TIREFIT kit ( Y
page 277)R
an emergency spare wheel ( Y
page 317)
Vehicles equipped with MOExtended tires are
not equipped with a TIREFIT kit at the factory. It
is therefore recommended that you additionally
equip your vehicle with a TIREFIT kit if you mount
tires that do not feature run-flat properties, e.g.
winter tires. A TIREFIT kit may be obtained from
a qualified specialist workshop.
Information on changing and mounting wheels
( Y
page 312). X
Stop the vehicle on solid, non-slippery and
level ground, as far away as possible from
traffic. X
Switch on the hazard warning lamps. X
Secure the vehicle against rolling away
( Y
page 141).X
If possible, bring the front wheels into the
straight-ahead position. X
Vehicles with AIRMATIC: make sure that "nor-
mal" level is selected ( Y
page 159).X
Switch off the engine. X
Remove the SmartKey from the ignition lock.
or, on vehicles with KEYLESS ‑ GO:X
Open the driver's door.
T he vehicle electronics now have status 0 .
This is the same as the SmartKey having been
removed. X
Remove the Start/Stop button from the igni-
tion lock ( Y
page 123).X
Make sure that the passengers are not endan-
gered as they do so. Make sure that no one is
near the danger area while a wheel is being changed. Anyone who is not directly assisting
in the wheel change should, for example,
stand behind the barrier. X
Get out of the vehicle. Pay attention to traffic
conditions when doing so. X
Close the driver's door.
MOExtended tires (tires with run-flat
properties)
General notes With MOExtended tires (tires with run flat char-
acteristics), you can continue to drive your vehi-
cle even if there is a total loss of pressure in one
or more tires. The affected tire must not show
any clearly visible damage.
You can recognize MOExtended tires by the
MOExtended marking which appears on the
sidewall of the tire. You will find this marking
next to the tire size designation, the load-bear-
ing capacity and the speed index ( Y
page 307).
MOExtended tires may only be used in conjunc-
tion with an active tire pressure loss warning
system or with an active tire pressure monitor.
If a pressure loss warning message appears
in the multifunction display: R
observe the instructions in the display mes-
sages ( Y
page 221). R
check the tire for damage. R
if driving on, observe the following notes.
The driving distance possible in run-flat mode is
approximately 50 miles (80 km) when the vehi-
cle is partially laden. When the vehicle is fully
laden it is approximately 19 miles (30 km).
In addition to the vehicle load, the driving dis-
tance possible depends upon: R
Vehicle speed R
Road condition R
Outside temperature
The driving distance p ossible in run-flat mode
may be reduced by extreme driving conditions
or maneuvers, or it can be increased through a
moderate style of driving.
The driving distance possible in run-flat mode is
counted from the moment the tire pressure loss
warning appears in the multifunction display.
You must not exceed a maximum permissible
speed of 50 mph (80 km/h).278
Flat tire
Breakdown assistance
Page 281 of 334
When replacing one or all tires, please observe
the following specifications for your vehicle's
tires: R
size R
the type and R
the "MOExtended" mark
If a tire has gone flat and cannot be replaced
with a MOExtended tire, a standard tire may be
used as a temporary measure. Make sure that
you use the proper size and type (summer or
winter tires).
Vehicles equipped with MOExtended tires are
not equipped with a TIREFIT kit at the factory. It
is therefore recommended that you additionally
equip your vehicle with a TIREFIT kit if you mount
tires that do not feature run-flat properties, e.g.
winter tires. A TIREFIT kit may be obtained from
a qualified specialist workshop.
Important safety notes
G WARNING
When driving in emergency mode, the driving
characteristics deteriorate, e.g. when corner-
ing, accelerating quickly and when braking.
There is a risk of an accident.
Do not exceed the stated maximum speed.
Avoid abrupt steering and driving maneuvers,
and driving over obstacles (curbs, potholes,
off-road). This applies in particular to a laden
vehicle.
Stop driving in emergency mode if: R
you hear banging noises. R
the vehicle starts to shake. R
you see smoke and smell rubber. R
ESP ®
is intervening constantly.R
there are tears in the sidewalls of the tire.
After driving in emergency mode, have the
wheel rims checked at a qualified specialist
workshop with regard to their further use. The
defective tire must be replaced in every case. TIREFIT kit
Important safety notes TIREFIT is a tire sealant.
You can use TIREFIT to seal punctures of up to
0.16 in (4 mm), particularly those in the tire
tread. You can use TIREFIT at outside tempera-
tures down to �
Page 294 of 334
Important safety notes
G WARNIN G
If wheels and tires of th e wrong siz e are used,
th e whee l brakes or suspension component s
may be damaged. Ther e is a ris k of an acci-
dent.
Always replace wheels and tires wit h those
that fulfill th e specification s of th e original
part .
When replacing wheels, mak e sur e to use th e
correct: R
designation R
model
When replacing tires , mak e sur e to use th e
correct: R
designation R
manufacturer R
model
G WARNIN G
A flat tire severely impairs th e driving , steer -
ing and braking characteristics of th e vehicle.
Ther e is a ris k of accident.
Tires without run-flat characteristics :R
do no t driv e wit h a flat tire.R
immediately replace th e flat tire wit h your
emergenc y spar e whee l or spar e wheel, or
consult a qualified specialist workshop.
Tires wit h run-flat characteristics :R
pay attention to th e information and warn -
ing notice s on MOExtended tires (tire s wit h
run-flat characteristics).
Accessories that are no t approve d for your vehi-
cle by Mercedes-Ben z or are no t bein g used cor-
rectl y can impair th e operating safety.
Before purchasing and usin g non-approve d
accessories, visit a qualified specialist work-
sho p and ask about :R
suitabilit yR
legal stipulation sR
factory recommendation s Further information regarding wheels and tires
can be foun d under "Wheel/tire combinations"
( Y
page 317).
You can ask for information regarding permitte d
wheel-tire combination s at an authorize d
Mercedes-Ben z Center.
Information on tire pressur e can be found:R
on th e Tir e and Loading Information placard
on th e B-pillar on th e driver' s side
( Y
page 302) R
in th e tire pressur e table in th e fuel filler flap
( Y
page 139) R
under "Tir e pressure" ( Y
page 295)
Operation
Information on driving Chec k th e tire pressur e when th e vehicl e is
heavily laden and adjust prio r to a trip.
While driving , pay attention to vibrations, noises
and unusual handlin g characteristics , e.g. pull-
ing to on e side . This may indicat e that th e
wheels or tires are damaged. If you suspec t that
a tire is defective, reduce your spee d immedi-
ately. Stop th e vehicl e as soo n as possible to
chec k th e wheels and tires for damage. Hidden
tire damag e could also be causing th e unusual
handlin g characteristics . If you fin d no sign s of
damage, hav e th e tires and wheels checke d at a
qualified specialist workshop.
When parking your vehicle, mak e sur e that th e
tires do no t get deformed by th e cur b or other
obstacles. If they canno t be avoided, driv e ove r
obstacles suc h as curbs slowly and at an obtuse
angle. Otherwise, you may damag e th e wheels
or tires .
Regular checking of wheels and tires
G WARNIN G
Damaged tires can caus e tire inflation pres-
sur e loss . As a result , you could lose control of
your vehicle. Ther e is a ris k of accident.
Chec k th e tires regularly for sign s of damag e
and replace any damaged tires immediately.
Chec k wheels and tires for damag e at least once
a month . Chec k wheels and tires after driving292
Operation
Wheels and tires