2018 MERCEDES-BENZ CLA tow bar
[x] Cancel search: tow barPage 170 of 326

for safe maneuvering and parking. Make sure
that there are no persons, animals or objects in
the maneuvering area while maneuvering and
parking in parking spaces.
Under the following circumstances, the rear
view camera wil ln ot function, or wil lf unction in
al imited manner: R
if the trunk lid is open R
in heavy rain, snow or fog R
at night or in very dark places R
if the camera is expose dtov ery bright lightR
if the area is lit by fluorescent bulbs or LED
lighting (the display may flicker) R
if there is as udden change in temperature,
e.g. when driving into ah eated garage in win-
ter R
if the camera lens is dirty or obstructed.
Observe the notes on cleaning
( Y
pag e2 65)R
if the rear of you rv ehicl eisd amaged. In this
case, have the camera position and setting
checked at aq ualified specialist workshop
The fiel dofv ision and other functions of the rear
view camera may be restricted due to additional
accessories on the rear of the vehicl e( e.g.
license plate holder, rear bicycle rack).
Activating/deactivating the rear view
camera X
To activate: make sure that the SmartKey is
in position �H in the ignition lock.X
Make sure that the Activation by Rg ear
function is selected in the multimedi as ystem;
see the Digita lO perator's Manual.X
Engage reverse gear.
The area behind the vehicl eiss how nw ith
guide lines in the multimedi as ystem display.
The image from the rear view camera is avail-
abl et hroughou tt he maneuvering process.
To deactivate: the rear view camera deacti-
vates if you shift the transmission to �] or after
driving forwards as hort distance. Messages in the multimedia system dis-
play The rear view camera may show ad istorted view
of obstacles, show them incorrectly or not at all.
The rear view camera does not show objects in
the following positions: R
very close to the rear bumper R
under the rear bumper R
in close range above the handl eont he trunk
lid
! Objects not at ground leve lm ay appear to
be further away than they actually are, e.g.: R
the bumper of ap arked vehicleR
the drawbar of at railerR
the bal lc oupling of at railer tow hitchR
the rear section of an HGV R
as lanted post
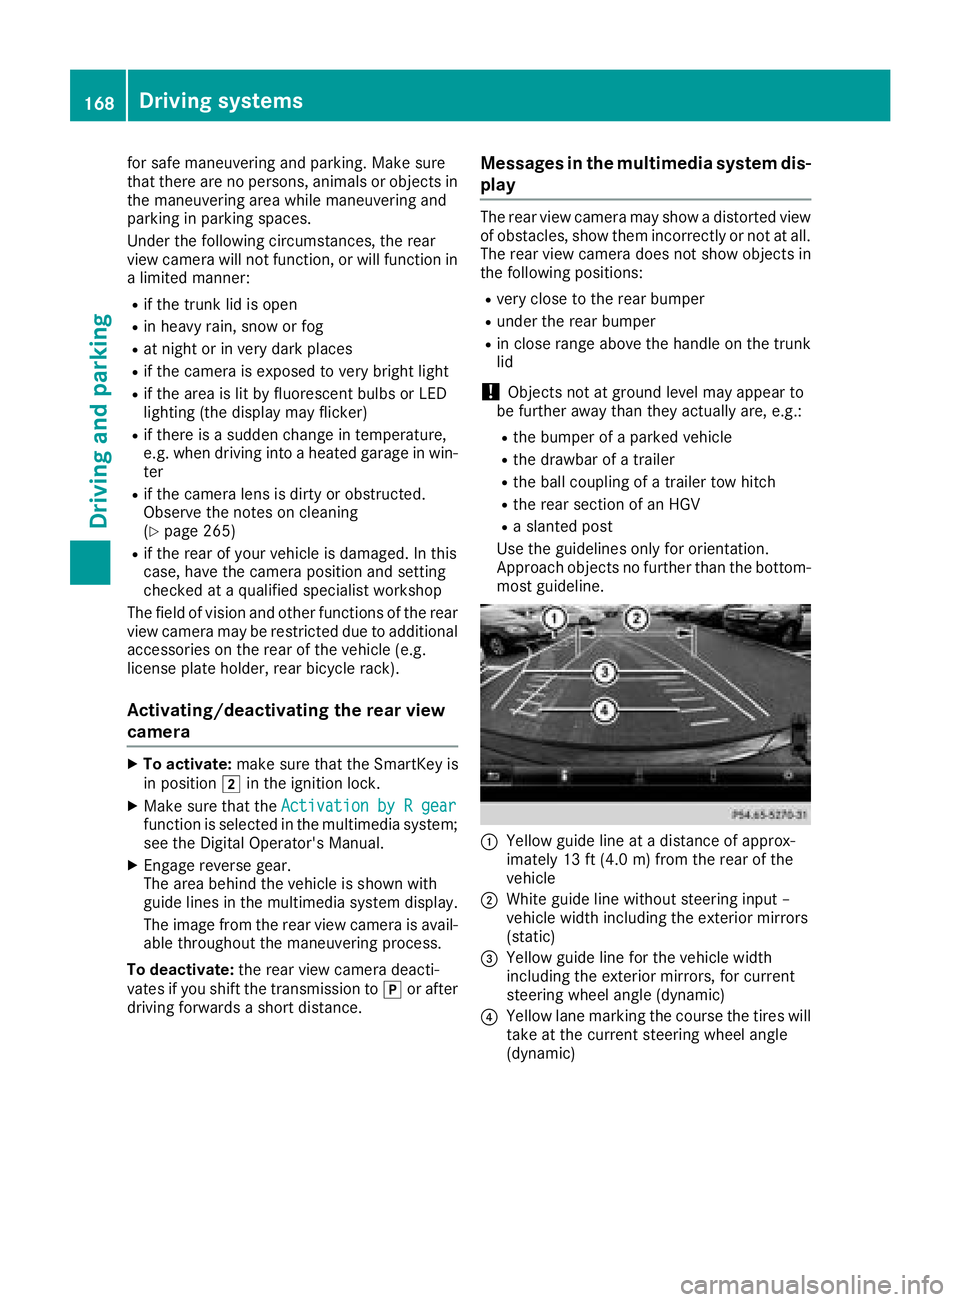
Use the guidelines only for orientation.
Approach objects no further than the bottom-
most guideline.
�C
Yellow guide line at ad istance of approx-
imately 13 ft (4.0 m) from the rear of the
vehicle �D
White guide line without steering inpu t–
vehicl ew idth including the exterior mirrors
(static)
�
Page 277 of 326

If at ire pressure of 200 kPa (2.0 bar/29 psi) has
been attained after ten minutes: X
Switch off the tire inflation compressor. X
Unscrew the fille rh ose from the valve of the
faulty tire.
Note that tire sealant may escape when you
unscrew the fille rh ose.X
USA only: Stow the tire sealant bottle and the
tire inflation compressor. X
Pull away immediately .X
Stop after driving for approximately ten
minutes and check the tire pressure with the
tire inflation compressor.
The tire pressure must now be at least
130 kPa (1.3 bar/19 psi).
G WARNING
If the required tire pressure is not reached
after driving for as hort period ,t he tire is too
badl yd amaged. The tire sealant cannot repair
the tire in this instance. Damaged tires and a
tire pressure that is too low can significantly
impair the vehicle's braking and driving char-
acteristics. There is ar isk of accident.
Do not continue driving. Contact aq ualified
specialist workshop.
i USA only: In cases such as the one men-
tioned above ,c ontact an authorized
Mercedes-Benz Center. Or call
1-800-FOR-MERCedes (in the USA) or
1-800-387-0100 (in Canada). X
USA only: Correct the tire pressure if it is still
at least 130 kPa (1.3 bar/19 psi). See the Tire
and Loading Information placard on the driv-
er's side B-pilla rort he tire pressure table in
the fuel fille rf lap for values.X
To increase the tire pressure: switch on the
tire inflation compressor. X
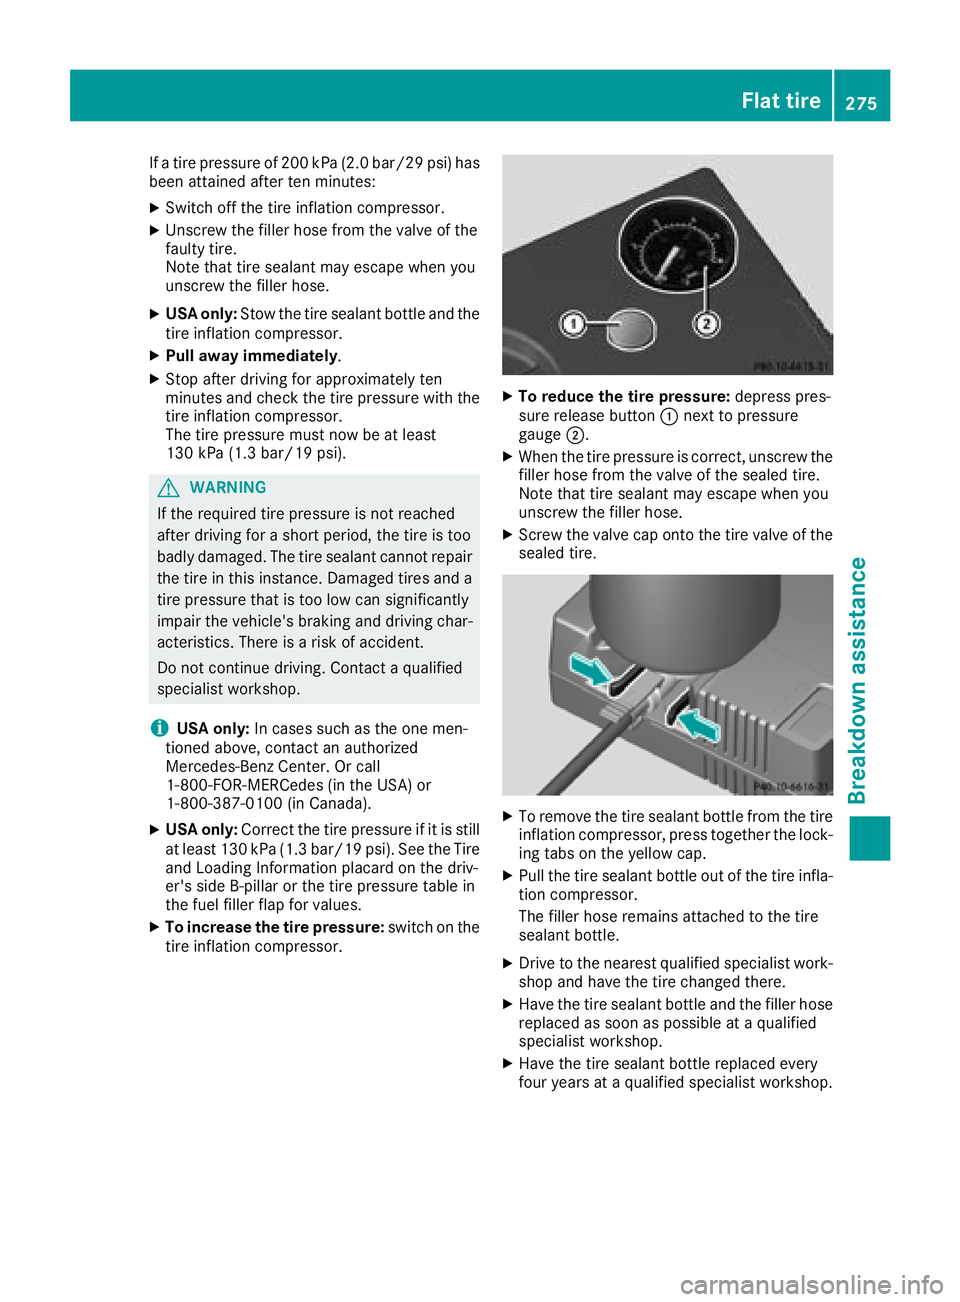
To reduce the tire pressure: depres sp res-
sure release button �C next to pressure
gauge �D . X
When the tire pressure is correct, unscrew the
fille rh ose from the valve of the sealed tire.
Note that tire sealant may escape when you
unscrew the fille rh ose.X
Screw the valve cap onto the tire valve of the
sealed tire.
X
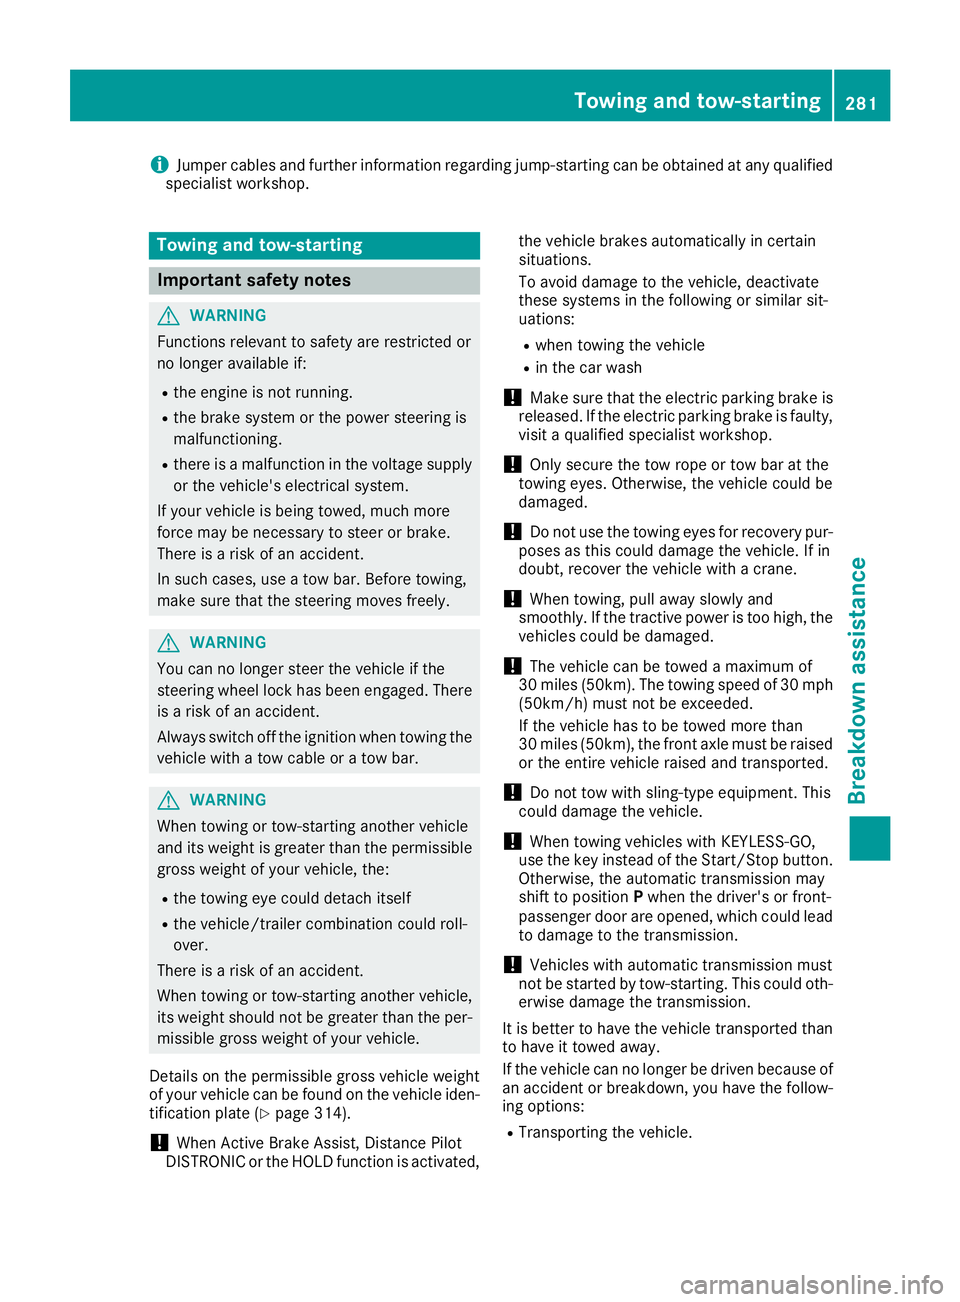
To remove the tire sealant bottle from the tire
inflation compressor, press together the lock-
ing tabs on the yellow cap. X
Pul lt he tire sealant bottle out of the tire infla-
tion compressor.
The fille rh ose remains attached to the tire
sealant bottle. X
Drive to the nearest qualifie ds pecialist work-
shop and have the tire changed there. X
Have the tire sealant bottle and the fille rh ose
replaced as soon as possible at aq ualified
specialist workshop. X
Have the tire sealant bottle replaced every
four years at aq ualifie ds pecialist workshop.Flat tire 275
Breakdow na ssistance Z
Page 283 of 326

i Jumper cable sa nd further informatio nr egardin gj ump-startin gc an be obtaine data ny qualified
specialist workshop.
Towing and tow-starting
Important safety notes
G WARNING
Function sr elevan ttos afety are restricted or
no longer available if: R
th ee ngine is no tr unning.R
th eb rak es ystem or th ep ower steering is
malfunctioning. R
there is am alfunctio nint he voltage supply
or th ev ehicle's electrical system.
If your vehicle is bein gt ow ed, muc hm ore
force may be necessar yt os te er or brake.
Ther eisar isk of an accident.
In such cases, use at ow bar. Before towing,
mak es ure that th es te ering moves freely.
G WARNING
You can no longer steer th ev ehicle if the
steering wheel loc kh as been engaged. There
is ar isk of an accident.
Always switch off th ei gnitio nw hen towing the
vehicle with at ow cable or at ow bar.
G WARNING
When towing or tow-startin ga nother vehicle
and its weight is greater than th ep ermissible
gross weight of your vehicle ,t he :R
th et ow ing eye could detach itselfR
th ev ehicle/trailer combinatio nc ould roll-
over.
Ther eisar isk of an accident.
When towing or tow-startin ga nother vehicle,
its weight shoul dn ot be greater than th ep er-
missible gross weight of your vehicle.
Details on th ep ermissible gross vehicle weight
of your vehicle can be foun dont he vehicle iden-
tification plat e( Y
page 314).
! When Activ eB ra ke Assist ,D istance Pilot
DISTRONIC or th eH OL Df unction is activated, th ev ehicle brakes automatically in certain
situations.
To avoid damage to th ev ehicle ,d eactivate
these systems in th ef ollowing or similar sit-
uations: R
when towing th ev ehicle R
in th ec ar wash
! Mak es ure that th ee lectric parking brak ei s
released. If th ee lectric parking brak eisf aulty,
visi taq ualifie ds pecialist workshop.
! Only secure th et ow rope or to wb ar at the
towing eyes. Otherwise, th ev ehicle coul db e
damaged.
! Do no tu se th et ow ing eyes for recover yp ur-
pose sast hi sc oul dd amage th ev ehicle .Ifi n
doubt ,r ecover th ev ehicle with ac ra ne.
! When towing ,p ull away slowly and
smoothly. If th et ra ctive power is to oh igh ,t he
vehicle sc oul dbed amaged.
! The vehicle can be towed am aximum of
30 miles (50km). The t owing speed of 30 mph
(5 0km/h) must no tbee xceeded.
If th ev ehicle has to be towed mor et ha n
30 miles (50km), th ef ront axle must be raised
or th ee ntire vehicle raise da nd transported.
! Do no tt ow with sling-type equipment .T his
coul dd amage th ev ehicle.
! When towing vehicle sw ith KEYLESS-GO,
use th ek ey instead of th eS ta rt/Sto pb utton.
Otherwise, th ea utomatic transmission may
shif ttop osition P when th ed river' sorf ront -
passenger door are opened, whic hc oul dl ead
to damage to th et ra nsmission.
! Vehicles with automatic transmission must
no tbes ta rted by tow-starting. This coul do th -
erwis ed amage th et ra nsmission.
It is bette rtoh ave th ev ehicle transported than
to have it towed away.
If th ev ehicle can no longer be driven because of
an acciden torb reakdown ,y ou have th ef ollow-
ing options: R
Transportin gt he vehicle.Towing and tow-starting 281
Breakdown assistance Z
Page 284 of 326

As ar ule, yo us houl dh av et he vehicl et rans-
ported. R
Towing the vehicl ew it hat ow rop eort ow bar.
Onl yt ow the vehicl eine xceptiona lc ases.
The battery must be connected and charged.
Otherwise, you: R
canno tt urn the SmartKe ytop osition �H in
the ignition lock. R
canno tr elease the electri cp ar king brake.R
canno ts hift the transmission to position �\\ .
The functio noft he electri cp ar king brake and
the parking lock is dependent on the on-board
voltage.
If the on-board voltag eisl ow or if ther eisas ys -
tem malfunction: R
the electri cp ar king brake ma yn ot be applied
in certain circumstances ,o rR
it ma ynol on ge rbep os sibl etos hift the trans-
mission to position �]
Switch off non-essentia lc onsumers, e.g .t he
radio.
Disar mt he automatic locking feature before the
vehicl eist owed ( Y
page 187). Yo uc ould other-
wise be locked ou tw he np us hing or towing the
vehicle.
Installing/removin gt he towin ge ye
Installing the towin ge ye
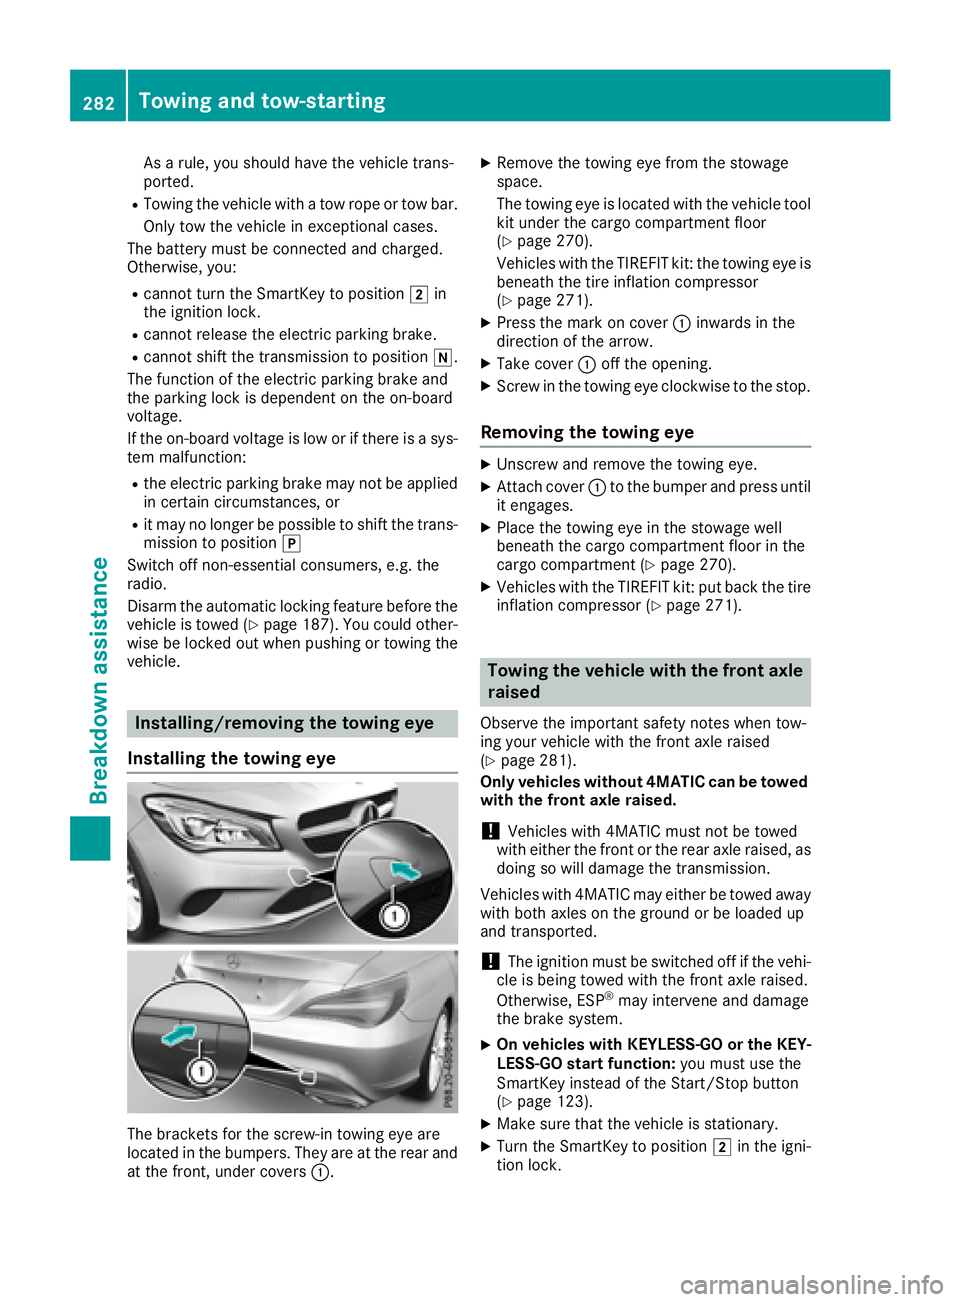
The brackets for the screw-i nt owing ey ea re
locate dint he bumpers. The ya re at the rea ra nd
at the front, under covers �C . X
Remove the towing ey ef rom the stowage
space.
The towing ey eisl oc ate dw it ht he vehicl et ool
kit under the cargo compartment floor
( Y
page 270).
Vehicles with the TIREFIT kit: the towing ey ei s
beneath the tire inflation compressor
( Y
page 271). X
Press the mark on cover �C inwards in the
direction of the arrow. X
Take cover �C off the opening. X
Screw in the towing ey ec lockwise to the stop.
Removing the towin ge ye X
Unscrew and remove the towing eye. X
Attach cover �C to the bumpe ra nd press until
it engages. X
Place the towing ey eint he stowag ew el l
beneath the cargo compartment floor in the
cargo compartment ( Y
page 270).X
Vehicles with the TIREFIT kit: pu tb ac kt he tire
inflation compressor ( Y
page 271).
Towin gt he vehicle with the fron ta xle
raised Observ et he important safety notes when tow-
ing your vehicl ew it ht he front axl er aised
( Y
page 281).
Only vehicle sw it hou t4 MATIC can be towed
with the fron ta xl er aised.
! Vehicles with 4MATIC must not be towed
with either the front or the rea ra xl er aised, as
doing so will damage the transmission.
Vehicles with 4MATIC ma ye it her be towed away
with both axles on the ground or be loaded up
and transported.
! The ignition must be switched off if the vehi-
cle is being towed with the front axl er aised.
Otherwise, ESP ®
ma yi ntervene and damage
the brake system. X
On vehicle sw it hK EYLESS -GO or the KEY-
LESS-GO start function: yo um us tu se the
SmartKe yi nstea doft he Start/Stop button
( Y
page 123). X
Make sure tha tt he vehicl eiss tationary.X
Turn the SmartKe ytop osit ion �H in the igni-
tio nl oc k.282
Towin ga nd tow-starting
Breakdo wn assis tance