2018 MERCEDES-BENZ CLA COUPE door lock
[x] Cancel search: door lockPage 252 of 326
Mercedes-BenzCustomer Assistanc eCenter
at 1-800-FOR-MERCedes (1-800-367-6372)
or 1-866-990-9007
You will be asked for your password.
XReturn to your vehicle at the time agreed upon
with the Mercedes-BenzC ustomer Assis-
tance Center.
Alternatively, the vehicle can be opened via:
Rthe Internet, under the "Owners Online" sec-
tion
Rtelephone applications (e.g. for iPhone®,
Android™)
To do this, you will need your identification num-
ber and password.
Vehicle remote closing
The vehicle remote-closing feature can be used
when you have forgotten to lock the vehicle and
you are no longer nearby.
The vehicle can then be locked by the Mercedes-
Benz Customer Assistanc eCenter.
The vehicle can be immediately remotely locked
within four days of the ignition being turned off.
After this time, remote closing may be delayed
by 15 to 60 minutes. After 30 days the vehicle
can no longer be valet locked remotely.
The vehicle remote closing feature is available if
the relevant mobile phone network is available
and adata connection is possible.
XContact the following service hotlines:
Mercedes-BenzC ustomer Assistanc eCenter
at 1-800-FOR-MERCedes (1-800-367-6372)
or 1-866-990-9007
You will be asked for your password.
The next time you are inside the vehicle and you
switch on the ignition, the Doors Locked
Remotelymessage appears in the multifunction
display.
Alternatively, the vehicle can be locked via:
Rthe Internet, under the "Owners Online" sec-
tion
Rtelephone applications (e.g. for iPhone®,
Android™)
To do this, you will need your identification num- ber and password.
Stolen vehicle recovery service
If your vehicle has been stolen:
XNotify the police.
The police will issue anumbered incident
report.
XThis number will be forwarded to the
Mercedes-BenzC ustomer Assistanc eCenter
together with your PIN.
The Mercedes-BenzC ustomer Assistance
Center then tries to locate the system. The
Mercedes-BenzC ustomer Assistanc eCenter
contacts you and the local law enforcement
agency if the vehicle is located.
However, only the law enforcement agency is informed of the location of the vehicle.
If the anti-theft alarm system is activated for
longer than 30 seconds, the Mercedes-Benz
Customer Assistanc eCenter is automatically
notified.
Vehicle Health Check
With the Vehicle Health Check, the Customer
Assistanc eCenter can provide improved sup-
port for problems with your vehicle. During an
existing call, vehicle data is transferred to the
Customer Assistanc eCenter.
The customer service representative can use
the received data to decide what kind of assis-
tance is required. You are then, for example,
guided to the nearest Mercedes-BenzS ervice
Center or arecovery vehicle is called.
If vehicle data needs to be transferred during an
MB Info call or aRoadside Assistanc ecall, this is
initiated by the Customer Assistanc eCenter.
The Roadside Assistance Connected
mes-
sage appears in the display.Ift he Vehicle Health
Check can be started, the Request
forVehi‐cle Diagnostics Received Start vehi‐cle diagnostics?message appears in the
display.
XPress the Yesbutton to confirm the message.
XWhen the Vehicle Diagnostics PleaseStart Ignitionmessage appears: turn the
SmartKey to position 2in the ignition lock
(
Ypage 122).
XIf the Please follow the instructionsreceivedbyphoneandmoveyourvehi‐cle to asafe position.message
appears: please follow the instructions
250Features
Stowage and features
Page 254 of 326
Currently inactiveareas can beactivated bytext
message.
Triggering th evehicle alarm
Witht hisf unction,y ou can triggert heveh icle's
panic alarm via text message. An alarm sounds
and th eexteri or lighting flashes. Dependin gon
th es etting, th epanic alarm lastsf iveort ensec-
onds. Afterwards, th ealarm switches off.
Garage door opener
General notes
The HomeLink®garag edoor opener integrated
in ther ear-view mirror allowsyou to operate up
to three different door and gates ystems.
Use th eintegrate dgarag edoor opener only on
garag edoorst hat:
Rhave safety stop and revers efeatures and
Rmee tcurren tU.S.federal safety standards
Once programed, th eintegrate dgarag edoor
opener inther ear-view mirror willassumet he
function of th egarag edoor system' sremote
control. Pleasea lso read theoperatin ginstruc-
tions for th egarag edoor system.
When programmin gagaragedoor opener, park
th ev ehicle outside theg arage. Do no tleave the
enginer unningwhile programming.
Certain garag edoor drives are incompatib le
wit hthe integrate dgarag edoor opener. Ifyou
have difficult yprograming th eintegrate dgarage
door opener, contact aMercedes-Ben zService
Center.
Alternatively, you can call th efollowin gtele-
phonea ssistance services:
RUSA:Mercedes-Ben zCustomerA ssistance
Cente rat1-800-FOR -MERCe des
RCanada: CustomerS erviceat
1-800-387-0100
RHomeLink®hotlin e1-800-355-351 5(free of
charge)
Morei nformatio nonHomeLink
®and/or com-
patible product sisalso availab leonlin eat
http:/ /www. homelin k.com.
Notes on the declaration of conformity
(
Ypage 27).
USA: FCC ID: CB2HMIHL4
Canada: IC: 279B-HMIHL4
Important safety notes
GWARNING
When you operate or program the garag edoor
with the integrated garag edoor opener, per-
sons in the range of movement of the garage
door can become trapped or struck by the
garag edoor. There is arisk of injury.
When using the integrated garag edoor
opener, always make sure that nobody is
within the range of movement of the garage
door.
GWARNING
Combustion engines emit poisonouse xhaust
gases such as carbon monoxide. Inhaling
these exhaust gases leadstop oisoning. There
is ar isk of fatal injury. Therefore never leave
the engine running in enclosed spaces with-
out sufficient ventilation.
Programming
Programming the buttons
Pay attention to the "Important safety notes"
(Ypage 252).
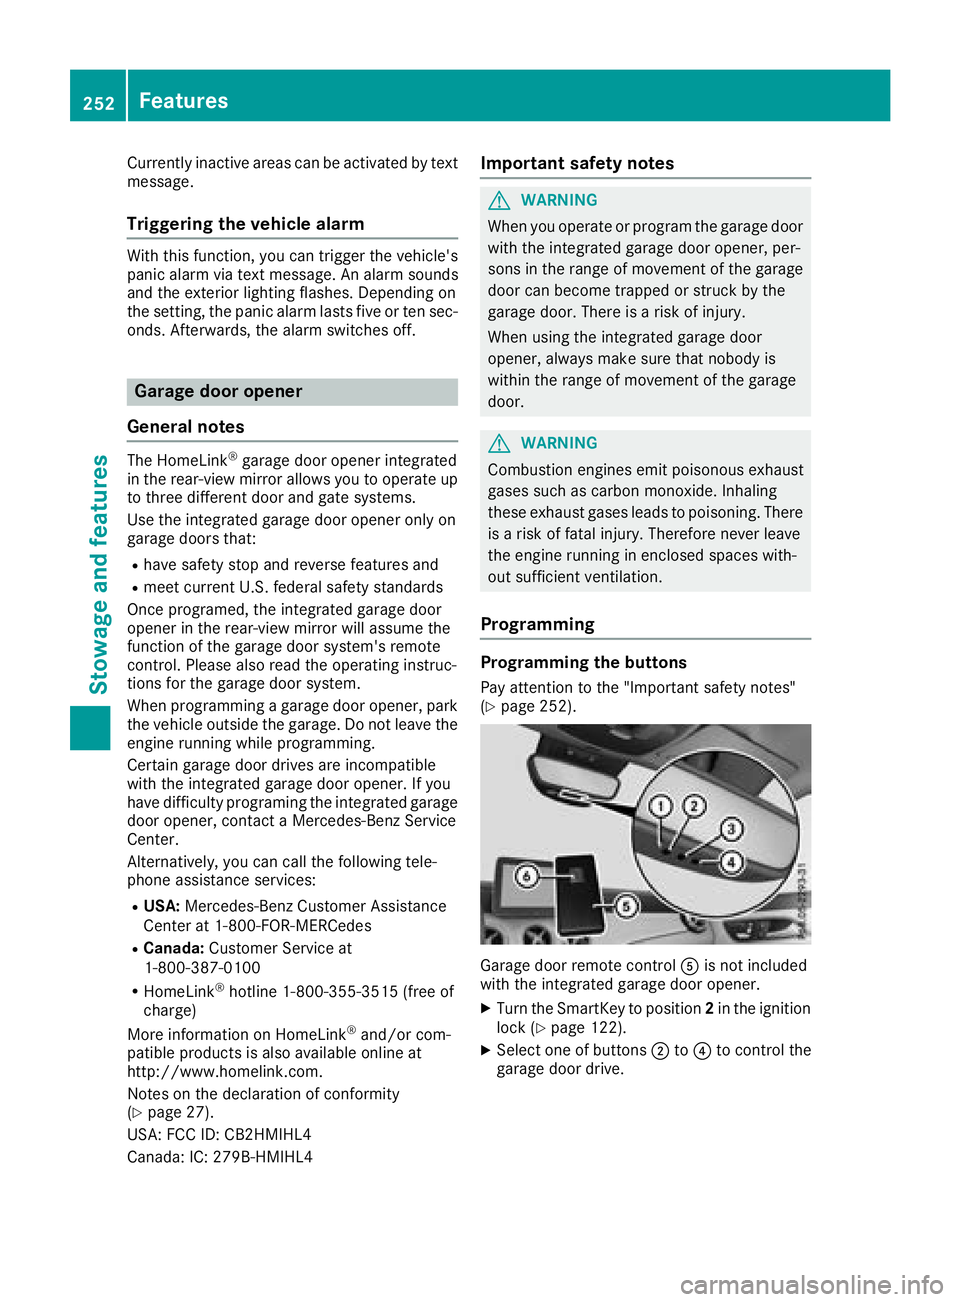
Garage door remote control Ais not included
with the integrated garag edoor opener.
XTurn the SmartKey to position 2in the ignition
lock (Ypage 122).
XSelect one of buttons ;to? to control the
garag edoor drive.
252Features
Stowage and features
Page 255 of 326
XTo start program mode:press and holdone
of buttons ;to? on the integrated garage
door opener.
The garag edooro penerisn ow in program
mode. After ashort time ,indicator lamp :
lights up yellow.
Indicato rlam p: lights up yellow as soona s
button ;,=or? is stored for the first time.
If the selecte dbutton hasa lready been pro-
gramed,i ndicator lamp :will onlyl ight up
yellow afte rten seconds have elapsed.
XReleas ebutton ;, =or?.I ndicator
lamp :flashesy ellow.
XTo program the remote control: point
garag edoorremote control Atoward sbut-
tons ;to? on the rear-view mirror at adis-
tance of 2to8in(5t o20c m).
XPress and hol dbutton Bon remote control
A unti lindicator lamp :lights up green.
Whe nindicator lamp :lights up green: pro-
gramming is finished.
Whe nindicator lamp :flashesg reen: pro-
gramming wa ssuccessful. The next step is to
synchronize the rolling code(
Ypage 253).
XReleas ebutton Bon remote control Afor
the garag edoord rive system.
If indicator lamp :lights up red:r epeatthe
programing procedur efor the corresponding
button on the rear-view mirror. Whe ndoing
so, var ythe distance between remote control
A and the re
ar-view mirror.
The required distance between remote con-
trol Aand the integrated garag edooropener
depends on the garag edoord rive system.
Several attempts might be necessary.Y ou
shoul dtest every positio nfor at least
25 seconds before trying another position.
Synchronizin gthe rolling code
Paya ttentio ntothe "Important safety notes"
(Ypage 252).
If the garag edoors ystem uses arolling code,
yo uw illa lsoh avetos ynchronize the garage
door system with the integrated garag edoor
opene rinthe rear-view mirror. To do thisy ouwill
nee dtou sethe programming button on the door
drive controlp anel.T he programming button
maybel ocate dind ifferent place sdepen ding on
the manufacturer. It is usuall yloc ate dont he
door drive uni tonthe garag eceiling.
Familiarize yoursel fwitht he garag edoord rive
operating instructions, e.g .under "Program- ming additional remote controls", before carry-
ing outt
he following steps.
Your vehicl emustbew ithinr each of the garage
door or gate opene rdrive. Make sure thatn ei-
ther your vehicl enor any persons/objects are
present withint he sweepofthe door or gate.
XTurn the SmartKey to position 2in the ignition
lock (Ypage 122).
XGe toutof the vehicle.
XPress the programming button on the door
drive unit.
Usually ,you now have 30 seconds to initiate
the next step.
XGe tinto the vehicle.
XPress previously programed button ;,=
or ? on the integrated garag edooro pener
repeatedly and in quick succession unti lthe
door closes.
The rolling codes ynchronizatio nist hen com-
plete.
Note sonp rogrammin gthe remote con-
trol
Canadia nradio frequency laws require a"break"
(o ri nterruption) of the transmission signals
afte rbroadcasting for afew seconds. Therefore,
thes esignals mayn ot last long enough for the
integrated garag edooro pener. The signalisn ot
detectedd uring programming. Comparable with
Canadia nlaw ,someU .S. garag edooro peners
also feature a"break".
Proceedasf ollows:
Rif youliveinC anada
Rif yo uhaved ifficultie sprogramming the
garag edooro pener(regardless of where you
live) as yo ufollo wthe programming steps.
XPress and hol done of buttons ;to? on the
integrated garag edooro pener.
After ashort time ,indicator lamp :lights up
yellow.
XReleas ethe button.
Indicato rlam p: flashesy ellow.
XPress button Bof garag edoorre mote con-
trol Afor two seconds, then release it for two
seconds.
XPress button Bagai nfor two seconds.
XRepeat thiss equence on button Bof remote
control Aunti lindicator lamp :lights up
green.
Whe nindicator lamp :lights up green: pro-
gramming is finished.
Features253
Stowag eand featur es
Z
Page 256 of 326
When indicator lamp:flashes green: pro-
gramming was successful. The next step is to
synchronize the rolling code.
XRelease button Bof remotec ontrolAof the
garage door drive.
If indicator lamp :lights up red: repeat the
programmingp rocess for the corresponding
button on the rear-view mirror. When doing
so, vary the distanc ebetween remotec ontrol
A and the rear-view mirror.
The required distanc ebetween remotec on-
trol Aand the integrated garage door opener
depends on the garage door drive system.
Several attempts might be necessary. You
should test every position for at least
25 seconds before trying another position.
Problems when programming
If you are experiencing problems programming
the integrated garage door opener on the rear-
view mirror, take not eofthe following instruc-
tions:
RCheck the transmitter frequenc yused by
garage door drive remotec ontrolAand
whether it is supported. The transmitter fre-
quency can usually be found on the back of
remotec ontrolAfor the garage door drive.
The integrated garage door opener is com-
patible with devices that have units which
operate in the frequenc yrange of 280 to
433 MHz.
RReplace the batteries in garage door remote
control A.This increases the likelihood that
garage door remotec ontrolAwill transmit a
stron gand precise signal to the integrated
garage door opener.
RWhen programming, hold remotec ontrolA
at varying distances and angles from but-
tons ;to? which you are programming. Try
various angles at adistanc ebetween 2and
8i nches (5to 20 cm) or at the same angle but
at varying distances.
RIf another remotec ontrolAis available for
the same garage door drive, repeat the same
programmings teps with this remotec ontrol
A.B eforep erforming these steps, make sure
that new batteries have been installed in
garage door drive remotec ontrolA.
RNote that some remotec ontrols only transmit
for alimited amount of time (the indicator
lamp on t
he remotec
ontrol goes out). Press button
Bon remotec ontrolAagain before
transmission ends.
RAlign the antenna cable of the garage door
opener unit. This can improve signal recep-
tion/transmission.
Opening/closing the garage door
After it has been programmed, the integrated
garage door opener performst he function of the
garage door system remotec ontrol. Please also
read the operating instruction sfor the garage
door system.
XTurn the SmartKey to position 2in the ignition
lock (Ypage 122).
XPress button ;,=or? which you have
programmed to operate the garage door.
Garage door system with afixed code: indi-
cator lamp :lights up green.
Garage door system with arolling code: indi-
cator lamp :flashes green.
The transmitter will transmit asignal as long
as the button is pressed. The transmission is
halted after amaximum of ten seconds and
indicator lamp :lights up yellow.
XPress button ;,=or? again if necessary.
Clearing the memory
Make sure that you clear the memory of the
integrated garage door opener before selling the
vehicle.
XTurn the SmartKey to position 2in the ignition
lock (Ypage 122).
XPress and hold buttons ;and ?.
The indicator lamp initially lights up yellow
and then green.
XRelease buttons ;and ?.
The memory of the integrated garage door
opener in the rear-view mirror is cleared.
254Features
Stowage and features
Page 283 of 326
iJumper cablesand further informatio nregardingj ump-startin gcan be obtaine datany qualified
specialist workshop.
Towing and tow-starting
Important safety notes
GWARNING
Functionsr elevanttos afety are restricted or
no longer available if:
Rth ee ngine is no trunning.
Rtheb rakes ystem or th epower steering is
malfunctioning.
Rthere is amalfunctio ninthevoltage supply
or th evehicle's electrical system.
If your vehicle is beingt owed, muchm ore
force may be necessaryt osteer or brake.
Thereisar isk of an accident.
In such cases, use atow bar. Before towing,
makes ure that th esteering moves freely.
GWARNING
You can no longer steer th evehicle if the
steering wheel lockh as been engaged. There
is ar isk of an accident.
Always switch off th eignitio nwhen towing the
vehicle with atow cable or atow bar.
GWARNING
When towing or tow-startin ganother vehicle
and its weight is greater than th epermissible
gross weight of your vehicle ,the :
Rthet ow ing eye could detach itself
Rthev ehicle/trailer combinatio ncould roll-
over.
Thereisar isk of an accident.
When towing or tow-startin ganother vehicle,
its weight shouldn otbe greater than th eper-
missible gross weight of your vehicle.
Details on th epermissible gross vehicle weight
of your vehicle can be foun donthevehicle iden-
tification plate(
Ypage 314).
!When Activ eBrake Assist,D istance Pilot
DISTRONIC or th eHOLDfunction is activated, th
ev ehicle brakes automatically in certain
situations.
To avoid damage to th evehicle ,deactivate
these systems in th efollowing or similar sit-
uations:
Rwhen towing th evehicle
Rin th ecar wash
!Makes ure that th eelectric parking brak eis
released. If th eelectric parking brakeisf aulty,
visitaq ualifiedspecialist workshop.
!Only secure th etow rope or to wbar at the
towing eyes. Otherwise, th evehicle coul dbe
damaged.
!Do no tuse th etow ing eyes for recoveryp ur-
posesast hisc oul dd amage th evehicle .Ifin
doubt,r ecover th evehicle with acrane.
!When towing ,pull away slowly and
smoothly. If th etractive power is to ohigh,t he
vehicle scoul dbed amaged.
!The vehicle can be towed amaximum of
30 miles (50km ). The towing speed of 30 mph
(50km/h) must no tbeexceeded.
If th evehicle has to be towed moret han
30 miles (50km), th efront axle must be raised
or th eentire vehicle raiseda nd transported.
!Do nottow with sling-type equipment .This
coul ddamage th evehicle.
!When towing vehicle swith KEYLESS-GO,
use th ekey instead of th eStart/Sto pbutton.
Otherwise, th eautomatic transmission may
shifttop ositionPwhen th edriver' sorf ront-
passenger door are opened, whichc ouldlead
to damage to th etransmission.
!Vehicles with automatic transmission must
no tbes tarted by tow-starting. This coul doth-
erwis edamage th etransmission.
It is bette rtohave th evehicle transported than
to have it towed away.
If th evehicle can no longer be driven because of
an accidentorb reakdown,you have thefollow-
ing options:
RTransportin gthe vehicle.
Towing and tow-starting281
Breakdown assistance
Z
Page 285 of 326
XWhen the vehicle is stationary, depress the
brake pedal and keep it depressed.
XShift the automatic transmission to position
j.
XRelease the brake pedal.
XRelease the electric parking brake.
XSwitchoff the automatic locking
(Ypage 187).
XSwitc hont he hazard warning lamps
(Ypage 102).
XTurn the SmartKey in the ignition lock to posi-
tion gand leave the SmartKey in the ignition
lock.
Towing avehicle with both axles on
the ground
It is importan tthat you observe the safety
instruction swhen towing away your vehicle
(
Ypage 281).
XOn vehicles with KEYLESS-GO or the KEY-
LESS-GO star tfunction: you must use the
SmartKey instead of the Start/Stop button
(
Ypage 123).
The automatic transmission automatically shifts
to position jwhen you open the driver's or
front-passenger door or when you remove the
SmartKey from the ignition lock. In order to
ensure that the automatic transmission stays in
position iwhen towing away the vehicle, you
must observe the following points:
XMake sure that the vehicle is stationary.
XTurn the SmartKey to position 2in the igni-
tion lock.
XDepress and hold the brake pedal.
XShift the automatic transmission to position
i.
XLeave the SmartKey in position 2in the igni-
tion lock.
XRelease the brake pedal.
XRelease the electric parking brake.
XSwitc hont he hazard warning lamps
(Ypage 102).
iIn order to signal achange of direction when
towing the vehicle with the hazard warning
lamps switched on, use the combination
switch as usual. In this case, only the indicator
lamps for the direction of travel flash. After resetting the combination switch, the hazard
warning lamp start
sflashing again.
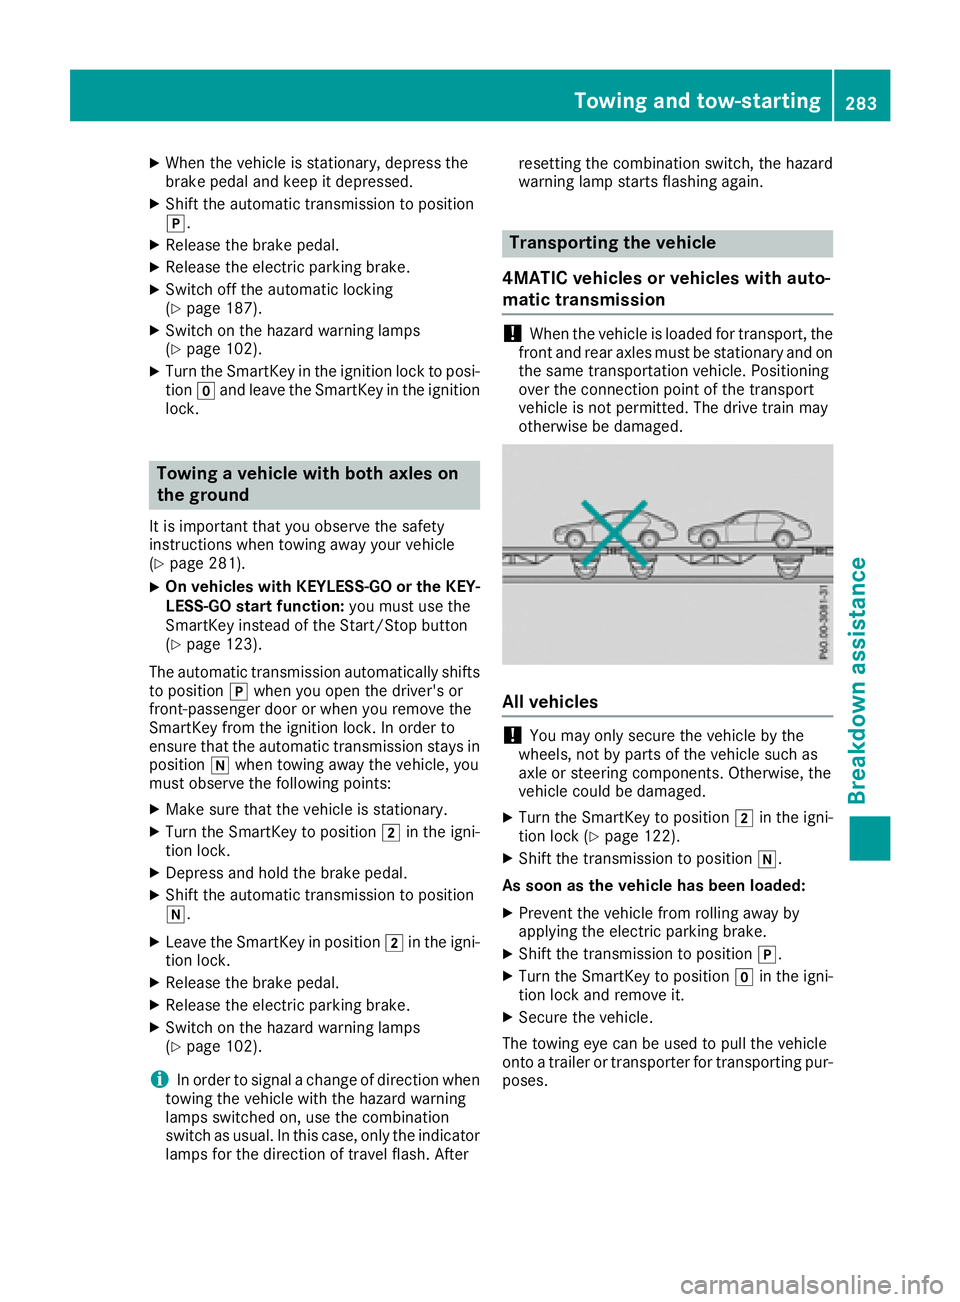
Transporting the vehicle
4MATIC vehicles or vehicles with auto-
matic transmission
!When the vehicle is loaded for transport, the
fronta nd rear axles must be stationary and on
the same transportation vehicle. Positioning
over the connection point of the transport
vehicle is not permitted. The drive train may
otherwise be damaged.
All vehicles
!You may only secure the vehicle by the
wheels, not by parts of the vehicle such as
axle or steerin gcomponents. Otherwise, the
vehicle could be damaged.
XTurn the SmartKey to position 2in the igni-
tion lock (Ypage 122).
XShift the transmission to position i.
As soon as the vehicle has been loaded:
XPreventt he vehicle from rolling away by
applying the electric parking brake.
XShift the transmission to position j.
XTurn the SmartKey to positiongin the igni-
tion lock and remove it.
XSecure the vehicle.
The towing eye can be used to pull the vehicle
ont oat railer or transporter for transportin gpur-
poses.
Towing and tow-starting283
Breakdown assistance
Z
Page 286 of 326
Noteson4 MATIC vehicles
!
Vehicle swith4 MATIC must not be towed
with eithe rthe front or the rea raxler aised, as
doing so will damage the transmission.
Vehicle swith4 MATIC mayo nlye ithe rbet owed
away with both axles on the ground or be loaded
up and transported.
If the vehicle' stransmission, front, or rea raxlei s
damaged, have the vehicl etransporte dona
truck or trailer.
In the even tofdamagetot he electrical sys-
tem:
If the battery is defective, the automatic trans-
mission will be locked in position j.Tos hift the
automatic transmission to position i,you
must provide powe rtothe vehicle' son-board
electrica lsys temint he same wa yaswhenjump-
starting (
Ypage 278).
Have the vehicl etransporte donatransporte ror
trailer.
Tow-startin g(em ergency engine
starting)
!
Vehicle switha utomatic transmission must
not be tow-started .You could otherwis edam -
ag et he automatic transmission.
iYouc an find information on "Jump-starting"
under (Ypage 278).
Fuses
Important safety notes
GWARNING
If yo umanipulate or bridg eafaulty fuse or if
yo ur eplace it with afusew ithah igheramper -
age, the electric cable scould be overloaded.
This could resul tinafire. There is ariskofa n
accident and injury.
Alway sreplace faulty fusesw itht he specified
new fusesh avingthe correc tamperage.
!Onlyu sefusest hath aveb eena pproved for
Mercedes-Benz vehicles and which have the
correc tfus er ating for the systemc oncerned.
Onlyu sefusesm arked with an "S" .Other- wise,c
omponents or systems could be dam-
aged.
!Make sure tha tnomoisture can ente rthe
fuse bo xwhent he cover is open.
!When closing the cover, make sure tha titis
lying correctly on the fuse box. Moistur eseep-
ing in or dirt could otherwis eimpair the oper-
ation of the fuses.
Th ef uses in your vehicl eserve to close down
faulty circuits .Ifafuse blows, al lthe compo-
nents on the circuit and their functions stop
operating.
Blown fusesm ustber eplaced with fusesoft he
same rating ,which yo ucan recognize by the
color and value. Th efuser ating sarelistedint he
fuse allocation chart.
Th efusea lloc atio
nc h
art is in the fuse bo xinthe
front-passenge rfootwell (Ypage 285).
If an ewly inserte dfusea lsob lows ,havet he
cause traced and rectifie dataqualified special-
is tw orkshop ,e.g.ana uthorized Mercedes-Benz
Center.
Before changin gafuse
XSecure the vehicl eagain st rolling away
(Ypage 141).
XSwitch off al lelectrica lconsumers.
XVehicle swithout KEYLESS-GO: remove the
SmartKeyf romthe ignition lock.
XVehicle swithK EYLESS -GOs tart-function
or KEYLESS-GO: open the driver's door.
Th ev ehicl eelectronics ar enow in position
g .Thisc orresponds to the SmartKeyb eing
remove dfromt he ignition.
Th ef uses arel oc ated in variou sfuseb oxes:
RFuse bo xinthe engine compartment on the
left-hand side of the vehicle, when viewed in
the directio noftravel
RFuse bo xinthe front-passenge rfootwell
Th efus ea lloc atio nchart is on the fuse bo xinthe
front-passenge rfootwell (
Ypage 285).
284Fuses
Breakdow nassistance
Page 310 of 326

Tire-mounting tools should not be used near
the valve. This could damage the electronic
components.
Only have tires changed ataqualified spe-
cialist workshop.
Observe the instructions and safety notes in the
"Changing awheel" section (
Ypage 307).
The wear pattern sonthe front and rear tires
differ, depending on the operating conditions.
Rotate the wheels before aclear wear pattern
has formed on the tires. Frontt ires typically
wear more on the shoulders and the rear tires in
the center.
On vehicles that have the same size front and
rear wheels, you can rotat ethe wheels accord-
ing to the intervals in the tire manufacturer's
warranty book in your vehicle documents. If no
warranty book is available, the tires should be
rotated every 3,000 to 6,000 miles (5,000 to
10,000k m).D ependin gontire wear, this may
be required earlier. Do not change the direction
of wheel rotation.
Clean the contact surfaces of the wheel and the brake disc thoroughly every time awheel is rota-
ted. Check the tire pressure and, if necessary,
restart the tire pressure loss warning system
(Canada only) or the tire pressure monitor (USA
only).
Direction of rotation
Tires with aspecified direction of rotation have
additional benefits ,e.g. if there is arisk of hydro-
planing. These advantages can only be gained if
the tires are installed corresponding to the
direction of rotation.
An arrow on the sidewall of the tire indicates its
correctd irection of rotation.
Storing wheels
Storewheels that are not being used in acool,
dry and preferably dark place. Protectt he tires
from oil, grease, gasoline and diesel.
Mounting awheel
Preparing the vehicle
XStop the vehicle on solid, non-slippery and
level ground.
XApply the electric parking brake manually.
XBring the front wheels into the straight-ahead position.
XShift the transmission to position j.
XSwitch off the engine.
XVehicles without KEYLESS-GO:remove the
SmartKey from the ignition lock.
XVehicles with KEYLESS-GO start-function
or KEYLESS-GO: open the driver's door.
The vehicle electronics are now in position
u.T his is the same as “key removed”.
XVehicles with KEYLESS-GO start-function
or KEYLESS-GO: remove the Start/Stop but-
ton from the ignition lock (
Ypage 122).
XMake sure that the engine cannot be started
via your smartphon e(Ypage 83).
XIf included in the vehicle equipment, remove
the tire-change tool kit from the vehicle.
XSafeguard the vehicle against rolling away
(Ypage 141).
iApart from certain country-specific varia-
tions, the vehicles are not equipped with a
tire-change tool kit. Some tools for changing a
wheel are specific to the vehicle. For more
information on which tools are required to
perform awheel change on your vehicle, con-
sult aqualified specialist workshop.
Necessary tire-changing tools can include, for
example:
RJack
RWheel chock
RLug wrench
308Changing awheel
Wheels and tires