2018 MERCEDES-BENZ C-CLASS ESTATE clock
[x] Cancel search: clockPage 115 of 609
R
secure the load using the tie-down eyes and
distribute the load evenly. St
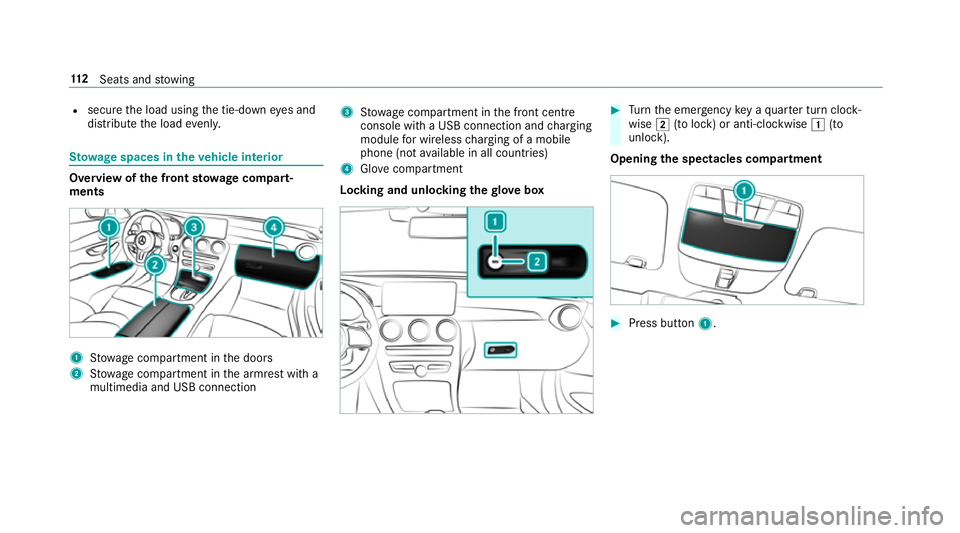
ow age spaces in theve hicle interior Overview of
the front stowage compa rt‐
ments 1
Stow age compartment in the doors
2 Stow age compartment in the armrest with a
multimedia and USB connection 3
Stow age compartment in the front cent re
console wi tha USB connection and charging
module for wireless charging of a mobile
phone (not available in all countries)
4 Glovecompa rtment
Locking and unlo cking thegl ove box 0007
Turn the emer gency key a quarter turn clock‐
wise 0048(to lock) or anti-clockwise 0047(to
unlock).
Opening the spectacles compa rtment 0007
Press button 1. 11 2
Seats and stowing
Page 149 of 609
0007
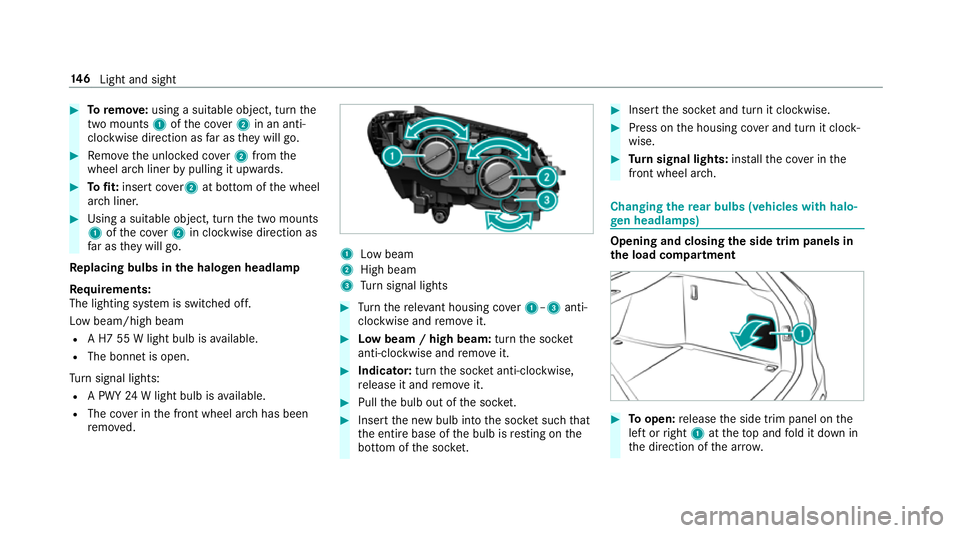
Toremo ve:using a suitable object, turn the
two mounts 1ofthe co ver2 in an anti-
clockwise direction as far as they will go. 0007
Remo vethe unloc ked co ver2 from the
wheel ar chliner bypulling it upwards. 0007
Tofit: inse rtco ver 2 at bottom of the wheel
ar ch liner. 0007
Using a suitable object, turn the two mounts
1 ofthe co ver2 in clockwise direction as
fa r as they will go.
Re placing bulbs in the halo gen headla mp
Re quirements:
The lighting sy stem is switched off.
Low beam/high beam
R A H7 55 W light bulb is available.
R The bonnet is open.
Tu rn signal lights:
R A PWY 24W light bulb is available.
R The co ver in the front wheel ar chhas been
re mo ved. 1
Low beam
2 High beam
3 Turn signal lights 0007
Turn there leva nt housing co ver1–3 anti-
clockwise and remo veit. 0007
Low beam / high beam: turnthe soc ket
anti-clockwise and remo veit. 0007
Indicator: turnthe soc ket anti-clo ckwise,
re lease it and remo veit. 0007
Pull the bulb out of the soc ket. 0007
Inse rtthe new bulb into the soc ket su chthat
th e entire base of the bulb is resting on the
bottom of the soc ket. 0007
Inse rtthe soc ket and turn it clo ckwise. 0007
Press on the housing co ver and turn it clock‐
wise. 0007
Turn signal lights: installth e co ver in the
front wheel ar ch. Changing
there ar bulbs (vehicles with halo‐
ge n headla mps) Opening and closing
the side trim panels in
th e load compa rtment 0007
Toopen: release the side trim panel on the
left or right 1attheto p and fold it down in
th e direction of the ar row. 14 6
Light and sight
Page 194 of 609
000E
NO
TEFuel may spr ayout when you
re mo vethe fuel pump nozzle. 0007
Only fill th e fuel tank until the pump
nozzle switches off. Re
quirements:
R The vehicle is unloc ked.
0009 Do not get into theve hicle again during the
re fuelling process. Otherwise, electros tatic
ch arge could build up again.
Obser vethe no tes on operating fluids
(0013 page477).
Plug-in hybrid: obser vethe no tes in the Supple‐
ment. Otherwise, you may failto recognise dan‐
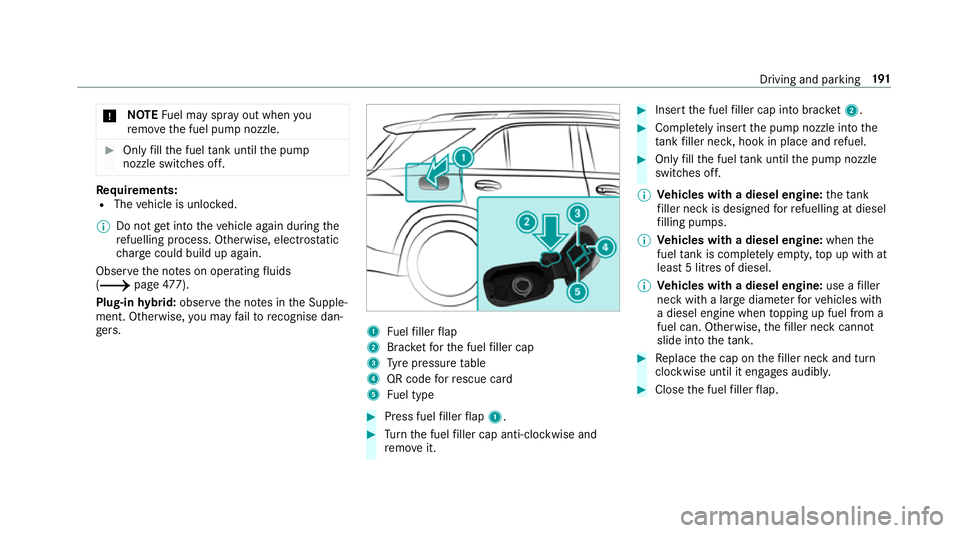
ge rs. 1
Fuelfiller flap
2 Brac ketfo rth e fuel filler cap
3 Tyre pressure table
4 QR code forre scue card
5 Fuel type 0007
Press fuel filler flap 1. 0007
Turn the fuel filler cap anti-clockwise and
re mo veit. 0007
Insert the fuel filler cap into brac ket2. 0007
Comp lete ly inse rtthe pump nozzle into the
ta nk filler nec k,hook in place and refuel. 0007
Only fill th e fuel tank until the pump nozzle
switches off.
0009 Vehicles with a diesel engine: theta nk
fi ller neck is designed forre fuelling at diesel
fi lling pumps.
0009 Vehicles with a diesel engine: whenthe
fuel tank is compl etely em pty, top up with at
least 5 litres of diesel.
0009 Vehicles with a diesel engine: use afiller
neck with a lar gediame terfo rve hicles with
a diesel engine when topping up fuel from a
fuel can. Otherwise, thefiller neck cannot
slide into theta nk. 0007
Replace the cap on thefiller neck and turn
clockwise until it engages audibl y. 0007
Close the fuel filler flap. Driving and parking
191
Page 196 of 609
The
following messages appear in order in the
multifunction display when theAd Blue ®
tank
re qu ires refilling:
R Refill AdBlue See Owner's Manual . The
Ad Blue ®
tank is down tothere ser veleve l.
R Refill AdBlue No start in XXX km. You can
on ly drive theve hicle overth e dis tance
shown. Refill Ad Blue ®
as soon as possible.
R Refill AdBlue Start not possible. The vehicle
can no longer be star ted.
Yo u can see theAd Blue ®
ra nge and le vel in the
multifunction display (0013 page276).
0009 The AdBlue ®
ra nge shown depends strongly
on the driving style and operating condi‐
tions. The actual range can therefore deviate
from the calculated range. Opening the
AdBlue ®
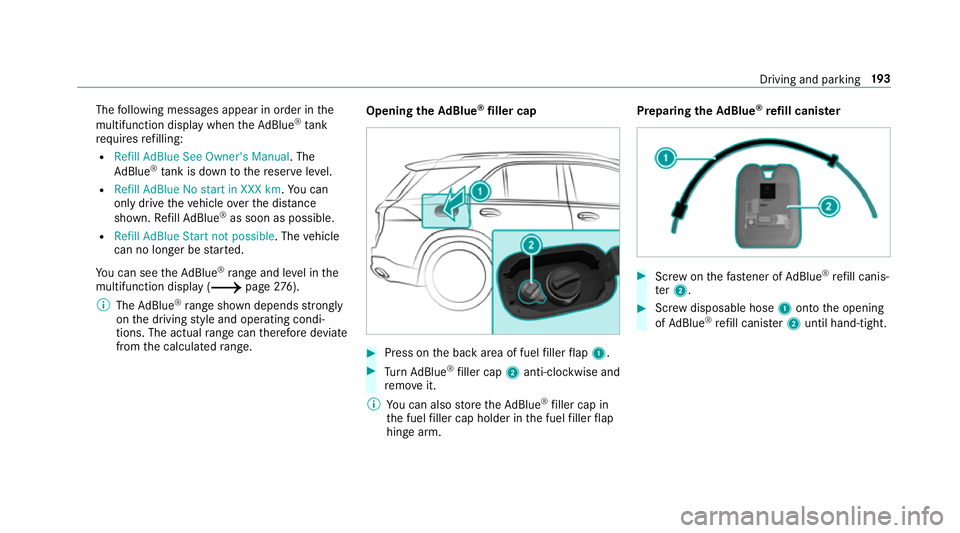
filler cap 0007
Press on the back area of fuel filler flap 1. 0007
Turn AdBlue ®
filler cap 2anti-clockwise and
re mo veit.
0009 You can also store theAd Blue ®
filler cap in
th e fuel filler cap holder in the fuel filler flap
hin gearm. Prepa
ring theAd Blue ®
re fill canis ter 0007
Screw onthefast ener of AdBlue ®
re fill canis‐
te r2. 0007
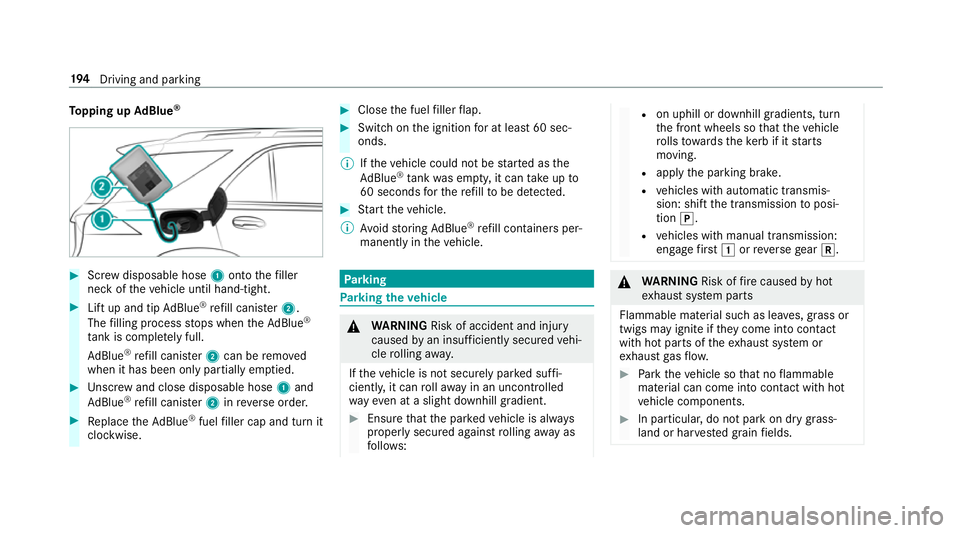
Screw disposable hose 1onto the opening
of Ad Blue ®
re fill canis ter2 until hand-tight. Driving and parking
19 3
Page 197 of 609
To
pping up AdBlue ® 0007
Screw disposable hose 1onto thefiller
neck of theve hicle until hand-tight. 0007
Lift up and tip AdBlue ®
re fill canis ter2.
The filling process stops when theAd Blue ®
ta nk is compl etely full.
Ad Blue ®
re fill canis ter2 can be remo ved
when it has been only partially em ptied. 0007
Unscr ew and close disposable hose 1and
Ad Blue ®
re fill canis ter2 inreve rse order. 0007
Replace theAd Blue ®
fuel filler cap and turn it
clockwise. 0007
Close the fuel filler flap. 0007
Swit chon the ignition for at least 60 sec‐
onds.
0009 Ifth eve hicle could not be star ted as the
Ad Blue ®
tan kwa s em pty, it can take up to
60 seconds forth ere fill to be de tected. 0007
Start theve hicle.
0009 Avoid storing AdBlue ®
re fill con tainers per‐
manently in theve hicle. Pa
rking Pa
rking theve hicle 000A
WARNING Risk of accident and inju ry
caused byan insuf ficiently secu redve hi‐
cle rolling away.
If th eve hicle is not securely par ked suf fi‐
ciently, it can rollaw ay in an uncont rolled
wa yev en at a slight downhill gradient. 0007
Ensure that the par kedve hicle is alw ays
properly secured against rolling away as
fo llo ws: R
on uphill or downhill gradients, turn
th e front wheels so that theve hicle
ro lls towa rdsth eke rb if it starts
moving.
R apply the parking brake.
R vehicles with automatic transmis‐
sion: shift the transmission toposi‐
tion 005D.
R vehicles with manual transmission:
engage firs t0047 orreve rsege ar 005E. 000A
WARNING Risk offire caused byhot
ex haust sy stem parts
Flammable material such as lea ves, grass or
twigs may ignite if they come into contact
wi th hot parts of theex haust sy stem or
ex haust gasflow. 0007
Park theve hicle so that no flammable
material can come into con tact wi thhot
ve hicle components. 0007
In particular, do not park on dry grass‐
land or har vested grain fields. 194
Driving and pa rking
Page 270 of 609
Coupling up a trailer
000E NO
TEDama getotheve hicle battery due
to full discharge Charging
the trailer battery using the po wer
supply of the trailer can damage theve hicle
batter y. 0007
Do not use theve hicle's po wer supply
to charge the trailer batter y. 0007
Remo vethe co ver from the ball head and
st ore it in a safe place (0013 page110). 0007
Position the trailer on a le vel sur face behind
th eve hicle and couple it up totheve hicle. 0007
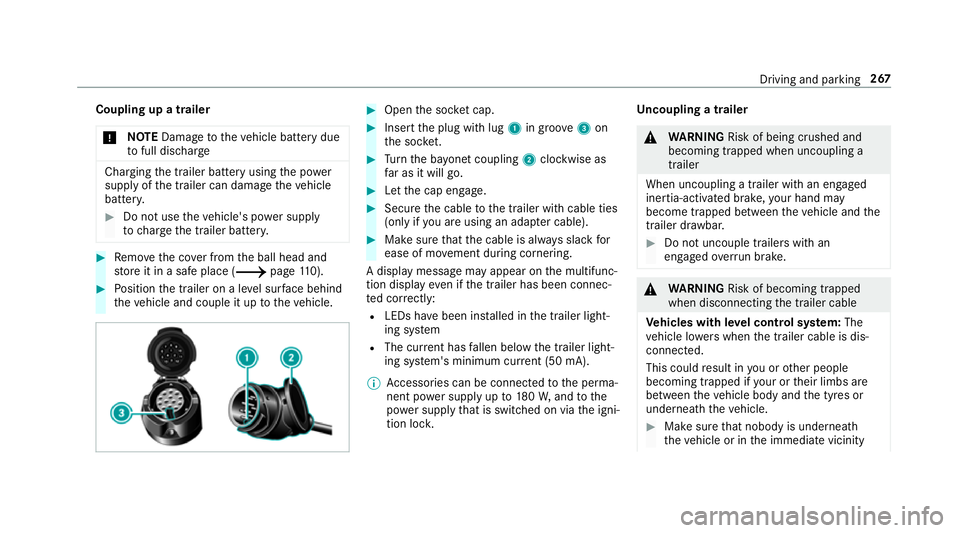
Open the soc ket cap. 0007
Inse rtthe plug with lug 1in groo ve3 on
th e soc ket. 0007
Turn the ba yonet coupling 2clockwise as
fa r as it will go. 0007
Let the cap engage. 0007
Secure the cable tothe trailer with cable ties
(only if you are using an adap ter cable). 0007
Make sure that the cable is alw ays slack for
ease of mo vement during cornering.
A display messa gemay appear on the multifunc‐
tion display even if the trailer has been connec‐
te d cor rectly:
R LEDs ha vebeen ins talled in the trailer light‐
ing sy stem
R The cur rent has fallen below the trailer light‐
ing sy stem's minimum cur rent (50 mA).
0009 Accessories can be connected tothe perma‐
nent po wer supp lyup to180W, and tothe
po we r supp lythat is swit ched on via the igni‐
tion loc k. Un
coupling a trailer 000A
WARNING Risk of being crushed and
becoming trapped when uncoupling a
trailer
When uncoupling a trailer wi than engaged
ine rtia-activated brake, your hand may
become trapped between theve hicle and the
trailer dr awbar. 0007
Do not uncouple trailers with an
engaged overrun brake. 000A
WARNING Risk of becoming trapped
when disconnecting the trailer cable
Ve hicles with le vel control sy stem: The
ve hicle lo werswhen the trailer cable is dis‐
connected.
This could result in you or other people
becoming trapped if your or their limbs are
between theve hicle body and the tyres or
underneath theve hicle. 0007
Make sure that nobody is unde rneath
th eve hicle or in the immediate vicinity Driving and parking
267
Page 304 of 609
0007
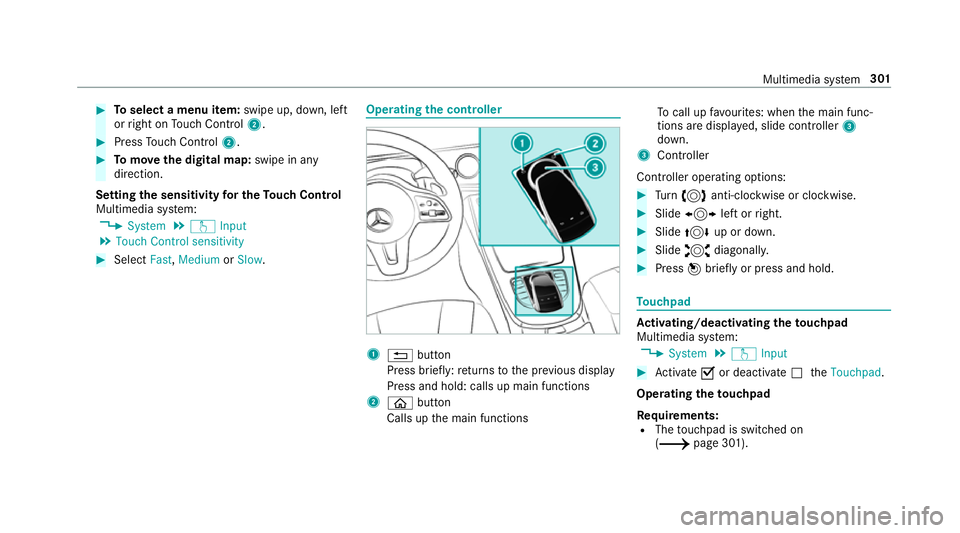
Toselect a menu item: swipe up, down, left
or right on Touch Control 2. 0007
Press Touch Control 2. 0007
Tomo vethe digital map: swipe in any
direction.
Setting the sensitivity for the Touch Control
Multimedia sy stem:
0018 System 0019
w Input
0019 Touch Control sensitivity 0007
Select Fast,Medium orSlow . Operating
the controller 1
0038 button
Press brief ly:re turns tothe pr evious display
Press and hold: calls up main functions
2 00E2 button
Calls up the main functions To
call up favo urites: when the main func‐
tions are displa yed, slide controller 3
down.
3 Controller
Controller operating options: 0007
Turn 0018 anti-clockwise or clo ckwise. 0007
Slide 0016 left orright. 0007
Slide 0019 up or down. 0007
Slide 0017 diagonally. 0007
Press 001Cbrief lyor press and hold. To
uchpad Ac
tivating/deactivating the touchpad
Multimedia sy stem:
0018 System 0019
w Input 0007
Activate 0073or deacti vate 0053 theTouchpad .
Operating theto uchpad
Re quirements:
R The touchpad is swit ched on
(0013 page 301). Multimedia sy
stem 301
Page 346 of 609
0009
Requirements:
R Mercedes me connect is available.
R You ha vea user account forthe
Mercedes me por tal.
R The service has been activated at a
Mercedes-Benz service centre.
Fu rther information can be found at: http://
www.mercedes.me
0009 The online information is not available in all
countries.
If Display in COMAND is activated inTraf fic Sign
Assi st (0013 page 257), speed limits and over‐
ta king restrictions are displ ayed on the map.
0009 Company logos displa yed on the map are
trademar ksofthere spective companies and
used solely forth e purpose of indicating the
locations of these companies. The use of
such logos on the map does not indicate
appr oval of, suppo rtof or advertising by
th ese companies forth e navigation sy stem
itself. Setting
the map scale
Re quirements:
R The map is shown.
Multimedia sy stem:
0018 Navigation 0007
Tozoom in: swipe down on theTo uch Con‐
trol.
or 0007
Turn the controller anti-clockwise.
or 0007
Movetwo fingers apart on theto uchpad. 0007
Tozoom out: swipe up on theTo uch Control.
or 0007
Turn the controller clockwise.
or 0007
Movetwo fingers toge ther on theto uchpad.
0009 You can set the unit of measurement of the
map scale (0013 page314). Moving
the map
Multimedia sy stem:
0018 Navigation 0019
Z Options
0019 Map menu 0007
Alternatively, if the map is displa yed in full
screen mode, press the cent ral control ele‐
ment.
The map menu appears. 0007
Select "Mo vemap" in map menu 2
(0013 page 342). 0007
Swipe in any direction on theTo uch Control
or touchpad.
or 0007
Slide the controller in any direction.
The map mo ves in the cor responding direc‐
tion under the crosshair. The fur ther you
mo veyour finger away from thest arting posi‐
tion on theto uchpad, thefast erthe map
mo ves. Multimedia sy
stem 343