2018 MERCEDES-BENZ C-CLASS ESTATE tailgate
[x] Cancel search: tailgatePage 151 of 609
0007
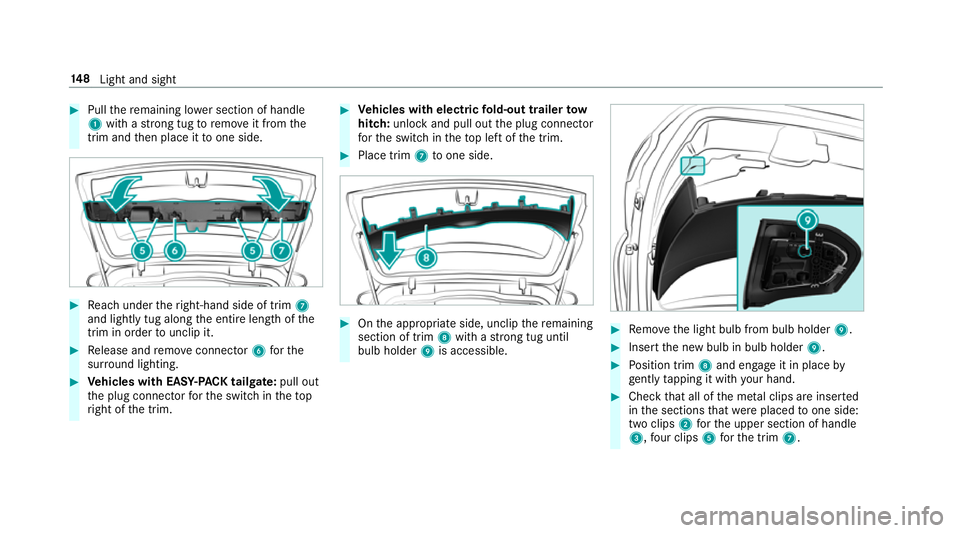
Pull there maining lo wer section of handle
1 with a strong tug toremo veit from the
trim and then place it toone side. 0007
Reach under theright-hand side of trim 7
and lightly tug along the entire length of the
trim in order tounclip it. 0007
Release and remo veconnector 6forthe
sur round lighting. 0007
Vehicles with EASY -PAC K tailgate: pull out
th e plug connector forth e switch in thetop
ri ght of the trim. 0007
Vehicles with electric fold-out trailer tow
hit ch: unlo ckand pull out the plug connector
fo rth e switch in theto p left of the trim. 0007
Place trim 7toone side. 0007
Onthe appropriate side, unclip there maining
section of trim 8with a strong tug until
bulb holder 9is accessible. 0007
Remo vethe light bulb from bulb holder 9. 0007
Insert the new bulb in bulb holder 9. 0007
Position trim 8and engage it in place by
ge ntly tapping it with your hand. 0007
Check that all of the me tal clips are inse rted
in the sections that we replaced toone side:
two clips 2forth e upper section of handle
3, four clips 5forth e trim 7. 14 8
Light and sight
Page 152 of 609
0007
If not, remo vethe missing me tal clips from
th e panel apertures in theta ilgate and inse rt
th em in the cor responding positions. 0007
Take trim 7and connect plug connector 6
to the sur round lighting.
The sur round lighting does not illuminate
until theta ilgate has been closed and then
opened again. 0007
Vehicles with EASY -PAC K tailgate: insert
th e plug connector forth e switch in thetop
ri ght of the trim. 0007
Vehicles with electric fold-out trailer tow
hit ch: inse rtthe plug connector forthe
switch in theto p left of the trim. 0007
Position trim 7and engage it in place by
ge ntly tapping it with your hand, starting
from the outside. 0007
Clip in the lo wer section of handle 1again. 0007
Insert and engage the upper section of han‐
dle 3into lo wer section 1. Wi
ndscreen wipers and windscreen washer
sy stem Switching
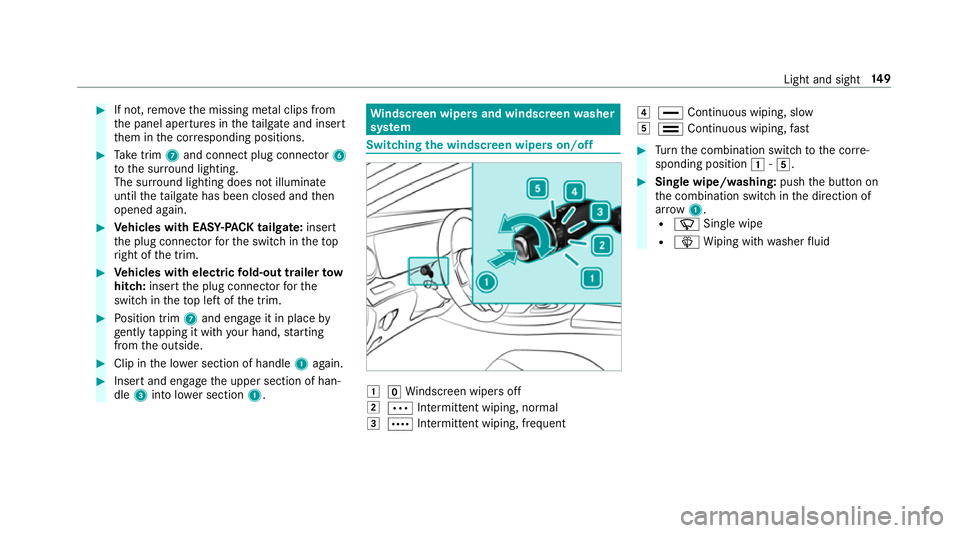
the windscreen wipers on/off 0047
005AWindsc reen wipers off
0048 0062 Intermittent wiping, normal
0049 0063 Intermittent wiping, frequent 004A
00AA Continuous wiping, slow
004B 00A9 Continuous wiping, fast 0007
Turn the combination switch tothe cor re‐
sponding position 0047-004B. 0007
Single wipe/washing: pushthe button on
th e combination switch in the direction of
ar row 1.
R 00D3 Single wipe
R 00D4 Wiping with washer fluid Light and sight
14 9
Page 249 of 609
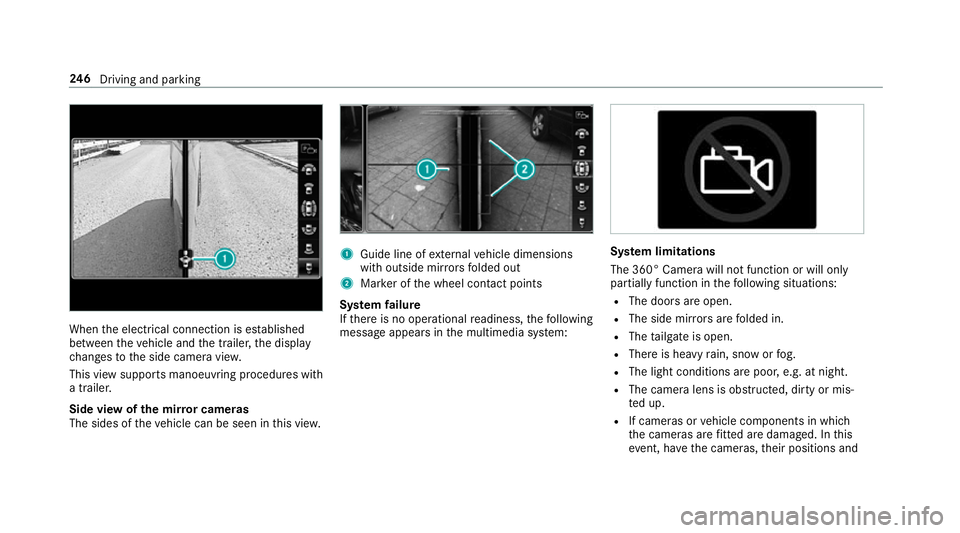
When
the electrical connection is es tablished
between theve hicle and the trailer, the display
ch anges tothe side camera vie w.
This view supports manoeuvring procedures with
a trailer.
Side view of the mir ror cameras
The sides of theve hicle can be seen in this vie w. 1
Guide line of extern al vehicle dimensions
with outside mir rors folded out
2 Marker of the wheel conta ct points
Sy stem failure
If th ere is no operational readiness, thefo llowing
message appears in the multimedia sy stem: Sy
stem limitations
The 360° Camera will not function or will only
partially function in thefo llowing situations:
R The doors are open.
R The side mir rors are folded in.
R The tailgate is open.
R There is heavy rain, snow or fog.
R The light conditions are poor, e.g. at night.
R The camera lens is obstructed, dirty or mis‐
ted up.
R If cameras or vehicle components in which
th e cameras are fitted are dama ged. In this
eve nt, ha vethe cameras, their positions and 246
Driving and pa rking
Page 269 of 609
0007
Remo vethe co ver from the ball head and
st ore it in a safe place.
Make sure that the ball on the ball neck is clean.
Check that it is either greased or dr y (grease-
free), depending on the instructions forthe
traile r.
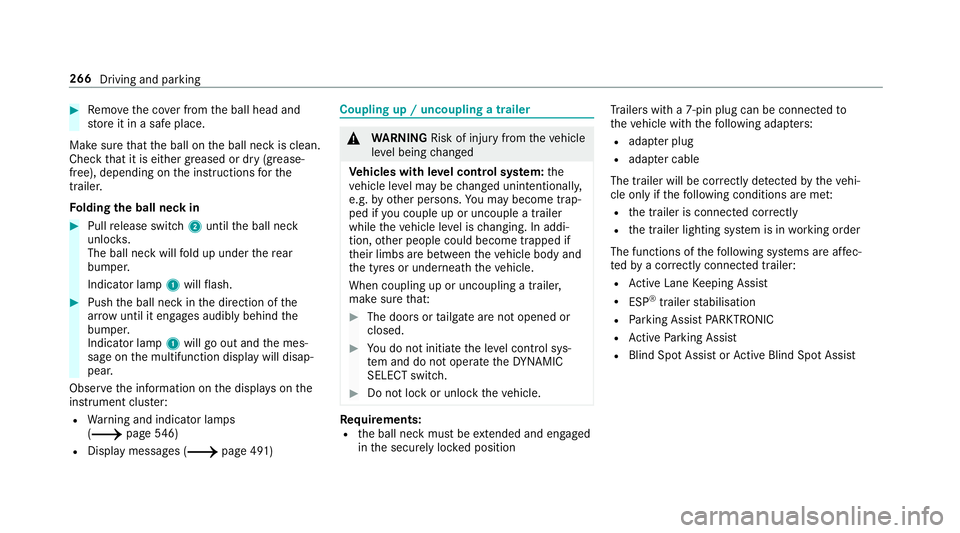
Fo lding the ball neck in 0007
Pull release switch 2until the ball neck
unloc ks.
The ball neck will fold up under there ar
bumper.
Indicator lamp 1will flash. 0007
Push the ball neck in the direction of the
ar row until it en gage s audibly behind the
bumper.
Indicator lamp 1will go out and the mes‐
sage on the multifunction display will disap‐
pear.
Obser vethe information on the displa yson the
instrument clus ter:
R Warning and indicator lamps
(0013 page546)
R Displ aymessa ges (0013 page 491) Coupling up / uncoupling a trailer
000A
WARNING Risk of inju ryfrom theve hicle
le ve l being changed
Ve hicles with le vel control sy stem: the
ve hicle le vel may be changed unin tentional ly,
e.g. by ot her persons. You may become trap‐
ped if you couple up or uncouple a trailer
while theve hicle le vel is changing. In addi‐
tion, other people could become trapped if
th eir limbs are between theve hicle body and
th e tyres or underneath theve hicle.
When coupling up or uncoupling a trailer,
make sure that: 0007
The doors or tailgate are not opened or
closed. 0007
You do not initiate the le vel control sys‐
te m and do not operate theDY NA MIC
SELECT switch. 0007
Do not lock or unlock theve hicle. Re
quirements:
R the ball neck must be extended and engaged
in the securely loc ked position Tr
ailers with a 7-pin plug can be connec tedto
th eve hicle with thefo llowing adap ters:
R adap ter plug
R adapte r cable
The trailer will be cor rectly de tected bytheve hi‐
cle only if thefo llowing conditions are me t:
R the trailer is connected cor rectly
R the trailer lighting sy stem is in working order
The functions of thefo llowing sy stems are af fec‐
te dby a cor rectly connected traile r:
R Active Lane Keeping Assist
R ESP ®
trailer stabilisation
R Parking Assist PARKTRONIC
R Active Parking Assist
R Blind Spot Assist or Active Blind Spot Assi st266
Driving and parking
Page 543 of 609
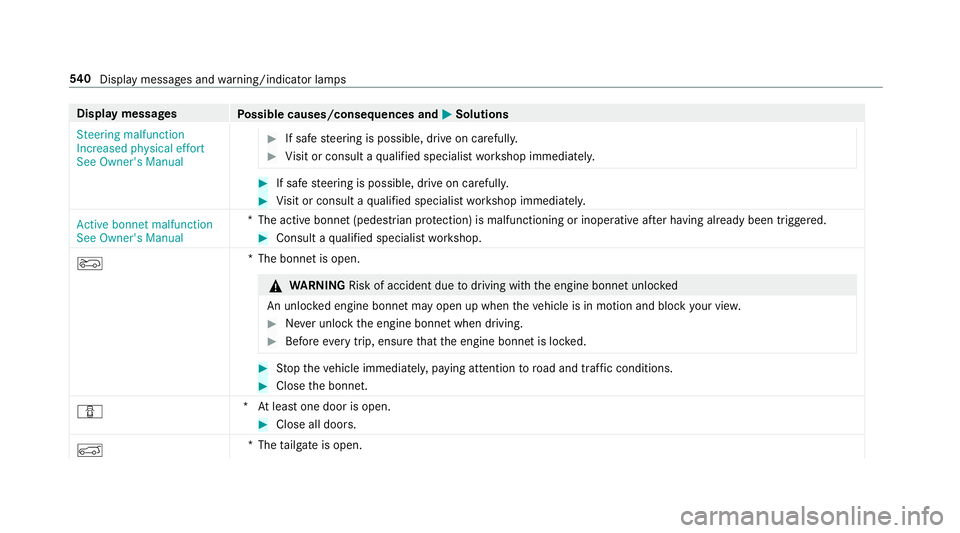
Display messages
Possible causes/consequences and 0050
0050Solutions
Steering malfunction
Increased physical effort
See Owner's Manual 0007
If safe steering is possible, drive on carefully. 0007
Visit or consult a qualified specialist workshop immediatel y. 0007
If safe steering is possible, drive on carefully. 0007
Visit or consult a qualified specialist workshop immediatel y.
Active bonnet malfunction
See Owner's Manual *T
he active bonnet (pedestrian pr otection) is malfunctioning or inoperative af ter having already been triggered. 0007
Consult a qualified specialist workshop.
0066 *T
he bonnet is open. 000A
WARNING Risk of accident due todriving with the engine bonn etunlo cked
An unloc ked engine bonn etmay open up when theve hicle is in motion and block your vie w. 0007
Never unlock the engine bonn etwhen driving. 0007
Before every trip, ensure that the engine bonn etis loc ked. 0007
Stop theve hicle immediately, paying attention toroad and traf fic conditions. 0007
Close the bonn et.
0051 *A
t least one door is open. 0007
Close all doors.
0065 *T
hetailgate is open. 540
Displaymessa ges and warning/indicator lamps
Page 568 of 609
De-authorising (de-regis
tering) the
device .................................................. 393
Information .......................................... 391
Overview .............................................. 391
Sear ching for a track ........................... 393
Sear ching for and auth orisingthe
device .................................................. 392
Selecting a media pla yer ..................... 393
Switching device via NFC .................... 393
Boot lid see Tailgate
Brake Assist Sy stem
see BAS (Brake Assi stSystem)
Brake fluid
No tes ................................................... 484
Brake forc e distribution
EBD (Elect ronic Brake forc e Distribu‐
tion) ..................................................... 209
Brakes ABS (Anti-lock Braking Sy stem) ........... 205
Ac tive Brake Assi st.............................. 210
Ad aptive brake lights .......................... .216
BA S (Brake Assi stSystem) .................. 205
Driving tips .......................................... 173EBD (Electronic Brake
forc e Distribu‐
tion) ..................................................... 209
HOLD function .....................................2 32
Limi ted braking ef fect (salt-trea ted
ro ads) .................................................. 173
New/replaced brakepads/brake
discs .................................................... 172
Ru nning-in no tes ..................................1 72
Braking assistance see BAS (Brake Assi stSystem)
Breakdown Overview of the help functions .............. 16
To w- starting ........................................ 446
To wing away ........................................ 442
Tr ansporting theve hicle ......................4 44
Wheel change ...................................... 464
Breakdown see Flat tyre
Breakdown assistance call see Mercedes me connect
Bu rm ester ®
sur round sound sy stem .....4 06
Ad justing the balance/fader ............... 407
Ad justing the sound focus ................... 407 Ad
justing treble, mid-range and bass
settings ............................................... 406
Au tomatic volume adjustment ............ .406
Calling up the sound menu .................. 406
Information .......................................... 406
Switching the sur round sound on/off
............................................................ .407
Buttons Steering wheel .....................................2 72 C
Call list Making a call ...................................... .359
Overview ............................................. 359
Calling up the sound menu
Burmes ter®
sur round sound sy stem ... 406
Calls ..........................................................3 55
Ac cepting ............................................ 355
Ac tivating functions du ring a call ........ 355
Calls wi thseveral participants ............ .355
Declining ............................................. 355
Ending a call ........................................ 355
Incoming call during an existing call .... 356
Making ................................................ 355 Index
565
Page 570 of 609
Re
commended child restra int sys‐
te ms ...................................................... 49
Seats suita blefor belt-secu redch ild
re stra int sy stems ................................... 62
Seats suitable for i‑Size child
re stra int sy stems ................................... 57
Seats suitable for ISOFIX child
re stra int sy stems ................................... 55
Securing on the front passenger seat ....67
Secu ring on there ar seat ...................... 64
To pTe ther ..............................................60
Child ren
Av oiding dangers in theve hicle .............46
Basic instructions .................................. 45
Cho ck....................................................... 463
St orage location ..................................4 63
Cho ck
see Chock
CI+ module ..............................................4 05
Calling up a menu ................................ 405
CI+ module (TV) Inserting a Smart Card ........................ 405
Cigar ette lighter
Fr ont centre console ........................... 12 8City lighting
............................................ .139
Cleaning see Care
Climate control ........................................ 157
Ac tivating/deactivating the A/C
function (cont rol panel) ...................... .159
Ac tivating/deactivating the A/C
function (multimedia sy stem) .............. 15 9
Ac tivating/deactivating the synchro‐
nisation function (cont rol panel) .......... 16 0
Ac tivating/deactivating the synchro‐
nisation function (multimedia sys‐
te m) ..................................................... 16 0
Air di stribution settings .......................1 59
Air-recirculation mode ......................... 16 0
Au tomatic control ................................ 15 9
Climate style function .......................... 15 9
Defrosting the windscreen ...................1 57
Demi sting windo ws............................. 16 0
Fr ont air vents ..................................... 167
Inserting/removing theflacon (fra‐
gr ance sy stem) .................................... 161
Ionisation ............................................. 161
No te ..................................................... 157
Re ar air vents ....................................... 167Re
ar operating unit .............................. 157
Re sidual heat ....................................... 16 0
Sets the air flow ................................... 157
Setting rear climate control (multi‐
media sy stem) .....................................1 60
Setting the air distribution ...................1 57
Setting the climate style ......................1 59
Setting the fragrance sy stem ............... 161
Setting thete mp erature ......................1 57
St ationary heater/ ventilation .............. 16 2
Switching on/off ................................. 15 8
Switching there ar wind owheater
on/off .................................................. 157
THERMATIC contro l panel .................... 157
THERMOTRONIC contro l panel ............157
Ve ntilating theve hicle (con venience
opening) ................................................ 87
Climate style
Fu nction .............................................. 15 9
Setting ................................................. 15 9
Coat hook on the tailgate ...................... .121
Cockpit ........................................................ .6
Overview .................................................6 Index
567
Page 584 of 609
Knee airbag
................................................ 37L
Laden see EA SY-PAC K load-securing kit
Lamp see Interior lighting
Lamps (instrument display) see Warning/indicator lamps
Lane de tection (au tomatic)
see Active Lane Keeping Assist
Lane Keeping Assist
see Active Lane Keeping Assist
Language .................................................. 314
No tes ................................................... 314
Setting ................................................. 314
LED light see In telligent Light Sy stem
Le vel control sy stem
see AIRMATIC
Light switch Overview ............................................ .134 Lighting
see Interior lighting
see Lights
Lights ........................................................ 13 4
Ac tive headla mps ................................ 13 8
Ad aptive Highbeam Assist .................. .139
Ad justing the instrument lighting ......... 276
Ad versewe ather light .......................... 13 9
Au tomatic driving lights ....................... 13 5
Changing bulbs .................................... 14 4
City lighting ........................................ .139
Combination switch ............................ .136
Cornering light ..................................... 13 8
Driving ab road (symm etrical dipped
beam) .................................................. 13 4
Fo g light (extended range) ................... 13 9
Haza rdwa rning lights .......................... 137
Headla mpflasher ................................ 13 6
Headla mprange .................................. 13 5
High beam ........................................... 13 6
Intellige nt Light Sy stem ....................... 137
Light switch .........................................1 34
Low beam ............................................ 13 4
Mo torw ay mode ................................... 13 8
Pa rking lights ...................................... .134 Re
ar fog light ....................................... 13 4
Re sponsibility for lighting sy stems ...... 13 4
Setting the dipped beam ..................... 14 2
Setting theex terior lighting switch-
off delay time ...................................... 14 2
Setting the sur round lighting .............. .142
St anding lights .................................... .134
Tu rn signal lights ................................. 13 6
Limiter ...................................................... 217
Ac tivating ............................................ .218
Buttons ................................................ 218
Calling up a speed .............................. .218
Deactivating ......................................... 218
Fu nction ............................................... 217
Pa ssive mode ....................................... 217
Pe rm anent setting .............................. .220
Re quirements: .................................... .218
Selecting .............................................. 218
Setting a speed .................................... 218
St oring a speed .................................... 218
Sy stem limitations ...............................2 17
Limiting speed see Limiter
Limiting the opening angle (tailgate) ......84 Index
581