2018 MERCEDES-BENZ AMG GT ROADSTER spare wheel
[x] Cancel search: spare wheelPage 270 of 409
Ty
res without run-flat characteristics: #
Do not drive on with a flat tyre. #
Chan getheflat tyre immediately with
an emer gency spa rewheel or spare
wheel. Alternativel y,consult a qualified
specialist workshop.
Ty res with run-flat characteristics: #
Obse rveth e information and warning
no tes on MOExtended tyres (run-flat
tyres). In
theeve nt of a flat tyre, thefo llowing options
are available depending on your vehicle's equip‐
ment:
R Vehicles with MOExtended tyres: it is pos‐
sible tocontinue the journey for a short
period of time. Make sure you obse rvethe
no tes on MOExtended tyres (run-flat tyres)
(/ page 267).
R Vehicles with a TIREFIT kit: you can repair
th e tyre so that it is possible tocontinue the
jou rney for a short period of time. Todo this,
use the TIREFIT kit (/ page 268). R
Vehicles with Mercedes me connect: you
can make a call for breakdown assi stance via
th eove rhead control panel in the case of a
breakdown (/ page217).
R Allvehicles: change the wheel
(/ page 297). Note
s on MOExtended tyres (run-flat tyres) &
WARNING Risk of accident when driving
in eme rgency mode
When driving in emer gency mode, the han‐
dling characteristics are impaired. e.g. when
cornering, when accelerating stronglyand
when braking. #
Do not exceed the permissible maxi‐
mum speed. #
Avoid any abrupt steering and driving
maneuvers as well as driving over
obs tacles (curbs, pot holes, off-road).
This applies, in pa rticular, toa loaded
ve hicle. #
Stop driving in the emer gency mode if
yo u notice:
R banging noise
R vehicle vibration
R smoke which smells like rubber
R continuous ESP ®
inter vention
R crac ksin tire side walls #
After driving in emergency mode ha ve
th erims checkedby aqu alified special‐
ist workshop with rega rd totheir fur ther
use. #
The defective tire must be replaced in
eve rycase. Wi
th MOExtended tyres (run-flat tyres), you can
continue todrive your vehicle even if there is a
tot al loss of pressure in one or more tyres. How‐
eve r,th e tyre af fected must not show any clearly
visible damage.
Yo u can recognise MOExtended tyres bythe
MOExtended marking which appears onthe side
wa ll of the tyre. Breakdown assis
tance 267
Page 289 of 409
Obser
vethefo llowing no tes when using snow
ch ains:
R Snow ch ains are on ly permissible for cer tain
wheel/tyre combinations. You can obtain
information about this from a Mercedes-Benz
Service Cent re.
R For saf etyre asons, on lyuse sn ow chainsthat
ha ve been specifically appr ovedfo ryo ur
ve hicle byMercedes-Benz, or snow chains
with the same quality standard.
R If sn ow ch ains are fitted, the maximum per‐
missible speed is 50 km/h.
R Vehicles with le vel control: if snowchains
are fitted, only drive at raised vehicle le vel.
% You can permanently limit the maximum
ve hicle speed for driving with winter tyres
(/ page 146).
% You can deactivate ESP ®
to pull away . This
allo ws th e wheels tospin, achieving an
increased driving forc e. Ty
re pressure Note
s on tyre pressure &
WARNING Risk of accident due toinsuf‐
fi cient or excessive tyre pressure
Underinfla ted or overinfla ted tyres pose the
fo llowing risks:
R The tyres may bur st, especially as the
load and vehicle speed increase.
R The tyres may wearexc essively and/or
une venly, which may greatlyimpair tyre
traction.
R The driving characteristics, as well as
st eering and braking, may be greatly
impaired. #
Comply with there commended tyre
pressure and check the tyre pressure of
all tyres including the spare wheel regu‐
larly:
R at least once a month
R when the load changes R
before embarking on a lon ger journey
R if operating conditions change, e.g. off-
ro ad driving #
Adjust the tyre pressure as necessar y. Ty
re pressure which is too high or too low can:
R Shor tenth e service life of the tyres.
R Cause increased tyre damage.
R Adversely af fect driving characteristics and
th us driving saf ety, e.g. due toaquaplaning. &
WARNING Risk of accident from repea‐
te d tyre pressure drop
If th e tyre pressure drops repeatedly, the
wheel, valve or tyre may be damaged.
Insuf ficient tyre pressure can cause the tyres
to bur st. #
Inspect the tyre for signs of fore ign
objects. #
Check whe ther the wheel or valve has a
leak. 286
Wheels and tyres
Page 306 of 409
Collapsible spa
rewheel Note
s onthe collapsible spa rewheel &
WARNING Risk of accident caused by
incor rect wheel and tyre dimensions
The wheel or tyre size and the tyre type of
th e emer gency spa rewheel or spare wheel
and the wheel tobe replaced may dif fer.
Mounting an emer gency spa rewheel/spare
wheel may se verely impair the driving char‐
acteristics.
To preve nt hazardous situations: #
Adapt your driving style according lyand
drive carefull y. #
Neverfit more than one emer gency
spa rewheel or spare wheel that dif fers
in size. #
Only use an emer gency spa rewheel or
spare wheel of a dif fere nt size brie fly. #
Do not switch off ESP ®
. #
Have the emer gency spa rewheel or
spare wheel of a dif fere nt size replaced
at the nearest qualified specialist work‐ shop. The new wheel must ha
vethe
cor rect dimensions. The collapsible spa
rewheel is only available in
cer tain countries.
The collapsible spare wheel is an emer gency
wheel which is only suitable for use for a limi ted
period of time and in a restricted manner in the
eve nt of a flat tyre (e.g. until the nearest work‐
shop).
The tyre side walls are folded when in transpo rt
mode. Before use, the collapsible spare wheel
has tobe inflated with the accompanying com‐
pressor.
Check the tyre pressure of the collapsible spare
wheel once fitted. Co rrect the pressure as nec‐
essar y.
The maximum permissible speed with a collapsi‐
ble spare wheel fitted is 80 km/h.
Do not fit snow chains with the collapsible spare
wheel.
Re place the collapsible spare wheel af ter six
ye ars at the latest, rega rdless of wear. %
Ve
hicles with a tyre pressure monitoring
sy stem: if a collapsible spare wheel is fitted
th e tyre pressure monitoring sy stem cann ot
function reliably. Only restart the sy stem
again when the collapsible spare wheel has
been replaced with a new wheel.
Ve hicles with a tyre pressure monitoring
sy stem: for a few minutes af ter a collapsible
spare wheel is fitted, the sy stem may still
display the tyre pressure of there mo ved
wheel.
Be sure toalso obse rveth efo llowing fur ther
re lated subjects:
R Notes on tyre pressure (/ page 286)
R Tyre pressure table (/ page 287) Re
moving the collapsible spare wheel The collapsible spare wheel is secured in
the col‐
lapsible spare wheel bag in the boot. #
Obser vethe information on mounting tyres
(/ page 293). #
Open the boot. Wheels and tyres
303
Page 307 of 409
#
Detach thefast ening stra ps. #
Unhook there taining spring hooks of thefa s‐
te ning stra ps from the brac kets. #
Remo vethe collapsible spare wheel bag
to ge ther with the collapsible spare wheel. #
Open the collapsible spare wheel bag and
re mo vethe collapsible spare wheel. Inflating
the collapsible spa rewheel Re
quirements:
R Mount the collapsible spare wheel as descri‐
bed. (/ page 301)
R Remo vethe tyre inflation compressor from
th estow agewell under the boot floor.
(/ page 268)
* NO
TEDama getothe collapsible spare
wheel when lo wering theve hicle Lo
we ring theve hicle without pr eviously
inflating the collapsible spare wheel can
damage its rim. #
Inflate the collapsible spare wheel using
th e tyre inflation compressor before
lo we ring theve hicle. *
NO
TEOverheating due tothe tyre infla‐
tion compressor running too long #
Do not runth e tyre inflation compres‐
sor for longer than ten minu tes without
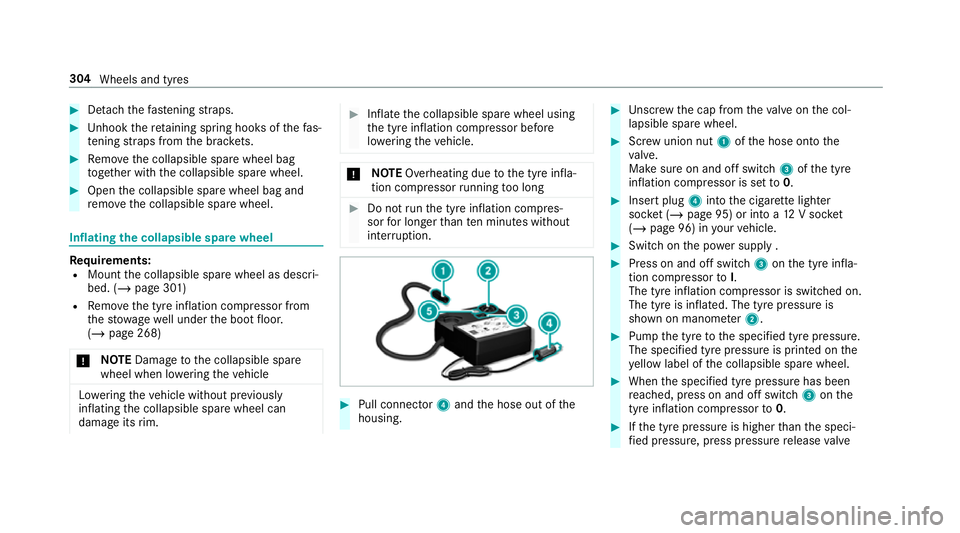
inter ruption. #
Pull connec tor4 and the hose out of the
housing. #
Unscr ew the cap from theva lve on the col‐
lapsible spare wheel. #
Screw union nut 1ofthe hose onto the
va lve.
Make sure on and off switch 3ofthe tyre
inflation compressor is set to0. #
Insert plug 4into the cigar ette lighter
soc ket (/ page 95) or into a 12V soc ket
( / page 96) in your vehicle. #
Switch on the po wer supp ly . #
Press on and off switch 3onthe tyre infla‐
tion compressor toI.
The tyre inflation compressor is switched on.
The tyre is inflated. The tyre pressure is
shown on manome ter2. #
Pump the tyre tothe specified tyre pressure.
The specified tyre pressure is printed on the
ye llow label of the collapsible spare wheel. #
When the specified tyre pressure has been
re ached, press on and off swit ch3 onthe
tyre inflation compressor to0. #
Ifth e tyre pressure is higher than the speci‐
fi ed pressure, press pressure release valve 304
Wheels and tyres
Page 381 of 409
Ac
tivating/deactivating the synchro‐
nisation function (cont rol panel) .......... 11 0
Ac tivating/deactivating the synchro‐
nisation function (multimedia sys‐
te m) ..................................................... 111
Air di stribution settings ........................ 11 0
Air-reci rculation mode .......................... 111
Au tomatic control ................................ 11 0
Climate style function .......................... 11 0
Demi sting windo ws.............................. 111
Fr ont air vents ...................................... 111
No te .................................................... 109
Setting the climate style ......................1 10
Switching on/off ................................. 109
THERMOTRONIC contro l panel ............109
Ve ntilating theve hicle (con venience
opening) ................................................ 70
Climate style
Fu nction ............................................... 11 0
Setting ................................................. 11 0
Cockpit ........................................................ .6
Overview .................................................6
Cof fee cup symbol
see ATTENTION ASSIST Collapsible spare wheel
.......................... 303
Inflating ............................................... 304
No tes .................................................. 303
Re moving ............................................ 303
Combination switch .................................. 99
Computer see On-board computer
Connection status
Displ aying ............................................ 227
Overview ............................................ .227
Connectivity Setting up a hotspot via business tel‐
ephony ................................................ 188
Switching transmission of theve hicle
position on/off .................................... 188
Contacts .................................................. .209
Calling up ............................................ 209
Deleting ............................................... 211
Downloading (from mobile phone) ...... 209
Impo rting ............................................ .210
Importing (o verview) ............................ 210
Information .......................................... 209
Making a call ....................................... 210
Na me form at ...................................... .209 Options ................................................
210
St oring .................................................2 10
Controller Operating ............................................ 180
Con venience closing ................................. 70
Con venience opening ................................ 70
Coolant (engine) Check le vel .......................................... 253
No tes ................................................... 312
Copyright .................................................. .28
Crosswind Assist Function/no tes ................................... 14 0
Cruise control .......................................... 14 3
Ac tivating ............................................ 14 4
Buttons ................................................ 14 4
Calling up a speed .............................. .144
Deactivating ........................................ 14 4
Fu nction .............................................. 14 3
Re quirements ...................................... 14 4
Selecting ............................................. 14 4
Setting a speed ................................... 14 4
St oring a speed ................................... 14 4
Sy stem limitations ...............................1 43378
Index
Page 398 of 409
Service centre
see Qualified specialist workshop
Service inter val display
see AS SYST PLUS
Setting a speed see Cruise control
Setting summer time ..............................187
Setting the da teform at .......................... 187
Setting the distance unit ........................ 191
SETUP (on-board computer, Perform‐
ance menu) .............................................. .171
Shift paddles see Steering wheel gearshift paddles
Shifting gears
Gea rshift recommendation .................. 124
Short messages see Text messa ges
Side impact airbag .................................... 35
Side windo ws............................................. 68
Au tomatic function ................................ 69
Closing .................................................. 68
Closing using theke y ............................ 70 Con
venience closing ............................. 70
Co nvenience opening ............................70
Opening .................................................68
Opening with theke y ............................ .70
Problem .................................................71
Ra in-closing feature .............................. .69
Smartphone see Android Auto
see Apple CarPlay™
see Mercedes-Benz Link
see Telephone
Snow chains ............................................ 285
Soc ket (12 V) ............................................. 96
Armrest ................................................ .96
Boot ....................................................... 96
Fr ont centre console ............................ .96
Soft top
Care .................................................... 260
Closing (soft- top switch) ........................ 72
Closing using theke y ............................ 70
Opening (so ft-top switch) ...................... 72
Opening with theke y ............................ .70
Problem .................................................75
Re locking .............................................. .74Soft-top switch
.......................................... 72
Software update ...................................... 194
Impor tant sy stem updates ...................1 95
Information .......................................... 194
Pe rforming ...........................................1 94
Sound PRE-SAFE ®
Sound ................................. 43
Wheels and tyres ................................. 285
Sound see Burmes ter®
sur round sound sy stem
see Tone settings
Sound settings Adjusting the balance/fader ................2 45
Ad justing treble, mid-range and bass
settings ............................................... 24 5
Au tomatic volume adjustment ............ .245
Spare wheel see Collapsible spa rewheel
Speed limitation for winter tyres
Setting ................................................. 14 6
Speedome ter
Digital ................................................. .174 Index
395