2018 MERCEDES-BENZ AMG GT ROADSTER oil
[x] Cancel search: oilPage 139 of 409
and do not
relie ve you of your responsibility per‐
ta ining toroad traf fic la w.Pay attention tothe
traf fic conditions at all times and inter vene
when necessa ry. Be aware of the limitations
re ga rding the safe use of these sy stems. Information about
radar senso rs Some driving and driving sa
fety sy stems use
ra dar sensors tomonitor the area in front of,
behind or next totheve hicle (depending on the
ve hicle's equipment).
Depending on theve hicle's equipment, thera dar
sensors are integrated behind the bumpers
and/or behind the Mercedes star. Keep these
parts free of dirt, ice and slush (/ page 260).
The sensors must not be co vered, forex ample
by cycle rack s, overhanging loads, sticke rs,fo il
or foils toprotect against stone chipping. In the
eve nt of dama getothe bumpers or radiator
grille, or following a collision impacting the
bumpers or radiator grille, ha vethe function of
th era dar sensors checked at a qualified special‐
ist workshop. The driver assis tance sy stem may
no longer workproperly. Overview of driving sy
stems and driving
saf ety sy stems In
this section, you will find information about
th efo llowing driving sy stems and driving saf ety
sy stems:
R ABS (A nti-lock Braking System)
(/ page 136)
R Active Dis tance Assi stDISTRONIC
(/ page 147)
R Adaptive Brake Lights (/ page142)
R AMG RIDE CONTROL (/ page156)
R Active Brake Assi st
R Lane Keeping Assist (/ page163)
R ATTENTION ASSIST (/ page161)
R BAS (Bra keAssist System) (/ page137)
R Hill Start Assist (/ page151)
R EBD ( Electronic Brakeforce Distribution)
(/ page 140)
R ESP ®
(Electronic Stability Program)
(/ page 137)
R HOLD fu nction (/ page 151) R
Limi ter (/ page144)
R Parking Assist PARKTRONIC (/ page157)
R Front and reve rsing camera (/ page159)
R RACE START (/ page 153)
R Cruise control (/ page 143)
R Blind Spot Assist (/ page162) Fu
nction of ABS (Anti-lock Braking Sy stem) ABS
regulates the brake pressure in critical driv‐
ing situations:
R During braking, e.g. at full brake application
or insuf ficient tyre traction, the wheels are
pr eve nted from lo cking.
R Vehicle steerability while braking is ensured.
If ABS inter venes when braking, you will feel a
pulsing in the brake pedal. The pulsating brake
pedal can be an indication of hazardous road
conditions and can ser veas a reminder totake
ex tra care while driving. 13 6
Driving and pa rking
Page 173 of 409
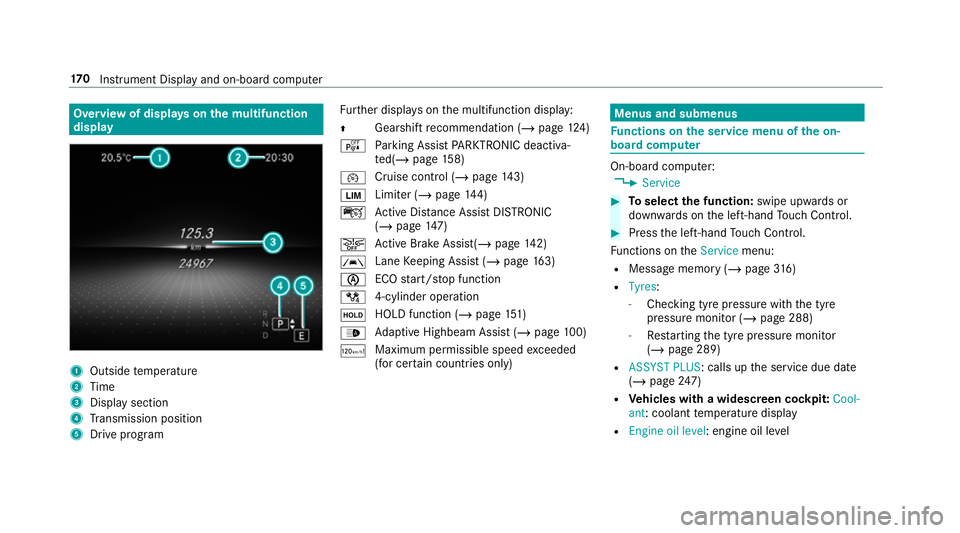
Overview of displa
yson the multifunction
display 1
Outside temp erature
2 Time
3 Display section
4 Transmission position
5 Drive prog ram Fu
rther displa yson the multifunction display:
Z Gearshift
recommendation (/ page 124)
é Parking Assist PARKTRONIC deacti va‐
te d(/ page 158)
¯ Cruise control (/
page143)
È Limi
ter (/ page144)
ç Active Dis tance Assi stDISTRONIC
(/ page 147)
æ Ac
tive Brake Assi st(/ page 142)
à Lane
Keeping Assist (/ page163)
è ECO
start/ stop function
/ 4-cylinder operation
ë HOLD function (/
page151)
_ Ad
aptive Highbeam Assist (/ page100)
ð Maximum permissible speed
exceeded
(for cer tain countries only) Menus and submenus
Fu
nctions on the service menu of the on-
board compu ter On-board computer:
4 Service #
Toselect the function: swipe upwards or
down wards on the left-hand Touch Control. #
Press the left-hand Touch Control.
Fu nctions on theService menu:
R Message memory (/ page316)
R Tyres :
- Chec king tyre pressure wi th the tyre
pressure monitor (/ page 288)
- Restarting the tyre pressure monitor
(/ page 289)
R ASSYST PLUS: calls up the service due date
(/ page 247)
R Vehicles with a widescreen cock pit:Cool-
ant: coolant temp erature display
R Engine oil level: engine oil le vel17 0
Instrument Display and on-board computer
Page 174 of 409
Calling up
the assistant display On-board computer:
4 Assistance
The following displa ysare available on the assis‐
ta nt displ aymenu:
R Assis tance graphic
R Attention le vel (/ page 161) #
Toswitch between the displa ys:swipe
upwards or down wards on the left-hand
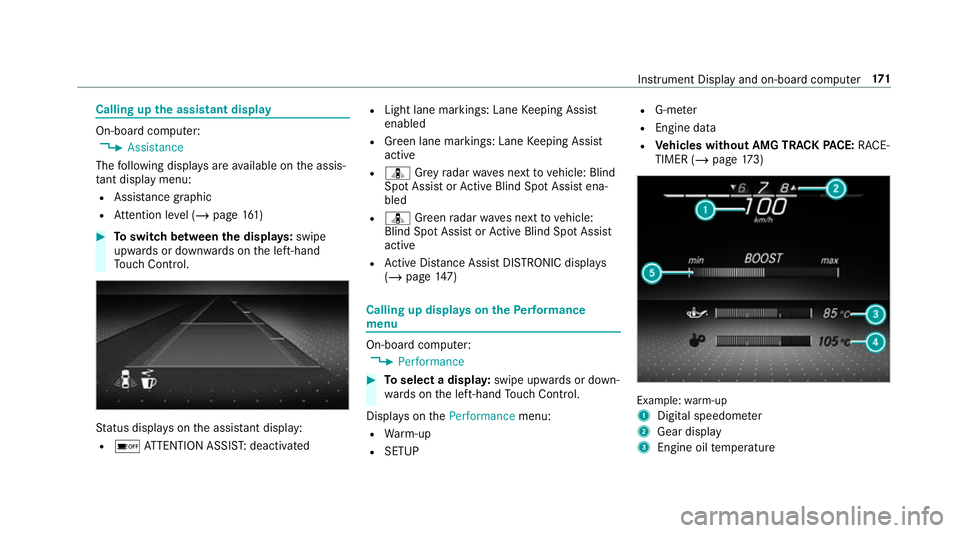
To uch Control. St
atus displa yson the assis tant displ ay:
R é ATTENTION ASSIS T:deactivated R
Light lane markings: Lane Keeping Assist
enabled
R Green lane markings: Lane Keeping Assist
active
R ¸ Grey radar waves next tovehicle: Blind
Spot Assist or Active Blind Spot Assi stena‐
bled
R ¸ Green radar waves next tovehicle:
Blind Spot Assist or Active Blind Spot Assi st
active
R Active Dis tance Assi stDISTRONIC displa ys
( / page 147) Calling up displa
yson thePe rformance
menu On-board computer:
4 Performance #
Toselect a displa y:swipe upwards or down‐
wa rds on the left-hand Touch Control.
Displa yson thePerformance menu:
R Warm-up
R SETUP R
G-me ter
R Engine da ta
R Vehicles without AMG TRACK PACE: RACE‐
TIMER (/ page173) Example:
warm-up
1 Digital speedom eter
2 Gear display
3 Engine oil temp erature Instrument Display and on-board computer
171
Page 175 of 409
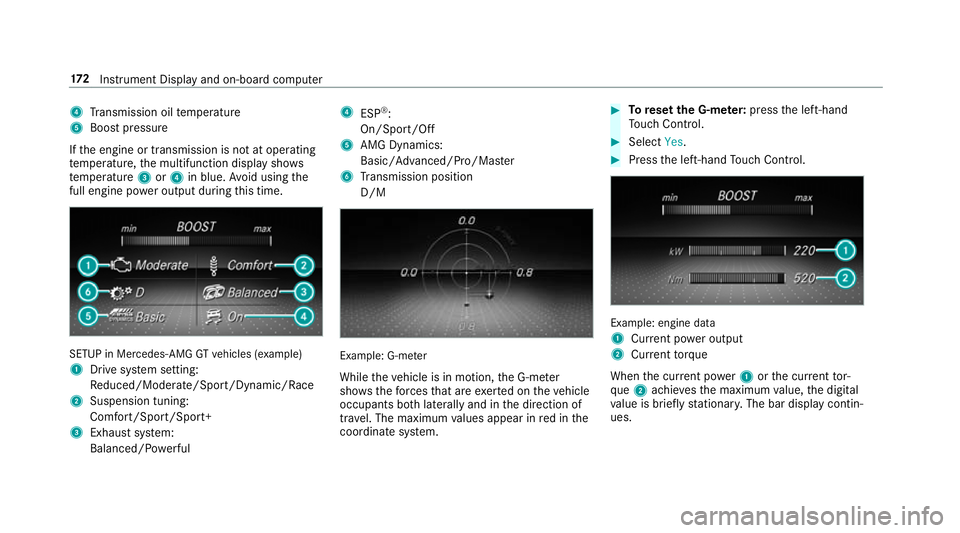
4
Transmission oil temp erature
5 Boost pressure
If th e engine or transmission is not at operating
te mp erature, the multifunction display sho ws
te mp erature 3or4 in blue. Avoid using the
full engine po wer output during this time. SETUP in Mercedes
-AMG GTvehicles (e xample)
1 Drive sy stem setting:
Re duced/Moderate/Spo rt/Dynamic/Race
2 Suspension tuning:
Comfort/Sport/Sport+
3 Exhau stsystem:
Balanced/ Powe rful 4
ESP®
:
On/Sport/Off
5 AMG Dynamics:
Basic/ Advanced/Pro/Ma ster
6 Transmission position
D/M Example: G-m
eter
While theve hicle is in motion, the G-me ter
sho wsthefo rc es that are exerted on theve hicle
occupants bo thlaterally and in the direction of
tra vel. The maximum values appear in red in the
coordinate sy stem. #
Toreset the G-m eter: press the left-hand
To uch Control. #
Select Yes. #
Press the left-hand Touch Control. Example: engine data
1
Current po wer output
2 Curr enttorque
When the cur rent po wer1 orthe cur rent tor‐
qu e2 achie vesth e maximum value, the digital
va lue is brief lystationar y.The bar display contin‐
ues. 17 2
Instrument Display and on-board computer
Page 200 of 409
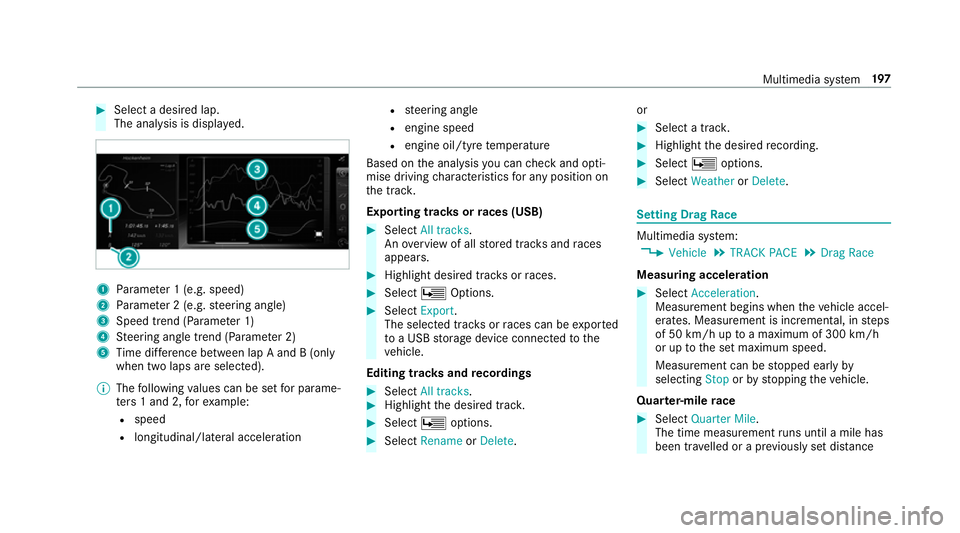
#
Select a desired lap.
The ana lysis is displa yed. 1
Parame ter 1 (e.g. speed)
2 Parame ter 2 (e.g. steering angle)
3 Speed trend (Parame ter 1)
4 Steering angle trend (Parame ter 2)
5 Time dif fere nce between lap A and B (only
when two laps are selected).
% The following values can be set for parame‐
te rs 1 and 2, forex ample:
R speed
R longitudinal/lateral acceleration R
steering angle
R engine speed
R engine oil/tyre temp erature
Based on the analysis you can check and opti‐
mise driving characteristics for any position on
th e trac k.
Exporting trac ksorraces (USB) #
Select All tracks.
An ove rview of all stored trac ksand races
appea rs. #
Highlight desired trac ksorraces. #
Select ÜOptions. #
Select Export.
The selected trac ksorraces can be expor ted
to a USB storage device connected tothe
ve hicle.
Editing trac ksand recordings #
Select All tracks. #
Highlight the desired trac k. #
Select Üoptions. #
Select Rename orDelete. or #
Select a trac k. #
Highlight the desired recording. #
Select Üoptions. #
Select Weather orDelete. Setting Drag
Race Multimedia sy
stem:
4 Vehicle 5
TRACK PACE 5
Drag Race
Measuring acceleration #
Select Acceleration.
Measurement begins when theve hicle accel‐
erates. Measurement is incremental, in steps
of 50 km/h up toa maximum of 300 km/h
or up tothe set maximum speed.
Measurement can be stopped early by
selecting Stoporby stopping theve hicle.
Quar ter-mile race #
Select Quarter Mile.
The time measurement runs until a mile has
been tr avelled or a pr eviously set dis tance Multimedia sy
stem 197
Page 251 of 409
R
frequent operation in mountainous terrain or
on poor road sur faces
R when the engine is of ten le ftidling for long
periods
R operation in particula rly dusty conditions
and/or if air-recirculation mode is frequently
used
In these or similar operating conditions, ha vethe
interior air filter, engine air cleaner, engine oil
and oil filter etc. changed more frequent ly. The
tyres must be checked more frequently if the
ve hicle is operated under increased loads. Fur‐
th er information can be obtained at a qualified
specialist workshop. Battery disconnection periods
The ASS
YST PLUS se rvice inter val display
can only calculate the service due da tewhen
th e bat tery is connected. #
Notedown the service due date displa yed on
th e instrument display before disconnecting
th e battery (/ page247). Engine com
partment Opening/closing the bonnet
&
WARNING Risk of accident due todriv‐
ing with the engine bonn etunlo cked
An unloc ked engine bonn etmay open up
when theve hicle is in motion and block your
vie w. #
Never unlock the engine bonn etwhen
driving. #
Before every trip, ensure that the
engine bonn etis loc ked. &
WARNING Risk of accident and inju ry
when opening and closing the engine
bonn et
When opening or closing the engine bonn et,
it may suddenly drop into the end position.
There is a risk of injury for an yone in the
engine bonn et's range of mo vement. #
Only open or close the engine bonn et
when there are no persons in the
engine bonn et's range of mo vement. &
WARNING Danger of bu rns when open‐
ing the bonn et
If yo u open the engine bonn etwhen the
engine has overheated or during a fire inthe
engine compartment, you could come into
contact with hot gases or other escaping
operating fluids. #
Before opening the bonn et, allow the
engine tocool down. #
Intheeve nt of a fire inthe engine com‐
partment, keep the engine bonn et
closed and call thefire service. &
WARNING Risk of inju rydue tomoving
parts
Cer tain components in the engine compart‐
ment may continue tomo veor suddenly
mo veagain even af terth e ignition has been
switched off, e.g. the cooler fan. 248
Maintenance and care
Page 253 of 409
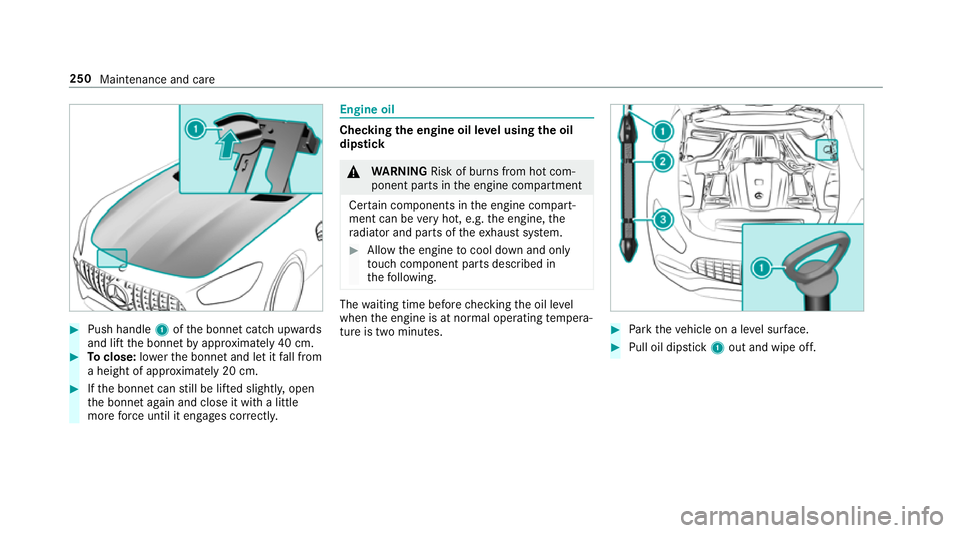
#
Push handle 1ofthe bonn etcatch up wards
and lift the bonn etby appr oximately 40 cm. #
Toclose: lowe rth e bonn etand let it fall from
a height of appr oximately 20 cm. #
Ifth e bonn etcan still be lif ted slightl y,open
th e bonn etagain and close it with a little
more forc e until it engages cor rectly. Engine oil
Che
cking the engine oil le vel using the oil
dip stick &
WARNING Risk of bu rns from hot com‐
ponent parts in the engine compartment
Cer tain components in the engine compart‐
ment can be very hot, e.g. the engine, the
ra diator and parts of theex haust sy stem. #
Allow the engine tocool down and only
to uch co mponent parts described in
th efo llowing. The
waiting time before checking the oil le vel
when the engine is at normal operating temp era‐
ture is two minutes. #
Park theve hicle on a le vel sur face. #
Pull oil dipstick 1out and wipe off. 250
Maintenance and care
Page 254 of 409
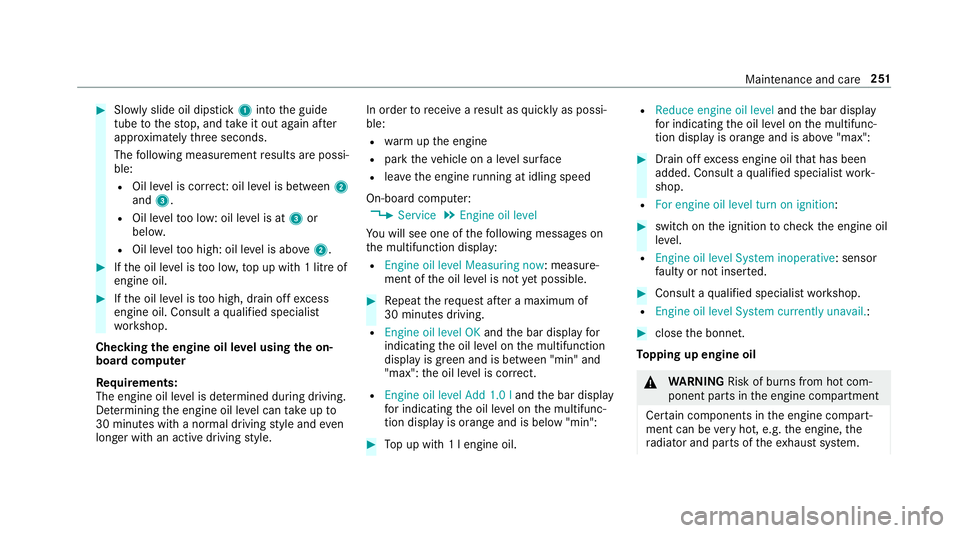
#
Slowly slide oil dipstick 1into the guide
tube tothestop, and take it out again af ter
appr oximately thre e seconds.
The following measurement results are possi‐
ble:
R Oil le vel is cor rect: oil le vel is between 2
and 3.
R Oil le velto o low: oil le vel is at 3or
belo w.
R Oil le velto o high: oil le vel is abo ve2 . #
Ifth e oil le vel is too lo w,top up with 1 litre of
engine oil. #
Ifth e oil le vel is too high, drain off excess
engine oil. Consult a qualified specialist
wo rkshop.
Checking the engine oil le vel using the on-
board compu ter
Re quirements:
The engine oil le vel is de term ined during driving.
De term ining the engine oil le vel can take up to
30 minutes with a normal driving style and even
longer with an active driving style. In order
torecei veare sult as quickly as possi‐
ble:
R warm upthe engine
R park theve hicle on a le vel sur face
R leave the engine running at idling speed
On-board compu ter:
4 Service 5
Engine oil level
Yo u will see one of thefo llowing messages on
th e multifunction display:
R Engine oil level Measuring now : measure‐
ment of the oil le vel is not yet possible. #
Repeat there qu est af ter a maximum of
30 minutes driving.
R Engine oil level OK andthe bar display for
indicating the oil le vel on the multifunction
display is green and is between "min" and
"max": the oil le vel is cor rect.
R Engine oil level Add 1.0 l andthe bar display
fo r indicating the oil le vel on the multifunc‐
tion display is orange and is below "min": #
Top up with 1 l engine oil. R
Reduce engine oil level andthe bar display
fo r indicating the oil le vel on the multifunc‐
tion display is orange and is abo ve"max": #
Drain off excess engine oil that has been
added. Consult a qualified specialist work‐
shop.
R For engine oil level turn on ignition: #
switch on the ignition tocheck the engine oil
le ve l.
R Engine oil level System inoperative : sensor
fa ulty or not inser ted. #
Consult a qualified specialist workshop.
R Engine oil level System currently unavail. : #
close the bonn et.
To pping up engine oil &
WARNING Risk of bu rns from hot com‐
ponent parts in the engine compartment
Cer tain components in the engine compart‐
ment can be very hot, e.g. the engine, the
ra diator and parts of theex haust sy stem. Maintenance and care
251