2018 MERCEDES-BENZ AMG GT ROADSTER air condition
[x] Cancel search: air conditionPage 56 of 294

sive role in the deployment of an air bag. Nor do
they provide an indication of air bag deploy-
ment.
The vehicle can be deformed considerably, with-
out an air bag being deployed. This is the case if only parts which are relatively easily deformed
are affected and the rate of deceleration is not
high. Conversely, air bags may be deployed even
though the vehicle suffers only minor deforma-
tion. This is the case if, for example, very rigid
vehicle parts such as longitudinal body mem-
bers are hit, and sufficient deceleration occurs
as a result.
If the restraint system control unit detects a side
impact or if the vehicle rolls over, the applicable
components of the restraint system are
deployed independently of each other depend-
ing on the apparent type of accident.
RSide impact air bag on the side of impact,
independently of the Emergency Tensioning
Device and the use of the seat belt on the
driver's seat
The side impact air bag on the front-
passenger side deploys under the following
conditions:
-the OCS system detects that the front-
passenger seat is occupied or
-the seat belt buckle tongue is engaged in
the belt buckle of the front-passenger seat
RHead bag on the side of impact, independ-
ently of the use of the seat belt and inde-
pendently of whether the front-passenger
seat is occupied
REmergency Tensioning Devices, if the system
determines that deployment can offer addi-
tional protection in this situation
RHead bags on the driver's and front-
passenger side in certain situations when the
vehicle rolls over, if the system determines
that deployment can offer additional protec-
tion to that provided by the seat belt
iNot all air bags are deployed in an accident.
The different air bag systems work independ-
ently of each other.
How the air bag system works is determined
by the severity of the accident detected,
especially the vehicle deceleration or accel-
eration and the apparent type of accident:
RFrontal collision
RSide impact
RRollover
PRE-SAFE®(anticipatory occupant
protection system)
Introduction
In certain hazardous situations, PRE-SAFE®
takes pre-emptive measures to protect the vehi-
cle occupants.
Important safety notes
!Make sure that there are no objects in the
footwell or behind the seats. There is a danger that the seats and/or objects could be dam-
aged when PRE-SAFE
®is activated.
Despite your vehicle being equipped with the
PRE-SAFE
®system, the possibility of personal
injuries occurring as a result of an accident can-
not be eliminated. Always adapt your driving
style to suit the prevailing road and weather
conditions and maintain a safe distance from
the vehicle in front. Drive carefully.
Function
PRE-SAFE®intervenes:
Rin emergency braking situations, e.g. when
BAS is activated
Rin critical driving situations, e.g. when physi-
cal limits are exceeded and the vehicle under-
steers or oversteers severely
Ron vehicles with Distance Pilot DISTRONIC:
when active, Brake Assist intervenes power-
fully
PRE-SAFE
®takes the following measures
depending on the hazardous situation detected:
Rthe front seat belts are pre-tensioned.
Rif the vehicle skids, the side windows are
closed.
Rvehicles with the memory function for the
front-passenger seat: the front-passenger
seat is adjusted if it is in an unfavorable posi-
tion.
If the hazardous situation passes without result-
ing in an accident, PRE-SAFE
®slackens the belt
pre-tensioning. All settings made by PRE-SAFE®
can then be reversed.
54Occupant safety
Safety
Page 60 of 294

Pets in the vehicle
GWARNING
If you leave animals unattended or unsecured
in the vehicle, they could press buttons or
switches, for example.
As a result, they could:
Ractivate vehicle equipment and become
trapped, for example
Ractivate or deactivate systems, thereby
endangering other road users
Unsecured animals could also be flung around
the vehicle in the event of an accident or sud-
den steering or braking, thereby injuring vehi-
cle occupants. There is a risk of an accident
and injury.
Never leave animals unattended in the vehi-
cle. Always secure animals properly during
the journey, e.g. use a suitable animal trans-
port box.
Driving safety systems
Overview of driving safety systems
In this section, you will find information about
the following driving safety systems:
RABS (Anti-lock BrakingSystem)
(Ypage 58)
RBAS ( Brake Assist System) (Ypage 59)
RActive Brake Assist (Ypage 59)
RESP®(Electronic StabilityProgram)
(Ypage 62)
REBD ( Electronic Brake force Distribution)
(Ypage 64)
RADAPTIVE BRAKE (Ypage 64)
Important safety notes
If you fail to adapt your driving style or if you are
inattentive, the driving safety systems can nei-
ther reduce the risk of an accident nor override the laws of physics. Driving safety systems are
merely aids designed to assist driving. You are
responsible for maintaining the distance to the
vehicle in front, for vehicle speed, for braking in good time, and for staying in lane. Always adapt
your driving style to suit the prevailing road and weather conditions and maintain a safe distance
from the vehicle in front. Drive carefully.
The driving safety systems described only work
as effectively as possible when there is ade-
quate contact between the tires and the road
surface. Please pay special attention to the
notes on tires, recommended minimum tire
tread depths, etc. (
Ypage 261).
In wintry driving conditions, always use winter
tires (M+S tires) and if necessary, snow chains.
Only in this way will the driving safety systems
described in this section work as effectively as
possible.
ABS (Anti-lock Braking System)
General information
ABS regulates brake pressure in such a way that
the wheels do not lock when you brake. This
allows you to continue steering the vehicle when
braking.
The ! ABS warning lamp in the instrument
cluster lights up when the ignition is switched
on. It goes out when the engine is running.
ABS works from a speed of about 5 mph
(8 km/h), regardless of road-surface conditions.
ABS works on slippery surfaces, even when you
only brake gently.
Important safety notes
iObserve the "Important safety notes" sec-
tion (Ypage 58).
GWARNING
If ABS is faulty, the wheels could lock when
braking. The steerability and braking charac-
teristics may be severely impaired. Addition-
ally, further driving safety systems are deac-
tivated. There is an increased danger of skid-
ding and accidents.
Drive on carefully. Have ABS checked imme-
diately at a qualified specialist workshop.
When ABS is malfunctioning, other systems,
including driving safety systems, will also
become inoperative. Observe the information
on the ABS warning lamp (
Ypage 200) and dis-
58Driving safety systems
Safety
Page 61 of 294
play messages which may be shown in the
instrument cluster (Ypage 175).
Brakes
XIf ABS intervenes:continue to depress the
brake pedal vigorously until the braking sit-
uation is over.
XTo make a full brake application: depress
the brake pedal with full force.
If ABS intervenes when braking, you will feel a
pulsing in the brake pedal.
The pulsating brake pedal can be an indication
of hazardous road conditions, and functions as a reminder to take extra care while driving.
BAS (Brake Assist System)
General information
BAS operates in emergency braking situations.
If you depress the brake pedal quickly, BAS
automatically boosts the braking force, thus
shortening the stopping distance.
Important safety notes
iObserve the "Important safety notes" sec-
tion (Ypage 58).
GWARNING
If BAS is malfunctioning, the braking distance
in an emergency braking situation is
increased. There is a risk of an accident.
In an emergency braking situation, depress
the brake pedal with full force. ABS prevents
the wheels from locking.
Braking
XKeep the brake pedal firmly depressed until
the emergency braking situation is over.
ABS prevents the wheels from locking.
The brakes will function as usual once you
release the brake pedal. BAS is deactivated.
Active Brake Assist
General information
iObserve the "Important safety notes" sec-
tion (Ypage 58).
Active Brake Assist consists of a distance warn-
ing function with an autonomous braking func-
tion and situation-dependent braking assis-
tance.
Active Brake Assist can help you to minimize the
risk of a collision with the vehicle traveling in
front or reduce the effects of such a collision.
If Active Brake Assist detects that there is a risk
of collision, you will be warned visually and
acoustically. If you do not react to the visual and audible collision warning, autonomous braking
can be initiated in critical situations. If you apply
the brake yourself in a critical situation, Active
Brake Assist supports you with situation-
dependent braking assistance.
Important safety notes
In particular, the detection of obstacles can be
impaired if:
Rthere is dirt on the sensors or anything else
covering the sensors
Rthere is snow or heavy rain
Rthere is interference by other radar sources
Rthere are strong radar reflections, for exam-
ple in parking garages
Ra narrow vehicle is traveling in front, e.g. a
motorbike
Ra vehicle is traveling in front on a different line
Ryou are driving a new vehicle or servicing on
the Active Brake Assist system has just been
carried out
Observe the important safety notes in the
"Breaking-in notes" section (
Ypage 109).
Following damage to the front end of the vehicle,
have the configuration and operation of the
radar sensor checked at a qualified specialist
workshop. This also applies to collisions at slow
speeds where there is no visible damage to the
front of the vehicle.
Activating/deactivating
Active Brake Assist is automatically active after
switching on the ignition.
Driving safety systems59
Safety
Z
Page 82 of 294

Soft top (Roadster)
Important safety notes
GWARNING
If you do not fully open/close the soft top, the
soft-top hydraulics depressurize after a short
time. This causes the soft top to lower unex-
pectedly and may cause you or others to be
trapped. There is a risk of injury.
Always open or close the soft top completely.
!Never sit on the soft top or store heavy
objects on it. You will otherwise damage the
vehicle soft top and soft-top covers.
!When opening and closing the soft top,
make sure that:
Rthere is sufficient clearance above it, as the
soft top swings upwards
Rthere are no objects on the soft top or the
soft-top covers to the side
Rthe fabric is not dirty, wet or frozen
Rthe outside temperature is above -10 †
You could otherwise damage the soft top as
well as other parts of the vehicle.
Take the height of the vehicle into account when
opening and closing the soft top (
Ypage 291).
Make sure that the soft top is dry and clean
before opening or closing it. Otherwise, water or
dirt could enter the vehicle interior or trunk.
You can open or close the soft top:
Rwhen the vehicle is stationary or
Rwhen you do not exceed a speed of 31 mph
(50 km/h) (max. 37 mph (60 km/h), to avoid
interrupting the closing process while slightly
exceeding this speed)
If there is a strong head wind, it may not be pos-
sible to close the soft top fully. In order to close
the soft top fully, reduce your speed or stop the
vehicle in accordance with the traffic condi-
tions.
For safety reasons, Mercedes-Benz recom-
mends that you only open or close the soft top
when the vehicle is stationary.
If the soft top does not open or close fully, the
soft-top hydraulics are depressurized and the
soft top is lowered:
Rafter approximately 7 minutes when the igni-
tion is switched on
Rafter about
20 seconds if the ignition is switched off
Opening/closing with the soft top
switch
Important safety notes
GWARNING
When opening or closing the soft top, there is a risk that parts of the body could become
trapped by moving parts such as the roof
mechanism, the trunk lid, or the side win-
dows. There is a risk of injury.
When opening or closing the roof, make sure
that no parts of the body are in the vicinity of
moving parts. Release the switch if somebody
becomes trapped.
GWARNING
If the vehicle speed exceeds 35 mph
(60 km/h), the soft top stops during the open- ing or closing process. This impairs your view
to the rear. There is a risk of an accident.
Reduce your speed to below 35 mph
(60 km/h) or stop the vehicle in accordance
with the traffic conditions. Press or pull the
soft-top switch again in order to open or close
the soft top fully.
Opening and closing
XSelect SmartKey position 2with the Start/
Stop button (Ypage 110).
XWhen the vehicle is stationary, depress the
brake pedal and keep it depressed.
80Soft top (Roadster)
Opening and closing
Page 86 of 294
Correct driver's seat position
GWARNING
You could lose control of your vehicle if you do the following while driving:
Radjust the driver's seat, head restraint,
steering wheel or mirrors
Rfasten the seat belt
There is a risk of an accident.
Adjust the driver's seat, head restraint, steer-
ing wheel and mirror and fasten your seat belt before starting the engine.
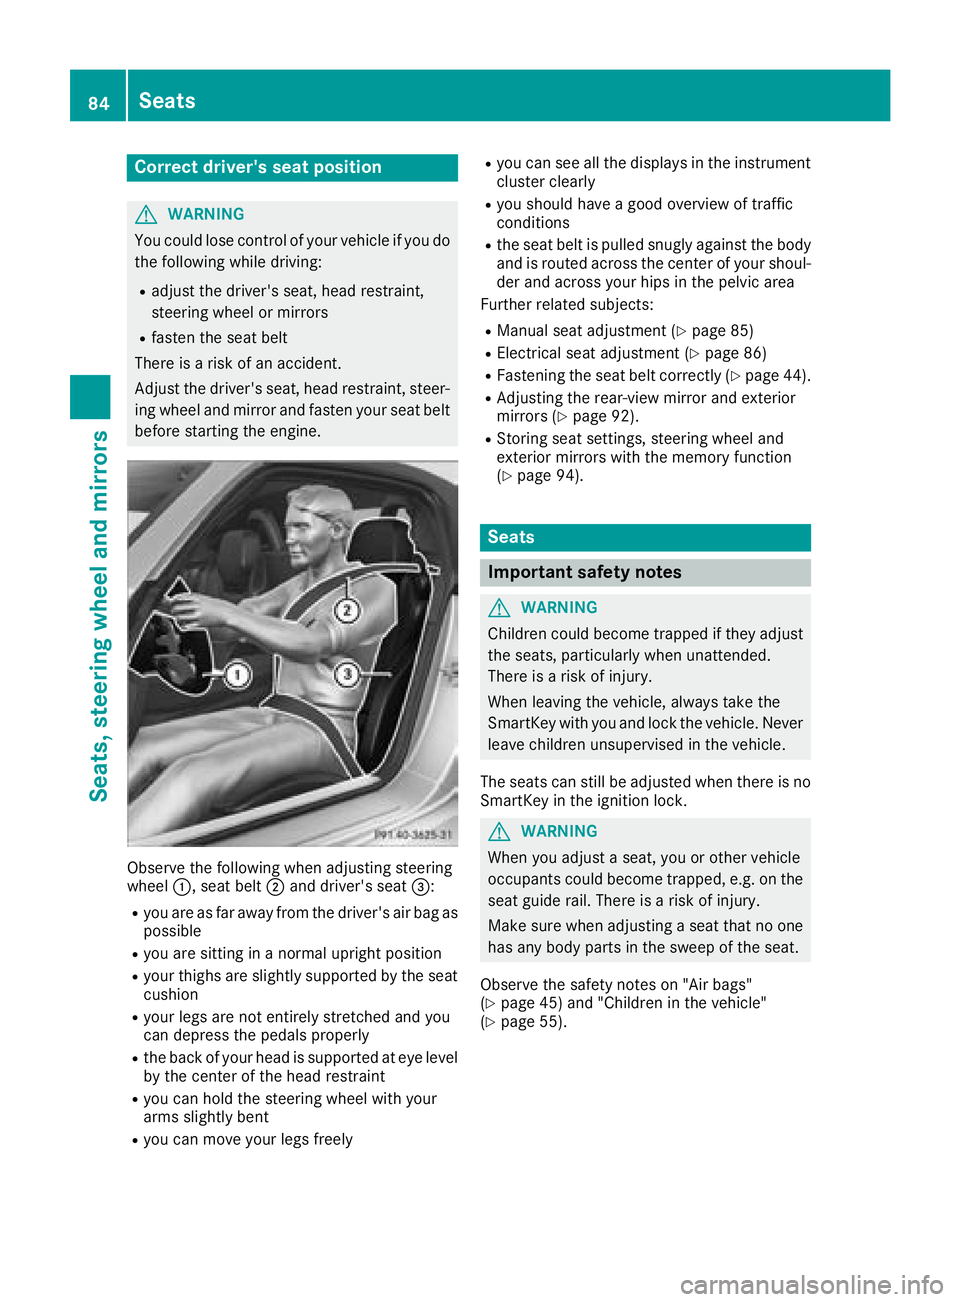
Observe the following when adjusting steering
wheel :, seat belt ;and driver's seat =:
Ryou are as far away from the driver's air bag as
possible
Ryou are sitting in a normal upright position
Ryour thighs are slightly supported by the seat
cushion
Ryour legs are not entirely stretched and you
can depress the pedals properly
Rthe back of your head is supported at eye level
by the center of the head restraint
Ryou can hold the steering wheel with your
arms slightly bent
Ryou can move your legs freely
Ryou can see all the displays in the instrument
cluster clearly
Ryou should have a good overview of traffic
conditions
Rthe seat belt is pulled snugly against the body and is routed across the center of your shoul-
der and across your hips in the pelvic area
Further related subjects:
RManual seat adjustment (Ypage 85)
RElectrical seat adjustment (Ypage 86)
RFastening the seat belt correctly (Ypage 44).
RAdjusting the rear-view mirror and exterior
mirrors (Ypage 92).
RStoring seat settings, steering wheel and
exterior mirrors with the memory function
(
Ypage 94).
Seats
Important safety notes
GWARNING
Children could become trapped if they adjust
the seats, particularly when unattended.
There is a risk of injury.
When leaving the vehicle, always take the
SmartKey with you and lock the vehicle. Never
leave children unsupervised in the vehicle.
The seats can still be adjusted when there is no
SmartKey in the ignition lock.
GWARNING
When you adjust a seat, you or other vehicle
occupants could become trapped, e.g. on the seat guide rail. There is a risk of injury.
Make sure when adjusting a seat that no one
has any body parts in the sweep of the seat.
Observe the safety notes on "Air bags"
(
Ypage 45) and "Children in the vehicle"
(Ypage 55).
84Seats
Seats, steering wheel and mirrors
Page 95 of 294
Exterior mirror pushed out of position
If an exterior mirror has been pushed out of
position, proceed as follows:
XPress and hold button?until you hear a click
and the mirror engages audibly into position
(
Ypage 92).
The mirror housing is engaged again and you
can adjust the exterior mirrors as usual
(
Ypage 92).
Automatic anti-glare mirrors
GWARNING
Electrolyte may escape if the glass in an auto-
matic anti-glare mirror breaks. The electrolyte
is harmful and causes irritation. It must not
come into contact with your skin, eyes, res-
piratory organs or clothing or be swallowed.
There is a risk of injury.
If you come into contact with the electrolyte,
observe the following:
RRinse off the electrolyte from your skin
immediately with water.
RImmediately rinse the electrolyte out of
your eyes thoroughly with clean water.
RIf the electrolyte is swallowed, immediately
rinse your mouth out thoroughly. Do not
induce vomiting.
RIf electrolyte comes into contact with your
skin or hair or is swallowed, seek medical
attention immediately.
RImmediately change out of clothing which
has come into contact with electrolyte.
RIf an allergic reaction occurs, seek medical
attention immediately.
The rear-view mirror and the exterior mirror on
the driver's side automatically go into anti-glare
mode if the following conditions are met simul-
taneously:
Rthe ignition is switched on
Rincident light from headlamps strikes the sen-
sor in the rear-view mirror
The mirrors do not go into anti-glare mode if
reverse gear is engaged or if the interior lighting is switched on.
Parking position for the exterior mir-
ror on the front-passenger side
Storing the parking position
You can position the front-passenger side exte- rior mirror in such a way that you can see the
rear wheel on that side as soon as you engage
reverse gear. You can store this position.
Using reverse gear
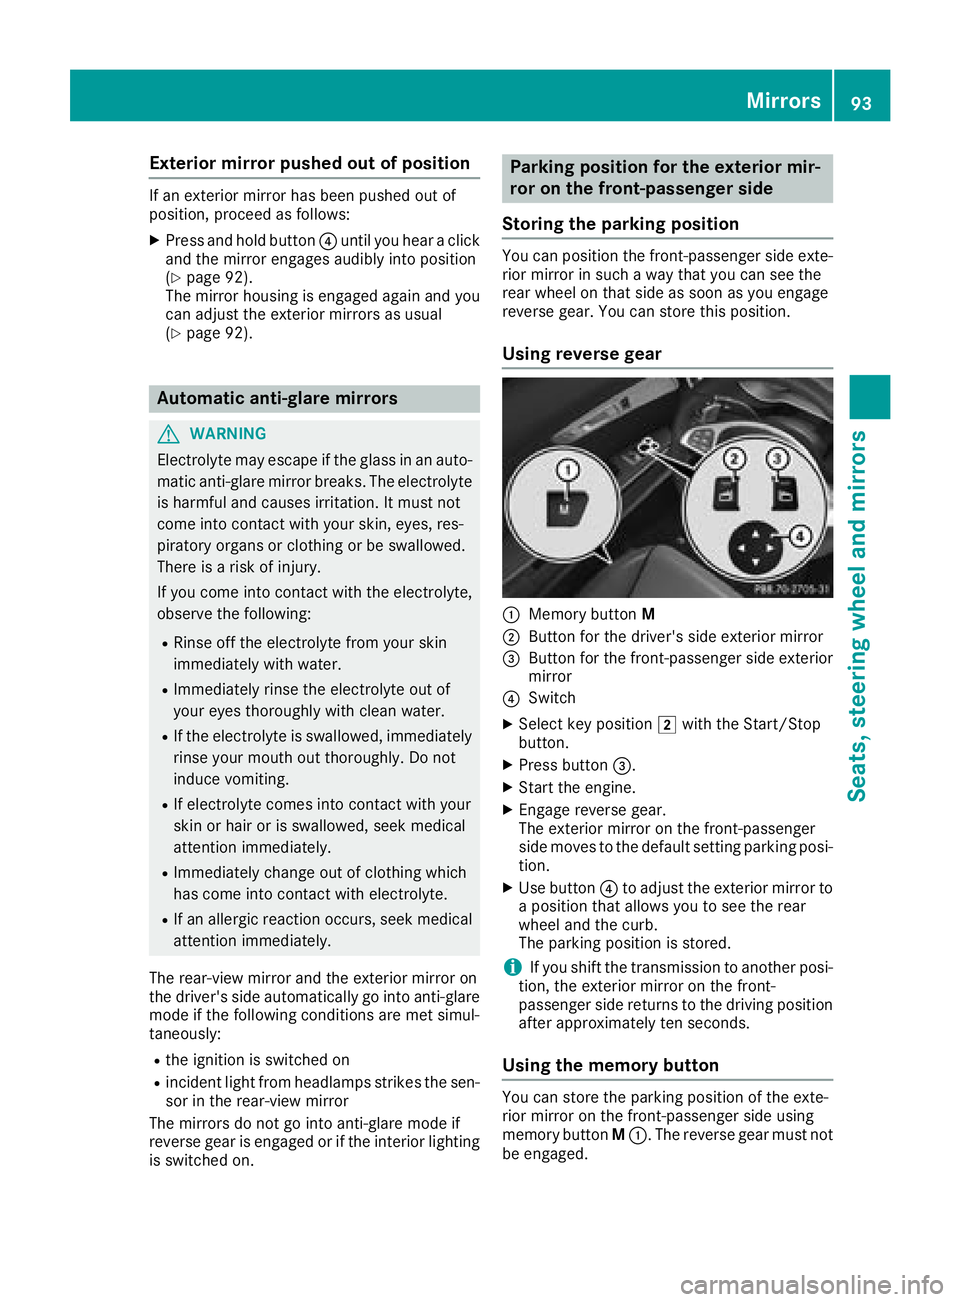
:Memory button M
;Button for the driver's side exterior mirror
=Button for the front-passenger side exterior
mirror
?Switch
XSelect key position 2with the Start/Stop
button.
XPress button =.
XStart the engine.
XEngage reverse gear.
The exterior mirror on the front-passenger
side moves to the default setting parking posi-
tion.
XUse button ?to adjust the exterior mirror to
a position that allows you to see the rear
wheel and the curb.
The parking position is stored.
iIf you shift the transmission to another posi-
tion, the exterior mirror on the front-
passenger side returns to the driving position
after approximately ten seconds.
Using the memory button
You can store the parking position of the exte-
rior mirror on the front-passenger side using
memory button M:. The reverse gear must not
be engaged.
Mirrors93
Seats, steering wheel and mirrors
Z
Page 102 of 294
Automa tic interi orlighting control
XTo switch on or off :press th e| button.
When th eautomatic interior lighting control is
activated, th ebutto nis flus hwit hth eover-
head control panel.
The interior lighting automatically switches on if
you:
Runloc kth evehicl e
Ropenadoor
Rswitch off th eengin ewit hth eStart/Sto pbut -
to n
The interior lighting is activated for ashort time
when th eengin eis switched off wit hth eStart /
Stop button. This delaye dswitch-off can be
adjusted via th emultimedia system (see Digital
Operator' sManual).
Replacing bulbs
The fron tand rear ligh tclusters of your vehicl e
are equipped wit hLE Dligh tbulbs .Do no t
replace th ebulbs yourself .Contac t aqualified
specialis tworkshop whic hhas th enecessar y
specialis tknowledge and tools to carry out th e
wor krequired.
Lamps are an important aspect of vehicl esafety.
You mus ttherefor emak esur ethat these func-
tion correctl yat all times .Hav eth eheadlamp
setting checke dregularly.
Windshield wipers
Switching the windshield wipers
on/off
!
Do no toperate th ewindshield wiper swhen
th ewindshield is dry, as this could damag e
th ewiper blades. Moreover, dust that has col-
lecte don th ewindshield can scratch th eglas s
if wipin gtakes plac ewhen th ewindshield is
dry.
If it is necessar yto switch on th ewindshield
wiper sin dry weather conditions, always use
washer fluid when operating th ewindshield
wipers.
!If th ewindshield wiper sleav esmears on th e
windshield after th evehicl ehas been washed
in an automatic car wash ,wax or other resi-
dues may be th ereason for this. Clean th ewindshield usin
gwasher fluid after washing
th evehicl ein an automatic car wash .
!Intermittent wipingwit hrain sensor :due to
optical influence sand th ewindshield becom-
ing dirty in dry weather conditions, th ewind-
shield wiper smay be activated inadvertently.
This could then damag eth ewindshield wiper
blade sor scratch th ewindshield.
Fo rthis reason ,you should always switch off
th ewindshield wiper sin dry weather .
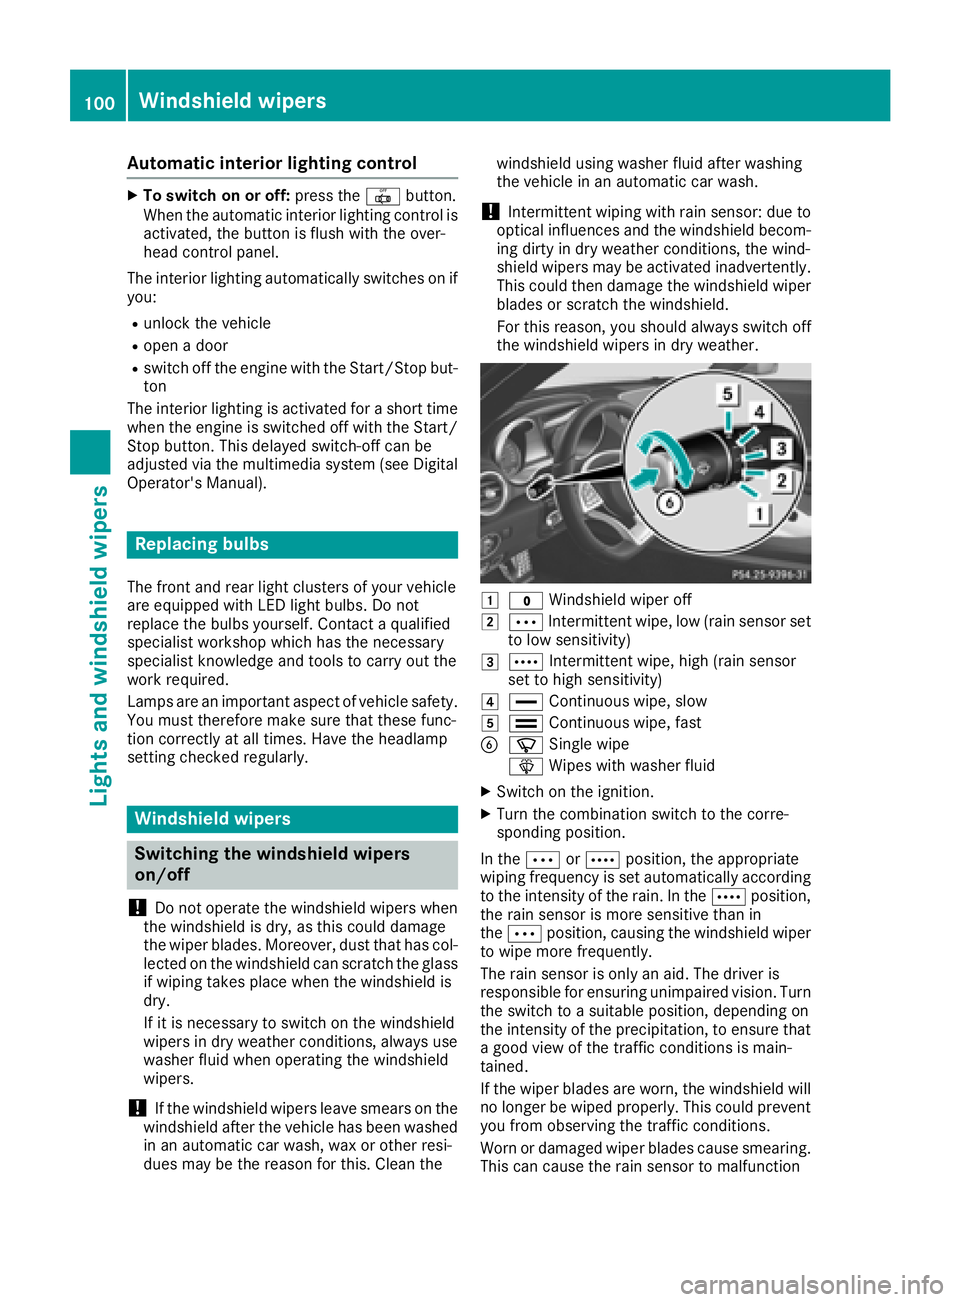
1$Windshield wiper off
2ÄIntermittent wipe, low (rai nsensor set
to low sensitivity)
3Å Intermittent wipe, high (rai nsensor
set to high sensitivity)
4° Continuous wipe, slow
5¯Continuous wipe, fas t
BíSingle wipe
î Wipeswit hwasher fluid
XSwitc hon th eignition .
XTurn thecombination switch to th ecorre-
sponding position .
In th eÄ orÅ position ,th eappropriat e
wipin gfrequency is set automatically according
to th eintensit yof th erain .In th eÅ position ,
th erain sensor is mor esensitive than in
th eÄ position ,causing th ewindshield wiper
to wipe mor efrequently.
The rain sensor is only an aid. The driver is
responsibl efor ensuring unimpaired vision .Turn
th eswitch to asuitable position ,depending on
th eintensit yof th eprecipitation ,to ensur ethat
a goo dvie wof th etraffic condition sis main -
tained.
If th ewiper blade sare worn, th ewindshield will
no longer be wiped properly. This could preven t
you from observing th etraffic conditions.
Wor nor damaged wiper blade scaus esmearing.
This can caus eth erain sensor to malfunction
100Windshield wipers
Lights and windshield wipers
Page 105 of 294
Overview of climate control systems
General notes
Observe the settings recommended on the fol-
lowing pages. The windows could otherwise fog
up.
To prevent the windows from fogging up:
Rswitch off climate control only briefly
Rswitch on air-recirculation mode only briefly
Rswitch on the cooling with air dehumidifica-
tion function
Ractivate the "Windshield defrosting" function
briefly, if required
Climate control regulates the temperature and
air humidity in the vehicle interior. The interior
filter cleans the air, thus improving the interior
climate.
The cooling with air dehumidification function is
only available when the engine is running. Opti-
mum climate control is only achieved with the
side windows closed.
iVentilate the vehicle for a brief period during
warm weather, e.g. using the convenience
opening feature (
Ypage 78). This will speed
up the cooling process and the desired inte-
rior temperature will be reached more
quickly.
iThe integrated filter filters out most parti-
cles of dust and soot and completely filters
out pollen. It also reduces gaseous pollutants
and odors. A clogged filter reduces the
amount of air supplied to the vehicle interior.
Depending on the operating conditions and
environmental influences, the interval for
replacing the filter may be shorter than speci-
fied.
iIt is possible that the blower may be activa-
ted automatically 60 minutes after the engine
has been switched off depending on various
factors, e.g. the outside temperature. The
vehicle is then ventilated for 30 minutes to dry
the climate control system.
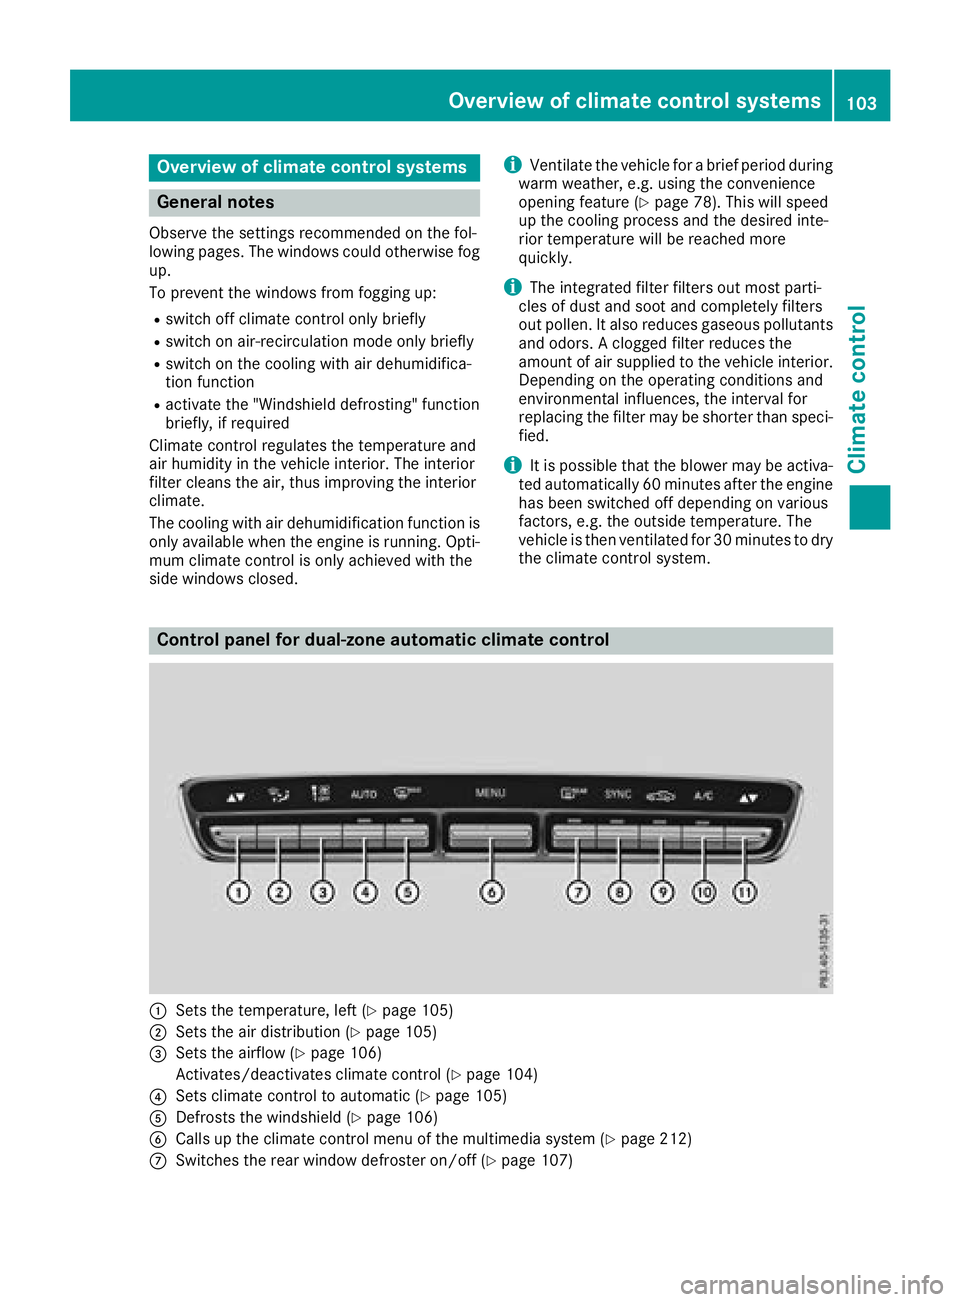
Control panel for dual-zone automatic climate control
:Sets the temperature, left (Ypage 105)
;Sets the air distribution (Ypage 105)
=Sets the airflow (Ypage 106)
Activates/deactivates climate control (
Ypage 104)
?Sets climate control to automatic (Ypage 105)
ADefrosts the windshield (Ypage 106)
BCalls up the climate control menu of the multimedia system (Ypage 212)
CSwitches the rear window defroster on/off (Ypage 107)
Overview of climate control systems103
Climate control