2018 MERCEDES-BENZ AMG GT ROADSTER ECU
[x] Cancel search: ECUPage 76 of 294

Always store objects so that they cannot be
flung around. Secure objects, luggage or
loads against slipping or tipping before the
journey.
!The trunk lid swings upwards when opened.
Therefore, make sure that there is sufficient
clearance above the trunk lid.
The opening dimensions of the trunk lid can be
found in the "Vehicle data" section
(
Ypage 291).
If the rear spoiler has been extended manually,
the height when opened is higher by this
amount. If in doubt, retract the rear spoiler again
manually before opening the trunk lid
(
Ypage 228).
Do not leave the SmartKey in the trunk. You
could otherwise lock yourself out.
You should preferably place luggage or loads in
the trunk. Observe the loading guidelines
(
Ypage 217).
Opening/closing from outside
Opening
XPress the Fbutton on the SmartKey.
The trunk lid opens slightly.
XLift the trunk lid.
Closing
XPull the trunk lid down using recess :and let
it drop into the lock.
XLock the vehicle if necessary with the &
button on the SmartKey or with KEYLESS-GO
(
Ypage 67).
Unlocking with KEYLESS-GO
Important safety notes
GWARNING
The vehicle exhaust system can become very
hot. If you use HANDS-FREE ACCESS, you
could burn yourself by touching the exhaust
system. There is a risk of injury. Always
ensure that you make the kicking movement
only within the detection range of the sensors.
!If the SmartKey is within the rear detection
range of KEYLESS-GO, the following situa-
tions, for example, could lead to the uninten-
tional opening of the trunk lid:
Rwhen using an automatic car wash
Rwhen using a power washer
Make sure that the SmartKey is at least 10 ft
(3 m) away from the vehicle.
General notes
Vehicles with KEYLESS-GO without carbon
package: you can unlock the trunk lid without
using your hands. This is useful if you have your
hands full. To do this, make a kicking movement
under the rear bumper with your foot.
74Trunk
Opening and closing
Page 84 of 294

The soft top is not locked if:
RtheOpen/Close Convertible Top Com‐pletelymessage is shown in the multifunc-
tion display
Ryou hear a warning tone for up to ten seconds
when pulling away or while driving
Lock the soft top again if it is not locked fully:
XPull over and stop the vehicle safely as soon
as possible, paying attention to road and traf-
fic conditions.
XSelect SmartKey position 2with the Start/
Stop button (Ypage 110).
XPress the soft top switch (Ypage 80).
Installing/removing the draft stop
Important safety notes
GWARNING
If the wind screen is incorrectly installed, it
could detach itself during a journey and
endanger other road users. There is a risk of
an accident and injury.
Install the wind screen as described. Do not
place any objects on top of the installed wind
screen.
!Install or remove the wind screen only when
the soft top is open. You could otherwise
damage the wind screen or the vehicle inte-
rior.
!Mercedes-Benz recommends that you only
use wind screens which have been tested and
approved for Mercedes-Benz vehicles. This
helps to prevent damage to the vehicle.
Installing/removing
The wind screen protects against wind when
driving with the soft top open. It is secured
between the roll bars.
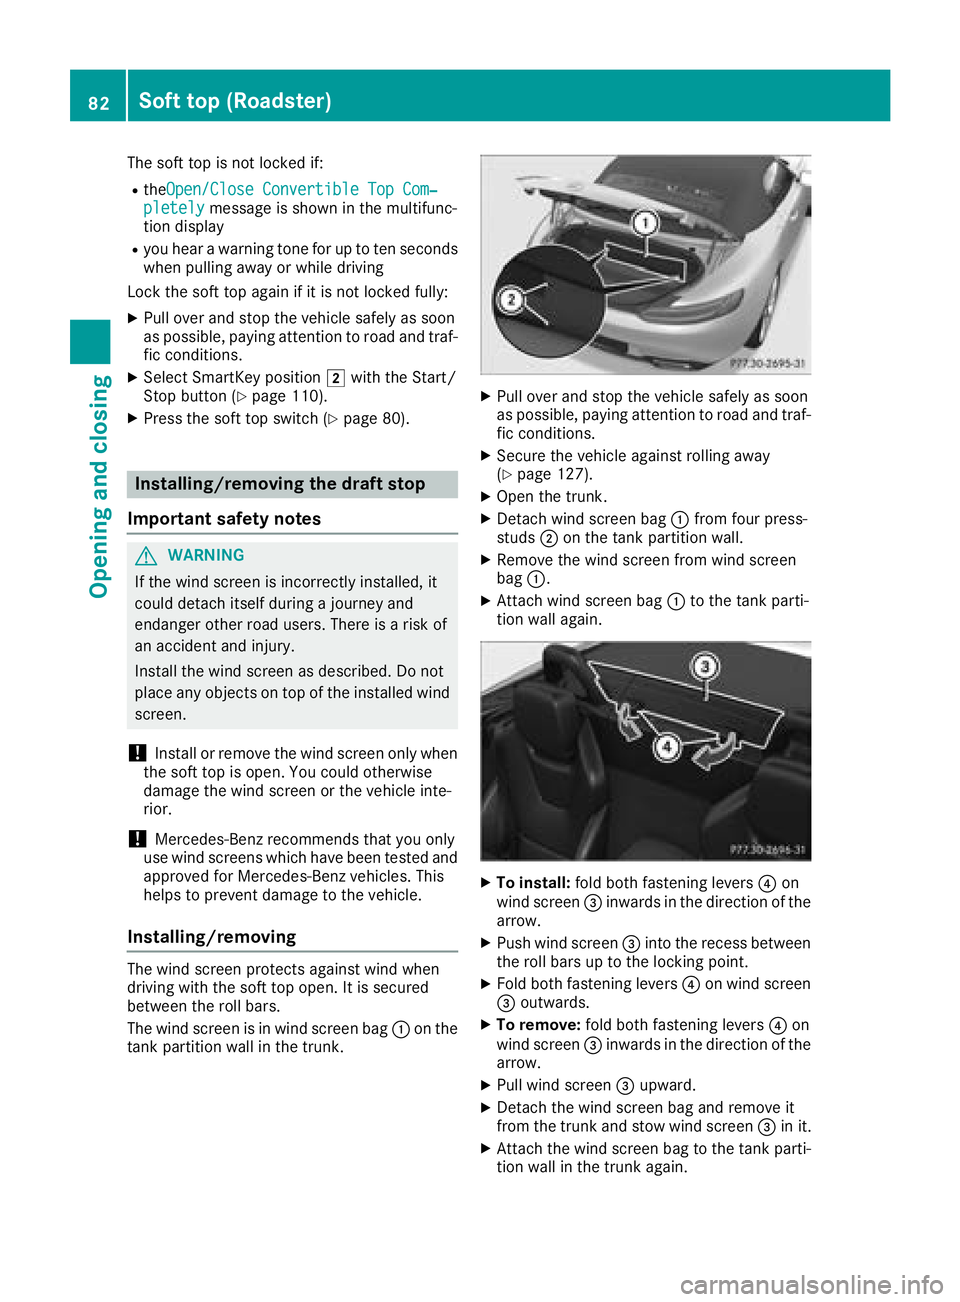
The wind screen is in wind screen bag :on the
tank partition wall in the trunk.
XPull over and stop the vehicle safely as soon
as possible, paying attention to road and traf-
fic conditions.
XSecure the vehicle against rolling away
(Ypage 127).
XOpen the trunk.
XDetach wind screen bag :from four press-
studs ;on the tank partition wall.
XRemove the wind screen from wind screen
bag :.
XAttach wind screen bag :to the tank parti-
tion wall again.
XTo install: fold both fastening levers ?on
wind screen =inwards in the direction of the
arrow.
XPush wind screen =into the recess between
the roll bars up to the locking point.
XFold both fastening levers ?on wind screen
= outwards.
XTo remove: fold both fastening levers ?on
wind screen =inwards in the direction of the
arrow.
XPull wind screen =upward.
XDetach the wind screen bag and remove it
from the trunk and stow wind screen =in it.
XAttach the wind screen bag to the tank parti-
tion wall in the trunk again.
82Soft top (Roadster)
Opening and closing
Page 111 of 294

Notes on breaking-in a new vehicle
Important safety notes
The sensor system of some driving and driving
safety systems adjusts automatically while a
certain distance is being driven after the vehiclehas been delivered or after repairs. Full system
effectiveness is not reached until the end of this
teach-in procedure.
New and replaced brake pads and discs only
reach their optimum braking effect after several hundred kilometers of driving. Compensate for
this by applying greater force to the brake pedal.
The first 1,000 miles (1,500 km)
The more you look after the engine when it is
new, the more satisfied you will be with its per-
formance in the future.
RYou should therefore drive at varying vehicle
and engine speeds for the first 1,000 miles
(1,500 km).
RIdeally, for the first 1,000 miles (1,500 km),
drive in program C.
RDo not drive faster than 85 mph (140 km/h)
for the first 1,000 miles (1,500 km).
ROnly briefly allow the engine to reach a max-
imum engine speed of 4,500 rpm briefly.
RAvoid heavy loads, e.g. driving at full throttle,
during this period.
RDo not exceed Ôof the maximum permitted
engine speed for each gear.
RShift up into manual mode Mand temporary
manual drive program in good time.
RDo not carry out a RACE START.
RDo not manually shift to a lower gear to brake
the vehicle.
RTry to avoid depressing the accelerator pedal
beyond the pressure point (kickdown).
After 1,000 mile s(1,500 km), you can increase
the engine speed gradually and accelerate the
vehicle to full speed.
You should also observe these notes on break-
ing in if the engine or parts of the drive train on
your vehicle have been replaced.
Always observe the respective maximu m per-
missibl
e speed.
Driving
Important safety notes
GWARNING
Objects in the driver's footwell can restrict the pedal travel or obstruct a depressed pedal.
The operating and road safety of the vehicle is
jeopardized. There is a risk of an accident.
Make sure that all objects in the vehicle are
stowed correctly, and that they cannot enter
the driver's footwell. Install the floormats
securely and as specified in order to ensure
sufficient clearance for the pedals. Do not use
loose floormats and do not place floormats on
top of one another.
GWARNING
Unsuitable footwear can hinder correct usage of the pedals, e.g.:
Rshoes with thick soles
Rshoes with high heels
Rslippers
There is a risk of an accident.
Wear suitable footwear to ensure correct
usage of the pedals.
GWARNING
If you switch off the ignition while driving,
safety-relevant functions are only available
with limitations, or not at all. This could affect, for example, the power steering and the brake
boosting effect. You will require considerably
more effort to steer and brake. There is a risk
of an accident.
Do not switch off the ignition while driving.
GWARNING
If the parking brake has not been fully
released when driving, the parking brake can:
Roverheat and cause a fire
Rlose its hold function.
There is a risk of fire and an accident. Release
the parking brake fully before driving off.
Driving109
Driving and parking
Z
Page 115 of 294

GWARNING
After a short time, hill start assist will no lon-
ger brake your vehicle and it could roll away.
There is a risk of an accident and injury.
Therefore, quickly move your foot from the
brake pedal to the accelerator pedal. Never
leave the vehicle when it is held by hill start
assist.
Hill start assist is not active if:
Ryou are pulling away on a level road or on a
downhill gradient
Rthe transmission is in position i
Rthe electric parking brake is applied
RESP®is malfunctioning
Rear axle steering
General notes
Depending on the speed, rear axle steering
adapts the track of the rear axle to the position
of the front wheels. Together with the steering
angle of the front wheels, this results in greater
mobility and stability than on vehicles without
rear axle steering.
Rear axle steering has the following character-
istics:
Rreduced steering effort and turning circle,
resulting in reduced parking effort.
Rimproved driving stability, e.g. on curves.
Rthe vehicle has more direct steering. Control
of the vehicle is thereby increased.
ECO start/stop function
Introduction
The ECO start/stop function switches the
engine off automatically if the vehicle is stopped
under certain conditions.
The engine starts automatically when the driver
wants to pull away again. The ECO start/stop
function thereby helps you to reduce the fuel
consumption and emissions of your vehicle.
Important safety notes
GWARNING
If the engine is switched off automatically and
you exit the vehicle, the engine is restarted
automatically. The vehicle may begin moving.
There is a risk of accident and injury.
If you wish to exit the vehicle, always turn off
the ignition and secure the vehicle against
rolling away.
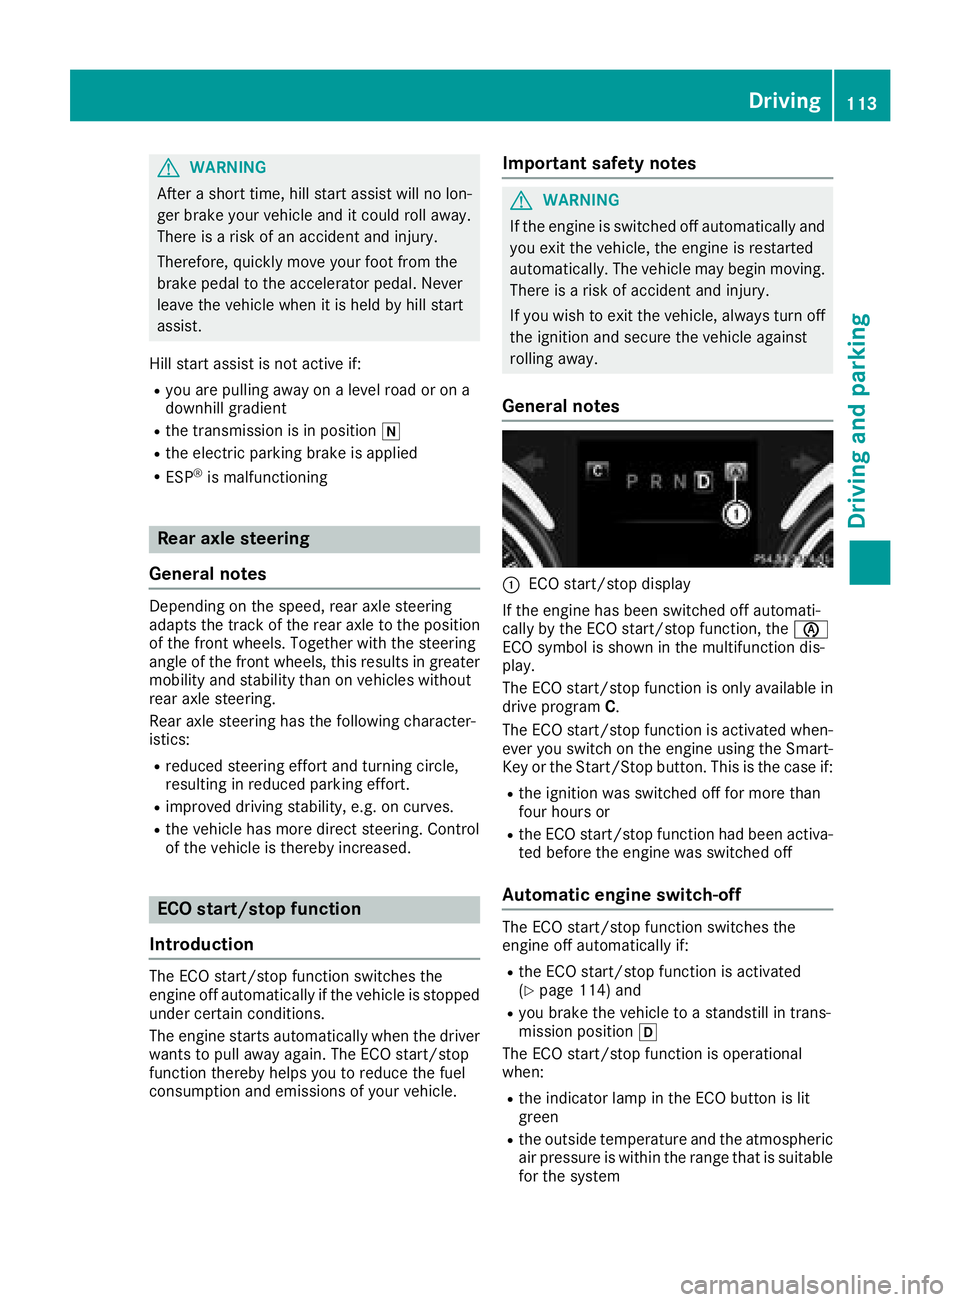
General notes
:ECO start/stop display
If the engine has been switched off automati-
cally by the ECO start/stop function, the è
ECO symbol is shown in the multifunction dis-
play.
The ECO start/stop function is only available in drive program C.
The ECO start/stop function is activated when-
ever you switch on the engine using the Smart-
Key or the Start/Stop button. This is the case if:
Rthe ignition was switched off for more than
four hours or
Rthe ECO start/stop function had been activa-
ted before the engine was switched off
Automatic engine switch-off
The ECO start/stop function switches the
engine off automatically if:
Rthe ECO start/stop function is activated
(Ypage 114) and
Ryou brake the vehicle to a standstill in trans-
mission position h
The ECO start/stop function is operational
when:
Rthe indicator lamp in the ECO button is lit
green
Rthe outside temperature and the atmospheric
air pressure is within the range that is suitable
for the system
Driving113
Driving and parking
Z
Page 121 of 294

XDepress the brake pedal and keep it
depressed.
XShift to neutrali.
XRelease the brake pedal.
XRelease the electric parking brake.
XSwitch the ignition off.
XTurn the SmartKey to position 2and leave it
in the ignition lock.
You can find further information under "Car
wash" (
Ypage 241).
Shifting to transmission position D
XStart the engine (Ypage 112).
XMake sure that the vehicle is stationary.
XDepress the brake pedal and keep it
depressed.
XPush the E-SELECT lever back past the first
point of resistance.
The automatic transmission shifts to h.
If the vehicle is braked to a standstill with the
transmission in position h, the ECO start/stop
function switches off the engine automatically
(
Ypage 113).
Transmission position and drive pro-
gram display
The current transmission position and drive pro-
gram appear in the multifunction display.
:Drive program
;Transmission position
Additionally, displays next to the E ‑SELECT lever
show the current transmission position.
The displays light up if you:
Rswitch on the power supply with the Start/
Stop button (Ypage 110) or
Rinsert the SmartKey into the ignition lock
(Ypage 111). The displays go out if you:
Rswitch off the power supply with the Start/
Stop button (Ypage 110) or
Rremove the SmartKey from the ignition lock
(Ypage 111).
If the transmission position display in the mul-
tifunction display is not working, check on the
display next to the E-SELECT lever whether the
desired transmission position is engaged.
Transmission positions
BPark position
This prevents the vehicle from rolling
away when stopped.
Only shift the transmission into posi-
tion j(
Ypage 117) when the vehi-
cle is stationary. The parking lock
should not be used as a brake when
parking. Always apply the electronic
parking brake in addition to the park-
ing lock in order to secure the vehi-
cle.
The automatic transmission shifts to j automatically if you:
Rremove the SmartKey
Rswitch off the engine when in kor
h and open the driver's door or
front-passenger door
Ropen the driver's door while trav-
eling at low speeds in transmission position hork
In the event of a malfunction of the
vehicle's electronics, the transmis-
sion may lock in position j. Have
the vehicle electronics checked
immediately at a qualified specialist
workshop.
CReverse gear
Only shift the transmission into posi-
tion kwhen the vehicle is station-
ary.
AMG SPEEDSHIFT DCT 7-speed sports transmission119
Driving and parking
Z
Page 130 of 294

positionhork, otherwise park position j
is engaged automatically.
The transmission could be damaged.
!Always secure the vehicle correctly against
rolling away. Otherwise, the vehicle or its driv-
etrain could be damaged.
To ensure that the vehicle is secured against
rolling away unintentionally:
Rthe electric parking brake must be applied.
Rthe transmission must be in position j.
Rthe SmartKey must be removed from the igni-
tion lock or the Start/Stop button must be
pressed.
Rthe front wheels must be turned towards the
curb on steep uphill or downhill gradients.
Rthe empty vehicle must be secured at the
front axle with a wheel chock or similar, for
example, on uphill or downhill gradients.
Ra laden vehicle must also be secured at the
rear axle with a wheel chock or similar, for
example, on uphill or downhill gradients.
Switching off the engine
Important safety notes
GWARNING
The automatic transmission switches to neu-
tral position Nwhen you switch off the engine.
The vehicle may roll away. There is a risk of an
accident.
After switching off the engine, always switch
to parking position P. Prevent the parked vehi-
cle from rolling away by applying the parking
brake.
AMG SPEEDSHIFT DCT 7-speed sport
transmission
!Do not remove the SmartKey while the vehi-
cle is in motion. Otherwise, at low speeds,
parking lock jwill be activated automati-
cally.
Do not open the driver's door while the vehi-
cle is in motion. At low speeds, transmission
position jis engaged automatically.
This could cause damage to the transmission
and the parking lock.
XApply the electric parking brake.
XShift the transmission to jusing the button
on the center console.
Using the Start/Stop button
XPress the Start/Stop button (Ypage 110)
The engine stops and all the indicator lamps in
the instrument cluster go out.
If the driver's door is closed, this is the same
as key position 1. If the driver's door is open,
this is the same as key position u, i.e. the
SmartKey having been removed.
If you switch the engine off with the trans-
mission in position korh, the transmis-
sion automatically shifts to i.
If you move the E-SELECT lever to ibefore
switching off the engine, the transmission
remains in ifor 30 minutes.
If you open the driver's or front-passenger
door during this period, the transmission
automatically shifts to jand the electric
parking brake is automatically applied.
The engine can be switched off in an emer-
gency while the vehicle is in motion by press-
ing and holding the Start/Stop button for
three seconds. This function operates inde-
pendently of the ECO start/stop automatic
engine switch-off function.
Using the SmartKey
XTurn the SmartKey to key position uin the
ignition lock and remove it.
The immobilizer is activated.
If you move the E-SELECT lever to ibefore
switching off the engine, the transmission
remains in ifor approximately 30 minutes.
If you open the driver's or front-passenger
door during this time, the transmission shifts
automatically to j.
The t
ransmission remains in iif:
Rthe SmartKey is in the ignition lock and
Ryou use the E ‑SELECT lever to shift the
transmission to ibefore switching the
engine off
This still applies if you open the driver's or
front-passenger door.
Further information on transmission position
i when operating with a SmartKey is avail-
able under "Automatic car wash"
(
Ypage 241).
128Parking
Driving and parking
Page 131 of 294

Electric parking brake
General notes
GWARNING
If you leave children unsupervised in the vehi-
cle, they could set it in motion by, for example:
Rrelease the parking brake.
Rshift the automatic transmission out of the
parking position P.
Rstart the engine.
In addition, they may operate vehicle equip-
ment and become trapped. There is a risk of
an accident and injury.
When leaving the vehicle, always take the
SmartKey with you and lock the vehicle. Never
leave children unsupervised in the vehicle.
The function of the electric parking brake is
dependent on the on-board voltage. If the on-
board voltage is low or there is a malfunction in
the system, it may not be possible to apply the
released parking brake.
XIf this is the case, only park the vehicle on
level ground and secure it to prevent it rolling
away.
XShift the automatic transmission to position
j.
It may not be possible to release an applied
parking brake if the on-board voltage is low or
there is a malfunction in the system. Contact a
qualified specialist workshop.
The electric parking brake performs a function
test at regular intervals while the engine is
switched off. The sounds that can be heard while
this is occurring are normal.
Applying or releasing manually
XTo apply: push handle :.
When the electric parking brake is applied,
the red F(USA only) or !(Canada
only) indicator lamp lights up in the instru-
ment cluster.
The electric parking brake can also be applied
when the SmartKey is in position u.
XTo release:pull handle:.
The red F(USA only) or !(Canada
only) indicator lamp in the instrument cluster goes out.
The electric parking brake can only be released:
Rif the ignition is switched on using the Start/
Stop button or
Rthe SmartKey is in SmartKey position 1or
2 in the ignition lock (Ypage 111)
Applying automatically
The electric parking brake is automatically
applied when the transmission is in position j
and:
Rthe engine is switched off or
Rthe driver is not wearing a seat belt and the
driver's door is opened
To prevent the electric parking brake from being
automatically applied, pull handle :.
The electric parking brake is also applied auto-
matically in the following cases if:
RDistance Pilot DISTRONIC brings the vehicle
to a standstill or
Rthe HOLD function is keeping the vehicle sta-
tionary
Parking129
Driving and parking
Z
Page 142 of 294

Changing lanes
If you change to the overtaking lane, Distance
Pilot DISTRONIC supports you if:
Ryou are driving at a speed greater than
45 mph (70 km/h)
Ryou switch on the appropriate turn signal
RDistance Pilot DISTRONIC does not currently
detect a danger of collision
If these conditions are fulfilled, your vehicle is
accelerated. Acceleration will be interrupted if
changing lanes takes too long or if the distance
between your vehicle and the vehicle in front
becomes too small.
iWhen you change lanes, Distance Pilot
DISTRONIC monitors the left lane.
Stopping
GWARNING
If you leave the vehicle when it is only being
braked by Distance Pilot DISTRONIC, it could
roll away if:
Rthere is a malfunction in the system or in
the voltage supply.
RDistance Pilot DISTRONIC is switched off
using the cruise control lever, e.g. by a vehi-
cle occupant or from outside the vehicle
Rthe electrical system in the engine com-
partment, the battery or the fuses are tam-
pered with.
Rthe battery is disconnected
Rthe vehicle is accelerated, e.g. by a vehicle
occupant.
There is a risk of an accident.
Before leaving the vehicle, always deactivate
Distance Pilot DISTRONIC and secure the
vehicle against rolling away.
Further information on deactivating Distance
Pilot DISTRONIC (
Ypage 141).
If Distance Pilot DISTRONIC detects that the
vehicle in front is stopping, it brakes your vehicle
to a stop.
Once your vehicle is stationary, it remains sta-
tionary and you do not need to depress the
brake.
iAfter a time, the electric parking brake
secures the vehicle and relieves the service
brake.
iDepending on the specified minimum dis-
tance, your vehicle will come to a standstill at
a sufficient distance behind the vehicle in
front. The specified minimum distance is set
using the control on the cruise control lever.
The elec tric par
king brake secures the vehicle
automatically if Distance Pilot DISTRONIC is
activated when the vehicle is stationary and:
Rthe driver's seat belt is not fastened and the
driver's door is open
Rthe engine is switched off, unless it is auto-
matically switched off by the ECO start/stop
function
Ra system malfunction occurs
Rthe power supply is insufficient
If a malfunction occurs, the transmission may
also shift to position jautomatically.
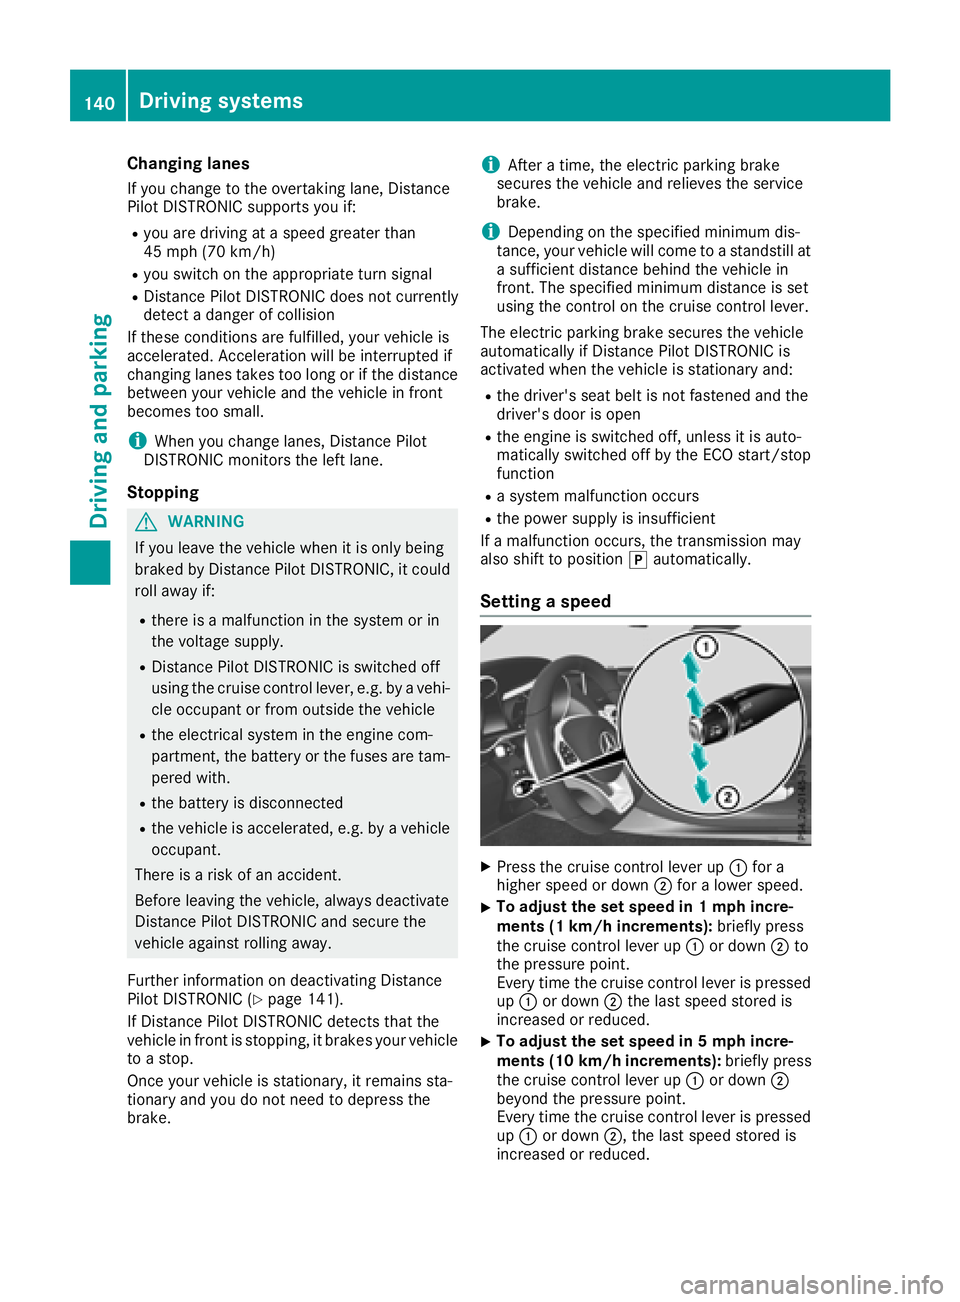
Setting a speed
XPress the cruise control lever up :for a
higher speed or down ;for a lower speed.
XTo adjust the set speed in 1 mph incre-
ments (1 km/h increments): briefly press
the cruise control lever up :or down ;to
the pressure point.
Every time the cruise control lever is pressed
up : or down ;the last speed stored is
increased or reduced.
XTo adjust the set speed in 5 mph incre-
ments (10 km/h increments): briefly press
the cruise control lever up :or down ;
beyond the pressure point.
Every time the cruise control lever is pressed
up : or down ;, the last speed stored is
increased or reduced.
140Driving systems
Driving and parking