2018 MERCEDES-BENZ AMG GT ROADSTER rear view mirror
[x] Cancel search: rear view mirrorPage 95 of 294
Exterior mirror pushed out of position
If an exterior mirror has been pushed out of
position, proceed as follows:
XPress and hold button?until you hear a click
and the mirror engages audibly into position
(
Ypage 92).
The mirror housing is engaged again and you
can adjust the exterior mirrors as usual
(
Ypage 92).
Automatic anti-glare mirrors
GWARNING
Electrolyte may escape if the glass in an auto-
matic anti-glare mirror breaks. The electrolyte
is harmful and causes irritation. It must not
come into contact with your skin, eyes, res-
piratory organs or clothing or be swallowed.
There is a risk of injury.
If you come into contact with the electrolyte,
observe the following:
RRinse off the electrolyte from your skin
immediately with water.
RImmediately rinse the electrolyte out of
your eyes thoroughly with clean water.
RIf the electrolyte is swallowed, immediately
rinse your mouth out thoroughly. Do not
induce vomiting.
RIf electrolyte comes into contact with your
skin or hair or is swallowed, seek medical
attention immediately.
RImmediately change out of clothing which
has come into contact with electrolyte.
RIf an allergic reaction occurs, seek medical
attention immediately.
The rear-view mirror and the exterior mirror on
the driver's side automatically go into anti-glare
mode if the following conditions are met simul-
taneously:
Rthe ignition is switched on
Rincident light from headlamps strikes the sen-
sor in the rear-view mirror
The mirrors do not go into anti-glare mode if
reverse gear is engaged or if the interior lighting is switched on.
Parking position for the exterior mir-
ror on the front-passenger side
Storing the parking position
You can position the front-passenger side exte- rior mirror in such a way that you can see the
rear wheel on that side as soon as you engage
reverse gear. You can store this position.
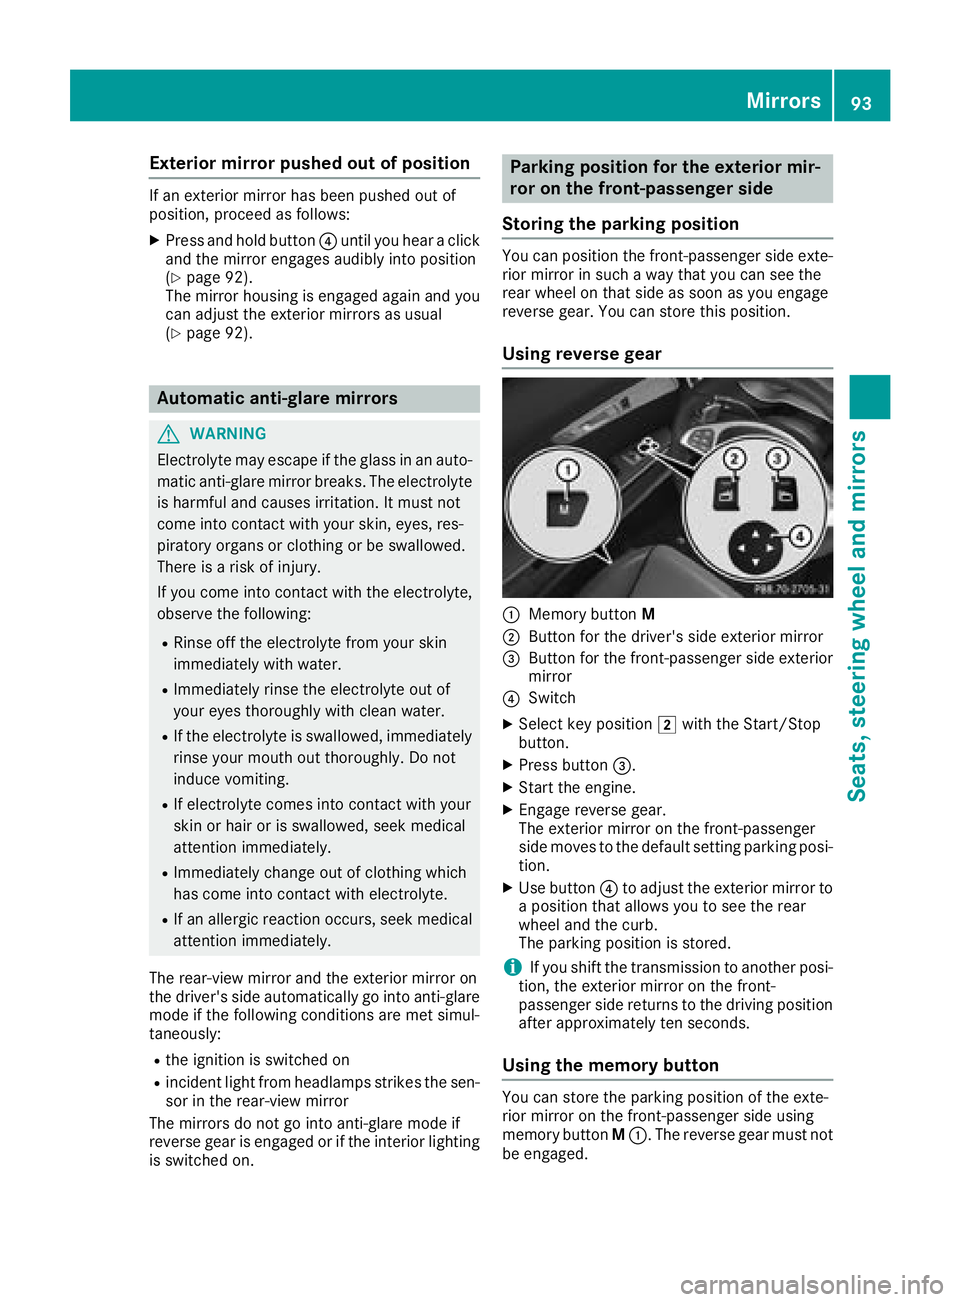
Using reverse gear
:Memory button M
;Button for the driver's side exterior mirror
=Button for the front-passenger side exterior
mirror
?Switch
XSelect key position 2with the Start/Stop
button.
XPress button =.
XStart the engine.
XEngage reverse gear.
The exterior mirror on the front-passenger
side moves to the default setting parking posi-
tion.
XUse button ?to adjust the exterior mirror to
a position that allows you to see the rear
wheel and the curb.
The parking position is stored.
iIf you shift the transmission to another posi-
tion, the exterior mirror on the front-
passenger side returns to the driving position
after approximately ten seconds.
Using the memory button
You can store the parking position of the exte-
rior mirror on the front-passenger side using
memory button M:. The reverse gear must not
be engaged.
Mirrors93
Seats, steering wheel and mirrors
Z
Page 152 of 294
Problems with Parking Assist PARKTRONIC
ProblemPossible causes/consequences andMSolutions
Only the red segments in
the Parking Assist
PARKTRONIC warning
displays are lit. You also
hear a warning tone for
approximately two sec-
onds.
Parking Assist
PARKTRONIC is then
deactivated and the indi-
cator lamp on the
PARKTRONIC button
lights up.Parking Assist PARKTRONIC has malfunctioned and has been deacti-
vated.
XIf problems persist, have Parking Assist PARKTRONIC checked at a
qualified specialist workshop.
Only the red segments in
the Parking Assist
PARKTRONIC warning
displays are lit. Parking
Assist PARKTRONIC is
then deactivated.The Parking Assist PARKTRONIC sensors are dirty or there is inter-
ference.
XClean the Parking Assist PARKTRONIC sensors (Ypage 245).
XSwitch the ignition back on.
The problem may be caused by an external source of radio or ultra-
sound waves.
XCheck to see if Parking Assist PARKTRONIC works at a different
location.
Rear view camera
General notes
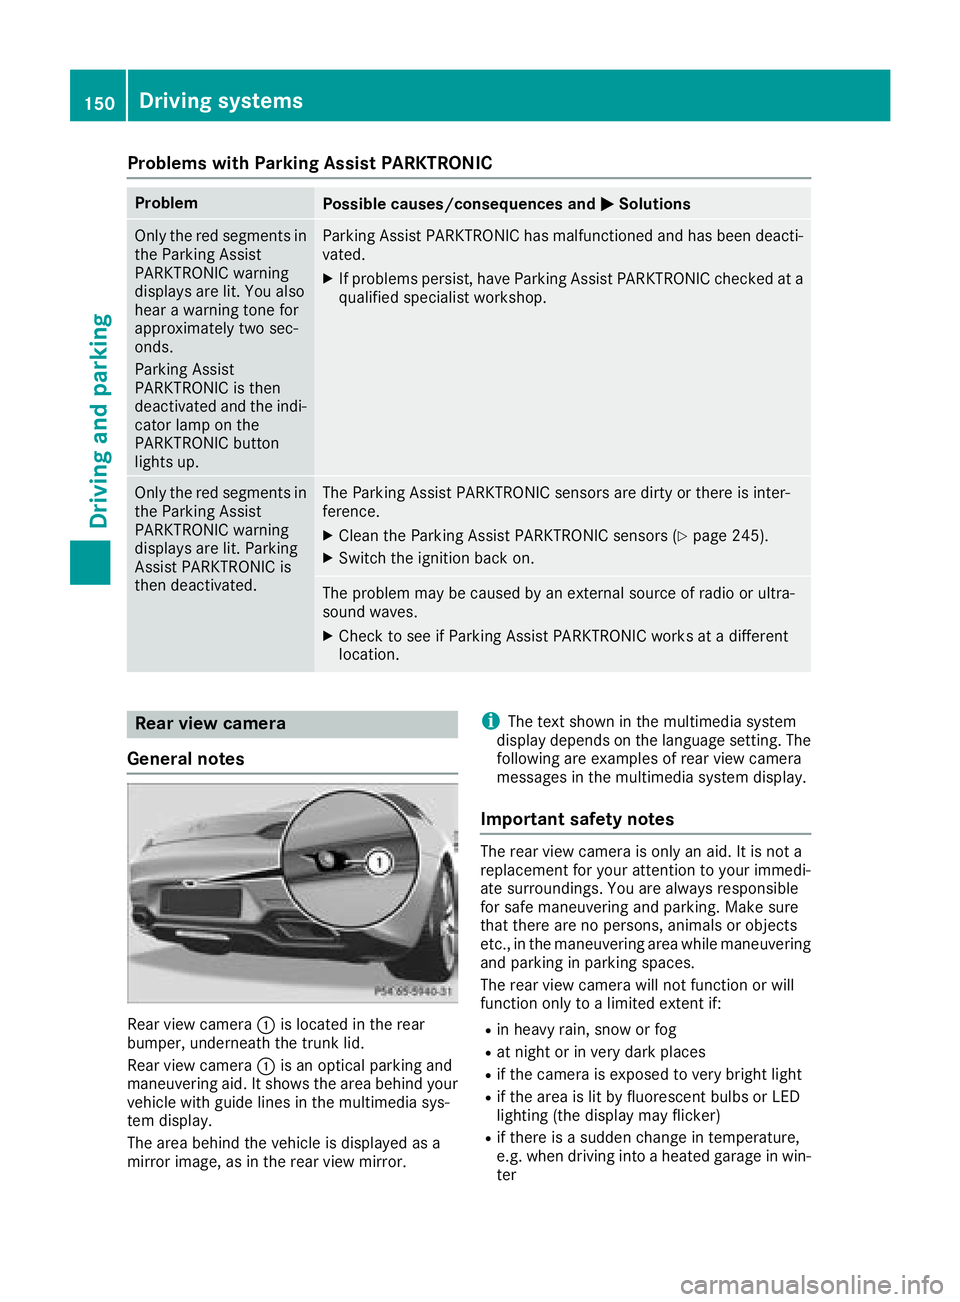
Rear view camera :is located in the rear
bumper, underneath the trunk lid.
Rear view camera :is an optical parking and
maneuvering aid. It shows the area behind your
vehicle with guide lines in the multimedia sys-
tem display.
The area behind the vehicle is displayed as a
mirror image, as in the rear view mirror.
iThe text shown in the multimedia system
display depends on the language setting. The
following are examples of rear view camera
messages in the multimedia system display.
Important safety notes
The rear view camera is only an aid. It is not a
replacement for your attention to your immedi-
ate surroundings. You are always responsible
for safe maneuvering and parking. Make sure
that there are no persons, animals or objects
etc., in the maneuvering area while maneuvering
and parking in parking spaces.
The rear view camera will not function or will
function only to a limited extent if:
Rin heavy rain, snow or fog
Rat night or in very dark places
Rif the camera is exposed to very bright light
Rif the area is lit by fluorescent bulbs or LED
lighting (the display may flicker)
Rif there is a sudden change in temperature,
e.g. when driving into a heated garage in win- ter
150Driving systems
Driving and parking
Page 153 of 294
Rif the camera lens is dirty or obstructed.
Observe the notes on cleaning
(
Ypage 245)
Rif the rear of your vehicle is damaged. In this
case, have the camera position and setting
checked at a qualified specialist workshop
The field of vision and other functions of the
reversing camera may be restricted due to addi-
tional accessories on the rear of the vehicle (e.g. license plate holder).
The guide lines in the multimedia system display
show the distances to your vehicle. The distan-
ces only apply to road level.
Activating/deactivating the rear view
camera
XTo activate: ensure that SmartKey position
2 has been selected with the Start/Stop
button.
XMake sure that the Activation by R gearfunction is selected in the multimedia system
(see the Digital Owner's Manual).
XEngage reverse gear.
The area behind the vehicle is shown with
guide lines in the multimedia system display.
The image from the rear view camera is avail-
able throughout the maneuvering process.
To deactivate: the rear view camera deacti-
vates if you shift the transmission to jor after
driving forwards a short distance.
Messages in the multimedia system dis-
play
The rear view camera may show a distorted view
of obstacles, show them incorrectly or not at all.
Obstacles are not shown by the rear view cam-
era in the following locations:
Rvery close to the rear bumper
Runder the rear bumper
!Objects not at ground level may appear to
be further away than they actually are, e.g.:
Rthe bumper of a parked vehicle
Rthe drawbar of a trailer
Rthe ball coupling of a trailer tow hitch
Rthe rear section of an HGV
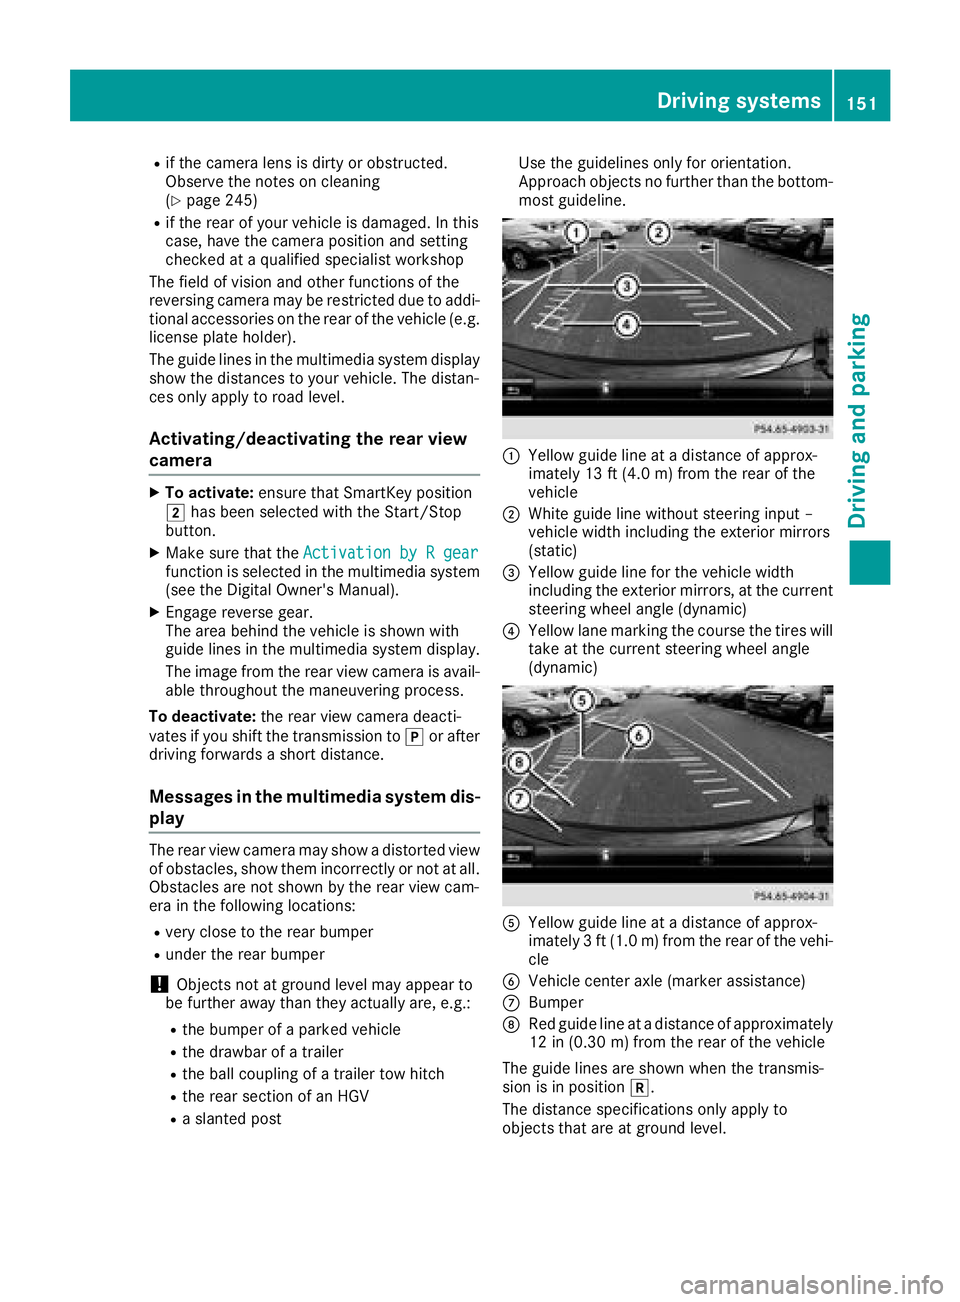
Ra slanted post Use the guidelines only for orientation.
Approach objects no further than the bottom-
most guideline.
:Yellow guide line at a distance of approx-
imately 13 ft (4.0 m) from the rear of the
vehicle
;White guide line without steering input –
vehicle width including the exterior mirrors
(static)
=Yellow guide line for the vehicle width
including the exterior mirrors, at the current
steering wheel angle (dynamic)
?Yellow lane marking the course the tires will
take at the current steering wheel angle
(dynamic)
AYellow guide line at a distance of approx-
imately 3 ft (1.0 m) from the rear of the vehi-
cle
BVehicle center axle (marker assistance)
CBumper
DRed guide line at a distance of approximately
12 in (0.30 m) from the rear of the vehicle
The guide lines are shown when the transmis-
sion is in position k.
The distance specifications only apply to
objects that are at ground level.
Driving systems151
Driving and parking
Z
Page 154 of 294
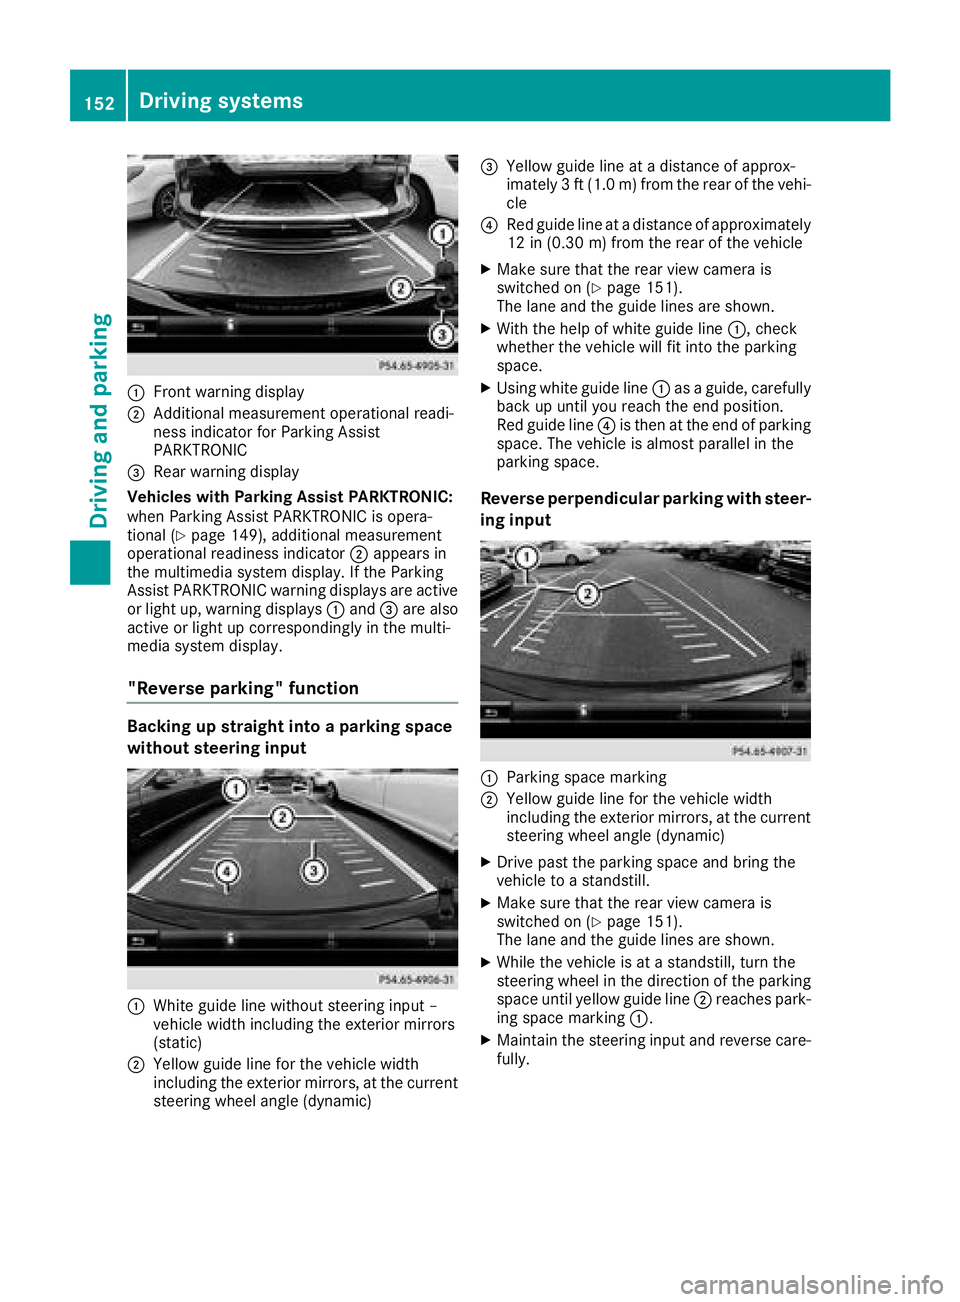
:Front warning display
;Additional measurement operational readi-
ness indicator for Parking Assist
PARKTRONIC
=Rear warning display
Vehicles with Parking Assist PARKTRONIC:
when Parking Assist PARKTRONIC is opera-
tional (
Ypage 149), additional measurement
operational readiness indicator ;appears in
the multimedia system display. If the Parking
Assist PARKTRONIC warning displays are active
or light up, warning displays :and =are also
active or light up correspondingly in the multi-
media system display.
"Reverse parking" function
Backing up straight into a parking space
without steering input
:White guide line without steering input –
vehicle width including the exterior mirrors
(static)
;Yellow guide line for the vehicle width
including the exterior mirrors, at the current
steering wheel angle (dynamic)
=Yellow guide line at a distance of approx-
imately 3 ft (1.0 m) fromthe rear of the vehi-
cle
?Red guide line at a distance of approximately
12 in (0.30 m) fromthe rear of the vehicle
XMake sure that the rear view camera is
switched on (Ypage 151).
The lane and the guide lines are shown.
XWith the help of white guide line :, check
whether the vehicle will fit into the parking
space.
XUsing white guide line :as a guide, carefully
back up until you reach the end position.
Red guide line ?is then at the end of parking
space. The vehicle is almost parallel in the
parking space.
Reverse perpendicular parking with steer-
ing input
:Parking space marking
;Yellow guide line for the vehicle width
including the exterior mirrors, at the current
steering wheel angle (dynamic)
XDrive past the parking space and bring the
vehicle to a standstill.
XMake sure that the rear view camera is
switched on (Ypage 151).
The lane and the guide lines are shown.
XWhile the vehicle is at a standstill, turn the
steering wheel in the direction of the parking
space until yellow guide line ;reaches park-
ing space marking :.
XMaintain the steering input and reverse care-
fully.
152Driving systems
Driving an d parking
Page 155 of 294

:Yellow guide line for the vehicle width
including the exterior mirrors, at the current
steering wheel angle (dynamic)
XStop the vehicle when it is almost exactly in
front of the parking space.
The white lane should be as close to parallel
with the parking space marking as possible.
:White guide line at the current steering input
;Parking space marking
XTurn the steering wheel to the center positionwhile the vehicle is stationary.
:Red guide line at a distance of approximately
12 in (0.30 m) from the rear of the vehicle
;White guide line without steering input
=End of parking space
XBack up carefully until you have reached the
final position.
Red guide line :is then at the end of parking
space =. The vehicle is almost parallel in the
parking space.
Wide-angle function
:Symbol for the wide-angle view function
;Your vehicle
=Warning displays for Parking Assist
PARKTRONIC
You can also use the rear view camera to select
a wide-angle view.
When Parking Assist PARKTRONIC is opera-
tional (
Ypage 149), a symbol for your own vehi-
cle appears in the multimedia system display. If
the Parking Assist PARKTRONIC warning dis-
plays are active, warning displays =light up in
the multimedia system display in yellow or red
accordingly.
ATTENTION ASSIST
General notes
ATTENTION ASSIST helps you during long,
monotonous journeys, such as on highways. It is
active in the 37 mph (60 km/h) to 125 mph
(200 km/h) range. If ATTENTION ASSIST
detects typical indicators of fatigue or increas-
ing lapses in concentration on the part of the
driver, it suggests taking a break.
Important safety notes
ATTENTION ASSIST is only an aid to the driver. It
might not always recognize fatigue or increasing
inattentiveness in time or fail to recognize them
at all. The system is not a substitute for a well-
rested and attentive driver.
Driving systems153
Driving and parking
Z
Page 232 of 294
ProblemPossible causes/consequences andMSolutions
The rear spoiler cannot
be retracted again after
manually extending it.You have opened the trunk lid while manually extending the rear
spoiler.
XClose the trunk lid.
The rear spoiler does not
extend or retract auto-
matically.The rear spoiler's movement is blocked, e.g. by an object jammed
between the body and the rear spoiler.
XRemove the object.
Garage door opener
General notes
The HomeLink®garage door opener integrated
in the rear-view mirror allows you to operate up
to three different door and gate systems.
Use the integrated garage door opener only on
garage doors that:
Rhave safety stop and reverse features and
Rmeet current U.S. federal safety standards
Once programed, the integrated garage door
opener in the rear-view mirror will assume the
function of the garage door system's remote
control. Please also read the operating instruc-
tions for the garage door system.
When programming a garage door opener, park
the vehicle outside the garage. Do not run the
engine while programming.
Certain garage door drives are incompatible
with the integrated garage door opener. If you
have difficulty programing the integrated garage door opener, contact a Mercedes-Benz Service
Center.
Alternatively, you can call the following tele-
phone assistance services:
RUSA: Mercedes-Benz Customer Assistance
Center at 1-800 FOR-MERCEDES
RCanada: Customer Service at
1-800-387-0100
RHomeLink®hotline 1-800-355-3515 (free of
charge)
More information on HomeLink
®and/or com-
patible products is also available online at
http://www.homelink.com.
Notes on the declaration of conformity
(
Ypage 27).
USA: FCC ID: CB2HMIHL4
Canada: IC: 279B-HMIHL4
Important safety notes
GWARNING
When you operate or program the garage door
with the integrated garage door opener, per-
sons in the range of movement of the garage
door can become trapped or struck by the
garage door. There is a risk of injury.
When using the integrated garage door
opener, always make sure that nobody is
within the range of movement of the garage
door.
GWARNING
Combustion engines emit poisonous exhaust
gases such as carbon monoxide. Inhaling
these exhaust gases leads to poisoning. There
is a risk of fatal injury. Therefore never leave
the engine running in enclosed spaces with-
out sufficient ventilation.
Programming
Programming the buttons
Pay attention to the "Important safety notes"
(Ypage 230).
230Features
Stowage and features
Page 233 of 294
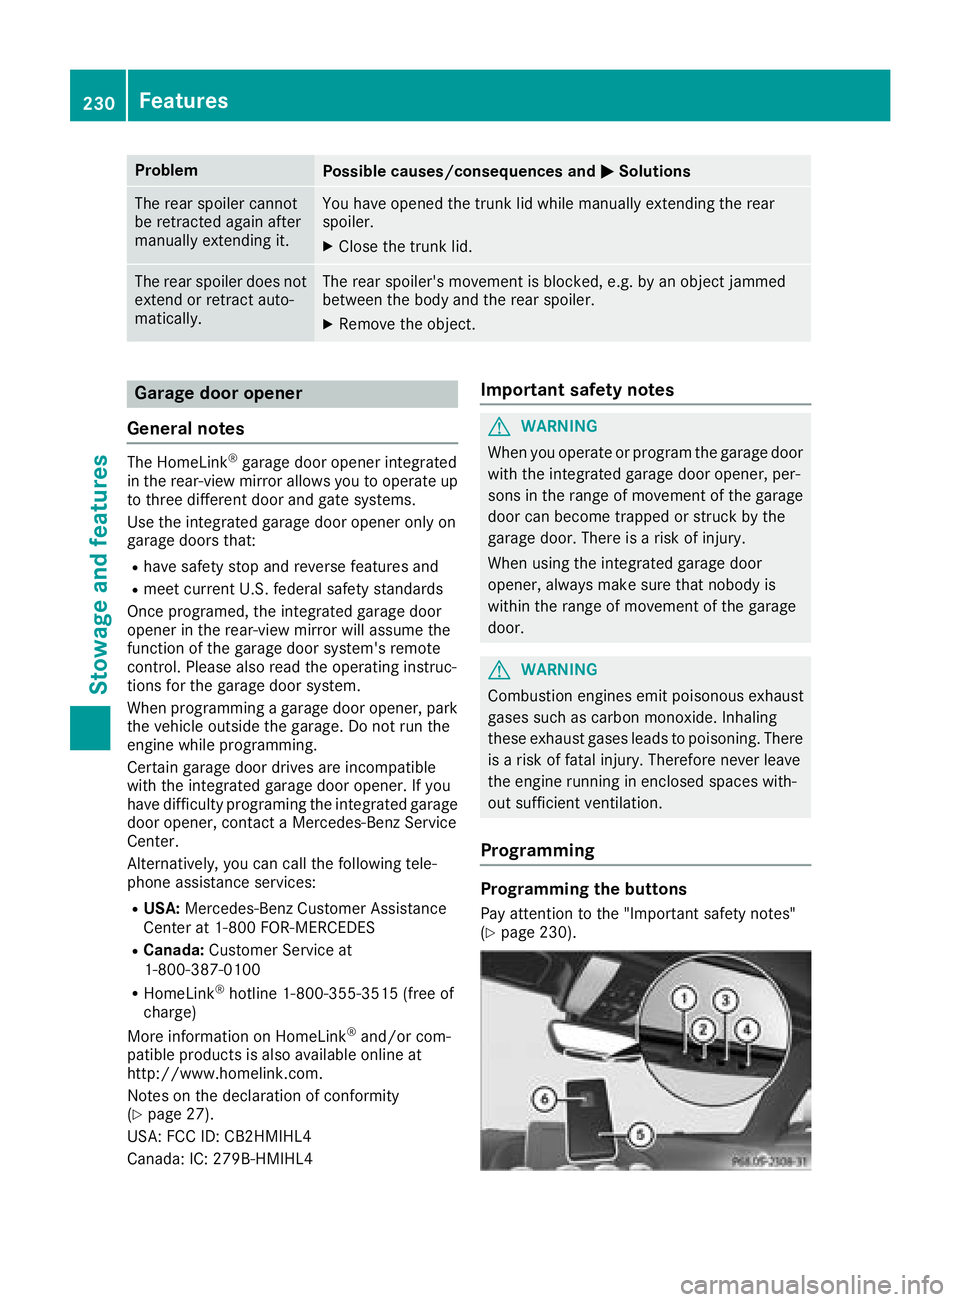
Garage door remote controlAis not included
with the integrated garage door opener.
XSelect SmartKey position 2with the Start/
Stop button (Ypage 111).
XSelect one of buttons ;to? to use to con-
trol the garage door drive.
XTo start programming mode: press and
hold one of buttons ;to? on the integrated
garage door opener.
The garage door opener is now in program-
ming mode. After a short time, indicator
lamp :lights up yellow.
Indicator lamp :lights up yellow as soon as
button ;,=or? is stored for the first time.
If the selected button has already been pro-
gramed, indicator lamp :will only light up
yellow after ten seconds have elapsed.
XRelease button ;,=or?. Indicator
lamp :flashes yellow.
XTo program the remote control: point
garage door remote control Atowards but-
tons ;to? on the rear-view mirror at a dis-
tance of 2 to 8 in (5 to 20 cm).
XPress and hold button Bon remote control
A until indicator lamp :lights up green.
When indicator lamp :lights up green: pro-
gramming is finished.
When indicator lamp :flashes green: pro-
gramming was successful. The next step is to
synchronize the rolling code (
Ypage 231).
XRelease button Bon remote control Afor
the garage door drive system.
If indicator lam
p :lights up red: repeat the
programing procedure for the corresponding
button on the rear-view mirror. When doing
so, vary the distance between remote control
A and the rear-view mirror.
The required distance between remote con-
trol Aand the integrated garage door opener
depends on the garage door drive system.
Several attempts might be necessary. You
should test every position for at least
25 seconds before trying another position.
Synchronizing the rolling code
Pay attention to the "Important safety notes"
(Ypage 230).
If the garage door system uses a rolling code,
you will also have to synchronize the garage
door system with the integrated garage door
opener in the rear-view mirror. To do this you will
need to use the programming button on the door drive control panel. The programming button
may be located in different places depending on
the manufacturer. It is usually located on the
door drive unit on the garage ceiling.
Familiarize yourself with the garage door drive
operating instructions, e.g. under "Program-
ming additional remote controls", before carry-
ing out the following steps.
Your vehicle must be within reach of the garage
door or gate opener drive. Make sure that nei-
ther your vehicle nor any persons/objects are
present within
the sweep of t
he door or gate.
XSelect SmartKey position 2with the Start/
Stop button (Ypage 111).
XGet out of the vehicle.
XPress the programming button on the door
drive unit.
You now have 30 seconds to initiate the next
step.
XGet into the vehicle.
XPress previously programed button ;,=
or ? on the integrated garage door opener
repeatedly until the door closes.
The rolling code synchronization is then com- plete.
Notes on programming the remote con-
trol
Canadian radio frequency laws require a "break"(or interruption) of the transmission signals
after broadcasting for a few seconds. Therefore,
these signals may not last long enough for the
integrated garage door opener. The signal is not recognized during programming. Comparable
with Canadian law, some U.S. garage door open-
ers also feature a "break".
Proceed as follows:
Rif you live in Canada.
Rif you have difficulties programming the
garage door opener (regardless of where you
live) when following the programming steps.
XPress and hold one of buttons ;to? on the
integrated garage door opener.
After a short time, indicator lamp :lights up
yellow.
XRelease the button.
Indicator lamp :flashes yellow.
XPress button Bof garage door remote con-
trol Afor two seconds, then release it for two
sec onds.
XPress button Bagain for two seconds.
Features231
Stowage and features
Z
Page 234 of 294
XRepeat this sequenceon butto nB of remot e
control Auntil indicator lamp :lights up
green .
When indicator lamp :lights up green :pro -
grammin gis finished.
When indicator lamp :flashes green :pro -
grammin gwas successful. The next step is to
synchroniz eth erollin gcode.
XReleas ebutto nB of remot econtrol Aof th e
garage door drive.
When indicator lamp :lights up red :repeat
th eprogrammin gprocess for th ecorrespond -
ing butto non th erear-view mirror .When
doin gso, var yth edistanc ebetween remot e
control Aand th erear-view mirror .
The require ddistanc ebetween remot econ-
trol Aand th eintegrate dgarage door opener
depend son th egarage door driv esystem.
Several attempts might be necessary. You
should test every position for at least
25 seconds before trying another position .
Problemswhen programming
If you are experiencin gproblem sprogrammin g
th eintegrate dgarage door opener on th erear -
vie wmirror ,tak enote of th efollowin ginstruc-
tions:
RChec kth etransmitte rfrequency used by
garage door driv eremot econtrol Aand
whether it is supported. The transmitte rfre-
quency can usually be foun don th ebac kof
remot econtrol Afor th egara ge d
oor drive.
The integrate dgarage door opener is com-
patible wit hdevice sthat hav eunit swhic h
operate in th efrequency range of 28 0to
43 3MHz.
RReplac eth ebatterie sin garage door remot e
control A.This increases th elikelihood that
garage door remot econtrol Awill transmit a
stron gand precis esignal to th eintegrate d
garage door opener.
RWhen programming, hold remot econtrol A
at varying distances and angles from but -
tons ;to? whic hyou are programming. Try
various angles at adistanc ebetween 2an d
8 inches (5t o20 cm) or at th esam eangle but
at varying distances.
RIf afurther remot econtrol Ais available for
th esam egarage door drive, repeat th esam e
programmin gsteps wit hthis remot econtrol
A. Before performin gthese steps, mak esur e
that ne wbatterie shav ebeen installed in
garage door driv eremot econtrol A.
RNotethat som eremot econtrol sonly transmit
for alimite damoun tof time (the indicator
lamp on th eremot econtrol goes out). Press
butto nB on remot econtrol Aagain before
transmission ends.
RAlign th eantenna cable of th egarage door
opener unit. This can improve signal recep-
tion/transmission.
Opening/closing the garage door
Afte rit has been programmed ,th eintegrate d
garage door opener performs th efunction of th e
garage door system remot econtrol .Pleas ealso
read th eoperating instruction sfor th egarage
door system.
XSelec tke yposition 2withth eStart/Sto p
butto n (Ypage 111).
XPress butto n;, =or? whic hyou pro -
grammed to operate th egarage door .
Garag edoor system wit h afixed code: indi-
cator lamp :lights up green .
Garag edoor system wit h arollin gcode: indi-
cator lamp :flashes green .
The transmitte rwill transmit asignal as lon g
as th ebutto nis pressed. The transmission is
halted after amaximum of te nseconds and
indicator lamp :lights up yellow .
XPress button;, =or? again if necessary.
Clearing the memory
Mak esur ethat you clear th ememory of th e
integrate dgarage door opener before selling th e
vehicle.
XSelec tke yposition 2withth eStart/Sto p
butto n (Ypage 111).
XPress and hold buttons ;and ?.
Indicato rlamp :initially lights up yellow and
then green .
XReleasebuttons ;and ?.
The memory of th eintegrate dgarage door
opener in th erear-view mirror is cleared .
Floormats
GWARNING
Objects in th edriver' sfootwell can restrict th e
pedal travel or obstruct adepressed pedal .
232Features
Stowage and features