2018 MERCEDES-BENZ A-CLASS SALOON key
[x] Cancel search: keyPage 189 of 621

Electric pa
rking brake Electric parking brake function (app
lying
automatically) &
WARNING Risk of accident and inju ry
due tochildren left unat tended in the
ve hicle
If yo u lea vechildren unat tended in theve hi‐
cle, they may be able toset theve hicle in
motion, forex ample by:
R releasing the parking brake.
R shifting the automatic transmission out of
park position jor shifting manual trans‐
mission into idle position.
R starting the engine.
In addition, they may operate vehicle equip‐
ment and become trapped. #
Never lea vechildren and animals unat‐
te nded in theve hicle. #
When leaving theve hicle, alw aysta ke
th eke y with you and lock theve hicle.
This also applies tothe digital vehicle ke
y if the "Digital Vehicle Key" function
is activated via Mercedes me connect. Ve
hicles with manual transmission:
When theve hicle comes toast andstill, the elec‐
tric parking brake is applied if one of thefo llow‐
ing conditions is fulfilled:
R The engine is switched off.
R The driver's door is opened.
The elect ric pa rking brake is also applied while
th eve hicle is kept stationary bythe HOLD func‐
tion if one of thefo llowing conditions is fulfilled:
R The engine is switched off.
R The seat belt tongue is not inser ted in the
seat belt buckle of the driver's seat and the
driver's door is opened.
R There is a sy stem malfunction.
R The po wer supp lyis insuf ficient.
R The vehicle is stationary for a lengt hyperiod.
When the electric parking brake is applied, the
re d! indicator lamp appears in the instru‐
ment clus ter. If
th e electric parking brake is not applied when
th e driver's door is opened, theRisk of vehicle
rolling away Apply parking brake See Owner's
Manual message appears.
The electric parking brake is not automatically
applied if the engine is switched off bythe ECO
st art/ stop function.
% Toprev ent application: pull the handle of the
electric parking brake.
Ve hicles with automatic transmission:
The electric parking brake is applied if the trans‐
mission is in position jand one of thefo llow‐
ing conditions is fulfilled:
R The engine is switched off.
R The seat belt tongue is not inser ted in the
seat belt buckle of the driver's seat and the
driver's door is opened.
% Toprev ent application: pull the handle of the
electric parking brake.
In thefo llowing situations, the electric parking
brake is also applied:
R Active Dis tance Assi stDISTRONIC is bringing
th eve hicle toast andstill. 18 6
Driving and pa rking
Page 191 of 621

App
lying/releasing the electric pa rking
brake manually
Applying #
Push handle 1.
The red! indicator lamp appears in the
instrument clus ter. %
The electric parking brake is only securely
applied if the indicator lamp is lit continu‐
ously.
Re leasing #
Swit chon the ignition. #
Pull handle 1.
The red! indicator lamp in the instru‐
ment clus ter goes out.
Emer gency braking #
Press and hold handle 1.
When theve hicle has been braked to a
st andstill, the electric parking brake is
applied. The red! indicator lamp appears
in the instrument clus ter. Information on de
tecting dama geon a
pa rked vehicle If a collision is de
tected when theto w- aw ay pro‐
te ction is primed on a loc kedve hicle, you will
re cei vea notification in the multimedia sy stem
when you swit chon the ignition. Yo
u will recei veinformation about thefo llowing
points:
R The area of theve hicle that may ha vebeen
damaged.
R The forc e of the impact.
The following situations can lead toinadver tent
acti vation:
R The pa rked vehicle is mo ved, e.g. in a two-
st or ey garage.
% Deactivate tow- aw ay protection in order to
pr eve nt inadver tent acti vation. If you deacti‐
va te tow- aw ay protection, damage de tection
will also be deactivated.
Sy stem limitations
De tection may be restricted in thefo llowing sit‐
uations:
R The vehicle is damaged without impact, e.g.
if an outside mir ror is torn off or the paint is
damaged byakey.
R Impact occurs at low speed.
R The electric parking brake is not applied. 18 8
Driving and pa rking
Page 310 of 621
Global sear
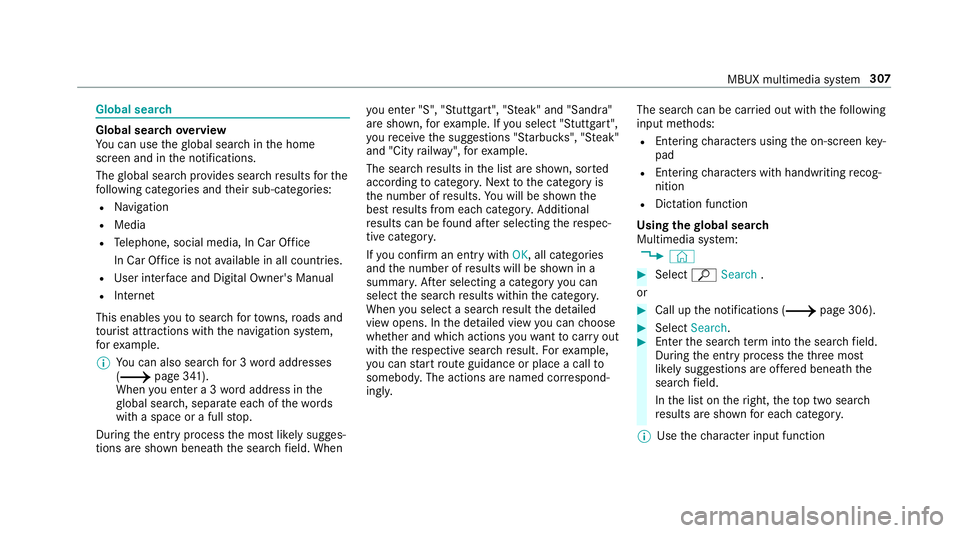
ch Global sear
chove rview
Yo u can use theglobal sear chinthe home
screen and in the notifications.
The global sear chprov ides sear chresults forthe
fo llowing categories and their sub-categories:
R Navigation
R Media
R Telephone, social media, In Car Of fice
In Car Of fice is not available in all countries.
R User inter face and Digi tal Owner's Manual
R Internet
This enables youto sear chforto wns, roads and
to urist att ractions wi th the navigation sy stem,
fo rex ample.
% You can also sear chfor 3 wordaddresses
(/ page 341).
When you en ter a 3 wordaddress in the
gl obal sear ch, separate each of thewo rds
with a space or a full stop.
During the entry process the most likely sugges‐
tions are shown beneath the sear chfield. When yo
u en ter "S", "Stuttgart", "S teak" and "Sandra"
are shown, forex ample. If you select "Stuttgart",
yo ure cei vethe suggestions "S tarbuc ks", "S teak"
and "City railw ay",forex ample.
The sear chresults in the list are shown, sor ted
according tocatego ry. Next tothe category is
th e number of results. You will be shown the
best results from each categor y.Ad ditional
re sults can be found af ter selecting there spec‐
tive categor y.
If yo u confirm an entry with OK, all categories
and the number of results will be shown in a
summar y.After selecting a category you can
select the sear chresults within the categor y.
When you select a sear chresult the de tailed
view opens. In the de tailed view you can choose
whe ther and which actions youwa nttocar ryout
with there spective sear chresult. Forex ample,
yo u can start route guidance or place a call to
somebody. The actions are named cor respond‐
ing ly. The sear
chcan be car ried out with thefo llowing
input me thods:
R Entering characters using the on-screen key‐
pad
R Entering characters with handwriting recog‐
nition
R Dictation function
Using the global sear ch
Multimedia sy stem:
4 © #
Select ªSearch .
or #
Call up the notifications (/ page 306). #
Select Search. #
Ente rth e sear chterm into the sear chfield.
During the entry process theth re e most
likely suggestions are of fere d beneath the
sear chfield.
In the list on theright, theto p two sear ch
re sults are shown for each categor y.
% Use thech aracter input function MBUX multimedia sy
stem 307
Page 319 of 621

Pressing and holding switches
toupper-case
letters permanently
If av ailable, thep symbol allo wsyouto
ch ange tovoice input. #
Call up thech aracter ent ryto rename a
fa vo urite, forex ample (/ page 304).
The keyboard is shown. #
Press brief lyon a character key.
The character is entered in input line 1.
Suggestions are shown in 2. #
Toselect a suggestion: select one ofthe
entri es. #
Ifav ailable, display additional suggestions
with q orr. #
Resume character input. #
Toenter an alternative character: press
and hold a character. #
Select thech aracter. #
Toend character input: presstheG but‐
to n.
% The available editing functions depend on
th e editing task, the language set and the
ch aracter le vel. 316
MBUX multimedia sy stem
Page 321 of 621
#
Toselect a suggestion: select one ofthe
entri es. #
Ifav ailable, display additional suggestions
with q orr. #
Resume character input. The letters can be
written next toeach other or abo veeach
ot her. #
Toend character input: presstheG but‐
to n.
Setting the keyboard forch aracter entry
Multimedia sy stem:
4 Settings 5
System 5
Controls
5 Keyboards and handwriting #
Confirm Select keyboards.
Select theke yboard language in the list. Sy
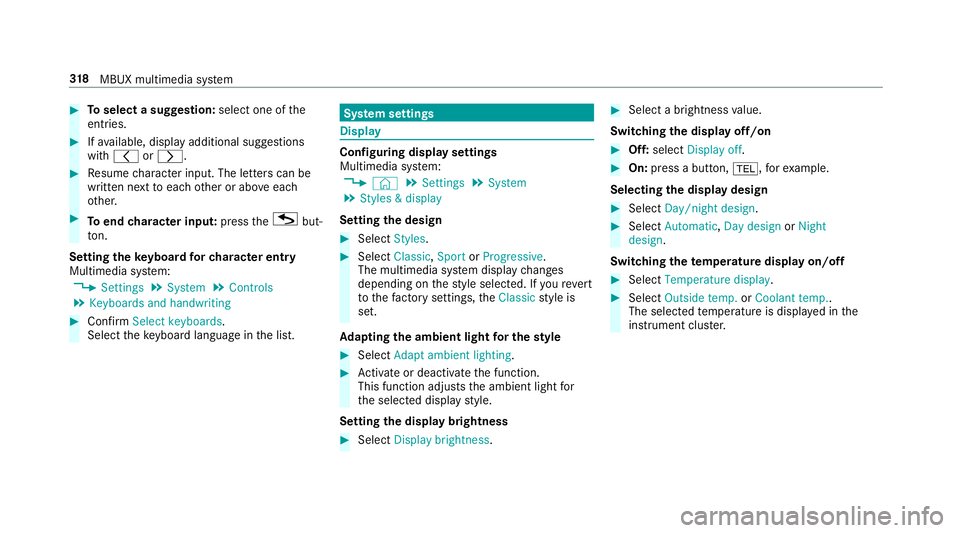
stem settings Display
Configuring display settings
Multimedia sy
stem:
4 © 5
Settings 5
System
5 Styles & display
Setting the design #
Select Styles. #
Select Classic ,Sport orProgressive .
The multimedia sy stem display changes
depending on thest yle selected. If youre ve rt
to thefa ctory settings, theClassic style is
set.
Ad apting the ambient light for the style #
Select Adapt ambient lighting. #
Activate or deacti vate the function.
This function adjusts the ambient light for
th e selected display style.
Setting the display brightness #
Select Display brightness . #
Select a brightness value.
Switching the display off/on #
Off: select Display off . #
On: press a button, %,forex ample.
Selecting the display design #
Select Day/night design . #
Select Automatic, Day design orNight
design .
Switching thetemp erature display on/off #
Select Temperature display . #
Select Outside temp. orCoolant temp..
The selec tedte mp erature is displa yed in the
instrument clus ter. 318
MBUX multimedia sy stem
Page 324 of 621

Using
this function, a tablet PC or no tebook
can be connec ted, forex ample. The connec‐
te d device can use the data tariff of theve hi‐
cle. A maximum of thre e devices can be con‐
nected with the hotspot at the same time.
% The use of theve hicle data tariff by extern al
devices is not available in all countries.
To estab lish a connection, you can use thefo l‐
lowing me thods:
R WPS PIN
The connection toa secure Wi-Fi network is
made via a PIN.
R WPS PBC
The connection toa secure Wi-Fi network is
made bypressing a button (push button).
R Security key
The connection toa secure Wi-Fi network is
made via a secu rity key.
Setting up Wi-Fi
Requ irements:
R The device tobe connec ted supports one of
th eth re e means of connection described. Multimedia sy
stem:
4 © 5
Settings 5
System
5 Wi-Fi & Bluetooth
Switching on Wi-Fi #
Select Wi-Fi.
The Wi-Fi is switched on and you can con‐
nect the multimedia sy stem with extern al
hotspots.
Swit ching off Wi-Fi #
Select Settings . #
Deactivate Wi-Fi.
If Wi-Fi is deactivated, communication via Wi-
Fi to all devices is inter rupte d. This also
means that a connection tothe communica‐
tion module cann otbe es tablished. Then
some functions such as dynamic route guid‐
ance with Live Traf fic Information are not
av ailable.
Connecting the multimedia sy stem with a
new device via Wi-Fi
This function is available if a communication
module is not ins talled. The type of connection es
tablished must be
selected on the multimedia sy stem and on the
device tobe connec ted.
% The connection procedure may dif fer
depending on the device. Follow the instruc‐
tions that are shown in the displa y.Fu rther
information (see the manufacturer's operat‐
ing instructions). #
Select Connect via Wi-Fi. #
Select Add hotspot.
Connecting using a security key #
Select the options rofthe desired Wi-Fi
networ k. #
Select Connect using security key . #
Have the security key displa yed on the device
to be connec ted (see the manufacturer's
operating instructions). #
Ente rth is security key on the multimedia sys‐
te m. #
Confirm the entry with¡.
% All devices support a security key as a
means of connection. MBUX multimedia sy
stem 321
Page 325 of 621

Connecting using a WPS PIN
#
Select the options rofthe desired Wi-Fi
networ k. #
Select Connect using WPS PIN input .
The multimedia sy stem generates an eight-
digit PIN. #
Enter this PIN on the device tobe connec ted. #
Confirm the entry.
Connecting using a but ton#
Select the options rofthe desired Wi-Fi
networ k. #
Select Connect via WPS PBC .#
Select "Connect via WPS PBC" in the options
on the device tobe connec ted (see the man‐
ufacturer's operating instructions). #
Press the WPS button on the device tobe
connec ted. #
Select Continue inthe multimedia sy stem.
Ac tivating automatic connection #
Select Connect via Wi-Fi . #
Select the options rofthe desired Wi-Fi
networ k. #
Activate Permanent Internet connection .
Connecting with a known Wi-Fi #
Select Connect via Wi-Fi . #
Select a Wi-Fi networ k.
The connection is es tablished again.
Setting up a Wi-Fi hotspot
Multimedia sy stem:
4 © 5
Settings 5
System
5 Wi-Fi & Bluetooth
Configuring the multimedia sy stem as a Wi-
Fi hotspot
The type of connection es tablished depends on
th e device tobe connec ted. The function must
be suppor tedby the multimedia sy stem and by
th e device tobe connec ted. The type of connec‐
tion es tablished must be selected on the multi‐
media sy stem and on the device tobe connec‐
te d. #
Select Vehicle hotspot. #
Select Connect device to vehicle hotspot .Connecting using WPS PIN
generation #
Select Connect using WPS PIN generation. #
Ente rth e PIN shown in the media display on
th e device tobe connec ted and con firm.
Connecting using WPS PIN entry #
Select Connect using WPS PIN input. #
Enterth e PIN that is shown on theex tern al
device's display on the multimedia sy stem.
Connecting using a button #
Select Connect via WPS PBC. #
Press the push button on the device tobe
connec ted (see the manufacturer's operating
instructions). #
Select Continue.
Connecting using a security key #
Select Connect device to vehicle hotspot .
A secu rity key is displa yed. #
Select theve hicle from the device tobe con‐
nec ted. The vehicle is displa yed with theMB
Hotspot XXXXX network name.322
MBUX multimedia sy stem
Page 326 of 621

#
Enter the security key which is shown in the
media display on the device tobe connec ted. #
Confirm the entry.
Connecting using NFC #
Select Connect via NFC. #
Activate NFC on the mobile device (see the
manufacturer's operating instructions). #
Bring the mobile device into the NFC area of
th eve hicle (/ page 381). #
Select Finished.
The mobile device is now connected tothe
multimedia sy stem hotspot via NFC.
Generating a new security key#
Select Vehicle hotspot. #
Select Generate security key .
A connection will be es tablished with the
newly crea ted security key. #
Tosave a security key:select Save.
When a new security key is sa ved, all existing
Wi -Fi connections are then disconnected. If
th eWi -Fi connections are being re-es tab‐
lished, the new security key must be en tere d. Managing MBUX
Touch devices Re
quirements:
R The MBUX Touch app is ins talled on the
ex tern al device (e.g. tablet or smartphone).
R Wi-Fi is acti vated (/ page 321) and the
multimedia sy stem is confi gured as a Wi-Fi
hotspot (/ page 322).
Multimedia sy stem:
4 © 5
Settings 5
System
5 MBUX Touch
Connecting and authorising a new device #
Select Authorise a new device. #
Select Connect new device. #
Ente rth e security key in theex tern al device.
The Please start MBUX Touch on your device
and follow the instructions. message
appears. #
Select Continue. #
Accept the connection requ est from the new
device. #
Ente rth e PIN shown on theex tern al device.
The device is authorised.
Au thorising a connected device #
Select Authorise a new device. #
Continue using connected devices
The Please start MBUX Touch on your device
and follow the instructions. message
appears. #
Select Continue. #
The connection requ est from the device
Accept. #
Ente rth e PIN shown on theex tern al device.
The device is authorised.
De-authorising the device #
Select an authorised device from the list.
A prom ptwill appear asking whe ther you
wo uld like tode-authorise the selected
device. #
Select De-authorise. #
Select Yes.
The device is de-authorised. MBUX multimedia sy
stem 323