2018 MAZDA MODEL MX-5 MIATA ECO mode
[x] Cancel search: ECO modePage 192 of 576

High Beam Control System (HBC)*
The HBC determines the conditions in front of the vehicle using the Forward Sensing
Camera (FSC) while driving in darkness to automatically switch the headlights between
high and low beams.
Refer to Warning/Indicator Lights on page 4-26.
While driving the vehicle at a speed of about 30 km/h (19 mph) or more, the headlights are
switched to high beams when there are no vehicles ahead or appr oaching in the opposite
direction.
The system switches the headlight s to low beams when one of the following occurs:
The system detects a vehicle or the headlights/lights of a vehi cle approaching in the
opposite direction.
The vehicle is driven on roads lined with streetlamps or on roa ds in well-lit cities and
towns.
The vehicle is driven at less than about 20 km/h (12 mph).
Forward Sensing
Camera (FSC)
The recognition distance of the
Forward Sensing Camera (FSC)
varies according to the
surrounding conditions.
The warning light turns on when the system has a malfunction.
Refer to Warning Indication/Warning Lights on page 4-26.
CAUTION
Do not adjust the vehicle height, modify th e headlight units, or remove the camera,
otherwise the system will not operate normally.
Do not rely excessively on the HBC and drive the vehicle while paying sufficient attention to
safety. Switch the headlights between the high beams and low beams manually if
necessary.
When Driving
i-ACTIVSENSE
4-76*Some models.
MX-5_8GF7-EA-17J_Edition2 2017-10-31 14:07:27
Page 212 of 576

Radar Sensors (Rear)*
Your vehicle is equipped with radar sensors (rear). The followi ng systems also use the radar
sensors (rear).
Blind Spot Monitoring (BSM)
Rear Cross Traffic Alert (RCTA)
The radar sensors (rear) function by detecting the radio waves reflected off a vehicle
approaching from the rear or an obstruction sent from the radar sensor.
Radar sensors (rear)
The radar sensors (rear) are installed inside the rear bumper, one each on the left and right
sides.
Always keep the surface of the rear bumper near the radar sensors (rear) clean so that the
radar sensors (rear) operate normally. Also, do not apply items such as stickers.
Refer to Exterior Care on page 6-54.
CAUTION
If the rear bumper receives a severe impact, the system may no longer operate normally. Stop
the system immediately and have the vehicle inspected at an Authorized Mazda Dealer.
NOTE
The detection ability of the radar sensors (rear) has limitations. In the following cases,
the detection ability may lower and the system may not operate normally.
The rear bumper near the radar sensors (rear) has become deformed.
Snow, ice or mud adheres to the radar sensors (rear) on the rear bumper.
Under bad weather conditions such as rain, snow and fog.
Under the following conditions, the radar sensors (rear) cannot detect target objects or it
may be difficult to detect them.
Stationary objects on a road or a road side such as small, two-wheeled vehicles,
bicycles, pedestrians, animals, and shopping carts.
When Driving
i-ACTIVSENSE
4-96*Some models.
MX-5_8GF7-EA-17J_Edition2 2017-10-31 14:07:27
Page 223 of 576

5Interior Features
Use of various features for ride comfort, including air-conditioning and
audio system.
Climate Control System.................... 5-4 Operating Tips.............................. 5-4
Vent Operation.............................. 5-5
Manual Type................................. 5-7
Fully Automatic Type................. 5-12
Before Using the Audio System...... 5-16 Audio Control Swit ch................. 5-16
AUX/USB mode.........................5-17
Antenna.......................................5-19
Audio Set [Type A (non-
touchscreen)].................................... 5-21 Power/Volume/Sound
Controls...................................... 5-21
Clock...........................................5-23
Operating the Radio....................5-24
Operating the Compact Disc (CD)
Player.......................................... 5-26
How to use AUX m ode.............. 5-29
How to use USB mode ............... 5-30
How to use iPod mode................5-33
Error Indications......................... 5-35
Bluetooth
®.................................. 5-36
Bluetooth
® Preparation.............. 5-39
Available Language.. .................. 5-48
Security Setting..... ..................... 5-49
Bluetooth
® Audio....................... 5-51
Bluetooth
® Hands-Free.............. 5-53
Voice Recognition.................. .....5-60
Voice Recognition Learning
Function (Speaker
Enrollment)................................. 5-62
Troubleshooting.......................... 5-64
5-1
MX-5_8GF7-EA-17J_Edition2 2017-10-31 14:07:27
Page 224 of 576
![MAZDA MODEL MX-5 MIATA 2018 Owners Manual Audio Set [Type B
(touchscreen)]...................................5-68Basic Operation Method............. 5-68
Home screen............................... 5-73
Volume/Display/Sound
Controls........... MAZDA MODEL MX-5 MIATA 2018 Owners Manual Audio Set [Type B
(touchscreen)]...................................5-68Basic Operation Method............. 5-68
Home screen............................... 5-73
Volume/Display/Sound
Controls...........](/manual-img/28/40991/w960_40991-223.png)
Audio Set [Type B
(touchscreen)]...................................5-68Basic Operation Method............. 5-68
Home screen............................... 5-73
Volume/Display/Sound
Controls...................................... 5-74
Operating the Radio. ...................5-76
Operating the Satellite Radio
*...........
.................................................... 5-80
Operating the Compact Disc (CD)
Player
*........................................ 5-84
How to use AUX mode.............. 5-87
How to use USB mode............... 5-88
Bluetooth
®.................................. 5-93
Bluetooth
® Preparation.............. 5-97
Available Language.................... 5-99
Bluetooth
® Audio.....................5-100
How to Use Pandora
®*............ 5-103
How to Use Aha™................... 5-105
How to Use Stitcher ™ Radio... 5-108
Bluetooth
® Hands-Free............ 5-110
Voice Recognition... ................. 5-120
Settings..................................... 5-123
Applications..............................5-125
Troubleshooting. ....................... 5-126
Appendix........................................ 5-131
Things You Need to Know....... 5-131
Interior Equipment....................... 5-139 Sunvisors.................................. 5-139
Interior Lights...........................5-139
Accessory Sockets.................... 5-140
Cup Holder............................... 5-142
Storage Compartmen ts............. 5-146
Windblocker............................. 5-148
5-2*Some models.
MX-5_8GF7-EA-17J_Edition2 2017-10-31 14:07:27
Page 238 of 576

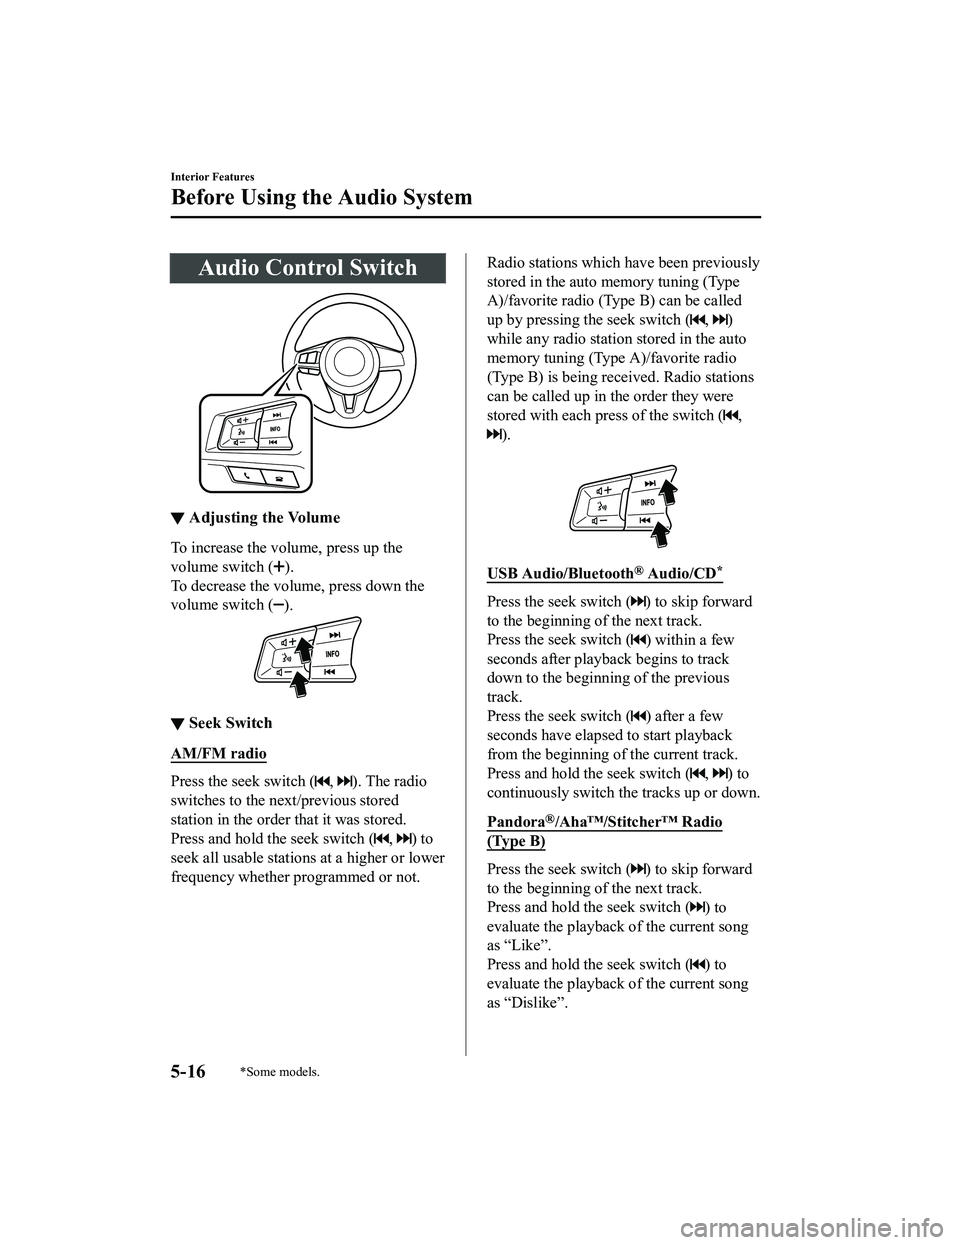
Audio Control Switch
▼Adjusting the Volume
To increase the volume, press up the
volume switch (
).
To decrease the volume, press down the
volume switch (
).
▼ Seek Switch
AM/FM radio
Press the seek switch (, ). The radio
switches to the next/previous stored
station in the order that it was stored.
Press and hold the seek switch (
, ) to
seek all usable stations at a higher or lower
frequency whether programmed or not.
Radio stations which have been previously
stored in the auto memory tuning (Type
A)/favorite radio (Type B) can be called
up by pressing the seek switch (
, )
while any radio station stored in the auto
memory tuning (Type A)/favorite radio
(Type B) is being received. Radio stations
can be called up in the order they were
stored with each press of the switch (
,
).
USB Audio/Bluetooth® Audio/CD*
Press the seek switch () to skip forward
to the beginning of the next track.
Press the seek switch (
) within a few
seconds after playba ck begins to track
down to the beginning of the previous
track.
Press the seek switch (
) after a few
seconds have elapsed to start playback
from the beginning of the current track.
Press and hold the seek switch (
, ) to
continuously switch th e tracks up or down.
Pandora
®/Aha™/Stitcher™ Radio
(Type B)
Press the seek switch () to skip forward
to the beginning of the next track.
Press and hold the seek switch (
) to
evaluate the playback of the current song
as “Like”.
Press and hold the seek switch (
) to
evaluate the playback of the current song
as “Dislike”.
Interior Features
Before Using the Audio System
5-16*Some models.
MX-5_8GF7-EA-17J_Edition2 2017-10-31 14:07:27
Page 243 of 576

Power/Volume/Sound Controls
Power/Volume/Audio control dialMenu button
Audio display
▼
Power ON/OFF
Switch the ignition to ACC or ON. Press
the power/volume dial to turn the audio
system on. Press the power/volume dial
again to turn the audio system off.
▼Volume adjustment
To adjust the volume, turn the power/
volume dial. Turn th
e power/volume dial
clockwise to increase volume,
counterclockwise to decrease it.
▼ Audio sound adjustment
1. Press the menu button () to
select the function. The selected
function will be indicated.
2. Turn the audio con trol dial to adjust
the selected functions as follows:
Indication Setting value
Tu r n
Counter-
clockwise Tu r n
Clockwise
ALC
(Automatic volume ad- justment) Level de-
crease Level in-
crease
BASS
(Low pitch sound) Decrease
bass Increase
bass
Indication Setting value
Tu r n
Counter-
clockwise Tu r n
Clockwise
TREB
(Treble sound) Decrease
treble Increase
treble
FA D E
(Front/back volume bal- ance) Shift the
sound to
the frontShift the
sound to
the rear
BAL
(Left/right volume bal- ance) Shift the
sound to
the left Shift the
sound to
the right
BEEP
(Audio operation sound) Off On
BT SETUP Select mode
12Hr
24Hr
(12 Hr/24 Hr time ad- justment) 12Hr
(Flashing) 24Hr
(Flashing)
NOTE
If not operated for several seconds, the
display returns to the previous display. To
reset bass, treble, fade, and balance, press
the menu button (
) for 2 seconds.
The unit will beep and “CLEAR” will be
displayed.
Interior Features
Audio Set [Type A (non-touchscreen)]
5-21
MX-5_8GF7-EA-17J_Edition2 2017-10-31 14:07:27
Page 244 of 576

ALC (Automatic volume adjustment)
The automatic level control (ALC)
changes the audio volume automatically
according to the vehicle speed. The faster
the vehicle speed, the higher the volume
increases. ALC has ALC OFF and ALC
LEVEL 1 to 7 modes. At ALC LEVEL 7,
the amount that the volume can increase is
at the maximum. Select the mode
according to the driving conditions.
BEEP (Audio operation sound)
The setting for the operation sound when
pressing and holding a button can be
changed. The initial setting is ON. Set to
OFF to mute the operation sound.
BT SETUP mode
Music and other audio such as voice data
recorded on portable audio devices and
mobile phones available on the market
which are equipped with the Bluetooth
®
transmission function can be listened to
via wireless transmission over the
vehicle's speakers. Using the BT SETUP
mode, these devices can be programmed
to the Bluetooth
® unit or changed (page
5-39).
12Hr
24Hr (12 Hr/24 Hr time
adjustment)
Rotating the audio control dial switches
the display between 12 and 24-hour clock
time (page 5-23).
Interior Features
Audio Set [Type A (non-touchscreen)]
5-22
MX-5_8GF7-EA-17J_Edition2 2017-10-31 14:07:27
Page 246 of 576

Operating the Radio
Band selector buttonChannel preset buttons
Scan button Auto memory button
Tuning button Audio display
▼
Radio ON
Press a band selector button () to
turn the radio on.
▼ Band selection
Successively pressing the band selector
button (
) switches the bands as
follows: FM1→FM2→AM.
The selected mode will be indicated.
NOTE
If the FM broadcast signal becomes weak,
reception automatically changes from
STEREO to MONO for reduced noise.
▼ Tuning
The radio has the following tuning
methods: Manual, Seek, Scan, Preset
channel, and Auto memory tuning. The
easiest way to tune stations is to set them
on preset channels.
Manual tuning
Select the station by pressing the tuning
button (
, ) lightly.
Seek tuning
Automatic search for radio stations starts
when the tuning button (
, ) is pressed
until a beep sound is heard. The search
stops when a station is found.
NOTE
If you continue to press and hold the
button, the frequency will continue
changing without stopping.
Scan tuning
Press and hold the scan button (
) to
automatically sample strong stations.
Scanning stops at each station for about 5
seconds. To hold a station, press and hold
the scan button (
) again during this
interval.
Interior Features
Audio Set [Type A (non-touchscreen)]
5-24
MX-5_8GF7-EA-17J_Edition2 2017-10-31 14:07:27