2018 MAZDA MODEL CX-5 display
[x] Cancel search: displayPage 307 of 628

NOTE
•If the parking space has division lines, straighten the wheels when the vehicle width
guide lines are parallel to them.
•Because there may be a difference between the displayed image, such as indicated
below, and the actual conditions when parking, always verify the safety at the rear of
the vehicle and the surrounding area directly with your eyes.
•In the image of the parking space (or garage) displayed on the screen, the back end
and distance guide lines may appear aligned in the monitor, but they may not
actually be aligned on the ground.
•When parking in a space with a division li ne on only one side of the parking space,
the division line and the vehicle width guide line appear aligned in the monitor, but
they may not actually be aligned on the ground.
When Driving
Rear View Monitor
4-171
CX-5_8GN5-EA-17J_Edition1 2017-8-18 12:58:27
Page 308 of 628

▼Variance Between Actual Road C
onditions and Displayed Image
Some variance occurs between the actual road and the displayed road. Such variance in
distance perspective could lead to an accident. Note the follow ing conditions that may cause
a variance in distance perspective.
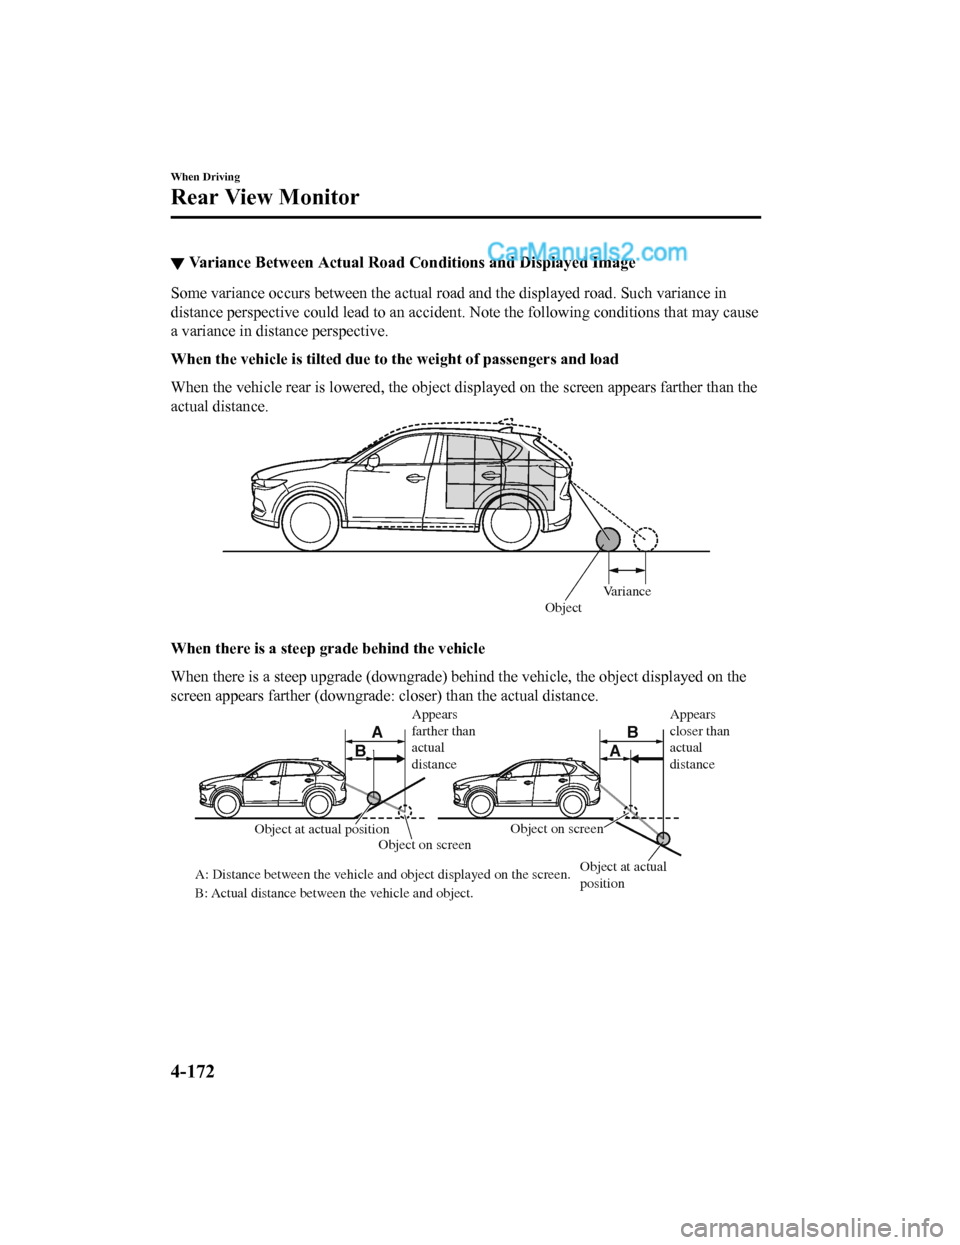
When the vehicle is tilted due to the weight of passengers and load
When the vehicle rear is lowered, the object displayed on the screen appears farther than the
actual distance.
Variance
Object
When there is a steep grade behind the vehicle
When there is a steep upgrade (downgrade) behind the vehicle, t he object displayed on the
screen appears farther (downgrade: closer) than the actual dist ance.
A
AB
B
Appears
farther than
actual
distance
Object at actual
position
Object at actual position
Object on screen
A: Distance between the vehicle and object displayed on the screen.
B: Actual distance between the vehicle and object. Object on screenAppears
closer than
actual
distance
When Driving
Rear View Monitor
4-172
CX-5_8GN5-EA-17J_Edition1
2017-8-18 12:58:27
Page 309 of 628

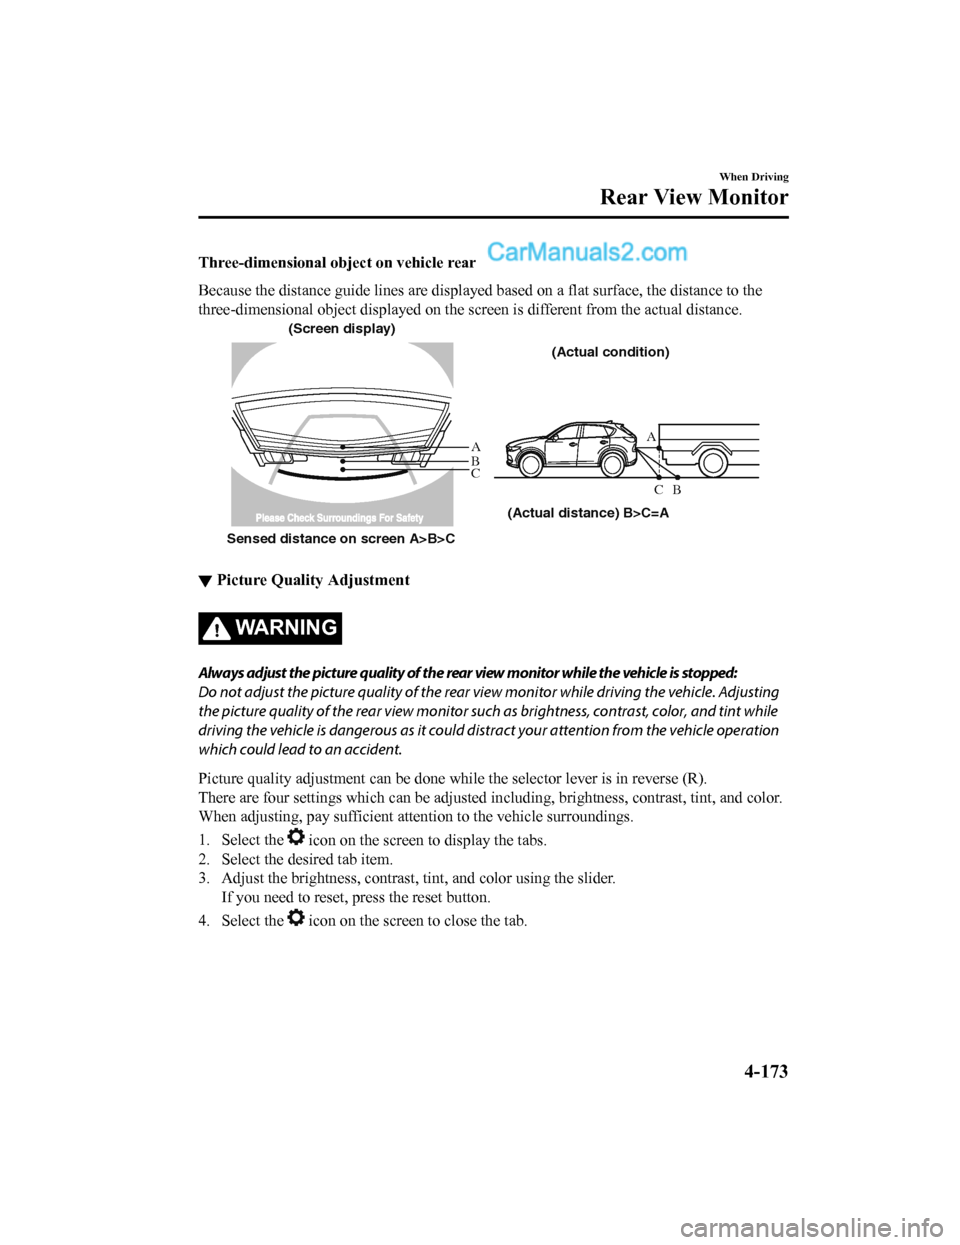
Three-dimensional object on vehicle rear
Because the distance guide lines are displayed based on a flat surface, the distance to the
three-dimensional object displayed on the screen is different f rom the actual distance.
A
A
C B
CB
(Actual distance) B>C=A
Sensed distance on screen A>B>C (Screen display)
(Actual condition)
▼Picture Quality Adjustment
WA R N I N G
Always adjust the picture quality of the rear view monitor while the vehicle is stopped:
Do not adjust the picture quality of the rear vi
ew monitor while driving the vehicle. Adjusting
the picture quality of the rear view monitor such as brightness, contrast, color, and tint while
driving the vehicle is dangerous as it could dist ract your attention from the vehicle operation
which could lead to an accident.
Picture quality adjustment can be done while the selector lever is in reverse (R).
There are four settings which ca n be adjusted including, brightness, contrast, tint, and color.
When adjusting, pay sufficient attention to the vehicle surroun dings.
1. Select the
icon on the screen to display the tabs.
2. Select the desired tab item.
3. Adjust the brightness, contras t, tint, and color using the slider.
If you need to reset, press the reset button.
4. Select the
icon on the screen to close the tab.
When Driving
Rear View Monitor
4-173
CX-5_8GN5-EA-17J_Edition1 2017-8-18 12:58:27
Page 311 of 628

5Interior Features
Use of various features for ride comfort, including air-conditioning and
audio system.
Climate Control System.................... 5-4 Operating Tips.............................. 5-4
Vent Operation.............................. 5-5
Manual Type................................. 5-7
Fully Automatic Type................. 5-11
Before Using the Audio System...... 5-15 Audio Control Swit ch................. 5-15
AUX/USB...................................5-16
Antenna.......................................5-19
Audio Set [Type A (non-
touchscreen)].................................... 5-20 Power/Volume/Sound
Controls...................................... 5-20
Clock...........................................5-22
Operating the Radio....................5-23
How to use AUX m ode.............. 5-24
How to use USB mode ............... 5-25
How to use iPod mode................5-28
Error Indications......................... 5-31
Bluetooth
®.................................. 5-32
Bluetooth
® Preparation.............. 5-35
Available Language.. .................. 5-45
Security Setting..... ..................... 5-46
Bluetooth
® Audio....................... 5-47
Bluetooth
® Hands-Free.............. 5-50
Voice Recognition.................. .....5-57
Voice Recognition Learning
Function (Speaker
Enrollment)................................. 5-58
Troubleshooting.......................... 5-61
Audio Set [Type B
(touchscreen)]...................................5-65 Basic Operation Method............. 5-65
Home screen............................... 5-69
Volume/Display/Sound
Controls...................................... 5-70
Operating the Radio....................5-73
Operating the Satellite Radio
*...........
.................................................... 5-77
How to use AUX m ode.............. 5-80
How to use USB mode ............... 5-81
Bluetooth
®.................................. 5-86
Bluetooth
® Preparation.............. 5-89
Available Language.. .................. 5-91
Bluetooth
® Audio....................... 5-92
How to Use Pandora
®*............... 5-95
How to Use Aha™..................... 5-97
How to Use Stitcher™ Radio... 5-100
Bluetooth
® Hands-Free............ 5-102
Voice Recognition.................. ...5-112
Settings..................................... 5-115
Applications.............................. 5-117
Troubleshooting........................ 5-118
Appendix........................................ 5-122 Things You Need to Know....... 5-122
*Some models.5-1
CX-5_8GN5-EA-17J_Edition1 2017-8-18 12:58:27
Page 321 of 628

Fully Automatic Type
Climate control system information is displayed on the display.
Airflow display
Temperature setting display (driver’s side)
Mode selector
display
A/C mode display
Air intake selector
(outside air position)
Driver temperature control dial
AUTO switch Mode selector switch
Fan control switch OFF switchWindshield defroster switch
Rear window defogger switch
Passenger temperature
control dial
DUAL switch
A/C switch
Temperature setting display
(Passenger’s side)
Air intake selector
(recirculated air position)
▼
Control Switches
AUTO switch
By pressing the AUTO switch the
following functions will be automatically
controlled in accordan
ce with the selected
set temperature:
•Airflow temperature
•Amount of airflow
•Selection of airflow mode
•Outside/Recirculated air selection
•Air conditioner operation
NOTE
AUTO switch indicator light
•When on, it indicates auto operation,
and the system will function
automatically.
•If any of the following switches are
operated while in auto control, the
AUTO switch indicator turns off.
•Mode selector switch
•Fan control switch
•Windshield defroster switch
The functions for switches other than
those operated continue to operate in
auto control.
OFF switch
Pressing the OFF switch shuts off the
climate control system.
Temperature control dial
This dial controls t emperature. Turn it
clockwise for hot and counterclockwise
for cold.
Interior Features
Climate Control System
5-11
CX-5_8GN5-EA-17J_Edition1 2017-8-18 12:58:27
Page 322 of 628

•When the DUAL switch is off:
Turn the driver temperature control dial
to control the temperature throughout
the entire cabin.
•When the DUAL switch is on:
Turn the driver or front passenger
temperature control dial to
independently control the temperature
on each side of the cabin.
NOTE
•The climate control system changes to
the individual operation mode (DUAL
switch indicator light illuminated) by
turning the front passenger temperature
control dial even when the DUAL switch
is off, which allows individual control of
the set temperature for the driver and
front passenger.
•The temperature units for the
temperature setting display can be
changed in conjunction with the
temperature units for the outside
temperature display.
(Type A instrument cluster)
Refer to Outside Temperature Display
on page 4-23.
(Type B instrument cluster)
Refer to Outside Temperature Display
(Without Multi-information Display) on
page 4-16.
Fan control switch
The fan has seven speeds. The selected
speed will be displayed.
Mode selector switch
The desired airflow mode can be selected
(page 5-6).
NOTE
•With the airflow mode set to the
position and the temperature control
dial set at a medium temperature,
heated air is directed to the feet and air
at a comparably lower temperature will
flow through the central, left and right
vents.
•To set the air vent to , press the
windshield defroster switch.
•In the or position, the air
conditioner is automatically turned on
and the outside air position is
automatically selected to defrost the
windshield. In the
or position, the
outside air position cannot be changed
to the recirculated air position.
A/C switch
Pressing the A/C swit ch while the AUTO
switch is turned on w ill turn off the air
conditioner (cooling/dehumidifying
functions).
The on/off of the air conditioner switches
each time the A/C switch is pressed.
NOTE
•The air conditioner operates when the
A/C switch is pressed while the air
conditioner is turned off.
•The air conditioner may not function
when the outside temperature
approaches 0 °C (32 °F).
Air intake selector
Outside or recirculated air positions can be
selected. Press the switch to select outside/
recirculated air positions.
Interior Features
Climate Control System
5-12
CX-5_8GN5-EA-17J_Edition1 2017-8-18 12:58:27
Page 330 of 628

Power/Volume/Sound Controls
Power/Volume/Audio control dialMenu button
Audio display
▼
Power ON/OFF
Switch the ignition to ACC or ON. Press
the power/volume dial to turn the audio
system on. Press the power/volume dial
again to turn the audio system off.
▼Volume adjustment
To adjust the volume, turn the power/
volume dial. Turn the power/volume dial
clockwise to increase volume,
counterclockwise to decrease it.
▼Audio sound adjustment
1. Press the menu button () to
select the function. The selected
function will be indicated.
2. Turn the audio control dial to adjust the selected functions as follows:
Indication Setting value
Tu r n
Counter-
clockwise Tu r n
Clockwise
ALC
(Automatic volume ad- justment) Level de-
crease Level in-
crease
BASS
(Low pitch sound) Decrease
bass Increase
bass
TREB
(Treble sound) Decrease
treble Increase
treble
FADE
(Front/back volume bal- ance) Shift the
sound to
the frontShift the
sound to
the rear
BAL
(Left/right volume bal- ance) Shift the
sound to
the left Shift the
sound to
the right
BEEP
(Audio operation sound) Off On
BT SETUP Select mode
12Hr
24Hr
(12 Hr/24 Hr time ad- justment) 12Hr
(Flashing) 24Hr
(Flashing)
Interior Features
Audio Set [Type A (non-touchscreen)]
5-20
CX-5_8GN5-EA-17J_Edition1 2017-8-18 12:58:27
Page 331 of 628

NOTE
If not operated for several seconds, the
display returns to the previous display. To
reset bass, treble, fade, and balance, press
the menu button (
) for 2 seconds.
The unit will beep and “CLEAR” will be
displayed.
ALC (Automatic volume adjustment)
The automatic leve l control (ALC)
changes the audio volume automatically
according to the vehicle speed. The faster
the vehicle speed, the higher the volume
increases. ALC has ALC OFF and ALC
LEVEL 1 to 7 modes. At ALC LEVEL 7,
the amount that the volume can increase is
at the maximum. Select the mode
according to the driving conditions.
BEEP (Audio operation sound)
The setting for the operation sound when
pressing and holding a button can be
changed. The initial setting is ON. Set to
OFF to mute the operation sound.
BT SETUP mode
Music and other audio such as voice data
recorded on portable audio devices and
mobile phones available on the market
which are equipped with the Bluetooth
®
transmission function can be listened to
via wireless transmission over the
vehicle's speakers. Using the BT SETUP
mode, these devices can be programmed
to the Bluetooth
® unit or changed (page
5-35).
12Hr
24Hr (12 Hr/24 Hr time
adjustment)
Rotating the audio control dial switches
the display between 12 and 24-hour clock
time (page 5-22).
Interior Features
Audio Set [Type A (non-touchscreen)]
5-21
CX-5_8GN5-EA-17J_Edition1 2017-8-18 12:58:27