2018 LINCOLN MKZ flat tire
[x] Cancel search: flat tirePage 337 of 595

Engine
•Change the engine oil and filter prior tostorage because used engine oil containscontaminates which may cause enginedamage.
•Start the engine every 15 days for aminimum of 15 minutes. Run at fast idlewith the climate controls set to defrostuntil the engine reaches normaloperating temperature.
•With your foot on the brake, shift throughall the gears while the engine is running.
•We recommend that you change theengine oil before you use your vehicleagain.
Fuel system
•Fill the fuel tank with high-quality fueluntil the first automatic shutoff of the fuelpump nozzle.
Cooling system
•Protect against freezing temperatures.
•When removing your vehicle fromstorage, check coolant fluid level.Confirm that there are no cooling systemleaks and that fluid is at therecommended level.
Battery
•Check and recharge as necessary. Keepconnections clean.
•If storing your vehicle for more than 30days without recharging the battery, werecommend that you disconnect thebattery cables to maintain battery chargefor quick starting.
Note:It is necessary to reset memoryfeatures if battery cables are disconnected.
Brakes
•Make sure the brakes and parking brakerelease fully.
Tires
•Maintain recommended air pressure.
Miscellaneous
•Make sure all linkages, cables, levers andpins under your vehicle are covered withgrease to prevent rust.
•Move vehicles at least 25 ft (7.5 m) every15 days to lubricate working parts andprevent corrosion.
Removing Vehicle From Storage
When your vehicle is ready to come out ofstorage, do the following:
•Wash your vehicle to remove any dirt orgrease film build-up on window surfaces.
•Check windshield wipers for anydeterioration.
•Check under the hood for any foreignmaterial that may have collected duringstorage such as mice or squirrel nests.
•Check the exhaust for any foreignmaterial that may have collected duringstorage.
•Check tire pressures and set tire inflationper the Tire Label.
334
MKZ (CC9) Canada/United States of America, enUSA, Edition date: 201706, First Printing
Vehicle Care
Page 339 of 595

TIRE SEALANT AND INFLATOR KIT
(If Equipped)
Note:The temporary mobility kit containsenough sealant compound in the canisterfor one tire repair only. See your authorizedLincoln dealer for replacement sealantcanisters.
The kit is located under the load floor in thetrunk. The kit consists of an air compressorto re-inflate the tire and a canister of sealingcompound that will effectively seal mostpunctures caused by nails or similar objects.This kit will provide a temporary tire repairallowing you to drive your vehicle up to120 mi (200 km) at a maximum speed of50 mph (80 km/h) to reach a tire servicelocation.
Air compressor (inside)A
Selector switchB
On and off buttonC
Air pressure gaugeD
Sealant bottle and canisterE
Dual purpose hose: air and repairF
Tire valve connectorG
Accessory power plugH
Casing/housingI
Bike/raft/sports ball adaptersJ
General Information
WARNING
Failure to follow these guidelines couldresult in an increased risk of loss ofvehicle control, injury or death.
Note:Do not use the kit if a tire has becomeseverely damaged. Only punctures locatedwithin the tire tread can be sealed with thekit.
Do not attempt to repair punctures largerthan ¼ inch (6 millimeters) or damage to thetire's sidewall. The tire may not completelyseal.
336
MKZ (CC9) Canada/United States of America, enUSA, Edition date: 201706, First Printing
Wheels and TiresE175977
Page 340 of 595

Loss of air pressure may adversely affect tireperformance. For this reason:
Note:Do not drive the vehicle above 50 mph(80 km/h).
Note:Do not drive further than 120 mi(200 km). Drive only to the closest authorizedLincoln dealer or tire repair shop to haveyour tire inspected.
•Drive carefully and avoid abrupt steeringmaneuvers.
•Periodically monitor tire inflation pressurein the affected tire; if the tire is losingpressure, have the vehicle towed.
•Read the information in the Tips for Useof the Kit section to make sure safeoperation of the kit and your vehicle.
Tips for Use of the Kit
To ensure safe operation of the kit:
•Read all instructions and cautions fully.
•Before operating the kit, make sure yourvehicle is safely off the road and awayfrom moving traffic. Turn on the hazardlights.
•Always set the parking brake to ensurethe vehicle doesn't move unexpectedly.
•Do not remove any foreign objects, suchas nails or screws, from the tire.
•When using the kit, leave the enginerunning (only if the vehicle is outdoors orin a well-ventilated area) so thecompressor does not drain the vehicle'sbattery.
•Do not allow the compressor to operatecontinuously for more than 15 minutes.This will help prevent the compressorfrom overheating.
•Never leave the kit unattended duringoperation.
•Sealant compound contains latex. Thosewith latex sensitivities should useappropriate precautions to avoid anallergic reaction.
•Keep the kit away from children.
•Only use the kit when the ambienttemperature is between -22°F (-30°C) and158°F (70°C).
•Only use the sealing compound beforethe use-by date. The use-by date is on alabel on the sealant canister and can beseen through the rectangular viewingwindow on the bottom of the compressor.Check the use-by date regularly andreplace the canister after four years ofnon-use.
•Do not store the kit unsecured inside thepassenger compartment of the vehicleas it may cause injury during a suddenstop or crash. Always store the kit in itsoriginal location.
•After sealant use, the tire pressuremonitoring system sensor and valve stemon the wheel must be replaced by anauthorized Lincoln dealer.
•Operating the kit could cause anelectrical disturbance in radio, CD, andDVD player operation.
* When inflation only is required fora tire or other objects, the selectormust be in the Air position.
337
MKZ (CC9) Canada/United States of America, enUSA, Edition date: 201706, First Printing
Wheels and TiresE175978
Page 341 of 595

What to do when a Tire Is Punctured
A tire puncture within the tire's tread areacan be repaired in two stages with the kit:
•In the first stage, the tire will be reinflatedwith a sealing compound and air. Afterthe tire has been inflated, you will needto drive the vehicle about 3.7 mi (6 km)to distribute the sealant in the tire.
•In the second stage, you will need tocheck the tire pressure and adjust, ifnecessary, to the vehicle's specified tireinflation pressure.
First Stage: Reinflating the Tire withSealing Compound and Air
WARNING
Do not stand directly beside the tirewhile the compressor is operating. Thiscould cause personal injury if the tire bursts.
Note:If the tire does not inflate to therecommended tire pressure within 15minutes, stop and call roadside assistance.
WARNINGS
Watch the sidewall of the tire wheninflating. If any cracks, bumps or similardamage appears, switch the compressor offand let the air out by means of the pressurerelief valve. Do not continue driving with thistire. This could cause loss of vehicle control.
Do not run the engine when operatingthe air compressor unless the vehicleis outdoors or in a well-ventilated area.
Preparation: Park the vehicle in a safe, leveland secure area, away from moving traffic.
Turn the hazard lights on. Apply the parkingbrake and turn the engine off. Inspect theflat tire for visible damage.
Sealant compound contains latex. Useappropriate precautions to avoid any allergicreactions.
Do not remove any foreign object that haspierced the tire. If a puncture is located inthe tire sidewall, stop and call roadsideassistance.
1.Remove the valve cap from the tire valve.
2. Unwrap the dual purpose hose (blacktube) from the back of the compressorhousing.
3. Fasten the hose to the tire valve byturning the connector clockwise. Tightenthe connection securely.
338
MKZ (CC9) Canada/United States of America, enUSA, Edition date: 201706, First Printing
Wheels and Tires
Page 343 of 595

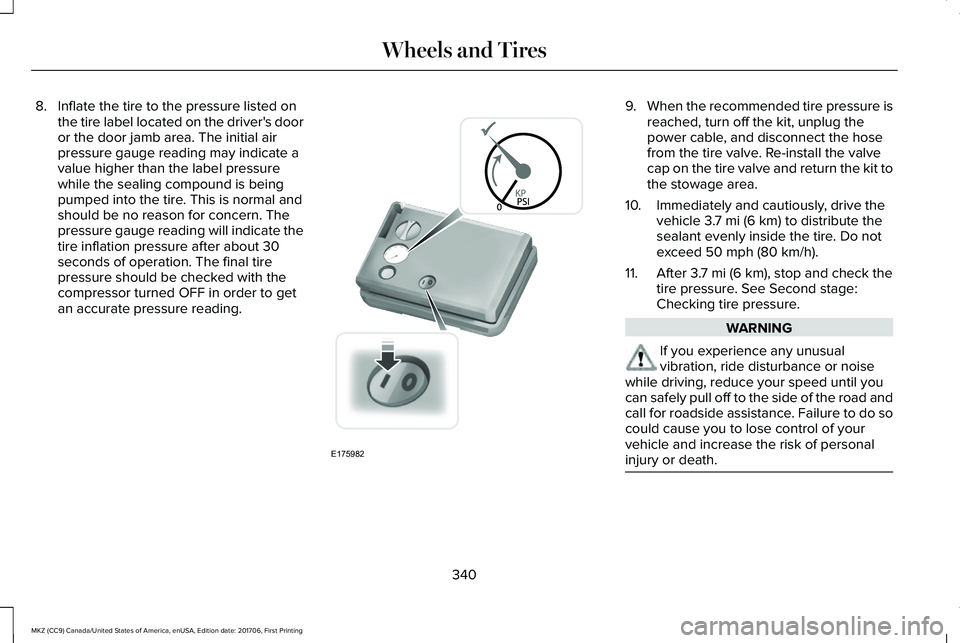
8. Inflate the tire to the pressure listed onthe tire label located on the driver's dooror the door jamb area. The initial airpressure gauge reading may indicate avalue higher than the label pressurewhile the sealing compound is beingpumped into the tire. This is normal andshould be no reason for concern. Thepressure gauge reading will indicate thetire inflation pressure after about 30seconds of operation. The final tirepressure should be checked with thecompressor turned OFF in order to getan accurate pressure reading.
9.When the recommended tire pressure isreached, turn off the kit, unplug thepower cable, and disconnect the hosefrom the tire valve. Re-install the valvecap on the tire valve and return the kit tothe stowage area.
10. Immediately and cautiously, drive thevehicle 3.7 mi (6 km) to distribute thesealant evenly inside the tire. Do notexceed 50 mph (80 km/h).
11. After 3.7 mi (6 km), stop and check thetire pressure. See Second stage:Checking tire pressure.
WARNING
If you experience any unusualvibration, ride disturbance or noisewhile driving, reduce your speed until youcan safely pull off to the side of the road andcall for roadside assistance. Failure to do socould cause you to lose control of yourvehicle and increase the risk of personalinjury or death.
340
MKZ (CC9) Canada/United States of America, enUSA, Edition date: 201706, First Printing
Wheels and TiresE175982
Page 344 of 595

Note:If you experience any unusualvibration, ride disturbance or noise whiledriving, do not proceed to the second stageof this operation.
Second Stage: Checking Tire Pressure
If you have injected sealant in the tire andthe pressure is below 20 psi (1.4 bar),continue to the next step.
Note:If the tire does not inflate to therecommended tire pressure within 15minutes, stop and call roadside assistance.
WARNING
The air compressor power plug maybe hot after use. Allow it to cool beforehandling. Failure to do so could result inpersonal injury.
Check the air pressure of your tires asfollows:
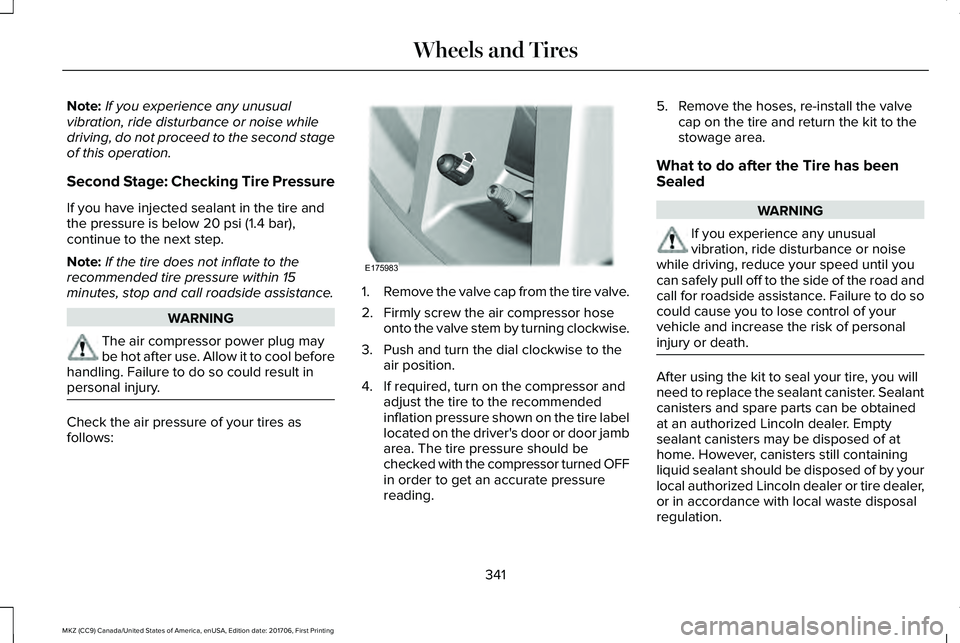
1.Remove the valve cap from the tire valve.
2. Firmly screw the air compressor hoseonto the valve stem by turning clockwise.
3. Push and turn the dial clockwise to theair position.
4. If required, turn on the compressor andadjust the tire to the recommendedinflation pressure shown on the tire labellocated on the driver's door or door jambarea. The tire pressure should bechecked with the compressor turned OFFin order to get an accurate pressurereading.
5. Remove the hoses, re-install the valvecap on the tire and return the kit to thestowage area.
What to do after the Tire has beenSealed
WARNING
If you experience any unusualvibration, ride disturbance or noisewhile driving, reduce your speed until youcan safely pull off to the side of the road andcall for roadside assistance. Failure to do socould cause you to lose control of yourvehicle and increase the risk of personalinjury or death.
After using the kit to seal your tire, you willneed to replace the sealant canister. Sealantcanisters and spare parts can be obtainedat an authorized Lincoln dealer. Emptysealant canisters may be disposed of athome. However, canisters still containingliquid sealant should be disposed of by yourlocal authorized Lincoln dealer or tire dealer,or in accordance with local waste disposalregulation.
341
MKZ (CC9) Canada/United States of America, enUSA, Edition date: 201706, First Printing
Wheels and TiresE175983
Page 346 of 595

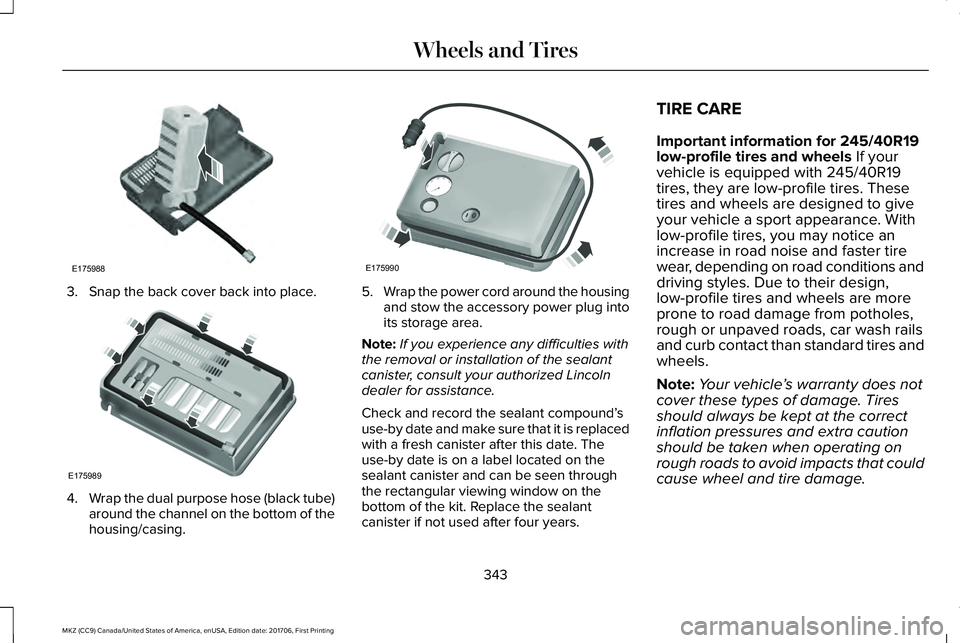
3. Snap the back cover back into place.
4.Wrap the dual purpose hose (black tube)around the channel on the bottom of thehousing/casing.
5.Wrap the power cord around the housingand stow the accessory power plug intoits storage area.
Note:If you experience any difficulties withthe removal or installation of the sealantcanister, consult your authorized Lincolndealer for assistance.
Check and record the sealant compound’suse-by date and make sure that it is replacedwith a fresh canister after this date. Theuse-by date is on a label located on thesealant canister and can be seen throughthe rectangular viewing window on thebottom of the kit. Replace the sealantcanister if not used after four years.
TIRE CARE
Important information for 245/40R19low-profile tires and wheels If yourvehicle is equipped with 245/40R19tires, they are low-profile tires. Thesetires and wheels are designed to giveyour vehicle a sport appearance. Withlow-profile tires, you may notice anincrease in road noise and faster tirewear, depending on road conditions anddriving styles. Due to their design,low-profile tires and wheels are moreprone to road damage from potholes,rough or unpaved roads, car wash railsand curb contact than standard tires andwheels.
Note:Your vehicle’s warranty does notcover these types of damage. Tires
should always be kept at the correctinflation pressures and extra cautionshould be taken when operating onrough roads to avoid impacts that couldcause wheel and tire damage.
343
MKZ (CC9) Canada/United States of America, enUSA, Edition date: 201706, First Printing
Wheels and TiresE175988 E175989 E175990
Page 348 of 595

Temperature A B C
WARNING
The temperature grade for this tireis established for a tire that isproperly inflated and not overloaded.Excessive speed, underinflation, orexcessive loading, either separately orin combination, can cause heat buildupand possible tire failure.
The temperature grades are A (thehighest), B and C, representing the tire’sresistance to the generation of heat andits ability to dissipate heat when testedunder controlled conditions on aspecified indoor laboratory test wheel.Sustained high temperature can causethe material of the tire to degenerate
and reduce tire life, and excessivetemperature can lead to sudden tirefailure. The grade C corresponds to alevel of performance which all
passenger car tires must meet under theFederal Motor Vehicle Safety StandardNo. 139. Grades B and A representhigher levels of performance on thelaboratory test wheel than the minimumrequired by law.
Glossary of Tire Terminology
•Tire label: A label showing theoriginal equipment tire sizes,recommended inflation pressure andthe maximum weight the vehicle cancarry.
•Tire Identification Number: Anumber on the sidewall of each tireproviding information about the tirebrand and manufacturing plant, tiresize and date of manufacture. Alsoreferred to as DOT code.
•Inflation pressure: A measure of theamount of air in a tire.
•Standard load: A class of P-metric orMetric tires designed to carry amaximum load at set pressure. Forexample: For P-metric tires 35 psi(2.4 bar) and for Metric tires 36 psi(2.5 bar). Increasing the inflationpressure beyond this pressure willnot increase the tire’s load carryingcapability.
•Extra load: A class of P-metric orMetric tires designed to carry aheavier maximum load at 42 psi(2.9 bar). Increasing the inflationpressure beyond this pressure willnot increase the tire’s load carryingcapability.
•kPa: Kilopascal, a metric unit of airpressure.
•PSI: Pounds per square inch, astandard unit of air pressure.
•Cold tire pressure: The tire pressurewhen the vehicle has been stationaryand out of direct sunlight for an houror more and prior to the vehiclebeing driven for 1.0 mi (1.6 km).
345
MKZ (CC9) Canada/United States of America, enUSA, Edition date: 201706, First Printing
Wheels and Tires