2018 LINCOLN CONTINENTAL warning light
[x] Cancel search: warning lightPage 237 of 615

The system uses red, yellow and greenhighlights that appear on top of the videoimage when any of the sensing systemsdetect an object.
Manual Zoom
WARNING: When manual zoom is on,the full area behind your vehicle may notshow. Be aware of your surroundings whenusing the manual zoom feature.
Note:Manual zoom is only available whenthe transmission is in reverse (R).
Note:When you enable manual zoom, onlythe centerline is shown.
Selectable settings for this feature are zoomin (+) and zoom out (-). Press the symbol inthe camera screen to change the view. Thedefault setting is zoom off.
This allows you to get a closer view of anobject behind your vehicle. The zoomedimage keeps the bumper in the image toprovide a reference. The zoom is only activewhile the transmission is in reverse (R).
Rear Camera Delay
Selectable settings for this feature are onand off.
The default setting for the rear camera delayis off.
When shifting the transmission out of reverse(R) and into any gear other than park (P), thecamera image remains in the display until:
•Your vehicle speed sufficiently increases.
•You shift your vehicle into park (P).
360 DEGREE CAMERA (If Equipped)
WARNING: The 360 degree camerasystem still requires the driver to use it inconjunction with looking out of the windows,and checking the interior and exterior mirrorsfor maximum coverage.
WARNING: You may not see objectsthat are close to either corner of the bumperor under the bumper due to the limitedcoverage of the camera system.
WARNING: Use caution when turningcamera features on or off when thetransmission is not in park (P). Make sureyour vehicle is not moving.
WARNING: At all times, you areresponsible for controlling your vehicle,supervising the system and intervening, ifrequired. Failure to take care may result inthe loss of control of your vehicle, seriouspersonal injury or death.
Note:Use caution using the 360 view whenany of the doors are ajar. If a door is ajar,the camera will be out of position and thevideo image may be incorrect.
The 360 degree camera system consists offront, side and rear cameras. The system:
•Allows you to see what is directly in frontor behind your vehicle.
•Provides cross traffic view in front andbehind your vehicle.
234
Continental (CPL) Canada/United States of America, enUSA, Edition date: 201706, Second-Printing
Parking Aids
Page 244 of 615

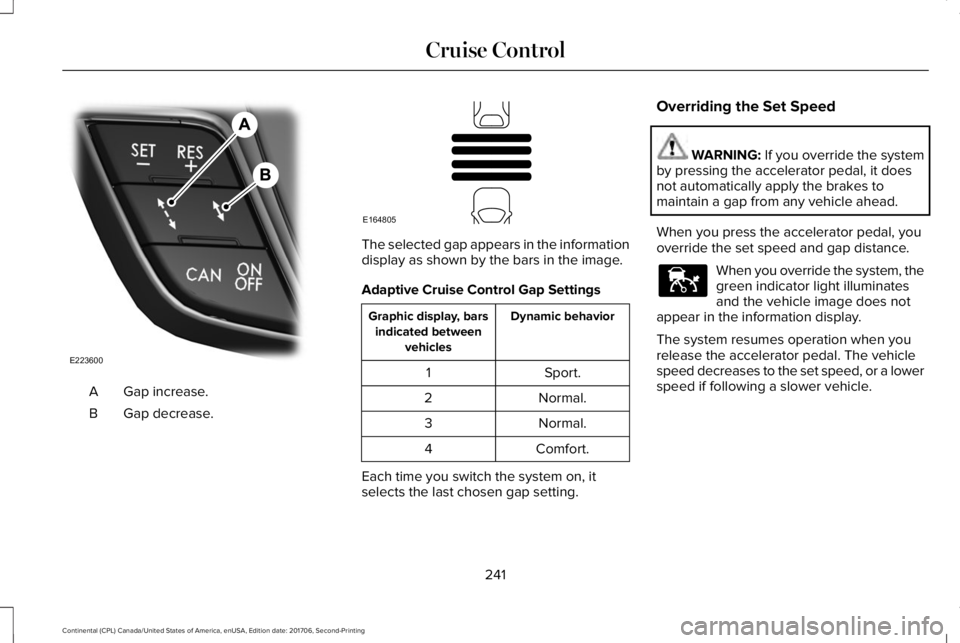
Gap increase.A
Gap decrease.B
The selected gap appears in the informationdisplay as shown by the bars in the image.
Adaptive Cruise Control Gap Settings
Dynamic behaviorGraphic display, barsindicated betweenvehicles
Sport.1
Normal.2
Normal.3
Comfort.4
Each time you switch the system on, itselects the last chosen gap setting.
Overriding the Set Speed
WARNING: If you override the systemby pressing the accelerator pedal, it doesnot automatically apply the brakes tomaintain a gap from any vehicle ahead.
When you press the accelerator pedal, youoverride the set speed and gap distance.
When you override the system, thegreen indicator light illuminatesand the vehicle image does notappear in the information display.
The system resumes operation when yourelease the accelerator pedal. The vehiclespeed decreases to the set speed, or a lowerspeed if following a slower vehicle.
241
Continental (CPL) Canada/United States of America, enUSA, Edition date: 201706, Second-Printing
Cruise ControlE223600 E164805 E144529
Page 248 of 615

ActionCause
Do not use the system in these conditions because it may not detectany vehicles ahead.Water, snow or ice on the surface of the road may interfere with theradar signals.
Wait a short time or switch to normal cruise control.You are in a desert or remote area with no other vehicles and noroadside objects.
Due to the nature of radar technology, it is possible to get a blockage warning with no actual block. This happens, for example, when drivingin sparse rural or desert environments. A false blocked condition either self clears, or clears after you restart your vehicle.
Switching to Normal Cruise Control
WARNING: Normal cruise control willnot brake when your vehicle is approachingslower vehicles. Always be aware of whichmode you have selected and apply thebrakes when necessary.
You can change from adaptive cruise controlto normal cruise control through theinformation display.
The cruise control indicator lightreplaces the adaptive cruisecontrol indicator light if you selectnormal cruise control. The gap setting doesnot display, and the system does not respondto lead vehicles. Automatic braking remainsactive to maintain set speed.
245
Continental (CPL) Canada/United States of America, enUSA, Edition date: 201706, Second-Printing
Cruise ControlE71340
Page 251 of 615

WARNING: The system may notcorrectly operate if your vehicle is fitted witha suspension kit not approved by us.
Note:The system works as long as thecamera can detect one lane marking.
Note:When aid or alert and aid modes areselected and the system detects no steeringactivity for a short period, the system alertsyou to put your hands on the steering wheel.The system may detect a light grip or touchon the steering wheel as hands off driving.
Note:The system may not function with ablocked camera, or a damaged or dirtywindshield. The system does not function ifthe operational speed of the vehicle is lessthan 40 mph (64 km/h).
When you switch the system on and itdetects an unintentional drift out of your laneis likely to occur, the system notifies orassists you to stay in your lane through thesteering system and information display. InAlert mode, the system provides a warningby vibrating the steering wheel. In Aid mode,the system provides steering assistance bygently counter steering your vehicle backinto the lane.
When the system is functioning in thecombined Alert and Aid mode, the systemfirst provides steering assistance by gentlycounter steering your vehicle back into thelane, followed by a warning by vibrating thesteering wheel if the vehicle is still out of thelane marking.
Switching the System On and Off
Note:The system on or off setting is storeduntil it is manually changed unless a MyKeyis detected. If the system detects a MyKeyit defaults to on and the mode is set to Alert.
Press the button on the direction indicatorstalk to switch the system on or off.
248
Continental (CPL) Canada/United States of America, enUSA, Edition date: 201706, Second-Printing
Driving AidsE249505 E132099
Page 254 of 615

The system can be temporarily suppressedat any time by the following:•Quick braking.
•Fast acceleration.
•Using the direction indicator.
•Evasive steering maneuver.
•Driving too close to the lane marking.
Troubleshooting
Why is the feature not available (line markings are gray) when I can see the lane markings on the road?
Your vehicle speed is outside the operational range of the feature.
The sun is shining directly into the camera lens.
A quick intentional lane change has occurred.
Your vehicle stays too close to the lane markings.
Driving at high speeds in curves.
The last alert warning or aid intervention occurred a short time ago.
Ambiguous lane markings, for example in construction zones.
Rapid transition from light to dark, or from dark to light.
Sudden offset in lane markings.
ABS or AdvanceTrac™ is active.
There is a camera blockage due to dirt, grime, fog, frost or water on the windshield.
You are driving too close to the vehicle in front of you.
251
Continental (CPL) Canada/United States of America, enUSA, Edition date: 201706, Second-Printing
Driving Aids
Page 257 of 615

System Lights and Messages
When the system detects a vehicle, an alertindicator illuminates in the exterior mirror onthe side the approaching vehicle is comingfrom. If you turn the direction indicator on forthat side of your vehicle, the alert indicatorflashes.
Note:The system may not alert you if avehicle quickly passes through the detectionzone.
Blocked Sensors
The sensors are behind the rear bumper onboth sides of your vehicle.
Note:Keep the sensors free from snow, iceand large accumulations of dirt.
Note:Do not cover the sensors with bumperstickers, repair compound or other objects.
Note:Blocked sensors could affect systemperformance.
If the sensors are blocked, a message mayappear in the information display. SeeInformation Messages (page 123). The alertindicators remain illuminated but the systemdoes not alert you.
System Errors
If the system detects a fault, a warning lampilluminates and a message displays. SeeInformation Messages (page 123).
Switching the System Off and On
You can switch the system off using theinformation display. See GeneralInformation (page 115). When you switch thesystem off, a warning lamp illuminates anda message displays. When you switch thesystem on or off, the alert indicators flashtwice.
Note:The system remembers the last settingwhen you start your vehicle.
Note:The system may not correctly operatewhen towing a trailer. For vehicles with atrailer tow module and tow bar approved byus, the system turns off when you attach atrailer. For vehicles with an aftermarkettrailer tow module or tow bar, werecommend that you switch the system offwhen you attach a trailer.
To permanently switch the system off,contact an authorized dealer.
254
Continental (CPL) Canada/United States of America, enUSA, Edition date: 201706, Second-Printing
Driving AidsE142442 E205199
Page 264 of 615

WARNING: The system may fail oroperate with reduced function during coldand severe weather conditions. Snow, ice,rain, spray and fog can adversely affect thesystem. Keep the front camera and radar freeof snow and ice. Failure to take care mayresult in the loss of control of your vehicle,serious personal injury or death.
WARNING: In situations where thevehicle camera has limited detectioncapability, this may reduce systemperformance. These situations include butare not limited to direct or low sunlight,vehicles at night without tail lights,unconventional vehicle types, pedestrianswith complex backgrounds, runningpedestrians, partly obscured pedestrians, orpedestrians that the system cannotdistinguish from a group. Failure to take caremay result in the loss of control of yourvehicle, serious personal injury or death.
WARNING: The system cannot helpprevent all crashes. Do not rely on thissystem to replace driver judgment and theneed to maintain a safe distance and speed.
Using the Pre-Collision Assist System
The system is active at speeds aboveapproximately 3 mph (5 km/h) and pedestriandetection is active at speeds up to 50 mph(80 km/h).
If your vehicle is rapidly approaching anotherstationary vehicle, a vehicle traveling in thesame direction as yours, or a pedestrianwithin your driving path, the system isdesigned to provide three levels offunctionality:
1. Alert
2. Brake Support
3. Active Braking
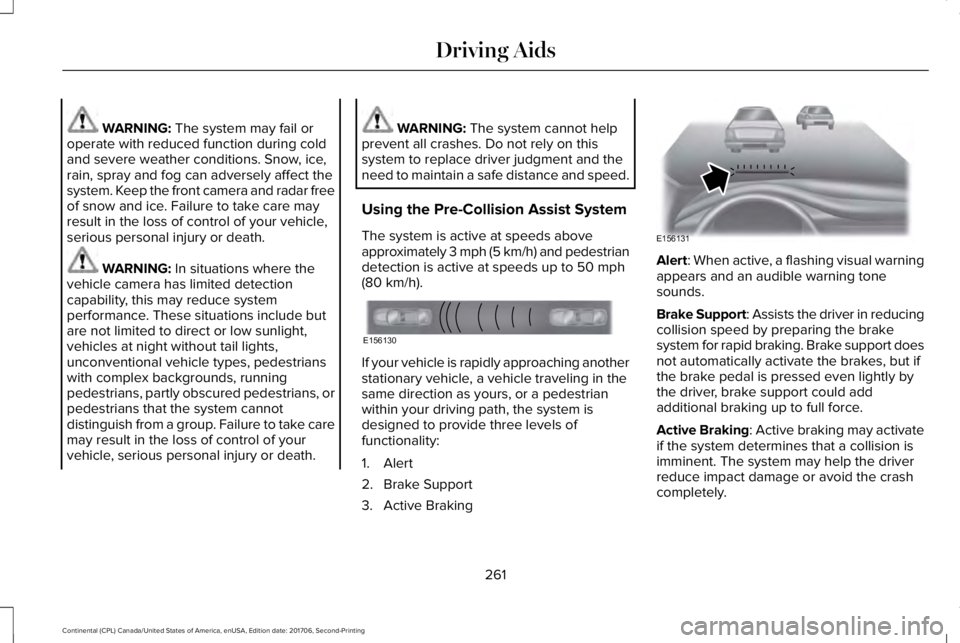
Alert: When active, a flashing visual warningappears and an audible warning tonesounds.
Brake Support: Assists the driver in reducingcollision speed by preparing the brakesystem for rapid braking. Brake support doesnot automatically activate the brakes, but ifthe brake pedal is pressed even lightly bythe driver, brake support could addadditional braking up to full force.
Active Braking: Active braking may activateif the system determines that a collision isimminent. The system may help the driverreduce impact damage or avoid the crashcompletely.
261
Continental (CPL) Canada/United States of America, enUSA, Edition date: 201706, Second-Printing
Driving AidsE156130 E156131
Page 274 of 615

TOWING A TRAILER
WARNING: Do not exceed theGVWR or the GAWR specified on thecertification label.
WARNING: Towing trailers beyondthe maximum recommended grosstrailer weight exceeds the limit of yourvehicle and could result in enginedamage, transmission damage,structural damage, loss of vehiclecontrol, vehicle rollover and personalinjury.
Note:There may be electrical itemssuch as fuses or relays that can affecttrailer towing operation. See Fuses(page 294).
The load capacity of your vehicle isdesignated by weight not volume. Youmay not necessarily be able to use allavailable space when loading yourvehicle or trailer.
Towing a trailer places extra load on theengine, transmission, axle, brakes, tires,and suspension. Inspect thesecomponents before, during and aftertowing.
Load Placement
To help minimize how trailer movementaffects the vehicle when driving:
•Load the heaviest items closest tothe trailer floor.
•Load the heaviest items in the centerof the left and right side trailer tires.
•Load the heaviest items above thetrailer axles or just slightly forwardtoward the trailer tongue. Do notallow the final trailer tongue weightto go above or below 10-15% of theloaded trailer weight.
•Select a ball mount with the correctrise or drop. When both the loadedvehicle and trailer are connected, thetrailer frame should be level, orslightly angled down toward thevehicle, when viewed from the side.
When driving with a trailer or payload, aslight takeoff vibration or shudder maybe present due to the increased payloadweight. Additional information regardingproper trailer loading and setting yourvehicle up for towing is located in theLoad Carrying chapter. See Load Limit(page 266).
You can also find information in the RV& Trailer Towing Guide available at yourauthorized dealer, or online.
271
Continental (CPL) Canada/United States of America, enUSA, Edition date: 201706, Second-Printing
Towing