2018 LINCOLN CONTINENTAL tires
[x] Cancel search: tiresPage 208 of 615

Once through water, always try the brakes.Wet brakes do not stop the vehicle aseffectively as dry brakes. Drying can beimproved by moving your vehicle slowlywhile applying light pressure on the brakepedal.
Be cautious of sudden changes in vehiclespeed or direction when you are driving inmud. Even AWD vehicles can lose tractionin slick mud. As when you are driving oversand, apply the accelerator slowly and avoidspinning your wheels. If the vehicle doesslide, steer in the direction of the slide untilyou regain control of the vehicle.
After driving through mud, clean off residuestuck to rotating driveshafts and tires. Excessmud stuck on tires and rotating driveshaftscauses an imbalance that could damagedrive components.
Note:Driving through deep water maydamage the transmission.
If the front or rear axle is submerged in water,have the power transfer unit (PTU) or rearaxle serviced by an authorized dealer.
Driving on Hilly or Sloping Terrain
Note:Avoid driving crosswise or turning onsteep slopes or hills. A danger lies in losingtraction, slipping sideways and possiblyrolling over. Whenever driving on a hill,determine beforehand the route you will use.Do not drive over the crest of a hill withoutseeing what conditions are on the other side.Do not drive in reverse over a hill withoutthe aid of an observer.
Although natural obstacles may make itnecessary to travel diagonally up or down ahill or steep incline, you should always try todrive straight up or straight down.
When climbing a steep slope or hill, start ina lower gear rather than downshifting to alower gear from a higher gear once theascent has started. This reduces strain onthe engine and the possibility of stalling.
If you do stall out, do not try to turnaroundbecause you might roll over. It is better toback down to a safe location.
Apply just enough power to the wheels toclimb the hill. Too much power will cause thetires to slip, spin or lose traction, resulting inloss of vehicle control.
Descend a hill in the same gear you woulduse to climb up the hill to avoid excessivebrake application and brake overheating. Donot descend in neutral; instead, disengageoverdrive or manually shift to a lower gear.When descending a steep hill, avoid suddenhard braking as you could lose control. Thefront wheels have to be turning in order tosteer the vehicle.
205
Continental (CPL) Canada/United States of America, enUSA, Edition date: 201706, Second-Printing
All-Wheel Drive (If Equipped)E143949
Page 209 of 615

Your vehicle has anti-lock brakes, thereforeapply the brakes steadily. Do not “pump” thebrakes.
Driving on Snow and Ice
WARNING: If you are driving in slipperyconditions that require tire chains or cables,then it is critical that you drive cautiously.Keep speeds down, allow for longer stoppingdistances and avoid aggressive steering toreduce the chances of a loss of vehiclecontrol which can lead to serious injury ordeath. If the rear end of your vehicle slideswhile cornering, steer in the direction of theslide until you regain control of your vehicle.
Note:Your vehicle may have originalequipment tires designed to optimize theperformance of your vehicle in dry or wetsummer road conditions. If your vehicle isequipped with such tires, we recommendusing a dedicated set (all 4 tires) of wintertires in snow and ice conditions. Do not mixwinter tires and performance tires betweenaxles or degraded traction and handlingcharacteristics could result.
Note:Excessive tire slippage can causedriveline damage.
AWD vehicles have advantages overtwo-wheel drive (2WD) vehicles in snow andice but can skid like any other vehicle.
Should you start to slide while driving onsnowy or icy roads, turn the steering wheelin the direction of the slide until you regaincontrol.
206
Continental (CPL) Canada/United States of America, enUSA, Edition date: 201706, Second-Printing
All-Wheel Drive (If Equipped)
Page 220 of 615
PRINCIPLE OF OPERATION
WARNING: Vehicle modificationsinvolving braking system, aftermarket roofracks, suspension, steering system, tireconstruction and wheel and tire size maychange the handling characteristics of yourvehicle and may adversely affect theperformance of the electronic stability controlsystem. In addition, installing any stereoloudspeakers may interfere with andadversely affect the electronic stabilitycontrol system. Install any aftermarket stereoloudspeaker as far as possible from the frontcenter console, the tunnel, and the frontseats in order to minimize the risk ofinterfering with the electronic stability controlsensors. Reducing the effectiveness of theelectronic stability control system could leadto an increased risk of loss of vehicle control,vehicle rollover, personal injury and death.
WARNING: Remember that evenadvanced technology cannot defy the lawsof physics. It’s always possible to lose controlof a vehicle due to inappropriate driver inputfor the conditions. Aggressive driving on anyroad condition can cause you to lose controlof your vehicle increasing the risk of personalinjury or property damage. Activation of theelectronic stability control system is anindication that at least some of the tires haveexceeded their ability to grip the road; thiscould reduce the operator’s ability to controlthe vehicle potentially resulting in a loss ofvehicle control, vehicle rollover, personalinjury and death. If your electronic stabilitycontrol system activates, SLOW DOWN.
The system automatically turns on each timeyou switch the ignition on.
If a fault occurs in either the stability controlor the traction control system, you mayexperience the following conditions:
•The stability and traction control lightilluminates steadily.
•The stability control and traction controlsystems do not enhance your vehicle'sability to maintain traction of the wheels.
•The adaptive steering system (ifequipped) automatically changes thesteering function to a fixed steering ratio.See Steering (page 259).
If a driving condition activates either thestability control or the traction control systemyou may experience the following conditions:
•The stability and traction control lightflashes.
•Your vehicle slows down.
•Reduced engine power.
•A vibration in the brake pedal.
•The brake pedal is stiffer than usual.
•If the driving condition is severe and yourfoot is not on the brake, the brake pedalmay move as the system applies higherbrake force.
217
Continental (CPL) Canada/United States of America, enUSA, Edition date: 201706, Second-Printing
Stability Control
Page 227 of 615

Note:Keep the sensors free from snow, iceand large accumulations of dirt.
Note:Do not cover up the sensors.
Note:Do not clean the sensors with sharpobjects.
Note:The sensors may not detect objectswith surfaces that absorb ultrasonic waves.The sensors may falsely detect objects dueto ultrasonic interference caused bymotorcycle exhausts, truck air brakes orhorns, for example.
Note:If you change any tires, the systemmust recalibrate and may not correctlyoperate for a short time.
The system may not correctly operate in anyof the following conditions:
•You use a spare tire or a tire that issignificantly worn more than the othertires.
•One or more tires are incorrectly inflated.
•You try to park on a tight curve.
•Something passes between the frontbumper and the parking space. Forexample, a pedestrian or cyclist.
•The edge of the neighboring parkedvehicle is high off the ground. Forexample, a bus, tow truck or flatbedtruck.
•The weather conditions are poor. Forexample, during heavy rain, snow, fog,high humidity and high temperatures.
Do not use the system if:
•You have attached an add-on accessoryclose to the sensors on the front or rearof your vehicle. For example, a bike rackor trailer.
•You have attached an overhangingobject to the roof. For example, asurfboard.
•The front bumper, rear bumper or theside sensors are damaged.
•The correct tire size is not in use on yourvehicle. For example, a mini-spare tire.
Using Active Park Assist
Selecting an Active Park Assist Mode
Press the button once to activateparallel parking. Press the buttona second time to activateperpendicular parking. If you press thebutton again the system switches off.
If your vehicle is parked and after you switchthe ignition on, you can use the informationdisplay to toggle through the modes. Pressthe button to switch the system on and openthe system menu in the information display.
Note:If your vehicle is parked, the defaultmode is parallel park out assist. However, ifyou did not use active park assist to parallelpark your vehicle, use the informationdisplay to select park out assist.
Note:You can repeatedly press the activepark assist button to toggle through themodes only after moving your vehicleapproximately 33 ft (10 m).
224
Continental (CPL) Canada/United States of America, enUSA, Edition date: 201706, Second-Printing
Parking AidsE146186
Page 233 of 615
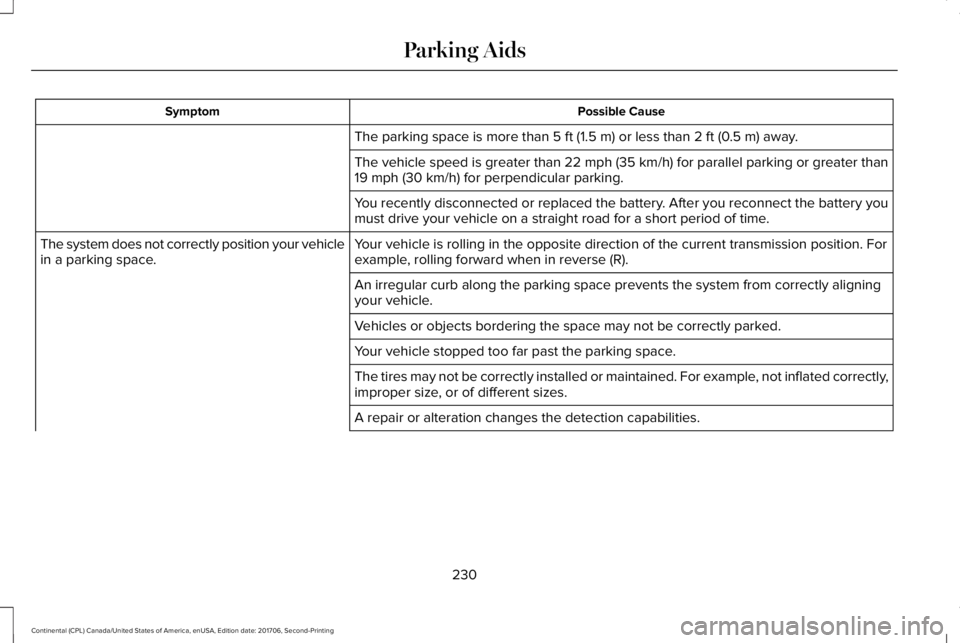
Possible CauseSymptom
The parking space is more than 5 ft (1.5 m) or less than 2 ft (0.5 m) away.
The vehicle speed is greater than 22 mph (35 km/h) for parallel parking or greater than19 mph (30 km/h) for perpendicular parking.
You recently disconnected or replaced the battery. After you reconnect the battery youmust drive your vehicle on a straight road for a short period of time.
Your vehicle is rolling in the opposite direction of the current transmission position. Forexample, rolling forward when in reverse (R).The system does not correctly position your vehiclein a parking space.
An irregular curb along the parking space prevents the system from correctly aligningyour vehicle.
Vehicles or objects bordering the space may not be correctly parked.
Your vehicle stopped too far past the parking space.
The tires may not be correctly installed or maintained. For example, not inflated correctly,improper size, or of different sizes.
A repair or alteration changes the detection capabilities.
230
Continental (CPL) Canada/United States of America, enUSA, Edition date: 201706, Second-Printing
Parking Aids
Page 245 of 615
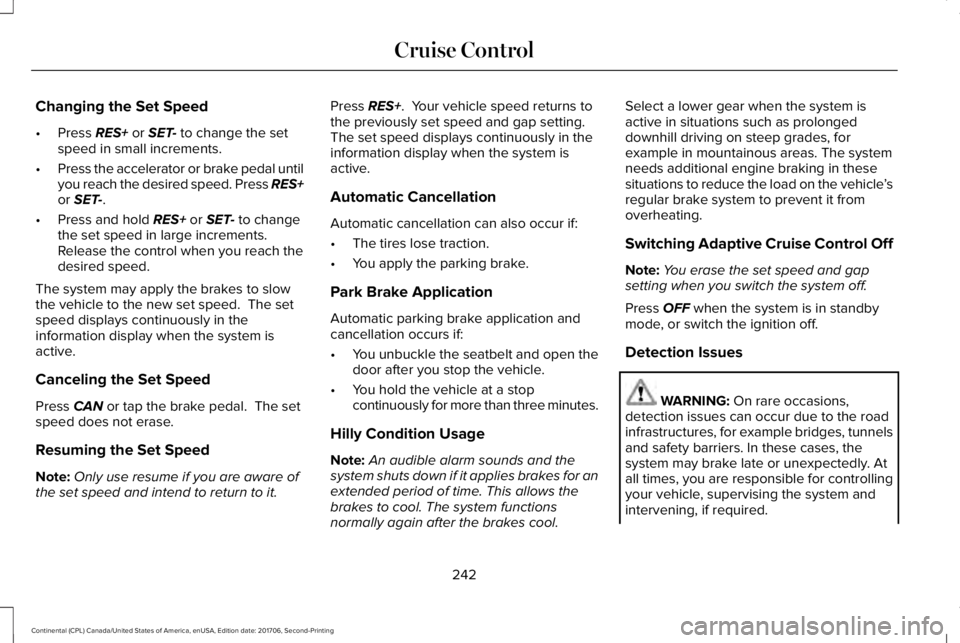
Changing the Set Speed
•Press RES+ or SET- to change the setspeed in small increments.
•Press the accelerator or brake pedal untilyou reach the desired speed. Press RES+or SET-.
•Press and hold RES+ or SET- to changethe set speed in large increments.Release the control when you reach thedesired speed.
The system may apply the brakes to slowthe vehicle to the new set speed. The setspeed displays continuously in theinformation display when the system isactive.
Canceling the Set Speed
Press CAN or tap the brake pedal. The setspeed does not erase.
Resuming the Set Speed
Note:Only use resume if you are aware ofthe set speed and intend to return to it.
Press RES+. Your vehicle speed returns tothe previously set speed and gap setting. The set speed displays continuously in theinformation display when the system isactive.
Automatic Cancellation
Automatic cancellation can also occur if:
•The tires lose traction.
•You apply the parking brake.
Park Brake Application
Automatic parking brake application andcancellation occurs if:
•You unbuckle the seatbelt and open thedoor after you stop the vehicle.
•You hold the vehicle at a stopcontinuously for more than three minutes.
Hilly Condition Usage
Note:An audible alarm sounds and thesystem shuts down if it applies brakes for anextended period of time. This allows thebrakes to cool. The system functionsnormally again after the brakes cool.
Select a lower gear when the system isactive in situations such as prolongeddownhill driving on steep grades, forexample in mountainous areas. The systemneeds additional engine braking in thesesituations to reduce the load on the vehicle’sregular brake system to prevent it fromoverheating.
Switching Adaptive Cruise Control Off
Note:You erase the set speed and gapsetting when you switch the system off.
Press OFF when the system is in standbymode, or switch the ignition off.
Detection Issues
WARNING: On rare occasions,detection issues can occur due to the roadinfrastructures, for example bridges, tunnelsand safety barriers. In these cases, thesystem may brake late or unexpectedly. Atall times, you are responsible for controllingyour vehicle, supervising the system andintervening, if required.
242
Continental (CPL) Canada/United States of America, enUSA, Edition date: 201706, Second-Printing
Cruise Control
Page 255 of 615
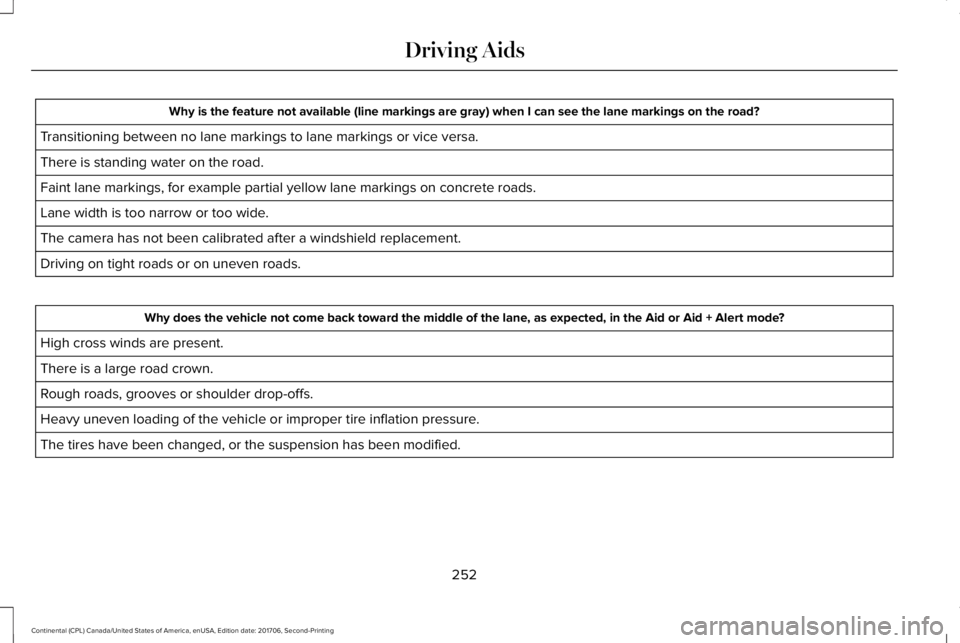
Why is the feature not available (line markings are gray) when I can see the lane markings on the road?
Transitioning between no lane markings to lane markings or vice versa.
There is standing water on the road.
Faint lane markings, for example partial yellow lane markings on concrete roads.
Lane width is too narrow or too wide.
The camera has not been calibrated after a windshield replacement.
Driving on tight roads or on uneven roads.
Why does the vehicle not come back toward the middle of the lane, as expected, in the Aid or Aid + Alert mode?
High cross winds are present.
There is a large road crown.
Rough roads, grooves or shoulder drop-offs.
Heavy uneven loading of the vehicle or improper tire inflation pressure.
The tires have been changed, or the suspension has been modified.
252
Continental (CPL) Canada/United States of America, enUSA, Edition date: 201706, Second-Printing
Driving Aids
Page 272 of 615
The gross combined weight must neverexceed the Gross Combined WeightRating.
Note: For trailer towing informationrefer to the RV and Trailer Towing Guideavailable at an authorized dealer.
WARNING: Do not exceed theGVWR or the GAWR specified on theSafety Compliance Certification label.
WARNING: Do not usereplacement tires with lower loadcarrying capacities than the original tiresbecause they may lower your vehicle’sGVWR and GAWR limitations.Replacement tires with a higher limitthan the original tires do not increase
the GVWR and GAWR limitations.
WARNING: Exceeding any vehicleweight rating limitation could result inserious damage to your vehicle,personal injury or both.
Steps for determining the correct loadlimit:
1.Locate the statement "The combinedweight of occupants and cargoshould never exceed XXX kg or XXXlb." on your vehicle’s placard.
2.Determine the combined weight ofthe driver and passengers that willbe riding in your vehicle.
3.Subtract the combined weight of thedriver and passengers from XXX kgor XXX lb.
4. The resulting figure equals theavailable amount of cargo andluggage load capacity. For example,if the “XXX” amount equals 1,400 lb.and there will be five 150 lb.
passengers in your vehicle, theamount of available cargo andluggage load capacity is 650 lb.(1400-750 (5 x 150) = 650 lb.)
5.Determine the combined weight ofluggage and cargo being loaded onthe vehicle. That weight may notsafely exceed the available cargoand luggage load capacity calculatedin Step 4.
6.If your vehicle will be towing a trailer,load from your trailer will betransferred to your vehicle. Consultthis manual to determine how thisreduces the available cargo andluggage load capacity of yourvehicle.
Helpful examples for calculating theavailable amount of cargo andluggage load capacity
Suppose your vehicle has a 1400-pound
(635-kilogram) cargo and luggagecapacity. You decide to go golfing. Isthere enough load capacity to carry you,four of your friends and all the golf bags?You and four friends average 220pounds (99 kilograms) each and the golfbags weigh approximately 30 pounds(13.5 kilograms) each. The calculationwould be: 1400 - (5 x 220) - (5 x 30) =
269
Continental (CPL) Canada/United States of America, enUSA, Edition date: 201706, Second-Printing
Load Carrying