2018 LINCOLN CONTINENTAL remove seats
[x] Cancel search: remove seatsPage 26 of 615

4. Insert the belt tongue into the properbuckle (the buckle closest to the directionthe tongue is coming from) for thatseating position until you hear a snap andfeel the latch engage. Make sure thetongue is latched securely by pulling onit.
5. To put the retractor in the automaticlocking mode, grasp the shoulder portionof the belt and pull downward until youpull all of the belt out.
Note:The automatic locking mode isavailable on the front passenger and rearseats.
6.Allow the belt to retract to remove slack.The belt clicks as it retracts to indicate itis in the automatic locking mode.
7.Try to pull the belt out of the retractor tomake sure the retractor is in theautomatic locking mode (you should notbe able to pull more belt out). If theretractor is not locked, unbuckle the beltand repeat Steps 5 and 6.
8. Remove remaining slack from the belt.Force the seat down with extra weight,for example, by pressing down orkneeling on the child restraint whilepulling up on the shoulder belt in orderto force slack from the belt. This isnecessary to remove the remaining slackthat will exist once the extra weight of
23
Continental (CPL) Canada/United States of America, enUSA, Edition date: 201706, Second-Printing
Child SafetyE142531 E142875 E142533
Page 29 of 615

5. To put the retractor in the automaticlocking mode, grasp the lap portion ofthe inflatable seatbelt and pull upwarduntil you pull all of the belt out.
Note:The automatic locking mode isavailable on the front passenger and rearseats.
Note:Unlike the standard seatbelt, theinflatable seatbelt's unique lap portion locksthe child restraint for installation. The abilityfor the shoulder portion of the belt to movefreely is normal, even after you put the lapbelt into the automatic locking mode.
Note:The lock-off device on some childrestraints may not accommodate theshoulder portion of the inflatable seatbelt.Follow all instructions provided by themanufacturer of the child restraint regardingthe necessary and proper use of the lock-offdevice. In some instances, these deviceshave been provided only for use in vehicleswith seatbelt systems that would otherwiserequire a locking clip.
6.Allow the belt to retract to remove slack.The belt clicks as it retracts to indicate itis in the automatic locking mode.
7.Try to pull the belt out of the retractor tomake sure the retractor is in theautomatic locking mode (you should notbe able to pull more belt out). If theretractor is not locked, unbuckle the beltand repeat Steps 5 and 6.
8. Remove remaining slack from the belt.Force the seat down with extra weight,for example, by pressing down orkneeling on the child restraint whilepulling down on the lap belt in order toforce slack from the belt. This isnecessary to remove the remaining slackthat will exist once the extra weight ofthe child is added to the child restraint.It also helps to achieve the propersnugness of the child restraint to yourvehicle. Sometimes, a slight lean towardthe buckle will additionally help toremove remaining slack from the belt.
26
Continental (CPL) Canada/United States of America, enUSA, Edition date: 201706, Second-Printing
Child SafetyE146524 E146525
Page 34 of 615

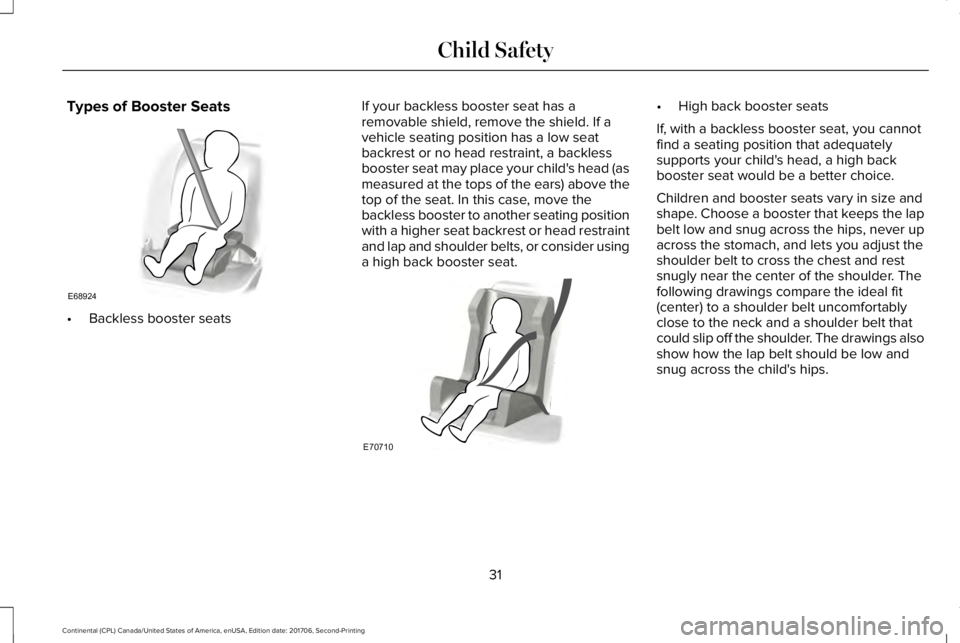
Types of Booster Seats
•Backless booster seats
If your backless booster seat has aremovable shield, remove the shield. If avehicle seating position has a low seatbackrest or no head restraint, a backlessbooster seat may place your child's head (asmeasured at the tops of the ears) above thetop of the seat. In this case, move thebackless booster to another seating positionwith a higher seat backrest or head restraintand lap and shoulder belts, or consider usinga high back booster seat.
•High back booster seats
If, with a backless booster seat, you cannotfind a seating position that adequatelysupports your child's head, a high backbooster seat would be a better choice.
Children and booster seats vary in size andshape. Choose a booster that keeps the lapbelt low and snug across the hips, never upacross the stomach, and lets you adjust theshoulder belt to cross the chest and restsnugly near the center of the shoulder. Thefollowing drawings compare the ideal fit(center) to a shoulder belt uncomfortablyclose to the neck and a shoulder belt thatcould slip off the shoulder. The drawings alsoshow how the lap belt should be low andsnug across the child's hips.
31
Continental (CPL) Canada/United States of America, enUSA, Edition date: 201706, Second-Printing
Child SafetyE68924 E70710
Page 37 of 615

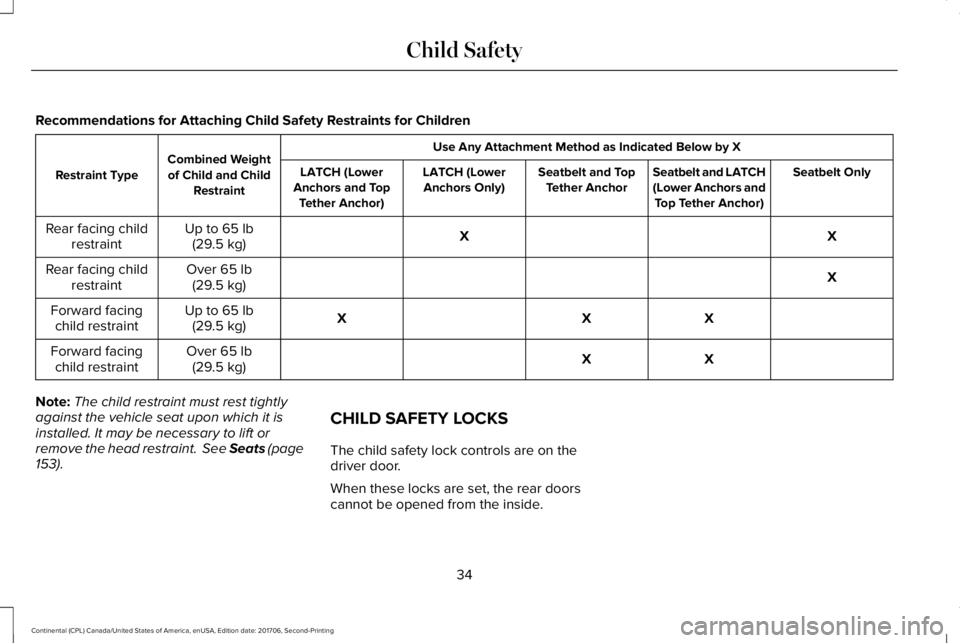
Recommendations for Attaching Child Safety Restraints for Children
Use Any Attachment Method as Indicated Below by XCombined Weightof Child and ChildRestraintRestraint TypeSeatbelt OnlySeatbelt and LATCH(Lower Anchors andTop Tether Anchor)
Seatbelt and TopTether AnchorLATCH (LowerAnchors Only)LATCH (LowerAnchors and TopTether Anchor)
XXUp to 65 lb(29.5 kg)Rear facing childrestraint
XOver 65 lb(29.5 kg)Rear facing childrestraint
XXXUp to 65 lb(29.5 kg)Forward facingchild restraint
XXOver 65 lb(29.5 kg)Forward facingchild restraint
Note:The child restraint must rest tightlyagainst the vehicle seat upon which it isinstalled. It may be necessary to lift orremove the head restraint. See Seats (page153).
CHILD SAFETY LOCKS
The child safety lock controls are on thedriver door.
When these locks are set, the rear doorscannot be opened from the inside.
34
Continental (CPL) Canada/United States of America, enUSA, Edition date: 201706, Second-Printing
Child Safety
Page 54 of 615

•When the front passenger sensingsystem disables (will not inflate) the frontpassenger frontal airbag, the passengerairbag status indicator illuminates the offlamp and stays lit to remind you that thefront passenger frontal airbag is disabled.
•If you have installed the child restraintand the passenger airbag status indicatorilluminates the on lamp, then switch yourvehicle off, remove the child restraintfrom your vehicle and reinstall therestraint following the child restraintmanufacturer's instructions.
The front passenger sensing system workswith sensors that are part of the frontpassenger seat and seatbelt. The sensorsare designed to detect the presence of aproperly seated occupant and determine ifthe front passenger frontal airbag should beenabled.
•When the front passenger sensingsystem enables the front passengerfrontal airbag (may inflate), the passengerairbag status indicator illuminates the onlamp and remains illuminated.
If a person of adult size is sitting in the frontpassenger seat, but the passenger airbagstatus indicator off lamp is lit, it is possiblethat the person is not sitting properly in theseat. If this happens:
•Switch your vehicle off and ask theperson to place the seat backrest in anupright position.
•Have the person sit upright in the seat,centered on the seat cushion, with theperson's legs comfortably extended.
•Restart your vehicle and have the personremain in this position for about twominutes. This allows the system to detectthat person and enable the passengerfrontal airbag.
•If the indicator off lamp remains lit evenafter this, you should advise the personto ride in the rear seat.
After all occupants have adjusted their seatsand put on seatbelts, it is very important thatthey continue to sit properly. A properlyseated occupant sits upright, leaning againstthe seatback, and centered on the seatcushion, with their feet comfortably extendedon the floor. Sitting improperly can increase
the chance of injury in a crash event. Forexample, if an occupant slouches, lies down,turns sideways, sits forward, leans forwardor sideways, or puts one or both feet up, thechance of injury during a crash is greatlyincreased.
If you think that the state of the passengerairbag status indicator lamp is incorrect,check for the following:
•Objects lodged underneath the seat.
•Objects between the seat cushion andthe center console.
•Objects hanging off the seat backrest.
•Objects stowed in the seat backrest mappocket.
•Objects placed on the occupant's lap.
•Cargo interference with the seat
•Other passengers pushing or pulling onthe seat.
•Rear passenger feet and knees restingor pushing on the seat.
51
Continental (CPL) Canada/United States of America, enUSA, Edition date: 201706, Second-Printing
Supplementary Restraints System
Page 55 of 615

The conditions listed above may cause theweight of a properly seated occupant to beincorrectly interpreted by the front passengersensing system. The person in the frontpassenger seat may appear heavier or lighterdue to the conditions described in theprevious list.
Make sure the front passengersensing system is operatingproperly. See Crash Sensors andAirbag Indicator (page 55).
If the airbag readiness light is lit, do thefollowing:
The driver and adult passengers shouldcheck for objects lodged underneath thefront passenger seat or cargo interfering withthe seat.
If objects are lodged or cargo is interferingwith the seat, please take the following stepsto remove the obstruction:
•Pull your vehicle over.
•Switch your vehicle off.
•Driver or adult passengers should checkfor any objects lodged underneath thefront passenger seat or cargo interferingwith the seat.
•Remove the obstruction(s) (if found).
•Restart your vehicle.
•Wait at least two minutes and verify thatthe airbag readiness light in theinstrument cluster is no longerilluminated.
•If the airbag readiness light in theinstrument cluster remains illuminated,this may or may not be a problem due tothe front passenger sensing system.
Do not attempt to repair or service thesystem. Take your vehicle immediately to anauthorized dealer.
If it is necessary to modify an advanced frontairbag system to accommodate a personwith disabilities, contact the Ford CustomerRelationship Center.
SIDE AIRBAGS
WARNING: Do not place objects ormount equipment on or near the airbagcover, on the side of the seatbacks (of thefront seats), or in front seat areas that maycome into contact with a deploying airbag.Failure to follow these instructions mayincrease the risk of personal injury in theevent of a crash.
WARNING: Do not use accessory seatcovers. The use of accessory seat coversmay prevent the deployment of the sideairbags and increase the risk of injury in anaccident.
WARNING: Do not lean your head onthe door. The side airbag could injure youas it deploys from the side of the seatback.
52
Continental (CPL) Canada/United States of America, enUSA, Edition date: 201706, Second-Printing
Supplementary Restraints SystemE67017
Page 152 of 615

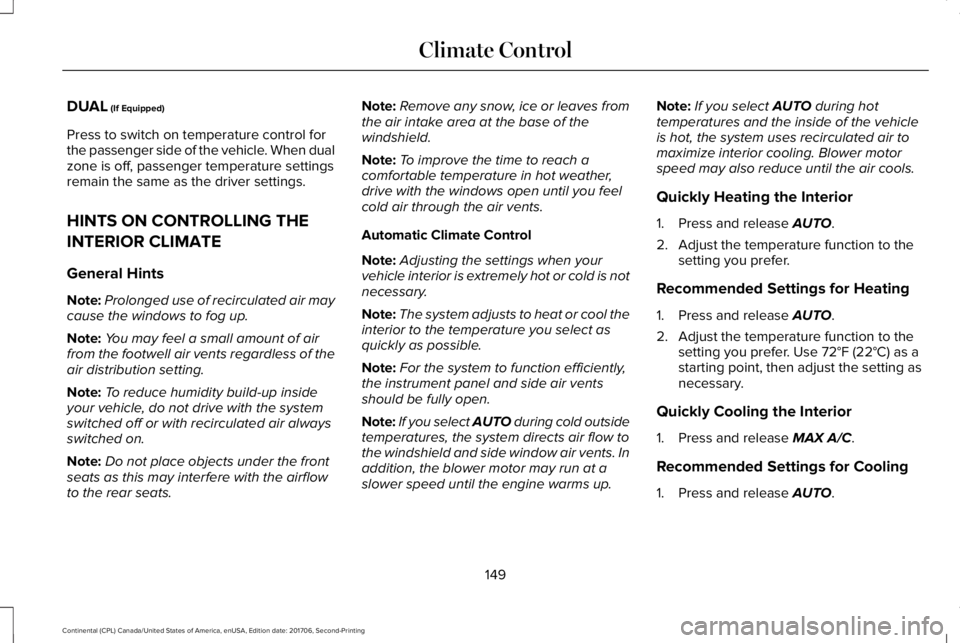
DUAL (If Equipped)
Press to switch on temperature control forthe passenger side of the vehicle. When dualzone is off, passenger temperature settingsremain the same as the driver settings.
HINTS ON CONTROLLING THE
INTERIOR CLIMATE
General Hints
Note:Prolonged use of recirculated air maycause the windows to fog up.
Note:You may feel a small amount of airfrom the footwell air vents regardless of theair distribution setting.
Note:To reduce humidity build-up insideyour vehicle, do not drive with the systemswitched off or with recirculated air alwaysswitched on.
Note:Do not place objects under the frontseats as this may interfere with the airflowto the rear seats.
Note:Remove any snow, ice or leaves fromthe air intake area at the base of thewindshield.
Note:To improve the time to reach acomfortable temperature in hot weather,drive with the windows open until you feelcold air through the air vents.
Automatic Climate Control
Note:Adjusting the settings when yourvehicle interior is extremely hot or cold is notnecessary.
Note:The system adjusts to heat or cool theinterior to the temperature you select asquickly as possible.
Note:For the system to function efficiently,the instrument panel and side air ventsshould be fully open.
Note:If you select AUTO during cold outsidetemperatures, the system directs air flow tothe windshield and side window air vents. Inaddition, the blower motor may run at aslower speed until the engine warms up.
Note:If you select AUTO during hottemperatures and the inside of the vehicleis hot, the system uses recirculated air tomaximize interior cooling. Blower motorspeed may also reduce until the air cools.
Quickly Heating the Interior
1. Press and release AUTO.
2. Adjust the temperature function to thesetting you prefer.
Recommended Settings for Heating
1. Press and release AUTO.
2. Adjust the temperature function to thesetting you prefer. Use 72°F (22°C) as astarting point, then adjust the setting asnecessary.
Quickly Cooling the Interior
1. Press and release MAX A/C.
Recommended Settings for Cooling
1. Press and release AUTO.
149
Continental (CPL) Canada/United States of America, enUSA, Edition date: 201706, Second-Printing
Climate Control
Page 154 of 615

Rear fan speed control: Adjuststhe volume of air circulated to therear passenger compartment.
A
Rear heated seats: Press to switchthe rear heated seats on and off.B
Rear AUTO: Press to switch onautomatic operation. Adjust toselect the desired temperature.Fan speed and air distributionadjust to heat or cool the vehicleto maintain the temperature youdesire.
C
Rear air distribution control: Pressto switch the direction of air flow.D
Rear passenger temperaturecontrol: Adjusts the temperaturesetting for the rear passengercompartment.
E
Rear ventilated seats: Press toswitch the rear ventilated seats onand off. See Rear PassengerClimate Controls (page 150).
F
Rear passenger power: Press toswitch the rear system on and off.G
Note: The rear climate systemturns off whenever you switch onmax defrost, and turns back onwhen you switch max defrost off.You can switch on the rear systemwith max defrost on.
Rear control lock: Whenilluminated, you can only operatethe rear passenger settingsthrough the front controls.
H
Note: The indicator brieflyilluminates if you try to use the rearclimate system when the controlsare locked.
HEATED WINDOWS AND MIRRORS
Note:Make sure the engine is runningbefore operating the heated windows.
Note:Depending on your remote startsettings, the heated windows, mirrors andwipers may remain on after remote startingthe vehicle.
Heated Rear Window
Press the button to clear theheated rear window of thin ice andfog. The heated rear window turnsoff after a short period of time. Press thebutton again to switch it off. It illuminateswhen you switch the system on.
Note: Do not use razor blades or othersharp objects to clean or remove decals fromthe inside of the heated rear window. Thevehicle warranty does not cover damagecaused to the heated rear window grid lines.
Heated Exterior Mirrors (If Equipped)
When you switch the heated rear windowon, the heated exterior mirrors turn on.
Note:Do not remove ice from the mirrorswith a scraper or adjust the mirror glasswhen it is frozen in place.
Note:Do not clean the mirror housing orglass with harsh abrasives, fuel or otherpetroleum-based cleaning products.
151
Continental (CPL) Canada/United States of America, enUSA, Edition date: 201706, Second-Printing
Climate ControlE72507