2018 LEXUS LS500 wheel
[x] Cancel search: wheelPage 326 of 514

326 5-3. Using the air conditioning system and defogger
LS500_OM_OM50F54U_(U) *
:If equipped
Heated steering wheel *
/seat
heaters *
/seat ventilators *
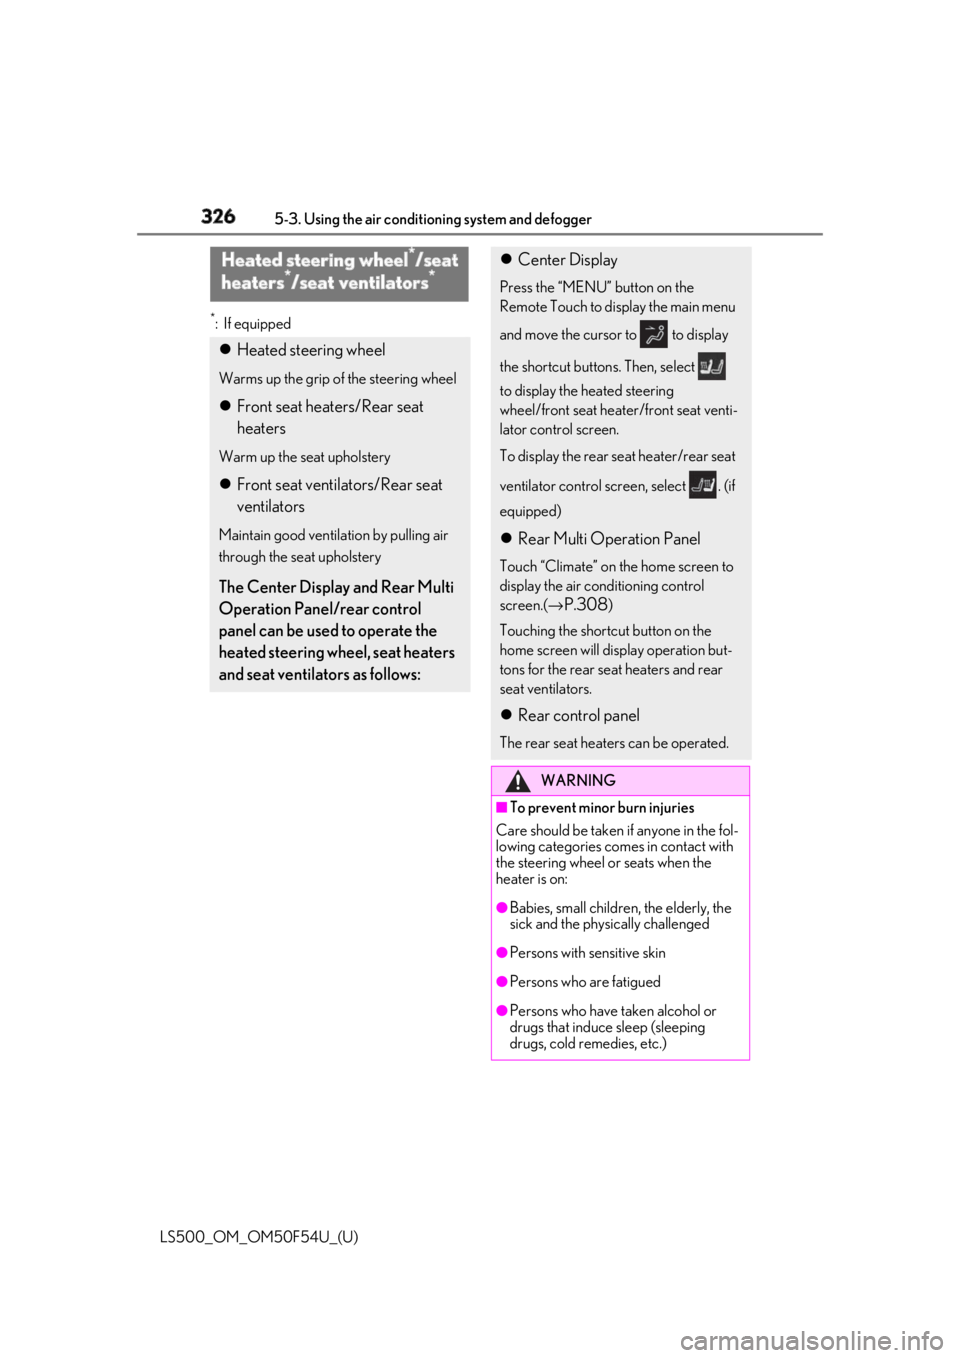
Heated steering wheel Warms up the grip of the steering wheel
Front seat heaters/Rear seat
heaters Warm up the seat upholstery
Front seat ventilators/Rear seat
ventilators Maintain good ventilation by pulling air
through the seat upholstery
The Center Display and Rear Multi
Operation Panel/rear control
panel can be used to operate the
heated steering wheel, seat heaters
and seat ventilators as follows: Center Display Press the “MENU” button on the
Remote Touch to display the main menu
and move the cursor to to display
the shortcut button s. Then, select
to display the heated steering
wheel/front seat heater/front seat venti-
lator control screen.
To display the rear seat heater/rear seat
ventilator control sc reen, select . (if
equipped)
Rear Multi Operation Panel Touch “Climate” on the home screen to
display the air conditioning control
screen.( →
P.308 )
Touching the shortc ut button on the
home screen will di splay operation but-
tons for the rear seat heaters and rear
seat ventilators.
Rear control panel The rear seat heaters can be operated.
WARNING■
To prevent minor burn injuries
Care should be taken if anyone in the fol-
lowing categories comes in contact with
the steering wheel or seats when the
heater is on:
●
Babies, small children, the elderly, the
sick and the physically challenged
●
Persons with sensitive skin
●
Persons who are fatigued
●
Persons who have taken alcohol or
drugs that induce sleep (sleeping
drugs, cold remedies, etc.)
Page 327 of 514

3275-3. Using the air conditio ning system and defogger
LS500_OM_OM50F54U_(U) 5
Interior features ■
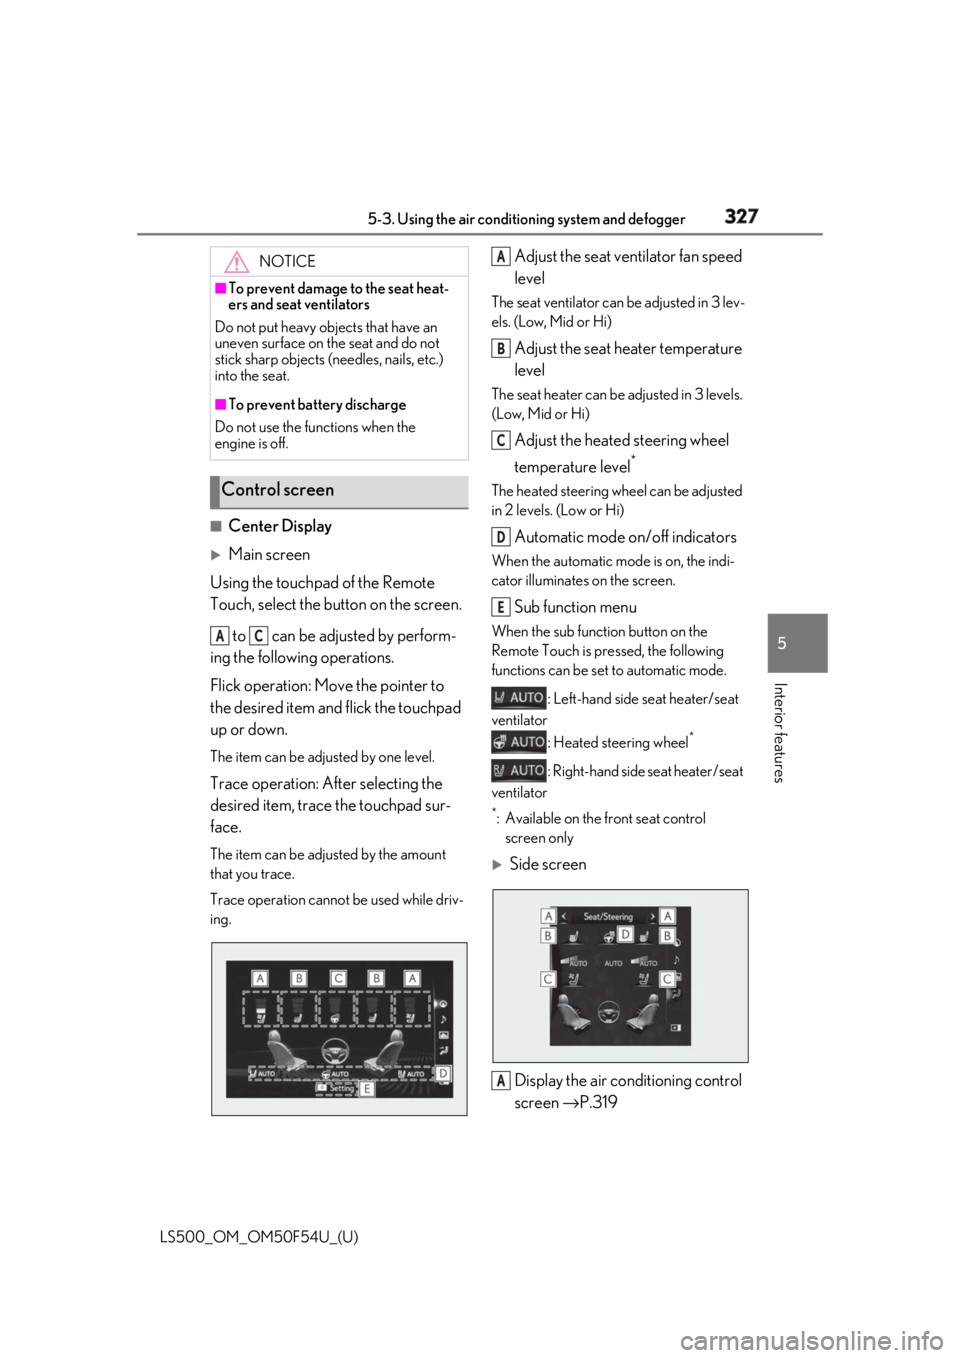
Center Display
Main screen
Using the touchpad of the Remote
Touch, select the button on the screen.
to can be adjusted by perform-
ing the following operations.
Flick operation: Move the pointer to
the desired item and flick the touchpad
up or down. The item can be adjusted by one level.
Trace operation: After selecting the
desired item, trace the touchpad sur-
face. The item can be adjusted by the amount
that you trace.
Trace operation cannot be used while driv-
ing. Adjust the seat ventilator fan speed
level The seat ventilator can be adjusted in 3 lev-
els. (Low, Mid or Hi)
Adjust the seat heater temperature
level The seat heater can be adjusted in 3 levels.
(Low, Mid or Hi)
Adjust the heated steering wheel
temperature level *
The heated steering wheel can be adjusted
in 2 levels. (Low or Hi)
Automatic mode on/off indicators When the automatic mode is on, the indi-
cator illuminates on the screen.
Sub function menu When the sub function button on the
Remote Touch is pressed, the following
functions can be set to automatic mode.
: Left-hand side seat heater/seat
ventilator
: Heated steering wheel *
: Right-hand side seat heater/seat
ventilator *
: Available on the front seat control
screen only
Side screen
Display the air conditioning control
screen → P.319NOTICE■
To prevent damage to the seat heat-
ers and seat ventilators
Do not put heavy objects that have an
uneven surface on the seat and do not
stick sharp objects (needles, nails, etc.)
into the seat. ■
To prevent battery discharge
Do not use the functions when the
engine is off.
Control screen A C A
B
C
D
E
A
Page 328 of 514

328 5-3. Using the air conditioning system and defogger
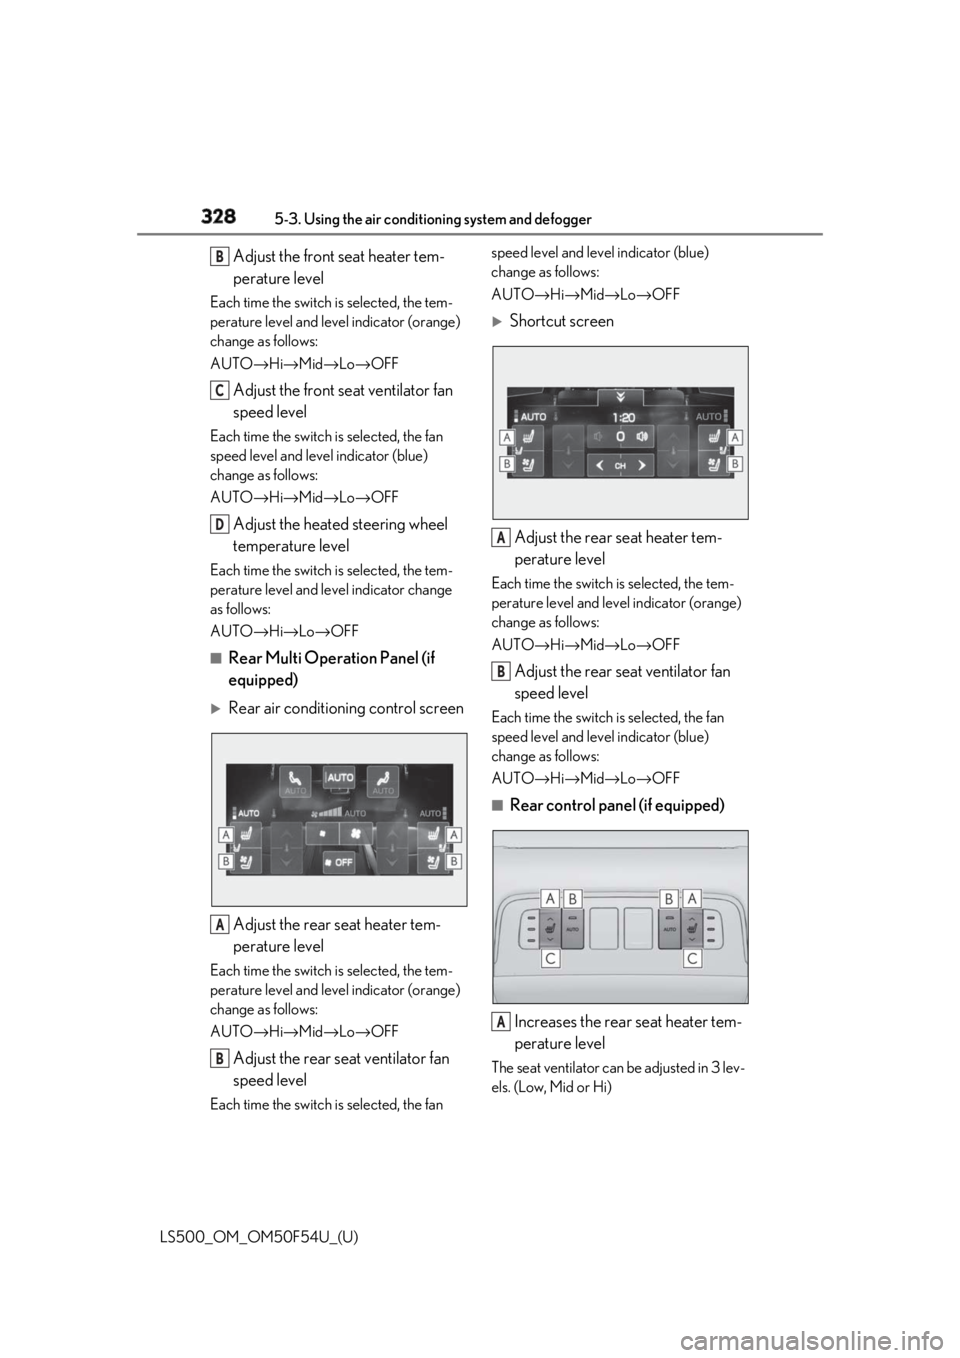
LS500_OM_OM50F54U_(U) Adjust the front seat heater tem-
perature levelEach time the switch is selected, the tem-
perature level and leve l indicator (orange)
change as follows:
AUTO → Hi → Mid → Lo → OFF
Adjust the front seat ventilator fan
speed levelEach time the switch is selected, the fan
speed level and leve l indicator (blue)
change as follows:
AUTO → Hi → Mid → Lo → OFF
Adjust the heated steering wheel
temperature levelEach time the switch is selected, the tem-
perature level and le vel indicator change
as follows:
AUTO → Hi → Lo → OFF■
Rear Multi Operation Panel (if
equipped)
Rear air conditioning control screen
Adjust the rear seat heater tem-
perature levelEach time the switch is selected, the tem-
perature level and leve l indicator (orange)
change as follows:
AUTO → Hi → Mid → Lo → OFF
Adjust the rear seat ventilator fan
speed levelEach time the switch is selected, the fan speed level and level indicator (blue)
change as follows:
AUTO → Hi → Mid → Lo → OFF
Shortcut screen
Adjust the rear seat heater tem-
perature level Each time the switch is selected, the tem-
perature level and level indicator (orange)
change as follows:
AUTO → Hi → Mid → Lo → OFF
Adjust the rear seat ventilator fan
speed level Each time the switch is selected, the fan
speed level and level indicator (blue)
change as follows:
AUTO → Hi → Mid → Lo → OFF■
Rear control panel (if equipped)
Increases the rear seat heater tem-
perature level The seat ventilator can be adjusted in 3 lev-
els. (Low, Mid or Hi)B
C
D
A
B A
B
A
Page 329 of 514

3295-3. Using the air conditio ning system and defogger
LS500_OM_OM50F54U_(U) 5
Interior features Enables/Disables the automatic
mode of the rear seat heaters
Decreases the rear seat heater
temperature levelIf this switch is select ed when the rear seat
heater temperature level is set to Lo, the
rear seat heater will turn off. ■
The heated steering wheel, seat heaters
and seat ventilators wheel can be used
when
The engine switch is in IGNITION ON
mode. ■
Air conditioning system-linked control
mode
When the seat ventilato r fan speed level is
Hi, the seat ventilator fan speed becomes
higher according to the fan speed of the air
conditioning system. ■
Customization
Some functions can be customized.
( → P.468)
WARNING■
To prevent overheating and minor
burn injuries
Observe the following precautions when
using the seat heaters. ●
Do not cover the seat with a blanket or
cushion when using the seat heater.
●
Do not use seat heater more than nec-
essary. B
C
Page 361 of 514

361
LS500_OM_OM50F54U_(U) 6 6
Maintenance and care Maintenance and care .
6-1. Maintenance and care
Cleaning and protecting the vehi-
cle exterior ................................ 362
Cleaning and protecting the vehi-
cle interior ................................. 365
6-2. Maintenance
Maintenance requirements
........................................................ 368
General maintenance ............. 369
Emission inspection and mainte-
nance (I/M) programs ......... 372
6-3. Do-it-yourself maintenance
Do-it-yourself service precautions
........................................................ 373
Hood............................................... 375
Positioning a floor jack............ 375
Engine compartment............... 377
Battery ........................................... 384
Tires ................................................ 386
Replacing the tire ...................... 396
Tire inflation pressure .............. 399
Wheels............................................ 401
Air conditioning filter............... 402
Electronic key battery ............. 403
Checking and replacing fuses
........................................................ 405
Light bulbs .................................... 408
Page 362 of 514

362 6-1. Maintenance and care
LS500_OM_OM50F54U_(U) 6-1.Maintenance and care
Working from top to bottom, liber-
ally apply water to the vehicle body,
wheel wells and underside of the
vehicle to remove any dirt and dust.
Wash the vehicle body using a
sponge or soft cloth, such as a
chamois.
For hard-to-remove marks, use car
wash soap and rinse thoroughly with
water.
Wipe away any water.
Wax the vehicle when the water-
proof coating deteriorates. If water does not bead on a clean surface,
apply wax when the vehicle body is cool.
■
Self-restoring coat
The vehicle body has a self-restoring coat-
ing that is resistant to small surface
scratches caused in a car wash etc.
●
The coating lasts for 5 to 8 years from
when the vehicle is delivered from the
plant.
●
The restoration time differs depending on
the depth of the scratch and outside tem-
perature.
The restoration time may become
shorter when the coating is warmed by
applying warm water.
●
Deep scratches caused by keys, coins,
etc. cannot be restored.
●
Do not use wax that contains abrasives. ■
Automatic car washes ●
Before washing the vehicle:
• Fold the mirrors
• Turn off the power trunk opener and
closer (if equipped)
Start washing from the front of the vehicle.
Extend the mirrors before driving.●
Brushes used in automatic car washes
may scratch the vehicl e surface and harm
your vehicle’s paint. ■
High pressure car washes ●
Do not allow the nozzles of the car wash
to come within close proximity of the win-
dows and the air suspension unit (if
equipped). ●
Before using the car wash, check that the
fuel filler door on your vehicle is closed
properly. ■
When using a car wash
If the door handle becomes wet while the
electronic key is within the effective range,
the door may lock and unlock repeatedly. In
that case, follow the following correction
procedures to wash the vehicle: ●
Place the key in a position 6 ft. (2 m) or
more separate from the vehicle while the
vehicle is being wash ed. (Take care to
ensure that the key is not stolen.) ●
Set the electronic key to battery-saving
mode to disable the smart access system
with push-button start. ( → P.108)■
Aluminum wheels ●
Remove any dirt immediately by using a
neutral detergent. ●
Wash detergent off with water immedi-
ately after use.
●
To protect the paint from damage, make
sure to observe the following precau-
tions.
• Do not use acidic, alkaline or abrasive
detergent
• Do not use hard brushes
• Do not use detergent on the wheels when
they are hot, such as after driving or park-
ing in hot weatherCleaning and protecting the
vehicle exterior Perform cleaning in a manner
appropriate to each component
and its material.
Cleaning instructions
Page 364 of 514

364 6-1. Maintenance and care
LS500_OM_OM50F54U_(U) WARNING■
Precaution regarding the front
bumper (vehicles with Lexus Safety
System+A)
If the paint of the fr ont bumper is chipped
or scratched, the Lexus Safety System+A
may not function correctly. If this occurs,
consult your Lexus dealer. ■
Precaution regarding the rear
bumper
If the paint of the rear bumper is chipped
or scratched, the fo llowing systems may
not function correctly. If this occurs, con-
sult your Lexus dealer. ●
Lexus Safety System+A (if equipped)●
BSM (if equipped)●
RCTA (if equipped)●
PKSB (if equipped)
NOTICE■
To prevent paint deterioration and
corrosion on the body and compo-
nents (aluminum wheels, etc.)●
Wash the vehicle immediately in the
following cases:
• After driving near the sea coast
• After driving on salted roads
• If coal tar or tree sap is present on the
paint surface
• If dead insects, in sect droppings or
bird droppings are present on the
paint surface
• After driving in an area contaminated
with soot, oily smoke, mine dust, iron
powder or chemical substances
• If the vehicle becomes heavily soiled
with dust or mud
• If liquids such as benzene and gasoline
are spilled on the paint surface ●
If the paint is chipped or scratched,
have it repaired immediately. ●
To prevent the wheels from corroding,
remove any dirt and store in a place
with low humidity when storing the
wheels. ■
Cleaning the exterior lights ●
Wash carefully. Do not use organic
substances or scrub with a hard brush.
This may damage the surfaces of the
lights. ●
Do not apply wax to the surfaces of the
lights.
Wax may cause damage to the lenses. ■
When using an automatic car wash
Set the wiper switch to the off position.
If the wiper switch is in “AUTO”, the wip-
ers may operate and the wiper blades
may be damaged. ■
When using a high pressure car wash ●
When washing the vehicle, do not
spray the camera or its surrounding
area directly with a high pressure
washer. Shock applied from high pres-
sure water may cause the device to not
operate normally. ●
Do not bring the nozzle tip close to
boots (rubber or re sin manufactured
cover), connectors or the following
parts. The parts may be damaged if
they come into contact with high-pres-
sure water.
• Traction related parts
•Steering parts
• Suspension parts
• Brake parts
Page 365 of 514

3656-1. Maintenance and care
LS500_OM_OM50F54U_(U) 6
Maintenance and care Remove dirt and dust using a vac-
uum cleaner. Wipe dirty surfaces
with a cloth dampened with luke-
warm water.
If dirt cannot be removed, wipe it off
with a soft cloth dampened with
neutral detergent diluted to approx-
imately 1%.
Wring out any excess water from
the cloth and thoroughly wipe off
remaining traces of detergent and
water. ■
Shampooing the carpets
There are several commercial foaming-type
cleaners available. Use a sponge or brush
to apply the foam. Rub in overlapping cir-
cles. Do not use water. Wipe dirty surfaces
and let them dry. Excellent results are
obtained by keeping the carpet as dry as
possible.
■
Handling the seat belts
Clean with mild soap and lukewarm water
using a cloth or spon ge. Also check the
belts periodically for excessive wear, fraying
or cuts.
■
When cleaning the carpeted portions of
the glove box, console box, etc.
If a strong adhesive tape is used, there is a
possibility that the surface of the carpet
could be damaged.Cleaning and protecting the
vehicle interior Perform cleaning in a manner
appropriate to each component
and its material.
Protecting the vehicle interior WARNING■
Water in the vehicle ●
Do not splash or spill liquid in the vehi-
cle.
Doing so may cause electrical compo-
nents, etc. to malfunction or catch fire. ●
Do not get any of the SRS components
or wiring in the vehicle interior wet.
( → P.29)
An electrical malfunction may cause
the airbags to deploy or not function
properly, resulting in death or serious
injury. ■
Cleaning the interior (especially
instrument panel)
Do not use polish wax or polish cleaner.
The instrument panel may reflect off the
windshield, obstructin g the driver’s view
and leading to an accident, resulting in
death or serious injury.
NOTICE■
Cleaning detergents ●
Do not use the following types of
detergent, as they may discolor the
vehicle interior or cause streaks or
damage to painted surfaces:
• Areas other than the seats and steer-
ing wheel: Organic substances such as
benzene or gasoline, alkaline or acidic
solutions, dye, and bleach
• Seats: Alkaline or acidic solutions,
such as thinner, benzene, and alcohol
• Steering wheel: Organic substances,
such as thinner, and cleaner that con-
tains alcohol
●
Do not use polish wax or polish
cleaner. The instrument panel’s or
other interior part’s painted surface
may be damaged.