2018 Lexus GS450h light
[x] Cancel search: lightPage 323 of 548

GS450h_OM_OM30G62U_(U)
3235-5. Using the other interior features
5
Interior features
Test the HomeLink® operation by pressing the newly programmed button
and observing the indicator light:
●Indicator light illuminates: Programming of a fixed code device has com-
pleted. The garage door or other de vice should operate when a Home-
Link
® button is pressed and released.
●Indicator light flashes rapidly: The garage door opener motor or other
device is equipped with a rolling co de. To complete programming, firmly
press and hold the HomeLink
® button for 2 seconds then release it.
●If the garage door or other device does not operate, proceed to “Pro-
gramming a rollin g code system”.
Repeat the steps above to program anot her device for any of the remaining
HomeLink
® buttons.
■Programming a rolling code system
2 or more people may be necessary to complete rolling code programming.
Locate the “Learn” or “Smart”
button on the garage door
opener motor in the garage.
This button can usually be found
where the hanging antenna wire is
attached to the unit. The name and
color of the button may vary by man-
ufacturer. Refer to the owner’s man-
ual supplied with the garage door
opener motor for details.
Press and release the “Learn” or
“Smart” button.
Perform within 30 seconds
after performing .
4
5
1
2
3
2
Page 325 of 548

GS450h_OM_OM30G62U_(U)
3255-5. Using the other interior features
5
Interior features
■Enabling 2-way communication with a garage door (only available for com-
patible devices)
When enabled, 2-way communication allows you to check the status of the
opening and closing of a garage door through indicators in your vehicle.
2-way communication is only available if the garage door opener motor used
is a compatible device. (To check devi ce compatibility, refer to www.Home-
Link.com.)
Within 5 seconds after programming the garage door opener has been
completed, if the garage door op ener motor is trained to HomeLink
®,
both garage door operation indicator s will flash rapidly (green) and the
light on the garage door opener moto r will blink twice, indicating that 2-
way communication is enabled.
If the indicators do not flash, perform and within the first 10 presses of
the HomeLink
® button after programming has been completed.
Press a programmed HomeLink
® button to operate a garage door.
Within 1 minute of pressing the HomeLink
® button, after the garage door
operation has stopped, press the “Learn” or “Smart” button on the garage
door opener motor. Within 5 seconds of the establishment of 2-way com-
munication with the garage door opener, both garage door operation indi-
cators in the vehicle will flash rapidly (green) and the light on the garage
door opener motor will blink twice, indicating that 2-way communication is
enabled.
■Reprogramming a single HomeLink® button
When the following procedure is performed, buttons which already have
devices registered to them can be overwritten: With one hand, press and hold the desired HomeLink
® button.
When the HomeLink
® indicator starts flashing (orange), continue to hold
the HomeLink® button and perform “Programming HomeLink®” (it
takes 20 seconds for the HomeLink® indicator to start flashing).
Press the appropriate HomeLink
® button. The HomeLink® indicator light
should turn on.
Operating HomeLink®
1
23
2
3
1
2
1
Page 326 of 548

326
GS450h_OM_OM30G62U_(U)
5-5. Using the other interior features
The status of the opening and closing of
a garage door is shown by the indica-
tors.Opening
Closing
This function is only available if the
garage door opener motor used is a
compatible device. (To check device
compatibility, refer to www.Home-
Link.com.)
The indicators can operate within ap proximately 820 ft. (250 m) of the
garage door. However, if there are obst ructions between the garage door and
the vehicle, such as houses and trees, feedback signals from the garage door
may not be received.
To recall the previous door operation status, press and release either Home-
Link
® buttons and or and simultaneously. The
last recorded status will be displayed for 3 seconds.
Press and hold the 2 outside buttons for
10 seconds until the HomeLink
® indi-
cator light changes from continuously
lit (orange) to rapidly flashing (green).
If you sell your vehicle, be sure to erase
the programs stored in the HomeLink®
memory.
Garage door operation indicators
1
2
ColorStatus
Orange (flashing)Currently opening/closing
GreenOpening/closing has completed
Red (flashing)Feedback signals cannot be received
Erasing the entire HomeLink® memory (all three codes)
Page 329 of 548

329
GS450h_OM_OM30G62U_(U)5-5. Using the other interior features
5
Interior features
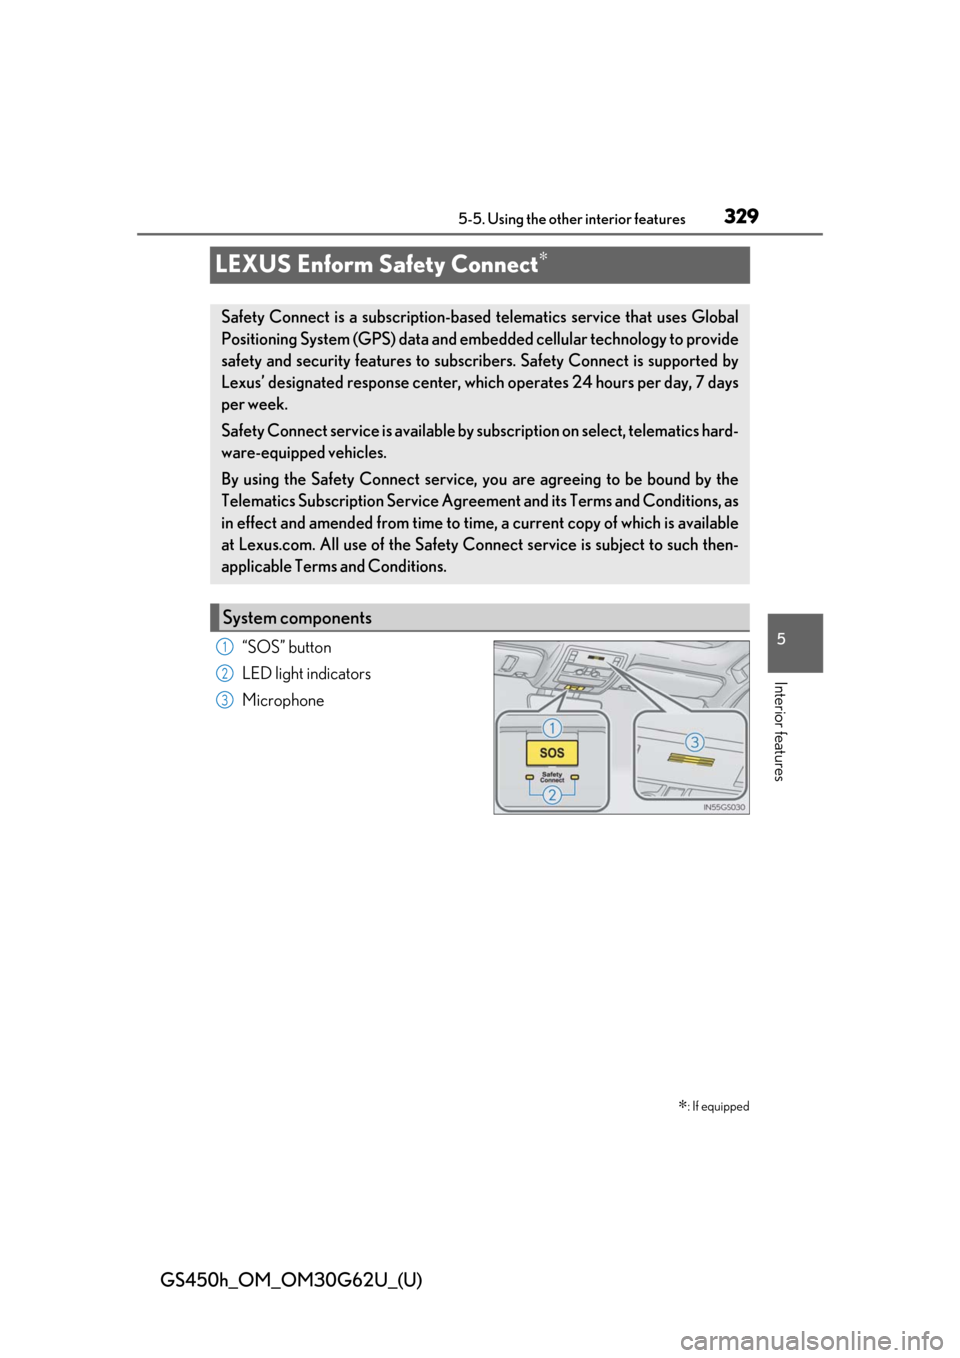
LEXUS Enform Safety Connect∗
“SOS” button
LED light indicators
Microphone
∗: If equipped
Safety Connect is a subscription-based telematics service that uses Global
Positioning System (GPS) data and embe dded cellular technology to provide
safety and security features to subscribers. Safety Connect is supported by
Lexus’ designated response center, wh ich operates 24 hours per day, 7 days
per week.
Safety Connect service is available by su bscription on select, telematics hard-
ware-equipped vehicles.
By using the Safety Connect service, you are agreeing to be bound by the
Telematics Subscription Service Agre ement and its Terms and Conditions, as
in effect and amended from time to time, a current copy of which is available
at Lexus.com. All use of the Safety Co nnect service is subject to such then-
applicable Terms and Conditions.
System components
1
2
3
Page 331 of 548

GS450h_OM_OM30G62U_(U)
3315-5. Using the other interior features
5
Interior features
When the power switch is turned to ON mode, the red indicator light comes on
for 2 seconds then turns off. Afterward, the green indicator light comes on, indi-
cating that the service is active.
The following indicator light patterns indicate specific system usage conditions:
●Green indicator light on = Active service
●Green indicator light flashing = Safety Connect call in process
●Red indicator light (except at vehicle start-up) = System malfunction (contact
your Lexus dealer)
●No indicator light (off) = Safety Connect service not active
■Automatic Collision Notification
In case of either airbag deployment or severe rear-end collision, the system is
designed to automatically call the re sponse center. The responding agent
receives the vehicle’s location and attempts to speak with the vehicl\
e occu-
pants to assess the level of emergency. If the occupants are unable to commu-
nicate, the agent automatically treats the call as an emergency, contacts the
nearest emergency services provider to describe the situation, and requests
that assistance be sent to the location.
■Stolen Vehicle Location
If your vehicle is stolen, Safety Conn ect can work with local authorities to
assist them in locating and recovering the vehicle. After filing a police report,
call the Safety Connect response ce nter at 1-800-25-LEXUS (1-800-255-
3987) and follow the prompts for Safety Connect to initiate this service.
In addition to assisting law enforcemen t with recovery of a stolen vehicle,
Safety-Connect-equipped vehicle locatio n data may, under certain circum-
stances, be shared with third parties to locate your vehicle. Further informa-
tion is available at Lexus.com.
■Emergency Assistance Button (“SOS”)
In the event of an emergency on the ro ad, push the “SOS” button to reach the
Safety Connect response center. Th e answering agent will determine your
vehicle’s location, assess the emergency, and dispatch the necessary assis-
tance required.
If you accidentally press the “SOS” button, tell the response-center agent that you
are not experiencing an emergency.
Safety Connect LED light Indicators
Safety Connect services
Page 335 of 548

335
GS450h_OM_OM30G62U_(U)
6Maintenance and care
6-1. Maintenance and care Cleaning and protecting the vehicle exterior ................ 336
Cleaning and protecting the vehicle interior..................340
6-2. Maintenance Maintenance requirements ... 343
General maintenance.............. 345
Emission inspection and maintenance (I/M)
programs ....................................348
6-3. Do-it-yourself maintenance Do-it-yourself service precautions................................ 349
Hood ................................................ 351
Positioning a floor jack ............ 352
Engine compartment ...............353
12-volt battery ............................. 362
Tires ................................................. 365
Tire inflation pressure............... 375
Wheels ........................................... 378
Air conditioning filter .............. 380
Electronic key battery ..............382
Checking and replacing fuses ..............................................384
Headlight aim (vehicles with single-beam headlights).......389
Light bulbs...................................... 391
Page 339 of 548

GS450h_OM_OM30G62U_(U)
3396-1. Maintenance and care
6
Maintenance and care
NOTICE
■To prevent paint deterioration and corrosion on the body and components (aluminum
wheels etc.)
●Wash the vehicle immediatel y in the following cases:
• After driving near the sea coast
• After driving on salted roads
• If coal tar, pollen or tree sap is present on the paint surface
• If dead insects, insect droppings or bird droppings are present on the paint surface
• After driving in an area contaminated wi th soot, oily smoke, mine dust, iron pow-
der or chemical substances
• If the vehicle becomes heavily soiled with dust or mud
• If liquids such as benzene and gasoli ne are spilled on the paint surface
●If the paint is chipped or scratched, have it repaired immediately.
●To prevent the wheels from corroding, remove any dirt and store in a place with low
humidity when storing the wheels.
■Cleaning the exterior lights
●Wash carefully. Do not use organic subs tances or scrub with a hard brush.
This may damage the surfaces of the lights.
●Do not apply wax to the surfaces of the lights.
Wax may cause damage to the lenses.
■When using an automatic car wash
Turn off AUTO mode of the wiper to prevent the wiper from operating. (→P. 207)
If AUTO mode is selected, the wipers may operate and the wiper blades may be dam-
aged.
■When using a high-pressure car wash
●When washing the vehicle, do not let water from the high-pressure washer directly hit
the camera or the area around the camera. Due to the shock from high-pressure
water, it is possible that the device may not operate normally.
●Do not bring the nozzle tip close to boots (rubber or resin manufactured cover), con-
nectors or the following parts. The parts may be damaged if they come into contact
with high-pressure water.
• Traction related parts
• Suspension parts •Steering parts
• Brake parts
Page 342 of 548

342
GS450h_OM_OM30G62U_(U)
6-1. Maintenance and care
NOTICE
■Cleaning detergents
●Do not use the following types of detergent, as they may discolor the vehicle interior
or cause streaks or damage to painted surfaces:
• Non-seat portions: Organic substances su ch as benzene or gasoline, alkaline or
acidic solutions, dye, and bleach
• Seats: Alkaline or acidic solutions, su ch as thinner, benzene, and alcohol
●Do not use polish wax or polish cleaner. The instrument pane l’s or other interior part’s
painted surface may be damaged.
■Preventing damage to leather surfaces
Observe the following precautions to avoid damage to and deterioration of leather
surfaces:
●Remove any dust or dirt from leather surfaces immediately.
●Do not expose the vehicle to direct sunlight for extended periods of time. Park the
vehicle in the shade, especially during summer.
●Do not place items made of vinyl, plastic, or containing wax on the upholstery, as they
may stick to the leather su rface if the vehicle interior heats up significantly.
■Water on the floor
Do not wash the vehicle floor with water.
Vehicle systems such as the audio system ma y be damaged if water comes into contact
with electrical components such as the au dio system above or under the floor of the
vehicle. Water may also cause the body to rust.
■When cleaning the inside of the windshie ld (vehicles with Lexus Safety System+)
Do not allow glass cleaner to contact the lens. Also, do not touch the lens. ( →P. 219)
■Cleaning the inside of the rear window
●Do not use glass cleaner to clean the rear window, as this may cause damage to the
rear window defogger heater wires or antenna. Use a cloth dampened with luke-
warm water to gently wipe the window clean. Wipe th e window in strokes running
parallel to the heater wires or antenna.
●Be careful not to scratch or damage the heater wires or antenna.