Page 69 of 602

691-1. For safe use
GS350_300_GS F_OM_OM30G34U_(U)
1
For safety and security
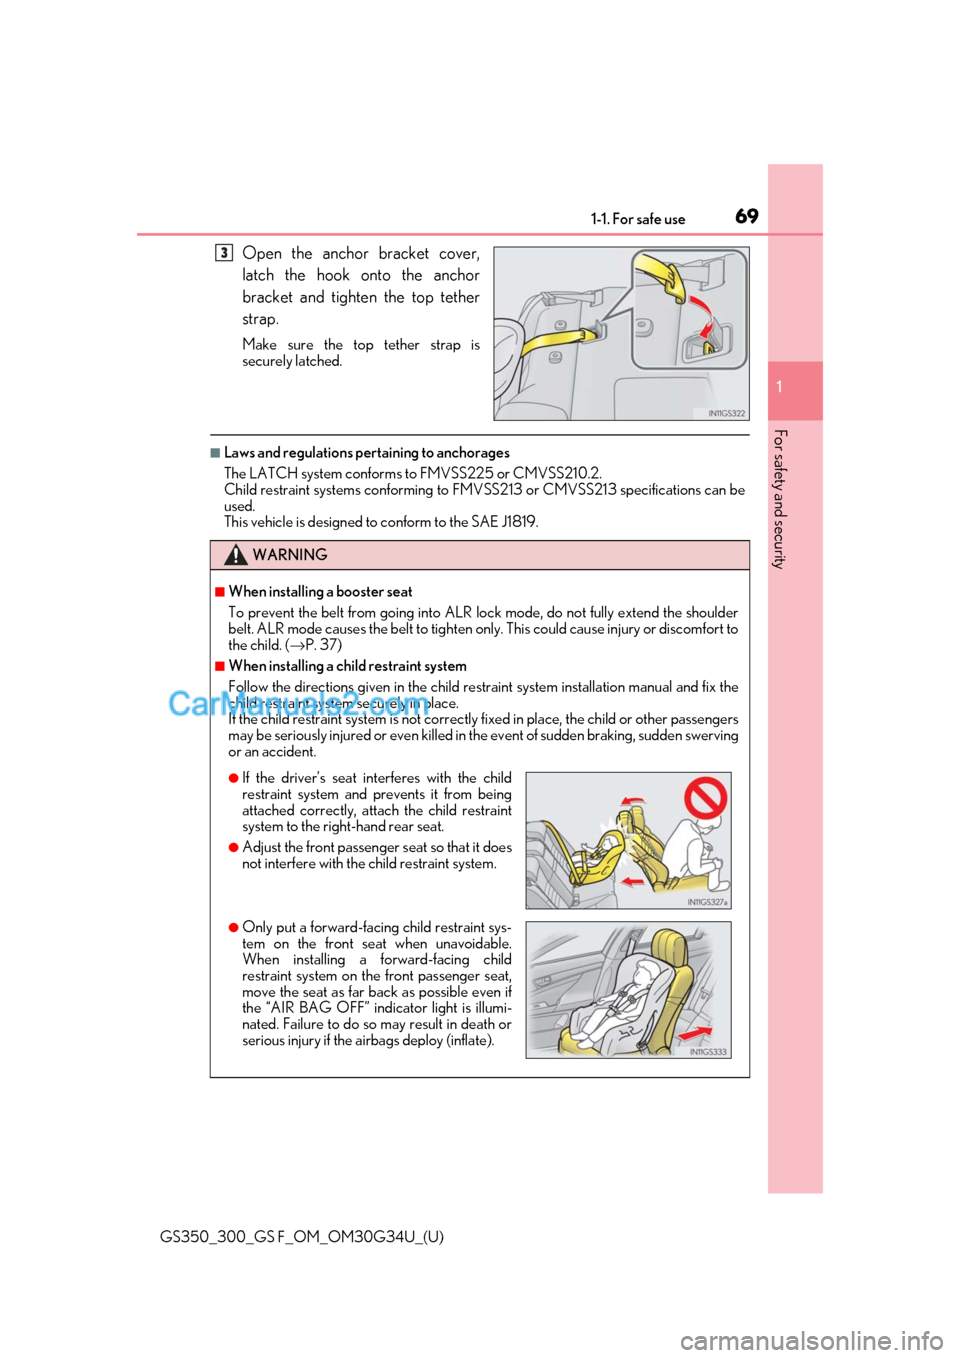
Open the anchor bracket cover,
latch the hook onto the anchor
bracket and tighten the top tether
strap.
Make sure the top tether strap is
securely latched.
■Laws and regulations pertaining to anchorages
The LATCH system conforms to FMVSS225 or CMVSS210.2.
Child restraint systems conforming to FMV SS213 or CMVSS213 specifications can be
used.
This vehicle is designed to conform to the SAE J1819.
3
WARNING
■When installing a booster seat
To prevent the belt from going into ALR lock mode, do not fully extend the shoulder
belt. ALR mode causes the belt to tighten only. This could cause injury or discomfort to
the child. ( →P. 37)
■When installing a child restraint system
Follow the directions given in the child rest raint system installation manual and fix the
child restraint system securely in place.
If the child restraint system is not correctly fixed in place, the child or other passengers
may be seriously injured or even killed in th e event of sudden braking, sudden swerving
or an accident.
●If the driver’s seat interferes with the child
restraint system and prevents it from being
attached correctly, atta ch the child restraint
system to the right-hand rear seat.
●Adjust the front passenger seat so that it does
not interfere with the child restraint system.
●Only put a forward-faci ng child restraint sys-
tem on the front seat when unavoidable.
When installing a forward-facing child
restraint system on the front passenger seat,
move the seat as far back as possible even if
the “AIR BAG OFF” indicator light is illumi-
nated. Failure to do so may result in death or
serious injury if the airbags deploy (inflate).
Page 70 of 602

701-1. For safe use
GS350_300_GS F_OM_OM30G34U_(U)
WARNING
■When installing a child restraint system
●When a booster seat is installed, always ensure that the shoulder belt is positioned
across the center of the child’s shoulder. The belt should be kept away from the child’s
neck, but not so that it could fall off the ch ild’s shoulder. Failing to do so may result in
death or serious injury in the event of sudden braking, sudden swerving or an acci-
dent.
●Ensure that the belt and plate are securely locked and the seat belt is not twisted.
●Shake the child restraint system left and right, and forward and backward to ensure
that it has been securely installed.
●After securing a child restraint system, never adjust the seat.
●Follow all installation instructions provided by the child restraint system manufacturer.
■Do not use a seat belt extender
If a seat belt extender is used when installing a child restraint system, the seat belt will
not securely hold the child restraint system , which could cause death or serious injury
to the child or other passengers in the event of sudden braking, sudden swerving or an
accident.
■To correctly attach a child re straint system to the anchors
When using the LATCH anchors, be sure that there are no foreign objects around the
anchors and that the seat belt is not caught behind the child restraint system. Make sure
the child restraint system is securely attached , or it may cause death or serious injury to
the child or other passengers in the event of sudden braking, sudden swerving or an
accident.
Page 74 of 602

741-2. Theft deterrent system
GS350_300_GS F_OM_OM30G34U_(U)
Alarm
The alarm uses light and sound to give an alert when an intrusion is detected.
The alarm is triggered in the following situations when the alarm is set:
●A locked door is unlocked or opened in any way other than using the entry
function, wireless remote control or mech anical key. (The doors will lock again
automatically.)
●A locked trunk is unlocked or opened in any way other than using the entry
function or wireless remote control.
●The hood is opened.
Close the doors, trunk and hood, and
lock all the doors. The system will be set
automatically after 30 seconds.
The indicator light changes from being
on to flashing when the system is set.
Do one of the following to de activate or stop the alarms:
●Unlock the doors.
●Turn the engine switch to ACCESSOR Y or IGNITION ON mode, or start
the engine. (The alarm will be deactivat ed or stopped after a few seconds.)
The alarm
Setting the alarm system
Deactivating or stopping the alarm
Page 75 of 602

751-2. Theft deterrent system
GS350_300_GS F_OM_OM30G34U_(U)
1
For safety and security
■System maintenance
The vehicle has a maintenance-free type alarm system.
■Items to check before locking the vehicle
To prevent unexpected triggering of the alarm and vehicle theft, make sure of the follow-
ing:
●Nobody is in the vehicle.
●The windows and moon roof are closed before the alarm is set.
●No valuables or other personal items are left in the vehicle.
■Triggering of the alarm
The alarm may be triggered in the following situations:
(Stopping the alarm deactivates the alarm system.)
■Alarm-operated door lock
In the following cases, the door may automatically lock:
●When a person remaining in the vehicle un locks the door and the alarm is activated.
●While the alarm is activated, a person remaining in the vehicle unlocks the door.
●When recharging or replacing the battery.
●The trunk is opened using the mechanical key.
●A person inside the vehicle opens a door, the
trunk or hood, or unlocks the vehicle using an
inside lock button.
●The battery is recharged or replaced when the
vehicle is locked. (→P. 507)
Page 87 of 602

GS350_300_GS F_OM_OM30G34U_(U)
872. Instrument cluster
2
Instrument cluster
Engine coolant temperature gauge
Displays the engine coolant temperature
Tachometer
Displays the engine speed in revolutions per minute
Outside temperature
Displays the outside temperature within the range of -40°F (-40 °C) to 122 °F
(50 °C). Low outside temperature indicator comes on when the ambient temperature
is 37 °F (3 °C) or lower.
Clock
Time displayed is linked to the anal og clock on the instrument panel. (→P. 339)
Speedometer
Displays the vehicle speed
Fuel gauge
Displays the quantity of fuel remaining in the tank
Multi-information display
Presents the driver with a variety of driving-related data ( →P. 100)
Displays warning me ssages in case of a malfunction ( →P. 441)
Odometer, trip meter and maintenance required information display
Odometer:
Displays the total distance the vehicle has been driven
Trip meter:
Displays the distance the vehi cle has been driven since the meter was last reset. Trip
meters “A” and “B” can be used to record and display different distances inde-
pendently.
Maintenance required information: • Displays the maintenance requ ired information when the engine switch is in IGNI-
TION ON mode.
• It can be reset from of th e multi-information display. (→P. 100)
Shift position and shift range
Displays the selected shift posi tion or selected shift range (→P. 202)
1
2
3
4
5
6
7
8
9
Page 90 of 602

90
GS350_300_GS F_OM_OM30G34U_(U)2. Instrument cluster
■Outside temperature display
●In the following situations, the correct outside temperature may not be displayed, or the
display may take longer than normal to change.
• When stopped, or driving at low speeds (less than 12 mph [20 km/h])
• When the outside temperature has changed suddenly (at the entrance/exit of a
garage, tunnel, etc.)
●When “--” or “E” is displayed, the system may be malfunctioning.
Take your vehicle to your Lexus dealer.
■Pop-up display
In some situations, a pop-up display will be temporarily displayed on the multi-informa-
tion display or the odometer/trip meter/maintenance required information screen.
Some pop-up displays can be set on/off. ( →P. 546)
■Liquid crystal display
Small spots or light spots may appear on the display. This phenomenon is characteristic
of liquid crystal displays, and there is no problem continuing to use the display.
■Clock settings
■Customization
The meter display can be customized on the multi-information display.
(Customizable features: →P. 545)
If the screen shown to the right is displayed
when trying to change the time display method
through ( →P. 100) on the multi-infor-
mation display, the system may be malfunction-
ing.
Have the vehicle inspected by your Lexus
dealer.
WARNING
■The information display at low temperatures
Allow the interior of the vehicle to warm up before using the liquid crystal information
display. At extremely low temperatures, th e information display monitor may respond
slowly, and display changes may be delayed.
For example, there is a lag between the dr iver’s shifting and the new gear number
appearing on the display. This lag could ca use the driver to downshift again, causing
rapid and excessive engine braking and possibly an accident resulting in death or
injury.
Page 104 of 602

104
GS350_300_GS F_OM_OM30G34U_(U)2. Instrument cluster
■Tire inflation pressure
Displays inflation pressure of each tire.
The inflation pressure of the compac
t spare tire will not be displayed.
■LKA (Lane-Keeping Assist) vehicle sway warning (if equipped)
→ P. 249
■Display off
A blank screen is displayed
*1: Displayed when the item is se t in “Drive Info 1”, “Drive Info 2” or “Drive Info 3”.
( → P. 546)
*2: The function can be reset by pressing th e of the meter control switches for longer
than 1 second when the item to reset is displayed.
If there is more than one item that can be reset, the item selection screen will appear.
The settings of the following items can be changed, refer to P. 545
For functions that can be enabled or disabled, the function switches between on and
off each time is pressed.
■(Lane-Keeping Assist) (if equipped) (→ P. 249)
■(Pre-Collision System) (if equipped) ( →P. 238)
■(Adaptive Front-lighting System) (if equipped) ( →P. 217)
■(Blind Spot Monitor) (if equipped) (→ P. 278)
■
Select to set the display mode of the clock.
Settings display
Page 133 of 602
131
GS350_300_GS F_OM_OM30G34U_(U)
3
Operation of
each component
3-1. Key information
Keys .................................................. 132
3-2. Opening, closing and locking the doors and trunk
Doors ................................................137
Trunk ................................................ 143
Smart access system with push-button start ............ 150
3-3. Adjusting the seats Front seats...................................... 158
Driving position memory ......... 160
Head restraints ............................ 165
3-4. Adjusting the steering wheel and mirrors
Steering wheel ............................. 168
Inside rear view mirror ............. 169
Outside rear view mirrors......... 171
3-5. Opening, closing the windows and moon roof
Power windows ............................175
Moon roof ...................................... 178