2018 KIA STINGER light
[x] Cancel search: lightPage 395 of 551

Driving your vehicle
142
5
Don’t let your parking brake
freeze
Under some conditions your parking
brake can freeze in the engaged
position. This is most likely to happen
when there is an accumulation of
snow or ice around or near the rear
brakes or if the brakes are wet. If
there is a risk the parking brake may
freeze, apply it only temporarily while
you put the gear shift lever in P
(Park, Automatic Transmission) and
block the rear wheels so the vehicle
cannot roll. Then release the parking
brake.
Don't let ice and snow accu-
mulate underneath
Under some conditions, snow and
ice can build up under the fenders
and interfere with the steering. When
driving in severe winter conditions
where this may happen, you should
periodically check underneath the
vehicle to be sure the movement of
the front wheels and the steering
components are not obstructed.
Carry emergency equipment
Depending on the severity of the
weather, you should carry appropri-
ate emergency equipment. Some of
the items you may want to carry
include tow straps or chains, flash-
light, emergency flares, sand, shov-
el, jumper cables, window scraper,
gloves, ground cloth, coveralls, blan-
ket, etc. We do not recommend using this
vehicle for trailer towing.
TRAILER TOWING
Page 402 of 551

What to do in an emergency
26
ROAD WARNING
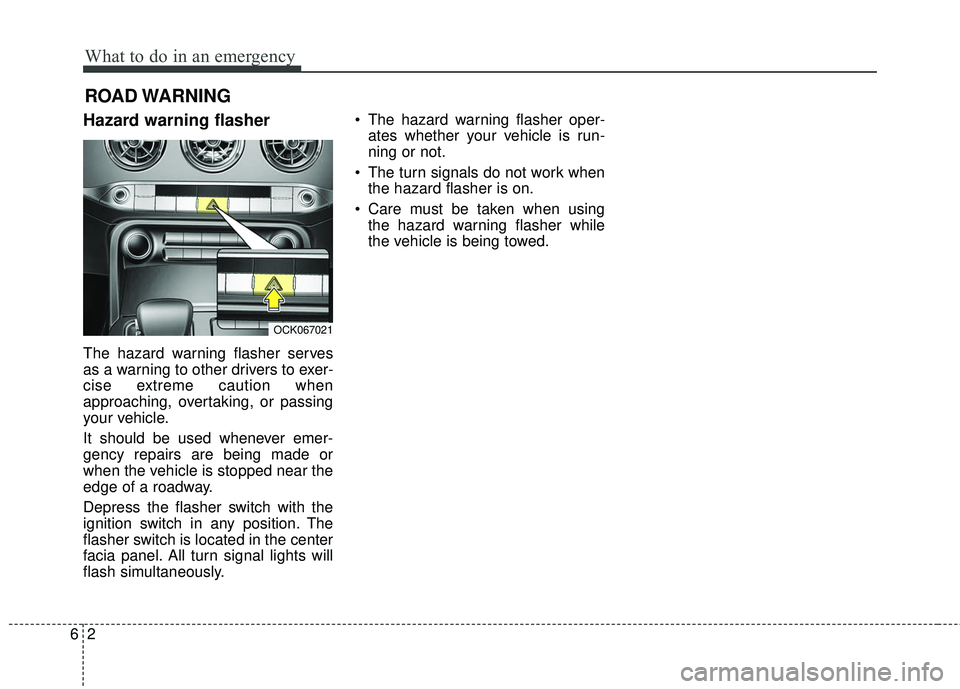
Hazard warning flasher
The hazard warning flasher serves
as a warning to other drivers to exer-
cise extreme caution when
approaching, overtaking, or passing
your vehicle.
It should be used whenever emer-
gency repairs are being made or
when the vehicle is stopped near the
edge of a roadway.
Depress the flasher switch with the
ignition switch in any position. The
flasher switch is located in the center
facia panel. All turn signal lights will
flash simultaneously.• The hazard warning flasher oper-
ates whether your vehicle is run-
ning or not.
The turn signals do not work when the hazard flasher is on.
Care must be taken when using the hazard warning flasher while
the vehicle is being towed.
OCK067021
Page 403 of 551

63
What to do in an emergency
If the engine stalls at a cross-
road or crossing
If the engine stalls at a crossroad or
crossing, set the shift lever in the N
(Neutral) position and then push the
vehicle to a safe place.
If you have a flat tire while
driving
If a tire goes flat while you are driv-
ing:
1. Take your foot off the acceleratorpedal and let the vehicle slow
down while driving straight ahead.
Do not apply the brakes immedi-
ately or attempt to pull off the road
as this may cause a loss of con-
trol. When the vehicle has slowed
to such a speed that it is safe to do
so, brake carefully and pull off the
road. Drive off the road as far as
possible and park on firm level
ground. If you are on a divided
highway, do not park in the median
area between the two traffic lanes. 2. When the vehicle is stopped, turn
on your emergency hazard flash-
ers, set the parking brake and put
the transaxle in P.
3. Have all passengers get out of the vehicle. Be sure they all get out on
the side of the vehicle that is away
from traffic.
4. When changing a flat tire, follow the instruction provided later in
this section.
If the engine stalls while driv-
ing
1. Reduce your speed gradually,keeping a straight line. Move cau-
tiously off the road to a safe place.
2. Turn on your emergency flashers.
3. Try to start the engine again. If your vehicle will not start, contact
an authorized Kia dealer or seek
other qualified assistance.
✽ ✽NOTICE
If there was a check engine light and
loss of power or stall and if safe to do
so, wait at least 10 seconds to restart
the vehicle after it stalls. This may
reset the car so it will no longer run
at low power (limp home) condition.
IN CASE OF AN EMERGENCY WHILE DRIVING
Page 404 of 551

What to do in an emergency
46
IF THE ENGINE WILL NOT START
If engine doesn't turn over or
turns over slowly
1. Be sure the shift lever is in N(Neutral) or P (Park) and the
emergency brake is set.
2. Check the battery connections to be sure they are clean and tight.
3. Turn on the interior light. If the light dims or goes out when you oper-
ate the starter, the battery is dis-
charged.
4. Check the starter connections to be sure they are securely tight-
ened.
5. Do not push or pull the vehicle to start it. See instructions for "Jump
starting".
If engine turns over normally
but does not start
1. Check the fuel level.
2. With the Engine Start/Stop Buttonin the OFF position, check all con-
nectors at the ignition coils and
spark plugs. Reconnect any that
may be disconnected or loose.
3. Check the fuel line in the engine compartment.
4. If the engine still does not start, call an authorized Kia dealer or
seek other qualified assistance.
WARNING - Push/
pull start
Do not push or pull the vehicle
to start it. Push or pull starting
may cause the catalytic con-
verter to overload and create a
fire hazard.
Page 413 of 551

613
What to do in an emergency
Allow the tire to cool before measur-
ing the inflation pressure. Always be
sure the tire is cold before inflating to
the recommended pressure.
A cold tire means the vehicle has
been sitting for 3 hours and driven for
less than 1.6 km (1 mile) in that 3
hour period.
Never use tire sealant if your vehicle
is equipped with a Tire Pressure
Monitoring System. The liquid
sealant can damage the tire pres-
sure sensors.
The TPMS cannot alert you tosevere and sudden tire damage
caused by external factors such as
nails or road debris.
If you feel any vehicle instability, immediately take your foot off the
accelerator, apply the brakes grad-
ually and with light force, and slow-
ly move to a safe position off the
road.✽ ✽ NOTICE - Protecting TPMS
Tampering with, modifying, or dis-
abling the Tire Pressure Monitoring
System (TPMS) components may
interfere with the system's ability to
warn the driver of low tire pressure
conditions and/or TPMS malfunc-
tions. Tampering with, modifying,
or disabling the Tire Pressure
Monitoring System (TPMS) compo-
nents may void the warranty for
that portion of the vehicle.
This device complies with
Industry Canada licence-exempt
RSS standard(s).
Operation is subject to the following
two conditions:
(1) This device may not cause inter-
ference, and
(2) This device must accept any interference, including interfer-
ence that may cause undesired
operation of the device.
Page 418 of 551

What to do in an emergency
18
6
9. Loosen the wheel nuts and
remove them with your fingers.
Slide the wheel off the studs and
lay it flat so it cannot roll away. To
put the wheel on the hub, pick up
the spare tire, line up the holes
with the studs and slide the wheel
onto them. If this is difficult, tip the
wheel slightly and get the top hole
in the wheel lined up with the top
stud. Jiggle the wheel back and
forth until the wheel can slide over
the other studs. Wheels may have sharp edges.
Handle them carefully to avoid possi-
ble severe injury. Before putting the
wheel into place, be sure that there
is nothing on the hub or wheel (such
as mud, tar, gravel, etc.) that pre-
vents the wheel from fitting solidly
against the hub.
10. To install the wheel, hold it on the
studs, put the wheel nuts on the
studs and tighten them finger
tight. Jiggle the tire to be sure it is
completely seated, then tighten
the nuts as much as possible
with your fingers again.
11. Insert the wrench into the jack and lower the vehicle to the
ground by turning the wheel nut
wrench counterclockwise.
WARNING- Installing a
wheel
Make sure the wheel makes
good contact with the hub when
installed. If the contact of the
mounting surface between the
wheel and hub is not good, the
wheel nuts could come loose
and cause the loss of a wheel.
Loss of a wheel may result in
loss of control of the vehicle.
Page 430 of 551

• Radial-ply tires . . . . . . . . . . . . . . . . . . . . . . . . . . . . . . 7-51
• Low aspect ratio tire . . . . . . . . . . . . . . . . . . . . . . . . . . 7-52
Fuses . . . . . . . . . . . . . . . . . . . . . . . . . . . . . . . . . . . . \
7-54
• Inner panel fuse replacement . . . . . . . . . . . . . . . . . . . 7-56
• Engine compartment fuse replacement. . . . . . . . . . . 7-58
• Fuse/relay panel description. . . . . . . . . . . . . . . . . . . . 7-60
Light bulbs . . . . . . . . . . . . . . . . . . . . . . . . . . . . . . . 7-77
• Bulb replacement precaution . . . . . . . . . . . . . . . . . . . 7-77
• Light bulb position (Front) . . . . . . . . . . . . . . . . . . . . 7-78
• Light bulb position (Rear) . . . . . . . . . . . . . . . . . . . . . 7-79
• Light bulb position (Side) . . . . . . . . . . . . . . . . . . . . . . 7-79
• Headlamp (LED type) replacement(Headlamp Type B) . . . . . . . . . . . . . . . . . . . . . . . . . . 7-80
• Side marker bulb replacement (Headlamp Type A) . . . . . . . . . . . . . . . . . . . . . . . . . . 7-80
• Position lamp + DRL (LED type) bulb replacement (Headlamp Type A) . . . . . . . . . . . . . . . . . . . . . . . . . . 7-80
• Headlamp (Low/High beam) bulb replacement (Headlamp Type A) . . . . . . . . . . . . . . . . . . . . . . . . . . 7-81
• Front turn signal lamp bulb replacement (Headlamp Type A) . . . . . . . . . . . . . . . . . . . . . . . . . . 7-82
• Stop and tail lamp (LED type) bulb replacement . . 7-83
• Rear side marker (LED type) bulb replacement . . . 7-84
• Rear turn signal lamp (LED type) bulb replacement. . 7-84
• Rear turn signal lamp (bulb type) bulb replacement . . 7-84• Back-up lamp bulb replacement . . . . . . . . . . . . . . . . 7-86
• High mounted stop lamp (LED type) bulb
replacement . . . . . . . . . . . . . . . . . . . . . . . . . . . . . . . . 7-88
• License plate lamp (LED type) bulb replacement . . 7-88
• Side repeater lamp (LED type) bulb replacement . . 7-88
• Map lamp (LED type) bulb replacement . . . . . . . . . 7-89
• Vanity mirror lamp (LED type) bulb replacement . . 7-89
• Room lamp (LED type) bulb replacement . . . . . . . . 7-89
• Glove box lamp (LED type) bulb replacement . . . . 7-90
• Luggage room lamp (LED type) bulb replacement. . 7-90
Appearance care . . . . . . . . . . . . . . . . . . . . . . . . . . . 7-91
• Exterior care . . . . . . . . . . . . . . . . . . . . . . . . . . . . . . . . 7-91
• Interior care . . . . . . . . . . . . . . . . . . . . . . . . . . . . . . . . . 7-96
Emission control system . . . . . . . . . . . . . . . . . . . . 7-99
• Crankcase emission control system . . . . . . . . . . . . . . 7-99
• Evaporative emission control (including ORVR
Onboard Refueling Vapor Recovery) system . . . . . 7-99
• Exhaust emission control system . . . . . . . . . . . . . . . 7-100
7
Page 435 of 551

77
Maintenance
OWNER MAINTENANCE
The following lists are vehicle checks
and inspections that should be per-
formed by the owner or an author-
ized Kia dealer at the frequencies
indicated to help ensure safe,
dependable operation of your vehi-
cle.
Any adverse conditions should be
brought to the attention of your deal-
er as soon as possible.
These Owner Maintenance Checks
are generally not covered by war-
ranties and you may be charged for
labor, parts and lubricants used.Owner maintenance schedule
When you stop for fuel:
Check the engine oil level.
Check the coolant level in coolantreservoir.
Check the windshield washer fluid level.
Look for low or under-inflated tires.
While operating your vehicle:
Note any changes in the sound of the exhaust or any smell of
exhaust fumes in the vehicle.
Check for vibrations in the steering wheel. Notice any increased steer-
ing effort or looseness in the steer-
ing wheel, or change in its straight-
ahead position.
Notice if your vehicle constantly turns slightly or “pulls” to one side
when traveling on smooth, level
road.
When stopping, listen and check for unusual sounds, pulling to one
side, increased brake pedal travel
or “hard-to-push” brake pedal.
If any slipping or changes in the operation of your transaxle occurs,
check the transaxle fluid level.
Check the automatic transaxle P (Park) function.
Check the parking brake.
Check for fluid leaks under your vehicle (water dripping from the air
conditioning system during or after
use is normal).
WARNING- Hot coolant
Be careful when checking your
engine coolant level when the
engine is hot. Scalding hot
coolant and steam may blow
out under pressure.