Page 407 of 605
Driving your vehicle
80
6
LANE DEPARTURE WARNING SYSTEM (LDWS) (IF EQUIPPED)
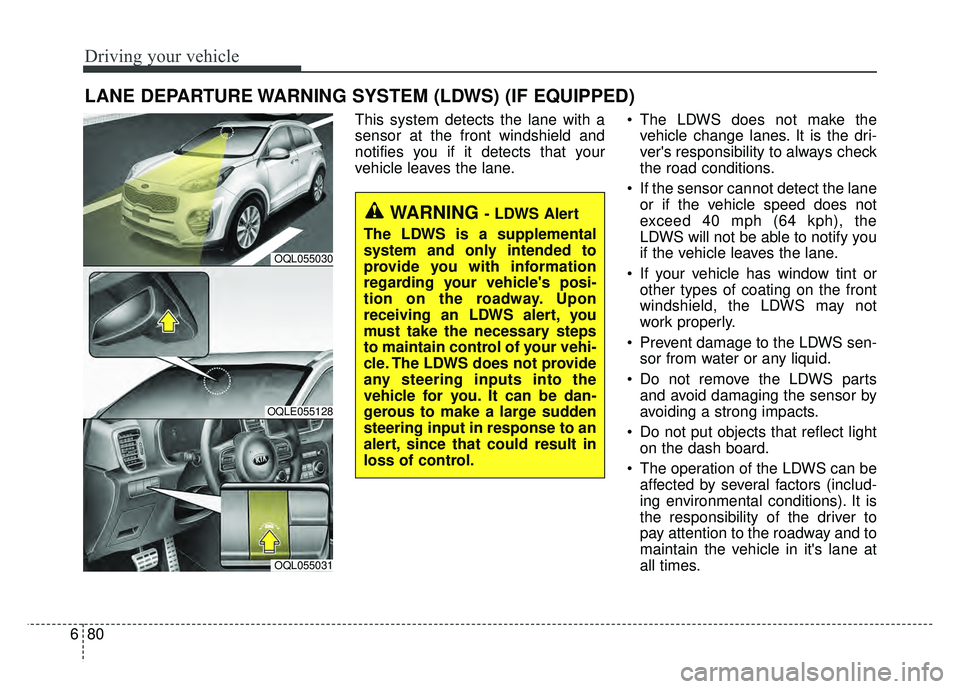
This system detects the lane with a
sensor at the front windshield and
notifies you if it detects that your
vehicle leaves the lane. The LDWS does not make the
vehicle change lanes. It is the dri-
ver's responsibility to always check
the road conditions.
If the sensor cannot detect the lane or if the vehicle speed does not
exceed 40 mph (64 kph), the
LDWS will not be able to notify you
if the vehicle leaves the lane.
If your vehicle has window tint or other types of coating on the front
windshield, the LDWS may not
work properly.
Prevent damage to the LDWS sen- sor from water or any liquid.
Do not remove the LDWS parts and avoid damaging the sensor by
avoiding a strong impacts.
Do not put objects that reflect light on the dash board.
The operation of the LDWS can be affected by several factors (includ-
ing environmental conditions). It is
the responsibility of the driver to
pay attention to the roadway and to
maintain the vehicle in it's lane at
all times.
WARNING - LDWS Alert
The LDWS is a supplemental
system and only intended to
provide you with information
regarding your vehicle's posi-
tion on the roadway. Upon
receiving an LDWS alert, you
must take the necessary steps
to maintain control of your vehi-
cle. The LDWS does not provide
any steering inputs into the
vehicle for you. It can be dan-
gerous to make a large sudden
steering input in response to an
alert, since that could result in
loss of control.
OQL055030
OQLE055128
OQL055031
Page 409 of 605
Driving your vehicle
82
6
2. Auditory warning
If you leave the lane, the warning
sound operates for maximum 3 sec-
onds.
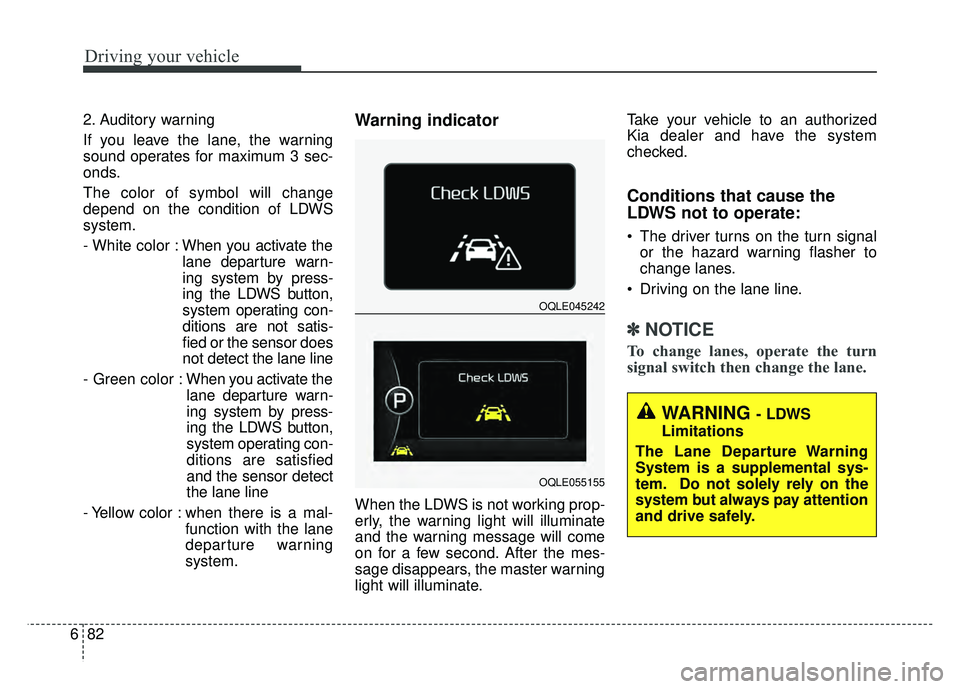
The color of symbol will change
depend on the condition of LDWS
system.
- White color : When you activate the
lane departure warn-
ing system by press-
ing the LDWS button,
system operating con-
ditions are not satis-
fied or the sensor does
not detect the lane line
- Green color : When you activate the
lane departure warn-
ing system by press-
ing the LDWS button,
system operating con-
ditions are satisfied
and the sensor detect
the lane line
- Yellow color : when there is a mal- function with the lane
departure warning
system.Warning indicator
When the LDWS is not working prop-
erly, the warning light will illuminate
and the warning message will come
on for a few second. After the mes-
sage disappears, the master warning
light will illuminate. Take your vehicle to an authorized
Kia dealer and have the system
checked.
Conditions that cause the
LDWS not to operate:
The driver turns on the turn signal
or the hazard warning flasher to
change lanes.
Driving on the lane line.
✽ ✽ NOTICE
To change lanes, operate the turn
signal switch then change the lane.
WARNING - LDWS
Limitations
The Lane Departure Warning
System is a supplemental sys-
tem. Do not solely rely on the
system but always pay attention
and drive safely.
OQLE045242
OQLE055155
Page 410 of 605
683
Driving your vehicle
Conditions that cause missed
warnings and false warnings:
The lane is not visible due to snow,rain, debris, puddles or other envi-
ronmental conditions.
The brightness outside changes suddenly such as when
entering/exiting a tunnel.
The headlights are off at night or in a tunnel.
The color of the lane marking from the road is difficult to distinguish.
Driving on a steep grade or a curve.
Light such as street lights, sunlight or oncoming vehicle lights reflect
off of water on the road.
The lens or windshield is obscured by debris.
The sensor cannot detect the lane because of fog, heavy rain or
heavy snow.
The rear view mirror housing has overheated from exposure to direct
sunlight.
The lane is very wide or narrow. The lane line is damaged or indis-
tinct.
The windshield is fogged up by humidity.
Objects in the median or along the side of the road cast shadows over
the lane markings
The sensor cannot distinguish the lane from the road due to the
dust/dirt.
There are other markings similar to lane lines.
There are lane boundaries instead of markings.
The vehicle ahead is very close, obscuring the view of the lane
markings, or the vehicle ahead is
driving over the lane markings.
The vehicle vibrates heavily due to poor road conditions.
The lanes are merging, expanding, or otherwise overlapping
Something reflective is placed on the dashboard. Driving with the sun in front of you.
Driving in areas under construc-
tion.
Lanes are marked by more than two sets of lines.
The windshield is fogged by humid air in the vehicle.
This device complies with Part 15
of the FCC rules.
Operation is subject to the following
two conditions:
1. This device may not cause harm- ful interference, and
2. This device must accept any inter- ference received, including inter-
ference that may cause undesired
operation.
Page 412 of 605
685
Driving your vehicle
Remember, your vehicle does notrequire extended warm-up. After
the engine has started, allow the
engine to run for 10 to 20 seconds
prior to placing the vehicle in gear.
In very cold weather, however, give
your engine a slightly longer warm-
up period.
Don't "lug" or "over-rev" the engine. Lugging is driving too slowly in a
very high gear resulting in engine
bucking. If this happens, shift to a
lower gear. Over-revving is racing
the engine beyond its safe limit.
This can be avoided by shifting at
the recommended speed. Use your air conditioning sparingly.
The air conditioning system is
operated by engine power so your
fuel economy is reduced when you
use it.
Open windows at high speeds can reduce fuel economy.
Fuel economy is less in crosswinds and headwinds. To help offset
some of this loss, slow down when
driving in these conditions.
Keeping a vehicle in good operating
condition is important both for econ-
omy and safety. Therefore, have an
authorized Kia dealer perform
scheduled inspections and mainte-
nance.
WARNING - Engine off
during motion
Never turn the engine off to
coast down hills or anytime the
vehicle is in motion. The power
steering and power brakes will
not function properly without
the engine running. In addition,
turning off the ignition while
driving could engage the steer-
ing wheel lock resulting in loss
of vehicle steering. Keep the
engine on and downshift to an
appropriate gear for an engine
braking effect.
Page 413 of 605
Driving your vehicle
86
6
Hazardous driving conditions
When hazardous driving conditions
are encountered such as water,
snow, ice, mud, sand, or similar haz-
ards, follow these suggestions:
Drive cautiously and allow extra
distance for braking.
Avoid sudden braking or steering.
When braking with non-ABS brakes pump the brake pedal with
a light up-and-down motion until
the vehicle is stopped.
Do not pump the brake pedal on a
vehicle equipped with ABS. If stalled in snow, mud, or sand,
use the second gear. Accelerate
slowly to avoid spinning the drive
wheels.
Use sand, rock salt, or other non- slip material under the drive
wheels to provide traction when
stalled in ice, snow, or mud.
Rocking the vehicle
If it is necessary to rock the vehicle
to free it from snow, sand, or mud,
first turn the steering wheel right and
left to clear the area around your
front wheels. Then, shift back and
forth between R (Reverse) and any
forward gear in vehicles equipped
with an Automatic Transaxle. Do not
race the engine, and spin the wheels
as little as possible. If you are still
stuck after a few tries, have the vehi-
cle pulled out by a tow vehicle to
avoid engine overheating and possi-
ble damage to the transaxle.
SPECIAL DRIVING CONDITIONS
WARNING- Downshifting
Do not downshift with an auto-
matic transaxle while driving on
slippery surfaces. The sudden
change in tire speed could
cause the tires to skid and
result in an accident.
WARNING- Sudden
Vehicle Movement
Do not attempt to rock the vehi-
cle if people or objects are near-
by. The vehicle may suddenly
move forward or backwards as it
becomes unstuck.
Page 436 of 605
What to do in an emergency
27
ROAD WARNING
Hazard warning flasher
The hazard warning flasher serves
as a warning to other drivers to exer-
cise extreme caution when
approaching, overtaking, or passing
your vehicle.It should be used whenever emer-
gency repairs are being made or
when the vehicle is stopped near the
edge of a roadway.
Depress the flasher switch with the
ignition switch in any position. The
flasher switch is located in the center
facia panel. All turn signal lights will
flash simultaneously.
• The hazard warning flasher oper-
ates whether your vehicle is run-
ning or not.
The turn signals do not work when the hazard flasher is on.
Care must be taken when using the hazard warning flasher while
the vehicle is being towed.
OQL066001
OQL066002
■Type A
■Type B
Page 438 of 605
What to do in an emergency
47
IF THE ENGINE WILL NOT START
If engine doesn't turn over or
turns over slowly
1. Be sure the shift lever is in N(Neutral) or P (Park) and the
emergency brake is set.
2. Check the battery connections to be sure they are clean and tight.
3. Turn on the interior light. If the light dims or goes out when you oper-
ate the starter, the battery is dis-
charged.
4. Check the starter connections to be sure they are securely tight-
ened.
5. Do not push or pull the vehicle to start it. See instructions for "Jump
starting".
If engine turns over normally
but does not start
1. Check the fuel level.
2. With the ignition switch in theLOCK position, check all connec-
tors at the ignition coils and spark
plugs. Reconnect any that may be
disconnected or loose.
3. Check the fuel line in the engine compartment.
4. If the engine still does not start, call an authorized Kia dealer or
seek other qualified assistance.
WARNING - Push/
pull start
Do not push or pull the vehicle
to start it. Push or pull starting
may cause the catalytic con-
verter to overload and create a
fire hazard.
Page 453 of 605
719
What to do in an emergency
9. Loosen the wheel nuts andremove them with your fingers.
Slide the wheel off the studs and
lay it flat so it cannot roll away. To
put the wheel on the hub, pick up
the spare tire, line up the holes
with the studs and slide the wheel
onto them. If this is difficult, tip the
wheel slightly and get the top hole
in the wheel lined up with the top
stud. Jiggle the wheel back and
forth until the wheel can slide over
the other studs. Wheels may have sharp edges.
Handle them carefully to avoid possi-
ble severe injury. Before putting the
wheel into place, be sure that there
is nothing on the hub or wheel (such
as mud, tar, gravel, etc.) that pre-
vents the wheel from fitting solidly
against the hub.
10. To install the wheel, hold it on the
studs, put the wheel nuts on the
studs and tighten them finger
tight. Jiggle the tire to be sure it is
completely seated, then tighten
the nuts as much as possible
with your fingers again.
11. Insert the wrench into the jack and lower the vehicle to the
ground by turning the wheel nut
wrench counterclockwise.
WARNING- Installing a
wheel
Make sure the wheel makes
good contact with the hub when
installed. If the contact of the
mounting surface between the
wheel and hub is not good, the
wheel nuts could come loose
and cause the loss of a wheel.
Loss of a wheel may result in
loss of control of the vehicle.