2018 KIA SOUL warning
[x] Cancel search: warningPage 51 of 620
333
Safety features of your vehicle
Child restraint system types
There are three main types of child
restraint systems: rear-facing seats,
forward-facing seats, and booster
seats. They are classified according
to the child’s age, height and weight.WARNING - Holding
Children
Never hold a child in your arms
or lap when riding in a vehicle.
The violent forces created dur-
ing a crash will tear the child
from your arms and throw the
child against the car’s interior.
Always use a child restraint
system which is appropriate for
your child's height and weight.WARNING - Unattended
Children
Never leave children unattended
in a vehicle. The car can heat up
very quickly, resulting in injuries
to the child in the vehicle.
WARNING - Seat Belt Use
Do not use one seat belt for two
occupants at the same time.
This will eliminate any safety
benefit provided by the seat belt
to the occupants.
Page 54 of 620
Safety features of your vehicle
36
3
Lower Anchors and Tether for
Children (LATCH) System
The LATCH system holds a child
restraint during driving and in an
accident. This system is designed to
make installation of the child restraint
easier and reduce the possibility of
improperly installing your child
restraint. The LATCH system uses
anchors in the vehicle and attach-
ments on the child restraint. The
LATCH system eliminates the need
to use seat belts to secure the child
restraint to the rear seats.
Lower anchors are metal bars built
into the vehicle. There are two lower
anchors for each LATCH seating
position that will accommodate a
child restraint with lower attach-
ments.
To use the LATCH system in your
vehicle, you must have a child
restraint with LATCH attachments.
The child seat manufacturer will pro-
vide you with instructions on how to
use the child seat with its attach-
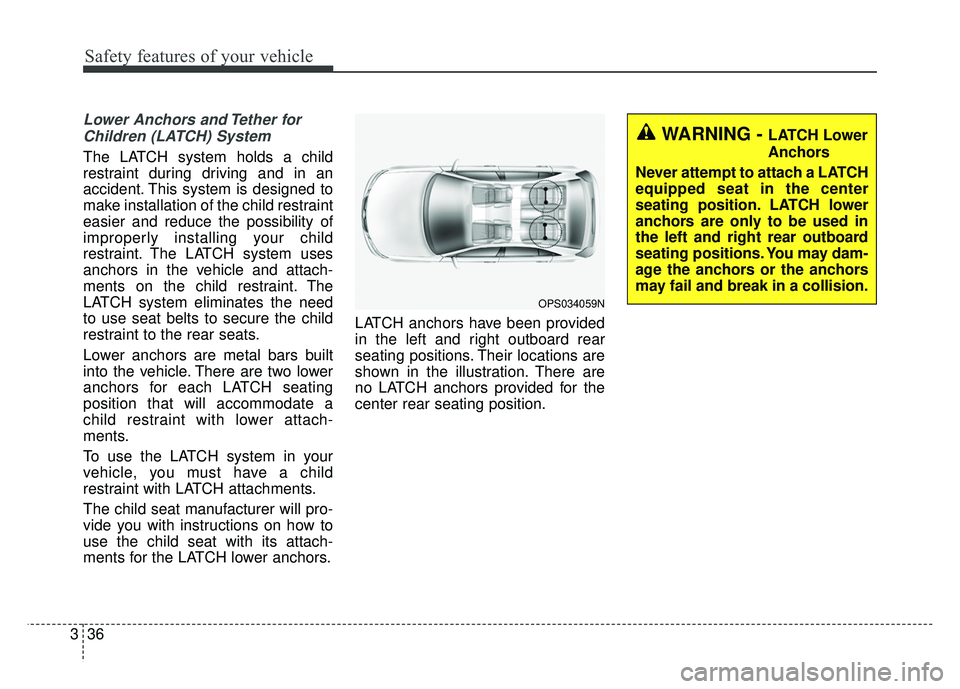
ments for the LATCH lower anchors. LATCH anchors have been provided
in the left and right outboard rear
seating positions. Their locations are
shown in the illustration. There are
no LATCH anchors provided for the
center rear seating position.
OPS034059N
WARNING - LATCH Lower
Anchors
Never attempt to attach a LATCH
equipped seat in the center
seating position. LATCH lower
anchors are only to be used in
the left and right rear outboard
seating positions. You may dam-
age the anchors or the anchors
may fail and break in a collision.
Page 55 of 620
337
Safety features of your vehicle
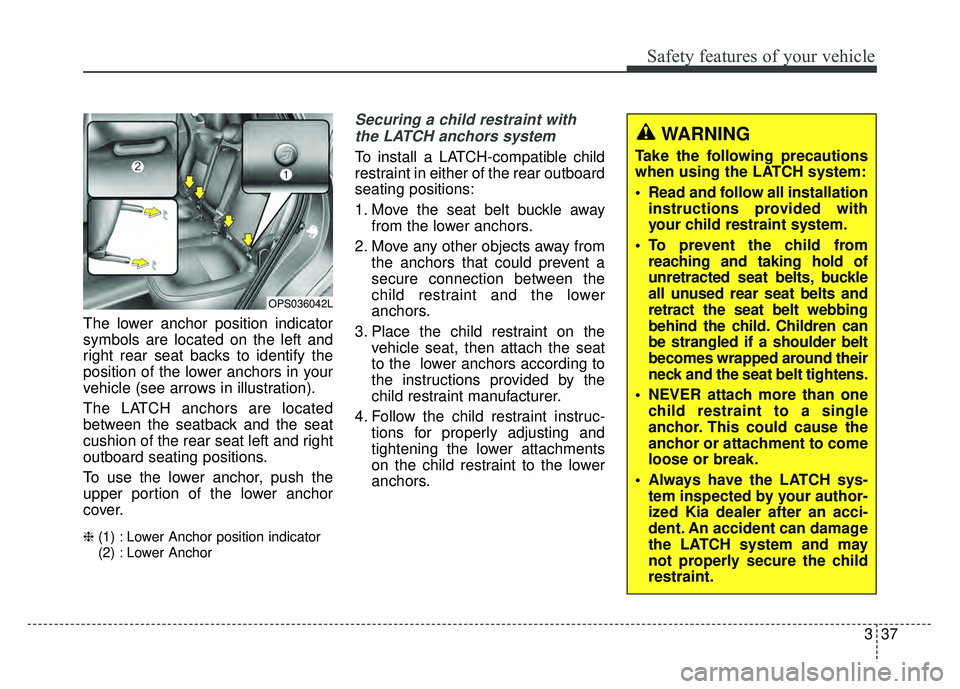
The lower anchor position indicator
symbols are located on the left and
right rear seat backs to identify the
position of the lower anchors in your
vehicle (see arrows in illustration).
The LATCH anchors are located
between the seatback and the seat
cushion of the rear seat left and right
outboard seating positions.
To use the lower anchor, push the
upper portion of the lower anchor
cover.
❈(1) : Lower Anchor position indicator
(2) : Lower Anchor
Securing a child restraint with
the LATCH anchors system
To install a LATCH-compatible child
restraint in either of the rear outboard
seating positions:
1. Move the seat belt buckle away from the lower anchors.
2. Move any other objects away from the anchors that could prevent a
secure connection between the
child restraint and the lower
anchors.
3. Place the child restraint on the vehicle seat, then attach the seat
to the lower anchors according to
the instructions provided by the
child restraint manufacturer.
4. Follow the child restraint instruc- tions for properly adjusting and
tightening the lower attachments
on the child restraint to the lower
anchors.
OPS036042L
WARNING
Take the following precautions
when using the LATCH system:
Read and follow all installationinstructions provided with
your child restraint system.
To prevent the child from reaching and taking hold of
unretracted seat belts, buckle
all unused rear seat belts and
retract the seat belt webbing
behind the child. Children can
be strangled if a shoulder belt
becomes wrapped around their
neck and the seat belt tightens.
NEVER attach more than one child restraint to a single
anchor. This could cause the
anchor or attachment to come
loose or break.
Always have the LATCH sys- tem inspected by your author-
ized Kia dealer after an acci-
dent. An accident can damage
the LATCH system and may
not properly secure the child
restraint.
Page 56 of 620
Safety features of your vehicle
38
3
✽
✽
NOTICE
The recommended maximum
weight for the LATCH system is 65
lbs. (30 kg). When selecting a proper
child restraint, consider that the
maximum total weight of the child
plus the child restraint should be
less than 65 lbs (30 kg).
As a guide, the MAX child restraint
weight should be determined by the
following calculation:
Child Restraint Weight =
65 - (child's total weight in lbs.)
Securing a child restraint seat
with "Tether Anchor" system
First secure the child restraint with
the LATCH lower anchors or the seat
belt. If the child restraint manufactur-
er recommends that the top tether
strap be attached, attach and tighten
the top tether strap to the top tether
strap anchor.
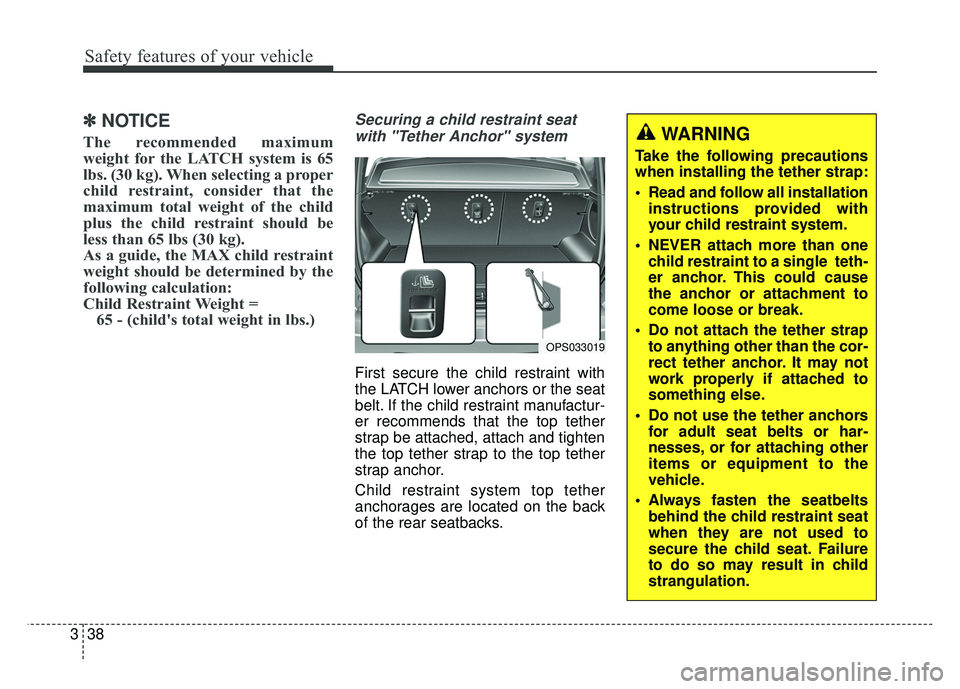
Child restraint system top tether
anchorages are located on the back
of the rear seatbacks.
OPS033019
WARNING
Take the following precautions
when installing the tether strap:
Read and follow all installation instructions provided with
your child restraint system.
NEVER attach more than one child restraint to a single teth-
er anchor. This could cause
the anchor or attachment to
come loose or break.
Do not attach the tether strap to anything other than the cor-
rect tether anchor. It may not
work properly if attached to
something else.
Do not use the tether anchors for adult seat belts or har-
nesses, or for attaching other
items or equipment to the
vehicle.
Always fasten the seatbelts behind the child restraint seat
when they are not used to
secure the child seat. Failure
to do so may result in child
strangulation.
Page 59 of 620
341
Safety features of your vehicle
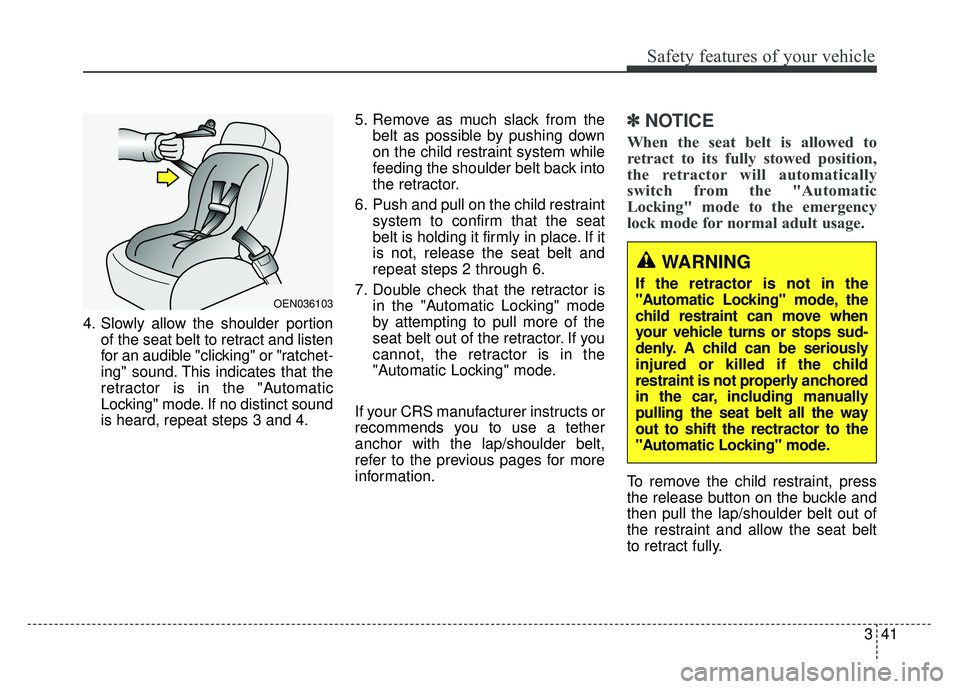
4. Slowly allow the shoulder portionof the seat belt to retract and listen
for an audible "clicking" or "ratchet-
ing" sound. This indicates that the
retractor is in the "Automatic
Locking" mode. If no distinct sound
is heard, repeat steps 3 and 4. 5. Remove as much slack from the
belt as possible by pushing down
on the child restraint system while
feeding the shoulder belt back into
the retractor.
6. Push and pull on the child restraint system to confirm that the seat
belt is holding it firmly in place. If it
is not, release the seat belt and
repeat steps 2 through 6.
7. Double check that the retractor is in the "Automatic Locking" mode
by attempting to pull more of the
seat belt out of the retractor. If you
cannot, the retractor is in the
"Automatic Locking" mode.
If your CRS manufacturer instructs or
recommends you to use a tether
anchor with the lap/shoulder belt,
refer to the previous pages for more
information.
✽ ✽ NOTICE
When the seat belt is allowed to
retract to its fully stowed position,
the retractor will automatically
switch from the "Automatic
Locking" mode to the emergency
lock mode for normal adult usage.
To remove the child restraint, press
the release button on the buckle and
then pull the lap/shoulder belt out of
the restraint and allow the seat belt
to retract fully.
OEN036103
WARNING
If the retractor is not in the
"Automatic Locking" mode, the
child restraint can move when
your vehicle turns or stops sud-
denly. A child can be seriously
injured or killed if the child
restraint is not properly anchored
in the car, including manually
pulling the seat belt all the way
out to shift the rectractor to the
"Automatic Locking" mode.
Page 62 of 620
Safety features of your vehicle
44
3
Noise and smoke
When inflated, the air bags make a
loud noise and leave smoke and
powder in the air inside the vehicle.
This is normal and is a result of the
ignition of the air bag inflator. After
the air bag inflates, you may feel sub-
stantial discomfort in breathing due
to the contact of your chest with both
the seat belt and the air bag, as well
as from breathing the smoke and
powder. Open your doors and/or
windows as soon as possible after
impact in order to reduce discom-
fort and prevent prolonged expo-
sure to the smoke and powder.
Though smoke and powder are non-
toxic, it may cause irritation to the
skin (eyes, nose and throat, etc). If
this is the case, wash and rinse with
cold water immediately and consult a
doctor if the symptom persists.WARNING- Hot compo-
nents
Do not touch the air bag storage
area's internal components
immediately after airbag infla-
tion. The air bag related parts in
the steering wheel, instrument
panel and the roof rails above
the front and rear doors are
very hot. Hot components can
result in burn injuries.WARNING- Airbag infla- tion
Sit as far back as possible from
the steering wheel while still
maintaining comfortable con-
trol of your vehicle. A distance
of at least 10" from your chest
to the steering wheel is recom-
mended. Failure to do so can
result in airbag inflation injuries
to the driver.
WARNING
Do not install or place any
accessories near air bag
deployment areas, such as the
instrument panel, windows, pil-
lars, and roof rails. Such objects
may become dangerous projec-
tiles if the airbag inflates.
Page 63 of 620
345
Safety features of your vehicle
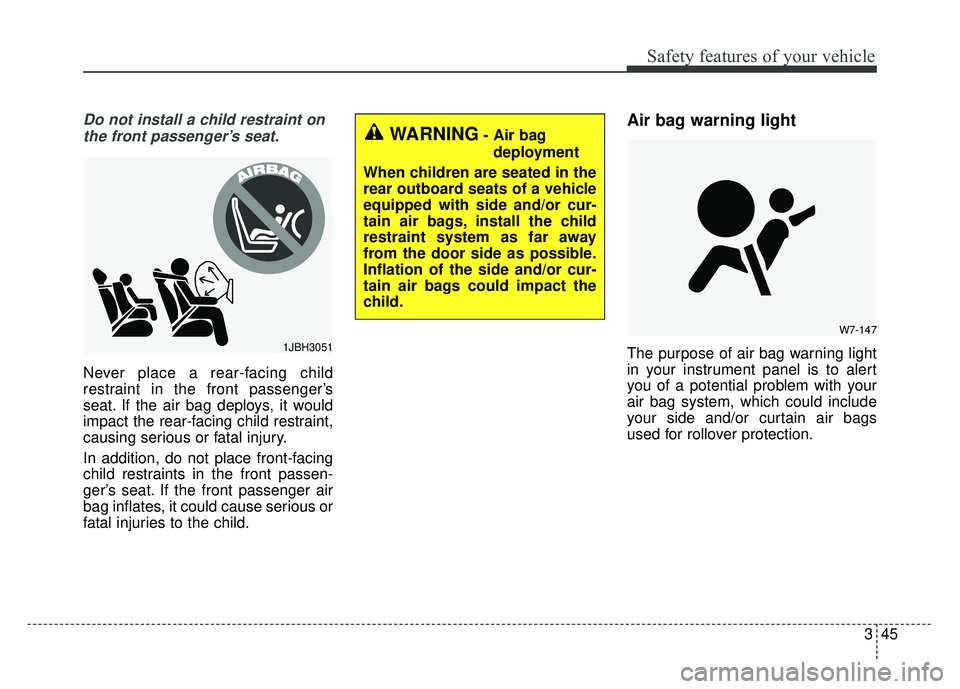
Do not install a child restraint onthe front passenger’s seat.
Never place a rear-facing child
restraint in the front passenger’s
seat. If the air bag deploys, it would
impact the rear-facing child restraint,
causing serious or fatal injury.
In addition, do not place front-facing
child restraints in the front passen-
ger’s seat. If the front passenger air
bag inflates, it could cause serious or
fatal injuries to the child.
Air bag warning light
The purpose of air bag warning light
in your instrument panel is to alert
you of a potential problem with your
air bag system, which could include
your side and/or curtain air bags
used for rollover protection.1JBH3051
W7-147
WARNING- Air bag deployment
When children are seated in the
rear outboard seats of a vehicle
equipped with side and/or cur-
tain air bags, install the child
restraint system as far away
from the door side as possible.
Inflation of the side and/or cur-
tain air bags could impact the
child.
Page 64 of 620

Safety features of your vehicle
46
3
When the ignition switch is turned
ON, the warning light should illumi-
nate for approximately 6 seconds,
then go off. Have the system
checked by an authorized Kia dealer-
ship if:
The light does not turn on briefly
when you turn the ignition ON.
The light stays on after illuminating for approximately 6 seconds.
The light comes on while the vehi- cle is in motion.
The light blinks when the ignition switch is in ON position.SRS components and functions
The SRS consists of the following
components:
1. Driver's front air bag module
2. Passenger's front air bag module
3. Side air bag modules
4. Curtain air bag modules
5. Retractor pre-tensioner assemblies
6. Air bag warning light
7. SRS control module (SRSCM)/ Rollover sensor
8. Front impact sensors
9. Side impact sensors 10. PASSENGER “AIR BAG OFF”
indicator (Front passenger’s seat
only)
11. Occupant detection system (Front passenger’s seat only)
12. Driver’s and front passenger’s seat belt buckle sensors
13. Emergency fastening device (EFD)
14. Side pressure impact sensor
The SRSCM continually monitors all
SRS components while the ignition
switch is ON to determine if a crash
impact is severe enough to require
air bag deployment or pre-tensioner
seat belt deployment.
OPS034060N/Q
,,
,,