2018 KIA SOUL warning lights
[x] Cancel search: warning lightsPage 325 of 620
Driving your vehicle
66
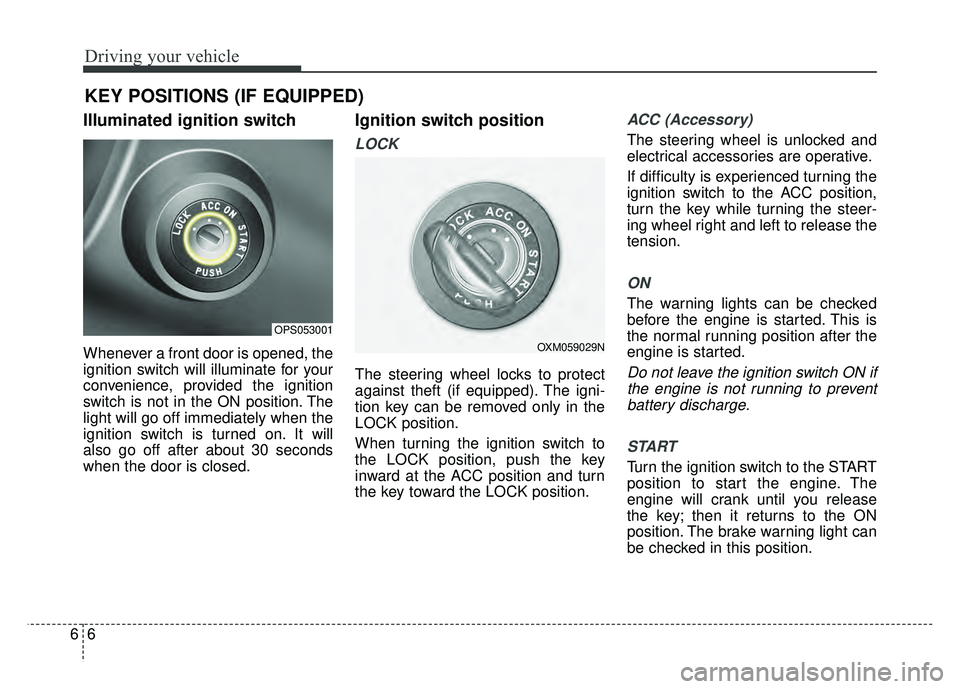
Illuminated ignition switch
Whenever a front door is opened, the
ignition switch will illuminate for your
convenience, provided the ignition
switch is not in the ON position. The
light will go off immediately when the
ignition switch is turned on. It will
also go off after about 30 seconds
when the door is closed.
Ignition switch position
LOCK
The steering wheel locks to protect
against theft (if equipped). The igni-
tion key can be removed only in the
LOCK position.
When turning the ignition switch to
the LOCK position, push the key
inward at the ACC position and turn
the key toward the LOCK position.
ACC (Accessory)
The steering wheel is unlocked and
electrical accessories are operative.
If difficulty is experienced turning the
ignition switch to the ACC position,
turn the key while turning the steer-
ing wheel right and left to release the
tension.
ON
The warning lights can be checked
before the engine is started. This is
the normal running position after the
engine is started.
Do not leave the ignition switch ON ifthe engine is not running to preventbattery discharge.
START
Turn the ignition switch to the START
position to start the engine. The
engine will crank until you release
the key; then it returns to the ON
position. The brake warning light can
be checked in this position.
KEY POSITIONS (IF EQUIPPED)
OPS053001
OXM059029N
Page 329 of 620
Driving your vehicle
10
6
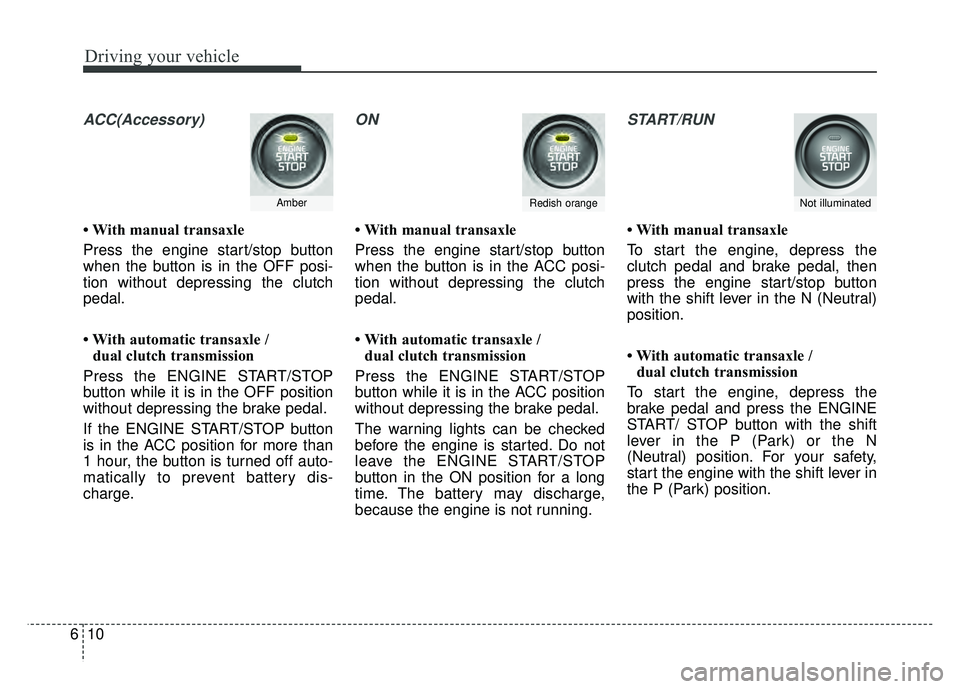
ACC(Accessory)
• With manual transaxle
Press the engine start/stop button
when the button is in the OFF posi-
tion without depressing the clutch
pedal.
• With automatic transaxle /
dual clutch transmission
Press the ENGINE START/STOP
button while it is in the OFF position
without depressing the brake pedal.
If the ENGINE START/STOP button
is in the ACC position for more than
1 hour, the button is turned off auto-
matically to prevent battery dis-
charge.
ON
• With manual transaxle
Press the engine start/stop button
when the button is in the ACC posi-
tion without depressing the clutch
pedal.
• With automatic transaxle / dual clutch transmission
Press the ENGINE START/STOP
button while it is in the ACC position
without depressing the brake pedal.
The warning lights can be checked
before the engine is started. Do not
leave the ENGINE START/STOP
button in the ON position for a long
time. The battery may discharge,
because the engine is not running.
START/RUN
• With manual transaxle
To start the engine, depress the
clutch pedal and brake pedal, then
press the engine start/stop button
with the shift lever in the N (Neutral)
position.
• With automatic transaxle / dual clutch transmission
To start the engine, depress the
brake pedal and press the ENGINE
START/ STOP button with the shift
lever in the P (Park) or the N
(Neutral) position. For your safety,
start the engine with the shift lever in
the P (Park) position.
AmberRedish orangeNot illuminated
Page 408 of 620

689
Driving your vehicle
The LDWS does not operate
when:
The driver turns on the turn signalor the hazard warning flasher to
change lane.
Driving on the lane line.
✽ ✽ NOTICE
To change lanes, operate the turn
signal switch then change the lane.
The LDWS may not warn you
even if the vehicle leaves the
lane, or may warn you even if
the vehicle does not leave the
lane when;
The lane is not visible due to snow,
rain, stain, a puddle or other envi-
ronmental conditions.
The brightness of the outside changes suddenly such as tunnel
enter/exit.
The headlights are off at night or in a tunnel.
The color of the lane marking from the road is difficult to distinguish.
Driving on a steep grade or a curve.
Light such as street light, sunlight or oncoming vehicle light reflects
from water on the road.
The lens or windshield is stained with foreign matter.
The sensor cannot detect the lane because of fog, heavy rain or
heavy snow. The surrounding of the inside rear
view mirror temperature is high
due to a direct ray of light.
The lane is very wide or narrow.
The lane line is damaged or indis- tinct.
The windshield is fogged by humid air in the vehicle.
The shadow is on the lane line by a median strip.
The sensor cannot distinguish the lane from the road due to the
dust/dirt.
There is a mark similar to a lane line.
There is a boundary structure.
The distance from vehicle ahead is very short or the vehicle ahead
drives hiding the lane line.
The vehicle vibrates heavily due to road conditions.
The lane number increases or decreases or the lane lines are
crossing.
WARNING - LDWS
Limitations
The Lane Departure Warning
System is a supplemental sys-
tem. Do not solely rely on the
system but always pay attention
and drive safely.
Page 441 of 620
What to do in an emergency
27
ROAD WARNING
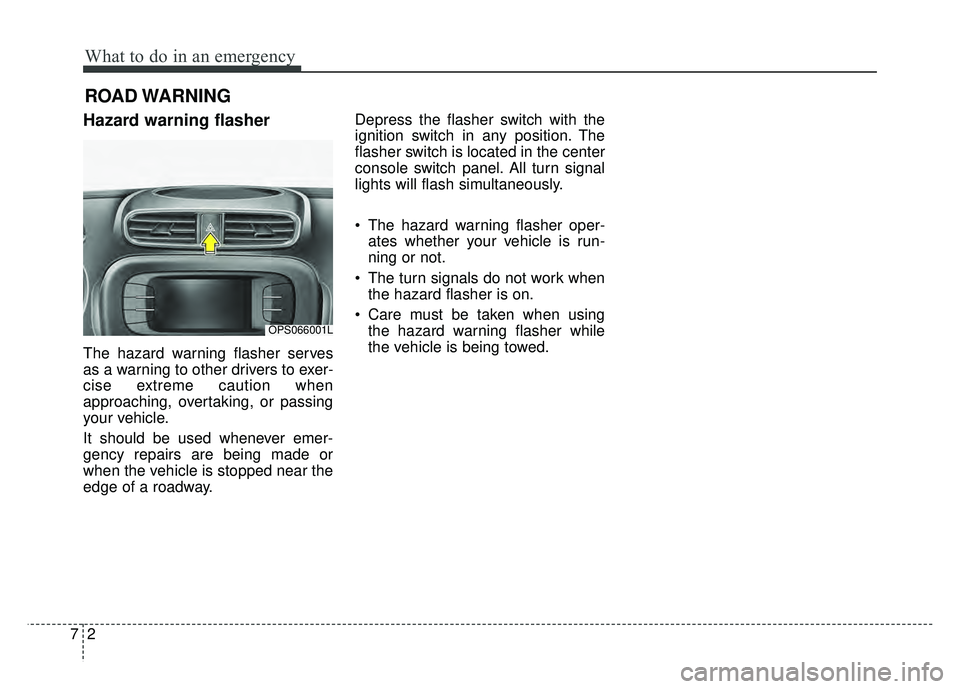
Hazard warning flasher
The hazard warning flasher serves
as a warning to other drivers to exer-
cise extreme caution when
approaching, overtaking, or passing
your vehicle.
It should be used whenever emer-
gency repairs are being made or
when the vehicle is stopped near the
edge of a roadway.Depress the flasher switch with the
ignition switch in any position. The
flasher switch is located in the center
console switch panel. All turn signal
lights will flash simultaneously.
• The hazard warning flasher oper-
ates whether your vehicle is run-
ning or not.
The turn signals do not work when the hazard flasher is on.
Care must be taken when using the hazard warning flasher while
the vehicle is being towed.
OPS066001L
Page 484 of 620
89
Maintenance
At least monthly:
Check the coolant level in theengine coolant reservoir.
Check the operation of all exterior lights, including the stoplights, turn
signals and hazard warning flash-
ers.
Check the inflation pressures of all tires including the spare.
At least twice a year
(i.e., every Spring and Fall):
Check the radiator, heater and air conditioning hoses for leaks or
damage.
Check the windshield washer spray and wiper operation. Clean
the wiper blades with clean cloth
dampened with washer fluid.
Check the headlight alignment.
Check the muffler, exhaust pipes, shields and clamps.
Check the lap/shoulder belts for wear and function.
Check for worn tires and loose wheel lug nuts.
At least once a year:
Clean the body and door drainholes.
Lubricate the door hinges and checks, and hood hinges.
Lubricate the door and hood locks and latches.
Lubricate the door rubber weather- strips.
Check the air conditioning system.
Inspect and lubricate the automat- ic transaxle linkage and controls.
Clean the battery and terminals.
Check the brake fluid level.
Page 532 of 620
857
Maintenance
Always read the following
instructions carefully when
handling a battery.
If any electrolyte gets into your eyes, flush your eyes
with clean water for at least
15 minutes and get immedi-
ate medical attention.
If electrolyte gets on your
skin, thoroughly wash the
contacted area. If you feel
pain or burning sensation,
get medical attention imme-
diately.
An inappropriately disposed battery can be harmful to the
environment and human
health. Dispose the battery
according to your local law(s)
or regulation.
Never attempt to recharge the bat-
tery when the battery cables are con-
nected.✽ ✽ NOTICE
If you connect unauthorized elec-
tronic devices to the battery, the bat-
tery may be discharged. Never use
unauthorized devices.
Battery recharging
Your vehicle has a maintenance-free,
calcium-based battery.
If the battery becomes discharged
in a short time (because, for exam-
ple, the headlights or interior lights
were left on while the vehicle was
not in use), recharge it by slow
charging (trickle) for 10 hours.
If the battery gradually discharges because of high electric load while
the vehicle is being used, recharge
it at 20-30A for two hours.
CALIFORNIA PROPO-
SITION 65 WARNING
Battery posts, terminals, and
related accessories contain
lead and lead compounds,
chemicals known to the State of
California to cause cancer, birth
defects and reproductive harm.
Batteries also contain other
chemicals known to the State of
California to cause cancer.
Wash hands after handling.
WARNING- Risk of elec-
trocution
Never touch the electrical igni-
tion system while the vehicle is
running. This system works
with high voltage which can
"zap" you.
WARNING- Recharging battery
Never attempt to recharge the
battery when the battery cables
are connected.
Page 549 of 620
Maintenance
74
8
FUSES
A vehicle’s electrical system is pro-
tected from electrical overload dam-
age by fuses.
This vehicle has 2 (or 3) fuse panels,
one located in the driver’s side panel
bolster, the other in the engine com-
partment near the battery.
If any of your vehicle’s lights, acces-
sories, or controls do not work, check
the appropriate circuit fuse. If a fuse
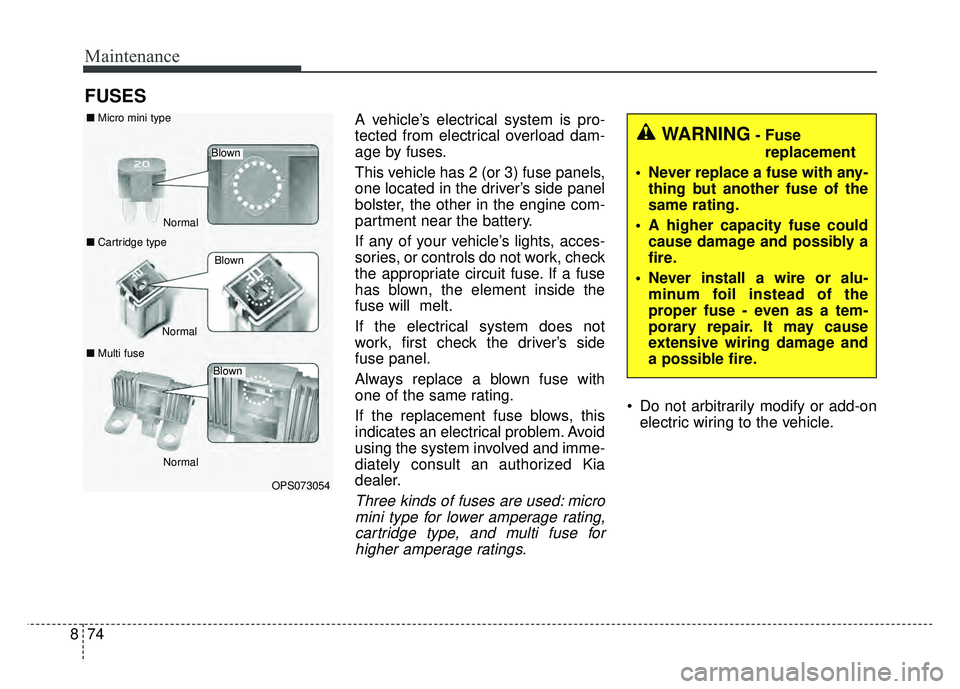
has blown, the element inside the
fuse will melt.
If the electrical system does not
work, first check the driver’s side
fuse panel.
Always replace a blown fuse with
one of the same rating.
If the replacement fuse blows, this
indicates an electrical problem. Avoid
using the system involved and imme-
diately consult an authorized Kia
dealer.
Three kinds of fuses are used: micro
mini type for lower amperage rating,cartridge type, and multi fuse forhigher amperage ratings.
Do not arbitrarily modify or add-on electric wiring to the vehicle.
WARNING- Fuse
replacement
Never replace a fuse with any- thing but another fuse of the
same rating.
A higher capacity fuse could cause damage and possibly a
fire.
Never install a wire or alu- minum foil instead of the
proper fuse - even as a tem-
porary repair. It may cause
extensive wiring damage and
a possible fire.
OPS073054
Normal
Normal
■
Micro mini type
■ Cartridge type
■ Multi fuse
Blown
Blown
Normal
Blown
Page 563 of 620

Maintenance
88
8
LIGHT BULBS
Bulb replacement precaution
Please keep extra bulbs on hand
with appropriate wattage ratings in
case of emergencies.
Refer to “Bulb Wattage” in chapter 9.
When changing lamps, first turn off
the engine at a safe place, firmly
apply the parking brake and detach
the battery’s negative (-) terminal.
Use only bulbs of the specified
wattage.✽ ✽ NOTICE
• If the light bulb or lamp connector
is removed while the lamp is still
on, the fuse box's electronic sys-
tem may log it as a malfunction.
Therefore, a lamp malfunction
incident may be recorded as a
Diagnostic Trouble Code (DTC) in
the fuse box.
• It is normal for an operating lamp to flicker momentarily. This is due
to a stabilization function of the
vehicle’s electronic control device.
If the lamp lights up normally
after momentarily blinking, then
it is functioning as normal.
However, if the lamp continues to
flicker several times or turns off
completely, there may be an error
in the vehicle’s electronic control
device. Please have the vehicle
checked by an authorized Kia
dealer immediately.
WARNING- Working on
the lights
Prior to working on the light,
firmly apply the parking brake,
ensure that the ignition switch
is turned to the LOCK position
and turn off the lights to avoid
sudden movement of the vehi-
cle and burning your fingers or
receiving an electric shock.
CAUTION -Light replace-
ment
Be sure to replace the burned- out bulb with one of the samewattage rating. Otherwise, itmay cause damage to the fuseor electric wiring system.
CAUTION -Headlamp
Lens
To prevent damage, do notclean the headlamp lens withchemical solvents or strongdetergents.