2018 KIA SOUL check oil
[x] Cancel search: check oilPage 520 of 620

845
Maintenance
BRAKE/CLUTCH FLUID
Checking the brake/clutch*
fluid level
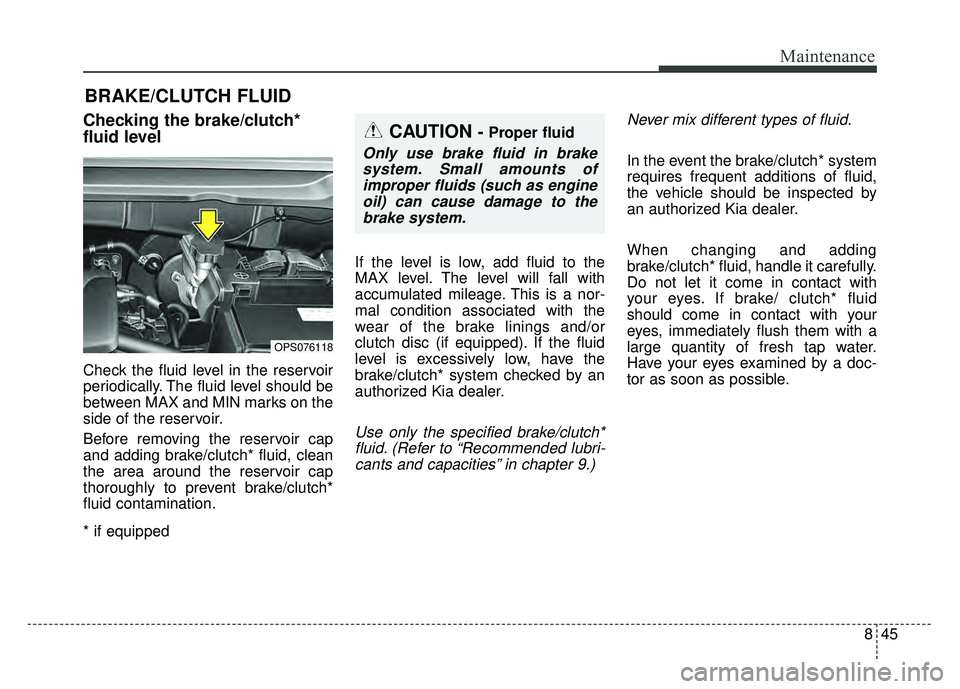
Check the fluid level in the reservoir
periodically. The fluid level should be
between MAX and MIN marks on the
side of the reservoir.
Before removing the reservoir cap
and adding brake/clutch* fluid, clean
the area around the reservoir cap
thoroughly to prevent brake/clutch*
fluid contamination.
* if equippedIf the level is low, add fluid to the
MAX level. The level will fall with
accumulated mileage. This is a nor-
mal condition associated with the
wear of the brake linings and/or
clutch disc (if equipped). If the fluid
level is excessively low, have the
brake/clutch* system checked by an
authorized Kia dealer.
Use only the specified brake/clutch*
fluid. (Refer to “Recommended lubri-cants and capacities” in chapter 9.) Never mix different types of fluid.
In the event the brake/clutch* system
requires frequent additions of fluid,
the vehicle should be inspected by
an authorized Kia dealer.
When changing and adding
brake/clutch* fluid, handle it carefully.
Do not let it come in contact with
your eyes. If brake/ clutch* fluid
should come in contact with your
eyes, immediately flush them with a
large quantity of fresh tap water.
Have your eyes examined by a doc-
tor as soon as possible.
OPS076118
CAUTION - Proper fluid
Only use brake fluid in brake
system. Small amounts ofimproper fluids (such as engineoil) can cause damage to thebrake system.
Page 533 of 620

Maintenance
58
8
When recharging the battery,
observe the following precautions:
The battery must be removed from
the vehicle and placed in an area
with good ventilation.
Do not allow cigarettes, sparks, or flame near the battery.
Watch the battery during charging, and stop or reduce the charging
rate if the battery cells begin
gassing (boiling) violently or if the
temperature of the electrolyte of
any cell exceeds 120°F (49°C).
Wear eye protection when check- ing the battery during charging.
Disconnect the battery charger in the following order. 1.Turn off the battery charger main
switch.
2.Unhook the negative clamp from the negative battery terminal.
3.Unhook the positive clamp from the positive battery terminal.
Before performing maintenance or recharging the battery, turn off all
accessories and stop the engine.
The negative battery cable must be removed first and installed last
when the battery is disconnected.Reset items
Items should be reset after the bat-
tery has been discharged or the bat-
tery has been disconnected.
Auto up/down window (See chapter 4)
Sunroof (See chapter 4)
Trip computer (See chapter 4)
Climate control system (See chapter 4)
Clock (See chapter 4)
Audio (See chapter 5)
Page 549 of 620

Maintenance
74
8
FUSES
A vehicle’s electrical system is pro-
tected from electrical overload dam-
age by fuses.
This vehicle has 2 (or 3) fuse panels,
one located in the driver’s side panel
bolster, the other in the engine com-
partment near the battery.
If any of your vehicle’s lights, acces-
sories, or controls do not work, check
the appropriate circuit fuse. If a fuse
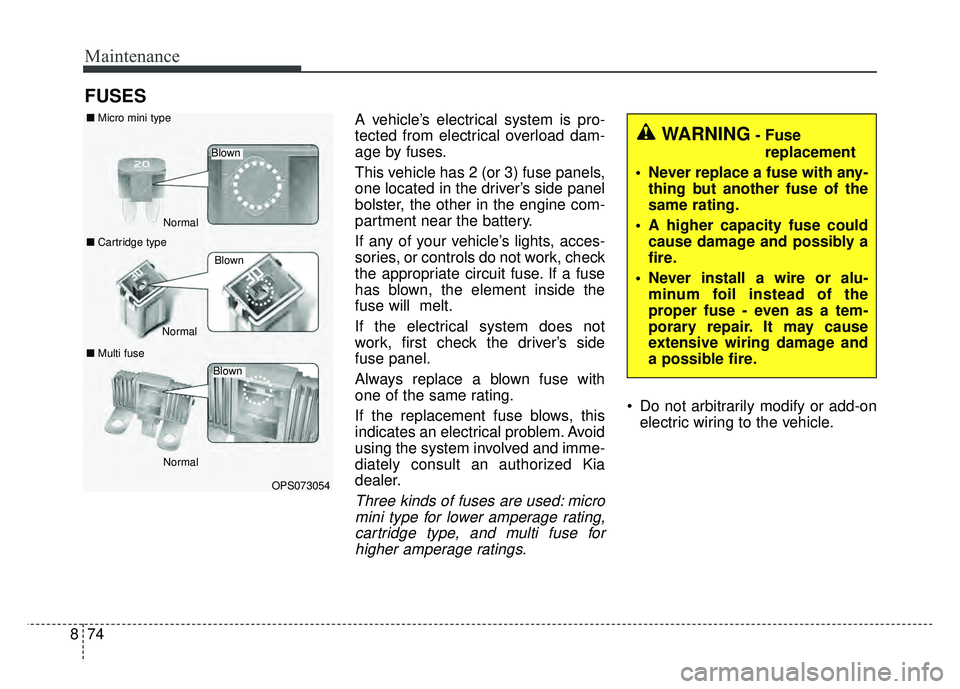
has blown, the element inside the
fuse will melt.
If the electrical system does not
work, first check the driver’s side
fuse panel.
Always replace a blown fuse with
one of the same rating.
If the replacement fuse blows, this
indicates an electrical problem. Avoid
using the system involved and imme-
diately consult an authorized Kia
dealer.
Three kinds of fuses are used: micro
mini type for lower amperage rating,cartridge type, and multi fuse forhigher amperage ratings.
Do not arbitrarily modify or add-on electric wiring to the vehicle.
WARNING- Fuse
replacement
Never replace a fuse with any- thing but another fuse of the
same rating.
A higher capacity fuse could cause damage and possibly a
fire.
Never install a wire or alu- minum foil instead of the
proper fuse - even as a tem-
porary repair. It may cause
extensive wiring damage and
a possible fire.
OPS073054
Normal
Normal
■
Micro mini type
■ Cartridge type
■ Multi fuse
Blown
Blown
Normal
Blown
Page 586 of 620

8111
Maintenance
When cleaning lower door panels,rocker panels and frame members,
be sure that drain holes are kept
open so that moisture can escape
and not be trapped inside to accel-
erate corrosion.
Keep your garage dry
Don't park your vehicle in a damp,
poorly ventilated garage. This cre-
ates a favorable environment for cor-
rosion. This is particularly true if you
wash your vehicle in the garage or
drive it into the garage when it is still
wet or covered with snow, ice or
mud. Even a heated garage can con-
tribute to corrosion unless it is well
ventilated so moisture is dispersed. Keep paint and trim in good con-
dition
Scratches or chips in the finish
should be covered with "touch-up"
paint as soon as possible to reduce
the possibility of corrosion. If bare
metal is showing through, the atten-
tion of a qualified body and paint
shop is recommended.
Bird droppings : Bird droppings are
highly corrosive and may damage
painted surfaces in just a few hours.
Always remove bird droppings as
soon as possible.
Don't neglect the interior
Moisture can collect under the floor
mats and carpeting and cause corro-
sion. Check under the mats periodi-
cally to be sure the carpeting is dry.
Use particular care if you carry fertil-
izers, cleaning materials or chemi-
cals in the vehicle.
These should be carried only in prop-
er containers and any spills or leaks
should be cleaned up, flushed with
clean water and thoroughly dried.Interior care
Interior general precautions
Prevent chemicals such as perfume,
cosmetic oil, sun cream, hand clean-
er, and air freshener from contacting
the interior parts because they may
cause damage or discoloration. If
they do contact the interior parts,
wipe them off immediately. If neces-
sary, use a vinyl cleaner, see product
instructions for correct usage.
Page 612 of 620

Index
4I
To temporarily accelerate with the cruise control on . . . . . . . . . . . . . . . . . . . . . . . . . . . . . . . . . . . . \
. . 6-64
To turn cruise control off, do one of the following . 6-66
Declaration of Conformity . . . . . . . . . . . . . . . . . . . . . . 5-84 FCC . . . . . . . . . . . . . . . . . . . . . . . . . . . . . . . . . . . . \
. 5-84
Defroster . . . . . . . . . . . . . . . . . . . . . . . . . . . . . . . . . . . 4-\
101 Rear window defroster . . . . . . . . . . . . . . . . . . . . . . 4-101
Dimensions . . . . . . . . . . . . . . . . . . . . . . . . . . . . . . . . . . . 9-\
2
Door locks. . . . . . . . . . . . . . . . . . . . . . . . . . . . . . . . . . . 4-\
17 Auto door lock/unlock feature . . . . . . . . . . . . . . . . . 4-20
Child-protector rear door lock . . . . . . . . . . . . . . . . . 4-21
Impact sensing door unlock system . . . . . . . . . . . . . 4-20
Operating door locks from inside the vehicle . . . . . 4-18
Operating door locks from outside the vehicle . . . . 4-17
Speed sensing door lock system . . . . . . . . . . . . . . . 4-20
Drive mode integrated control system . . . . . . . . . . . . . 6-84
Dual Clutch Transmission (DCT). . . . . . . . . . . . . . . . . 6-25 Dual clutch transmission operation . . . . . . . . . . . . . 6-25
Good driving practices . . . . . . . . . . . . . . . . . . . . . . . 6-33
Economical operation . . . . . . . . . . . . . . . . . . . . . . . . . 6-103
Electrical equipment (U.S. Only) . . . . . . . . . . . . . . . . . 9-15 Emergency starting . . . . . . . . . . . . . . . . . . . . . . . . . . . . . 7-5
Jump starting . . . . . . . . . . . . . . . . . . . . . . . . . . . . . . . 7-5
Push-starting . . . . . . . . . . . . . . . . . . . . . . . . . . . . . . . . 7-7
Emission control system . . . . . . . . . . . . . . . . . . . . . . . 8-114 Crankcase emission control system . . . . . . . . . . . . 8-114
Evaporative emission control (including ORVR:Onboard Refueling Vapor Recovery) system. . . . 8-114
Exhaust emission control system . . . . . . . . . . . . . . 8-115
Engine . . . . . . . . . . . . . . . . . . . . . . . . . . . . . . . . . . . . \
. . . 9-3
Engine compartment . . . . . . . . . . . . . . . . . . . . . . . . 2-6, 8-3
Engine coolant . . . . . . . . . . . . . . . . . . . . . . . . . . . . . . . 8-42 Changing the coolant . . . . . . . . . . . . . . . . . . . . . . . . 8-44
Checking the coolant level . . . . . . . . . . . . . . . . . . . . 8-42
Engine number . . . . . . . . . . . . . . . . . . . . . . . . . . . . . . . 9-11
Engine oil . . . . . . . . . . . . . . . . . . . . . . . . . . . . . . . . . . . 8-\
40 Changing the engine oil and filter . . . . . . . . . . . . . . 8-41
Checking the engine oil level . . . . . . . . . . . . . . . . . . 8-40
Engine start/stop button . . . . . . . . . . . . . . . . . . . . . . . . . 6-9 Engine start/stop button position . . . . . . . . . . . . . . . . 6-8
Illuminated engine start/stop button. . . . . . . . . . . . . . 6-9
Starting the engine with a smart key . . . . . . . . . . . . 6-11
Explanation of scheduled maintenance items . . . . . . . 8-34
Exterior features . . . . . . . . . . . . . . . . . . . . . . . . . . . . . 4-147 Mounting bracket for roof carrier . . . . . . . . . . . . . 4-148
Roof rack . . . . . . . . . . . . . . . . . . . . . . . . . . . . . . . . 4-147
Exterior overview . . . . . . . . . . . . . . . . . . . . . . . . . . . . . . 2-2
D
E
Page 618 of 620

Index
10I
Overview . . . . . . . . . . . . . . . . . . . . . . . . . . . . . . . . . 4-68
Trip A/B (for Type A cluster) . . . . . . . . . . . . . . . . . . 4-69
Vehicle Break-In Process . . . . . . . . . . . . . . . . . . . . . . . . 1-6
Vehicle certification label . . . . . . . . . . . . . . . . . . . . . . . 9-10
Vehicle data collection and event data recorders . . . . . . 1-7
Vehicle handling instructions . . . . . . . . . . . . . . . . . . . . . 1-6
Vehicle identification number (VIN) . . . . . . . . . . . . . . 9-10
Vehicle load limit . . . . . . . . . . . . . . . . . . . . . . . . . . . . 6-114 Certification label . . . . . . . . . . . . . . . . . . . . . . . . . . 6-118
Tire and loading information label. . . . . . . . . . . . . 6-114
Vehicle weight glossary . . . . . . . . . . . . . . . . . . . . . . . 6-120 Base curb weight . . . . . . . . . . . . . . . . . . . . . . . . . . 6-120
Cargo weight . . . . . . . . . . . . . . . . . . . . . . . . . . . . . 6-120
GAW (Gross axle weight) . . . . . . . . . . . . . . . . . . . 6-120
GAWR (Gross axle weight rating) . . . . . . . . . . . . . 6-120
GVW (Gross vehicle weight). . . . . . . . . . . . . . . . . 6-120
GVWR (Gross vehicle weight rating) . . . . . . . . . . 6-120
Vehicle curb weight . . . . . . . . . . . . . . . . . . . . . . . . 6-120
Warning and indicator lights. . . . . . . . . . . . . . . . . . . . . 4-74 Indicator Lights . . . . . . . . . . . . . . . . . . . . . . . . . . . . 4-82
Warning lights . . . . . . . . . . . . . . . . . . . . . . . . . . . . . 4-74 Washer fluid . . . . . . . . . . . . . . . . . . . . . . . . . . . . . . . . . 8-47
Checking the washer fluid level . . . . . . . . . . . . . . . . 8-47
Windows . . . . . . . . . . . . . . . . . . . . . . . . . . . . . . . . . . . . \
4-24 Power windows . . . . . . . . . . . . . . . . . . . . . . . . . . . . 4-52
Windshield defrosting and defogging. . . . . . . . . . . . . 4-128 Automatic climate control system . . . . . . . . . . . . . 4-129
Defogging logic . . . . . . . . . . . . . . . . . . . . . . . . . . . 4-130
Manual climate control system . . . . . . . . . . . . . . . 4-128
Winter driving . . . . . . . . . . . . . . . . . . . . . . . . . . . . . . . 6-110 Carry emergency equipment . . . . . . . . . . . . . . . . . 6-113
Change to “winter weight” oil if necessary . . . . . . 6-112
Check battery and cables . . . . . . . . . . . . . . . . . . . . 6-112
Check spark plugs and ignition system . . . . . . . . . 6-112
Don’t let your parking brake freeze . . . . . . . . . . . . 6-113
Don't let ice and snow accumulate underneath . . . 6-113
Snowy or icy conditions . . . . . . . . . . . . . . . . . . . . . 6-110
To keep locks from freezing. . . . . . . . . . . . . . . . . . 6-112
Use approved window washer anti-freeze in system. . . . . . . . . . . . . . . . . . . . . . . . . . . . . . . . . . 6-11\
2
Use high quality ethylene glycol coolant. . . . . . . . 6-112
Wiper blades . . . . . . . . . . . . . . . . . . . . . . . . . . . . . . . . . 8-52 Blade inspection . . . . . . . . . . . . . . . . . . . . . . . . . . . . 8-52
Blade replacement . . . . . . . . . . . . . . . . . . . . . . . . . . 8-52
V
W