2018 KIA SOUL ignition
[x] Cancel search: ignitionPage 8 of 50

SOUL FEATURES & FUNCTIONS GUIDE6*IF EQUIPPED
INSTRUMENT CLUSTER
The Trip Computer is a driver information system
that displays information related to driving on
the display when the ignition switch is ON
To cycle through the LCD Display modes, press
the Mode/Select button A
When in the Trip Computer mode , press the
Move/Reset button B to cycle through the screens
When displaying the Tripmeter, press and hold the
Move/Reset button B to reset the Tripmeter to zero
REMINDERS:
•
Appearance of Tripmeter display may differ as equipped
•
All stored driving information (except Odometer and Range) is reset if the battery is disconnectedSET
CRUISE
RES
CANCELMODE
VOL
VOL
SETCRUISERESCANCELMODEVOL
VOL
(For Type B cluster; Buttons located on Steering Wheel)
1 75 4 mi
16.8 MPGAverage
0 10
Hold OK : Reset20
30
Instant18.4 MPG
(Type B Cluster)
TRIP
• Average Fuel Economy• Instant Fuel Economy
Digital Speedometer
ACCUMULATE INFO
• Tripmeter• Fuel Economy• Timer
DRIVE INFO
• Tripmeter • Fuel Economy • Timer
Trip Computer Mode: Displays driving information for tripmeter, fuel economy, etc
Turn-by-Turn Mode*: Displays the state of the Navigation system
User Settings Mode: Change settings of the doors, lights, sound, drivings assist, convenience, service and other features
Master Warning Mode: Informs of warning messages related to TPMS, Blind Spot Detection (BSD) system, etc
Lane Departure Warning System (LDWS)*: Displays the state of the LDWS
LCD Instrument Cluster Modes*
Press the Mode button A to cycle through different LCD
Instrument Cluster Modes:
Trip Modes / Trip Computer*
Your vehicle’s steering wheel buttons may differ from those in the illustrations.
A
B
Page 10 of 50

SOUL FEATURES & FUNCTIONS GUIDE8*IF EQUIPPED
INSTRUMENT CLUSTER
ECO Mode (Active ECO)*
Active ECO helps improve fuel economy by controlling
several vehicle components When activated, it optimizes
drivetrain operations such as engine power and
transmission to help improve fuel economy
To turn ON, press the DRIVE MODE button A The green
ECO indicator light B in the instrument cluster will
illuminate, indicating that Active ECO is operating
The Active ECO System will remain on even when the
ignition is cycled
To turn Active ECO OFF, press the button A again
(Type B cluster)
B(For Type B cluster; Button located on Steering Wheel)
To help improve your fuel efficiency: •
Drive at a moderate speed, accelerating smoothly and at a moderate rate •
Keep tires inflated to the recommended pressure •Be sure the wheels are properly aligned
QUICK TIPS
Drive Mode Video To view a video on your mobile device, snap this QR Code or visit the listed website
Refer to page 2 for more information
www.youtube.com/KiaFeatureVideos
QR CODE
A
DRIVE MODE
Drive Mode Integrated Control System*
The Drive Mode may be selected based on the driver’s
preferences and road conditions
To cycle through the different Drive Modes A, press the
DRIVE MODE button B The instrument cluster will display
SPORT or ECO when selected When in NORMAL mode, it
will not display in the instrument cluster
REMINDERS:
•
The system is turned ON and in NORMAL mode when ignition is in the ON position
•
When ECO mode is selected, the indicator will display and system remains on, even when ignition is cycled Otherwise the system will default to NORMAL
•Steering effort may be slightly increased in Sport mode
(Button located on Steering Wheel)
Your vehicle’s steering wheel buttons may differ from those in the illustrations. See your Owner’s Manual for more details
A
SETCRUISERESCANCELMODEVOL
VOL
DRIVE MODEDRIVE MODE
B
ECO
NORMAL
SPORT
Dual Clutch Transmission*
NORMALSPORT
Page 11 of 50

9ALWAYS CHECK THE OWNER’S MANUAL FOR COMPLETE OPER ATING INFORMATION AND SAFET Y WARNINGS *IF EQUIPPED
DRIVER'S PANEL
Autonomous Emergency Braking (AEB) / Forward Collision Warning (FCW)*
The AEB and FCWS help to alert the driver when rapidly approaching a
vehicle that is slowing down, braking or stopped A warning message will
appear on the LCD screen and a chime will sound
The FCWS will become active when the vehicle is traveling more than
10 mph The AEB will become active when the vehicle is traveling more
than 6 mph
Select alert settings (Early, Normal, Late) in the User Settings in the
instrument cluster LCD display To turn the AEB/FCWS off, go to User
Settings in the LCD Instrument Cluster modes
The Autonomous Emergency Braking (AEB) / Forward Collision Warning (FCW)* are not substitutes for safe and proper driving. Always drive safely and use caution. The FCWS will be activated by default when the ignition is cycled ON, even when previous setting to OFF.
Lane Departure Warning System (LDWS)*
With the Engine Start /Stop button in the ON position, press the LDWS button A
(shown on previous page) to turn system ON The instrument cluster indicator
will illuminate white
If the LDWS detects that you are veering outside of your lane, the system may issue
a warning on the LCD screen and an alert may sound, under these conditions:
•The vehicle exceeds approximately 40 mph
•The LDWS system recognizes the lane the vehicle is traveling in
If LDWS button is ON/OFF and ignition is cycled, the system returns to
its previous state
REMINDER: LDWS will not issue a warning if the turn signal or hazard lights are activated
REMINDERS:
• The FCWS and AEB will be activated by default when vehicle power is cycled on, even when previous setting is off
• The FCWS will not operate when the vehicle is traveling more than approximately 50 mph
The Lane Departure Warning System (LDWS) is not a substitute for safe and proper driving. Always drive safely and use caution. LDWS may not always alert the driver if the vehicle is driven outside of its lane.
When the LDWS sensor detects the lane traveling in, the lane is illuminatedWhen the LDWS sensor does not detect the lane traveling in the lanes is not illuminatedWhen the LDWS sensor detects the vehicle veering outside of the lane traveling in, the lane the vehicle’s crossing will blink (shown in both images above)Lane DepartureLane Departure
Lane DepartureLane DepartureLane DepartureLane Departure
Lane DepartureLane Departure
Lane DepartureLane Departure
Lane DepartureLane DepartureLane DepartureLane Departure
Lane DepartureLane Departure
A
Lane Departure Warning System Video
To view a video on your mobile device, snap this QR Code or visit the listed website
Refer to page 2 for more information
www youtube com/KiaFeatureVideos
QR CODE
Page 13 of 50

11ALWAYS CHECK THE OWNER’S MANUAL FOR COMPLETE OPER ATING INFORMATION AND SAFET Y WARNINGS *IF EQUIPPED
DRIVER'S PANEL
Electronic Stability Control (ESC)
The ESC system is designed to help stabilize the vehicle during cornering
maneuvers It is a good idea to keep the ESC turned ON for daily driving
whenever possible
Press ESC button A to turn ESC OFF/ON
REMINDERS:
•
ESC is turned ON by default at vehicle start-up When ignition is cycled, ESC will turn ON again
•
The ESC Indicator Light in the instrument cluster will be lit momentarily whenever the ESC is active
Hill-Start Assist Control (HAC)
HAC helps prevent the vehicle from rolling backward when accelerating
from a stop while on a steep incline The HAC automatically activates
whether the ESC is OFF or ON, but does NOT activate when the ESC has
malfunctioned
REMINDER: The HAC does not operate when the gear shift is in the P (Park) or the N (Neutral) position
•
•HAC provides a 2-second delay before the vehicle may start rolling backwards •When HAC is active (e g , accelerating from a stop on an incline), you may notice that the brakes will momentarily remain engaged after you depress the accelerator
QUICK TIPS
(Buttons located on left side of Driver’s Panel)
For more information on Electronic Stability Control (ESC) and its specific features and operations, please refer to your Owner’s Manual.
A
Instrument Panel Dimmer
With parking lights / headlights ON, press switch A + or – to adjust
display brightness of the instrument panel illumination
REMINDERS:
•
Door Mood Lamp is a fixed brightness and cannot be adjusted (not to be confused with Advanced Mood Lighting Speaker)
•
The Instrument Panel Dimmer does not adjust brightness on the audio/navigation system* screens; use the SETUP modes to adjust brightness on the screen
A
(Buttons located on left side of Driver’s Panel)
Page 16 of 50

SOUL FEATURES & FUNCTIONS GUIDE14*IF EQUIPPED
STEERING WHEEL CONTROLS
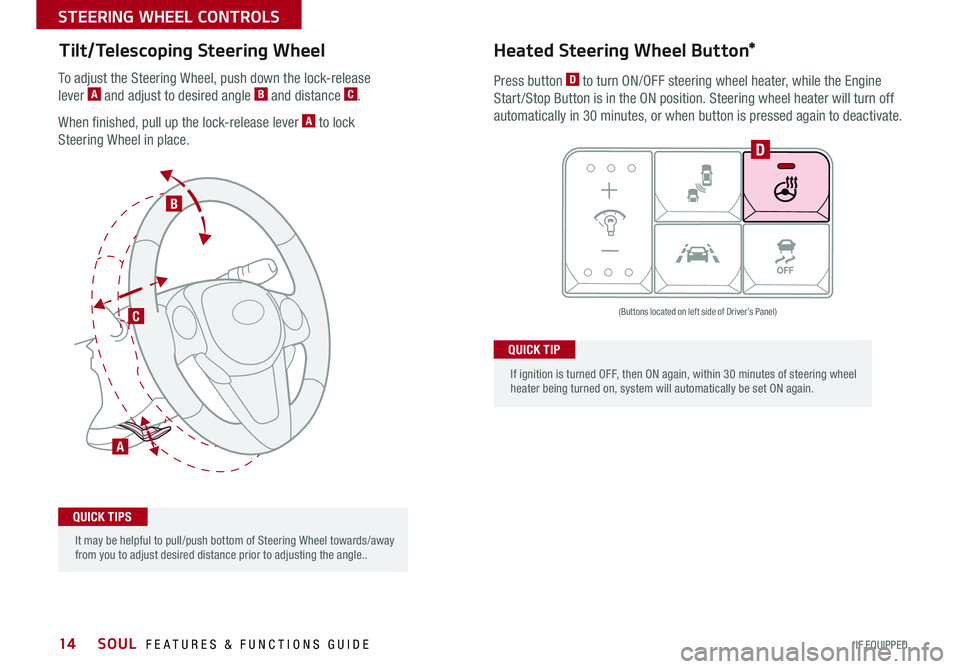
To adjust the Steering Wheel, push down the lock-release
lever A and adjust to desired angle B and distance C
When finished, pull up the lock-release lever A to lock
Steering Wheel in place
Tilt/Telescoping Steering WheelHeated Steering Wheel Button*
Press button D to turn ON/OFF steering wheel heater, while the Engine
Start /Stop Button is in the ON position Steering wheel heater will turn off
automatically in 30 minutes, or when button is pressed again to deactivate
B
C
A
If ignition is turned OFF, then ON again, within 30 minutes of steering wheel heater being turned on, system will automatically be set ON again
QUICK TIP
(Buttons located on left side of Driver’s Panel)
It may be helpful to pull/push bottom of Steering Wheel towards/away from you to adjust desired distance prior to adjusting the angle
QUICK TIPS
D
Page 19 of 50

17ALWAYS CHECK THE OWNER’S MANUAL FOR COMPLETE OPER ATING INFORMATION AND SAFET Y WARNINGS *IF EQUIPPED
STEERING WHEEL CONTROLS
Cruise Control*Audio Controls
AB
C
E
GD
F
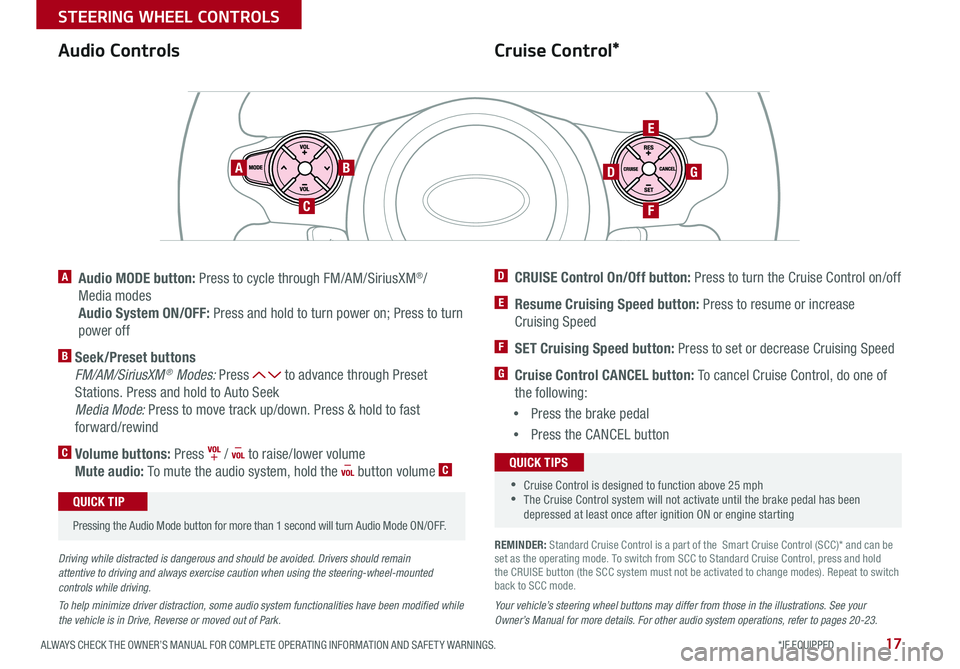
A Audio MODE button: Press to cycle through FM/AM/SiriusXM®/
Media modes
Audio System ON/OFF: Press and hold to turn power on; Press to turn
power off
B Seek/Preset buttons
FM/AM/SiriusXM® Modes: Press to advance through Preset
Stations Press and hold to Auto Seek
Media Mode: Press to move track up/down Press & hold to fast
forward/rewind
C Volume buttons: Press / to raise/lower volume
Mute audio: To mute the audio system, hold the button volume C
Pressing the Audio Mode button for more than 1 second will turn Audio Mode ON/OFF
QUICK TIP
Your vehicle’s steering wheel buttons may differ from those in the illustrations. See your Owner’s Manual for more details. For other audio system operations, refer to pages 20-23.
Driving while distracted is dangerous and should be avoided. Drivers should remain attentive to driving and always exercise caution when using the steering-wheel-mounted controls while driving.
To help minimize driver distraction, some audio system functionalities have been modified while the vehicle is in Drive, Reverse or moved out of Park.
D CRUISE Control On/Off button: Press to turn the Cruise Control on/off
E Resume Cruising Speed button: Press to resume or increase
Cruising Speed
F SET Cruising Speed button: Press to set or decrease Cruising Speed
G Cruise Control CANCEL button: To cancel Cruise Control, do one of
the following:
•Press the brake pedal
•Press the CANCEL button
SCC sys
•Cruise Control is designed to function above 25 mph •The Cruise Control system will not activate until the brake pedal has been depressed at least once after ignition ON or engine starting
QUICK TIPS
REMINDER: Standard Cruise Control is a part of the Smart Cruise Control (SCC)* and can be set as the operating mode To switch from SCC to Standard Cruise Control, press and hold the CRUISE button (the SCC system must not be activated to change modes) Repeat to switch back to SCC mode
Page 22 of 50

SOUL FEATURES & FUNCTIONS GUIDE20*IF EQUIPPED
STEERING WHEEL CONTROLS
B
C
GA
B
Smart Cruise Controlcanceled
E
D
H
Smart Cruise Control Video
To view a video on your mobile device, snap this QR Code or visit the listed website
Refer to page 2 for more information
www youtube com/KiaFeatureVideos
QR CODE
17 2 f t13 0 f t
82ft
10 6 f t
( Vehicle-to-vehicle distance settings; may vary per vehicle)
Smart Cruise Control (SCC)*
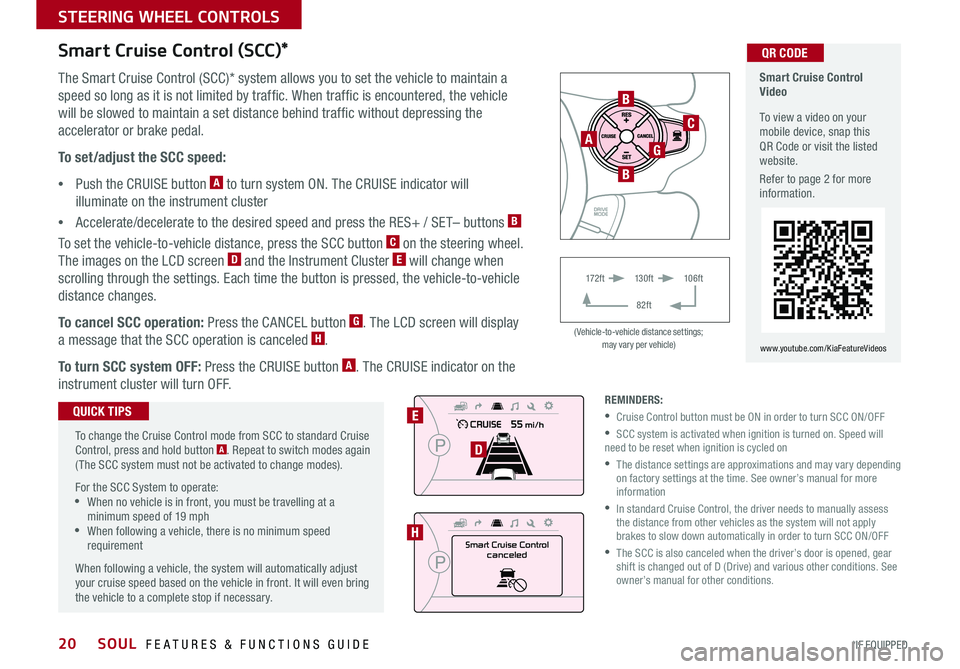
The Smart Cruise Control (SCC)* system allows you to set the vehicle to maintain a
speed so long as it is not limited by traffic When traffic is encountered, the vehicle
will be slowed to maintain a set distance behind traffic without depressing the
accelerator or brake pedal
To set/adjust the SCC speed:
•Push the CRUISE button A to turn system ON The CRUISE indicator will
illuminate on the instrument cluster
•Accelerate/decelerate to the desired speed and press the RES+ / SET– buttons B
To set the vehicle-to-vehicle distance, press the SCC button C on the steering wheel
The images on the LCD screen D and the Instrument Cluster E will change when
scrolling through the settings Each time the button is pressed, the vehicle-to-vehicle
distance changes
To cancel SCC operation: Press the CANCEL button G The LCD screen will display
a message that the SCC operation is canceled H
To turn SCC system OFF: Press the CRUISE button A The CRUISE indicator on the
instrument cluster will turn OFF
To change the Cruise Control mode from SCC to standard Cruise Control, press and hold button A Repeat to switch modes again ( The SCC system must not be activated to change modes)
For the SCC System to operate: •When no vehicle is in front, you must be travelling at a minimum speed of 19 mph •When following a vehicle, there is no minimum speed requirement
When following a vehicle, the system will automatically adjust your cruise speed based on the vehicle in front It will even bring the vehicle to a complete stop if necessary
QUICK TIPSREMINDERS:
•Cruise Control button must be ON in order to turn SCC ON/OFF
•SCC system is activated when ignition is turned on Speed will need to be reset when ignition is cycled on
•
The distance settings are approximations and may vary depending on factory settings at the time See owner’s manual for more information
•
In standard Cruise Control, the driver needs to manually assess the distance from other vehicles as the system will not apply brakes to slow down automatically in order to turn SCC ON/OFF
•
The SCC is also canceled when the driver’s door is opened, gear shift is changed out of D (Drive) and various other conditions See owner’s manual for other conditions
Page 27 of 50

25ALWAYS CHECK THE OWNER’S MANUAL FOR COMPLETE OPER ATING INFORMATION AND SAFET Y WARNINGS *IF EQUIPPED
CENTER PANEL
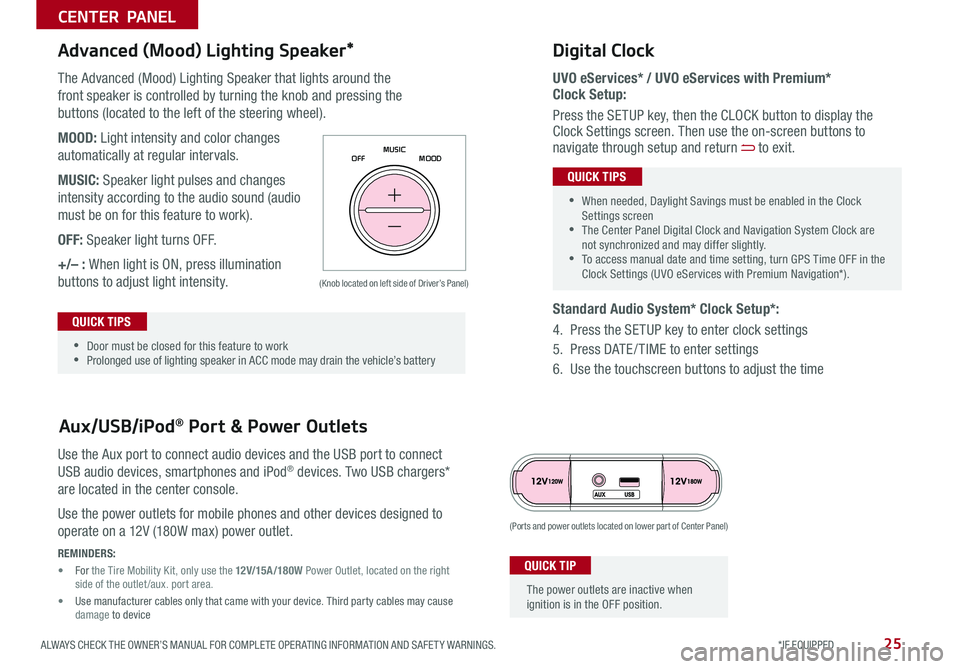
The Advanced (Mood) Lighting Speaker that lights around the
front speaker is controlled by turning the knob and pressing the
buttons (located to the left of the steering wheel)
MOOD: Light intensity and color changes
automatically at regular intervals
MUSIC: Speaker light pulses and changes
intensity according to the audio sound (audio
must be on for this feature to work)
OFF: Speaker light turns OFF
+/– : When light is ON, press illumination
buttons to adjust light intensity
Use the Aux port to connect audio devices and the USB port to connect
USB audio devices, smartphones and iPod® devices Two USB chargers*
are located in the center console
Use the power outlets for mobile phones and other devices designed to
operate on a 12V (180W max) power outlet
Aux/USB/iPod® Port & Power Outlets
Digital Clock
UVO eServices* / UVO eServices with Premium* Clock Setup:
Press the SETUP key, then the CLOCK button to display the Clock Settings screen Then use the on-screen buttons to navigate through setup and return to exit
Standard Audio System* Clock Setup*:
4 Press the SETUP key to enter clock settings
5 Press DATE / TIME to enter settings
6 Use the touchscreen buttons to adjust the time
Advanced (Mood) Lighting Speaker*
OFF MOOD
MUSIC
REMINDERS:
• For the Tire Mobility Kit, only use the 12V/15A/180W Power Outlet, located on the right side of the outlet /aux
port area
• Use manufacturer cables only that came with your device Third party cables may cause damage to device
(Ports and power outlets located on lower part of Center Panel)
(Knob located on left side of Driver’s Panel)
The power outlets are inactive when ignition is in the OFF position
QUICK TIP
•
•Door must be closed for this feature to work •Prolonged use of lighting speaker in ACC mode may drain the vehicle’s battery
QUICK TIPS
•
•When needed, Daylight Savings must be enabled in the Clock Settings screen •The Center Panel Digital Clock and Navigation System Clock are not synchronized and may differ slightly •To access manual date and time setting, turn GPS Time OFF in the Clock Settings (UVO eServices with Premium Navigation*)
QUICK TIPS