2018 KIA SOUL EV driver seat adjustment
[x] Cancel search: driver seat adjustmentPage 76 of 496
33
Safety features of your vehicle
WARNING- Uprightingseat
Do not press the release lever
on a manual seatback without
holding and controlling the
seatback. The seatback will
spring upright possibly impact-
ing you or other passengers.
WARNING- Loose objects
Do not place anything in the dri-
ver's foot well or under the front
seats. Loose objects in the dri-
ver's foot area could interfere
with the operation of the foot
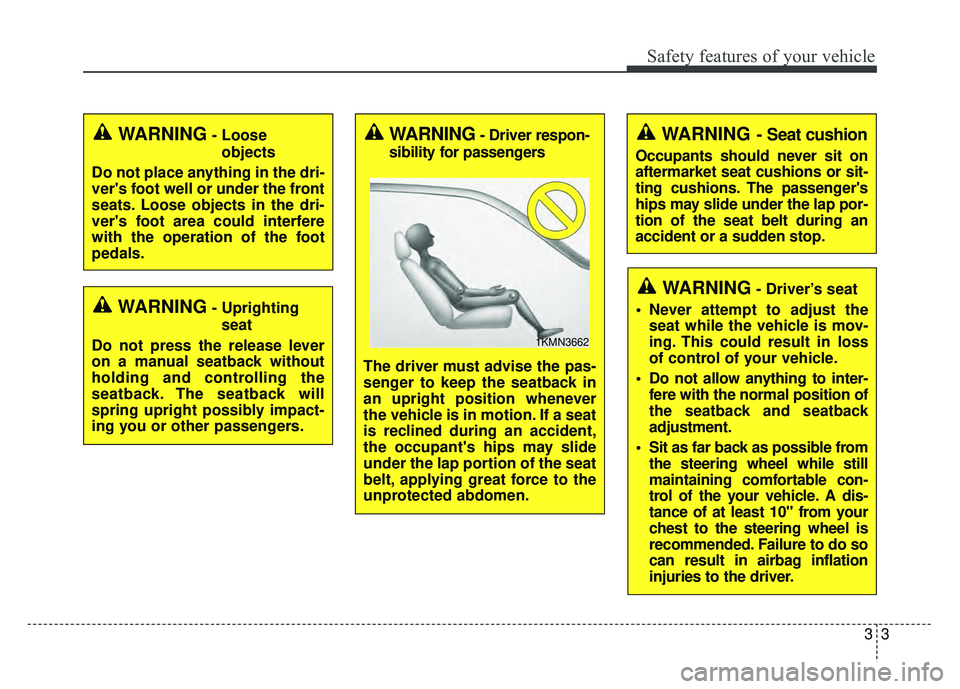
pedals.WARNING- Driver respon-
sibility for passengers
The driver must advise the pas-
senger to keep the seatback in
an upright position whenever
the vehicle is in motion. If a seat
is reclined during an accident,
the occupant's hips may slide
under the lap portion of the seat
belt, applying great force to the
unprotected abdomen.
1KMN3662
WARNING- Driver’s seat
Never attempt to adjust the seat while the vehicle is mov-
ing. This could result in loss
of control of your vehicle.
Do not allow anything to inter- fere with the normal position of
the seatback and seatback
adjustment.
Sit as far back as possible from the steering wheel while still
maintaining comfortable con-
trol of the your vehicle. A dis-
tance of at least 10" from your
chest to the steering wheel is
recommended. Failure to do so
can result in airbag inflation
injuries to the driver.
WARNING - Seat cushion
Occupants should never sit on
aftermarket seat cushions or sit-
ting cushions. The passenger's
hips may slide under the lap por-
tion of the seat belt during an
accident or a sudden stop.
Page 77 of 496
Safety features of your vehicle
43
WARNING- Unexpected
Seat Movement
After adjusting a manual seat,
always check that it is locked by
shifting your weight to the front
and back. Sudden or unexpect-
ed movement of the driver's
seat could cause you to lose
control of the vehicle.WARNING - Rear seatbacks
Always lock the rear seatback
before driving. Failure to do so
could result in passengers or
objects being thrown forward
injuring vehicle occupants.
WARNING- Luggage and Cargo
Do not stack pile or stack lug-
gage or cargo higher than the
seatback in the cargo area. In an
accident the cargo could strike
and injury a passenger. If
objects are large, heavy or must
be piled, they must be secured
in the cargo area.
WARNING- Seat adjustment
Do not adjust the seat while wearing seat belts. Moving the
seat forward will cause strong
pressure on the abdomen.
Do not place your hand near the seat bottom or seat track
while adjusting the seat. Your
hand could get caught in the
seat mechanism.WARNING- Cargo Area
Do not allow passengers to ride
in the cargo area under any cir-
cumstance. The cargo area is
solely for the purpose of trans-
porting luggage or cargo.
WARNING- Small Objects
Use extreme caution when pick-
ing small objects trapped under
the seats or between the seat
and the center console. Your
hands might be cut or injured
by the sharp edges of the seats
mechanism.
Page 80 of 496
37
Safety features of your vehicle
For maximum effectiveness in case of
an accident, the headrest should be
adjusted so the middle of the headrest
is at the same height of the center of
gravity of an occupant's head.
Generally, the center of gravity of most
people's head is similar with the height
of the top of their eyes. Also, adjust the
headrest as close to your head as pos-
sible. For this reason, the use of a
cushion that holds the body away from
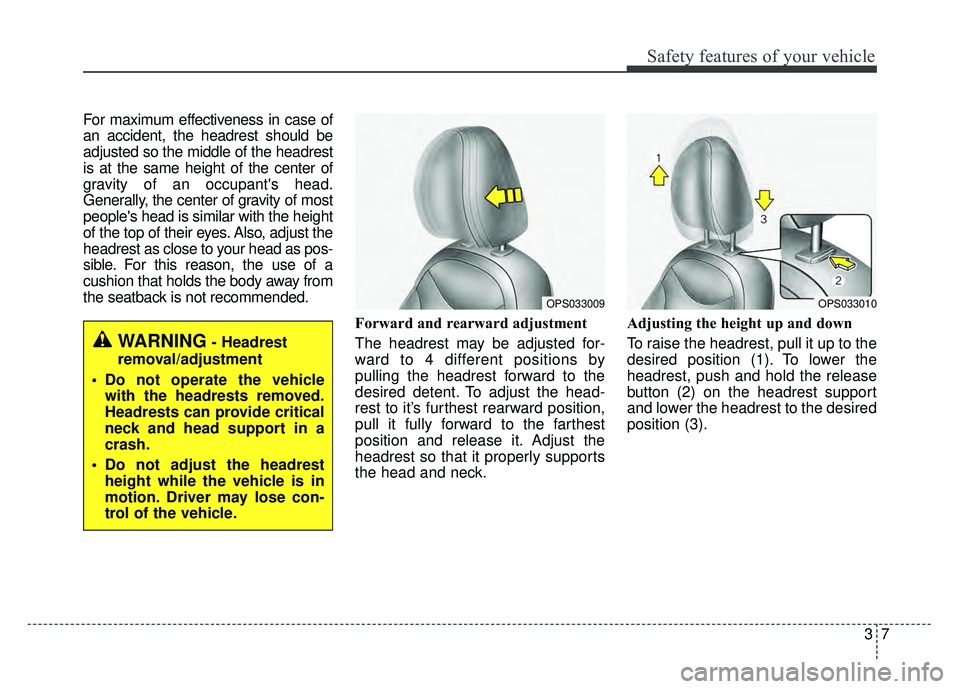
the seatback is not recommended.Forward and rearward adjustment
The headrest may be adjusted for-
ward to 4 different positions by
pulling the headrest forward to the
desired detent. To adjust the head-
rest to it’s furthest rearward position,
pull it fully forward to the farthest
position and release it. Adjust the
headrest so that it properly supports
the head and neck.Adjusting the height up and down
To raise the headrest, pull it up to the
desired position (1). To lower the
headrest, push and hold the release
button (2) on the headrest support
and lower the headrest to the desired
position (3).
WARNING- Headrest
removal/adjustment
Do not operate the vehicle with the headrests removed.
Headrests can provide critical
neck and head support in a
crash.
Do not adjust the headrest height while the vehicle is in
motion. Driver may lose con-
trol of the vehicle.
OPS033009OPS033010
Page 84 of 496
311
Safety features of your vehicle
For maximum effectiveness in case of
an accident, the headrest should be
adjusted so the middle of the head-
rest is at the same height as the cen-
ter of gravity of an occupant's head.
Generally, the center of gravity of
most people's head is similar with
the height of the top of their eyes.
Also adjust the headrest as close to
your head as possible. For this rea-
son, the use of a cushion that holds
the body away from the seatback is
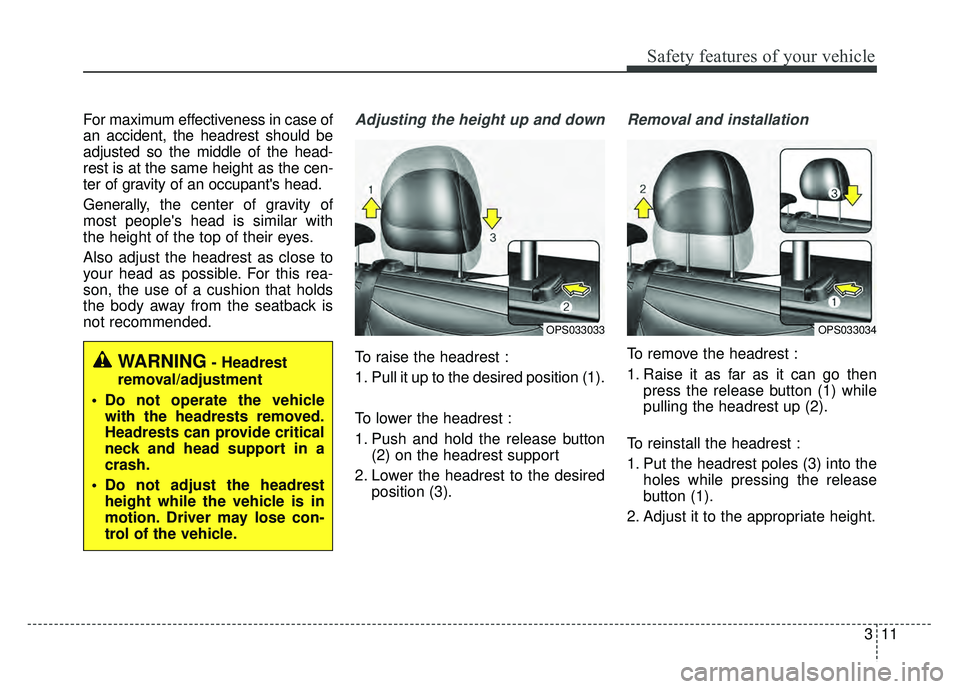
not recommended.Adjusting the height up and down
To raise the headrest :
1. Pull it up to the desired position (1).
To lower the headrest :
1. Push and hold the release button (2) on the headrest support
2. Lower the headrest to the desired position (3).
Removal and installation
To remove the headrest :
1. Raise it as far as it can go thenpress the release button (1) while
pulling the headrest up (2).
To reinstall the headrest :
1. Put the headrest poles (3) into the holes while pressing the release
button (1).
2. Adjust it to the appropriate height.WARNING- Headrest
removal/adjustment
Do not operate the vehicle with the headrests removed.
Headrests can provide critical
neck and head support in a
crash.
Do not adjust the headrest height while the vehicle is in
motion. Driver may lose con-
trol of the vehicle.
OPS033033OPS033034
Page 89 of 496
Safety features of your vehicle
16
3
Seat belt - Driver's 3-point system
with emergency locking retractor
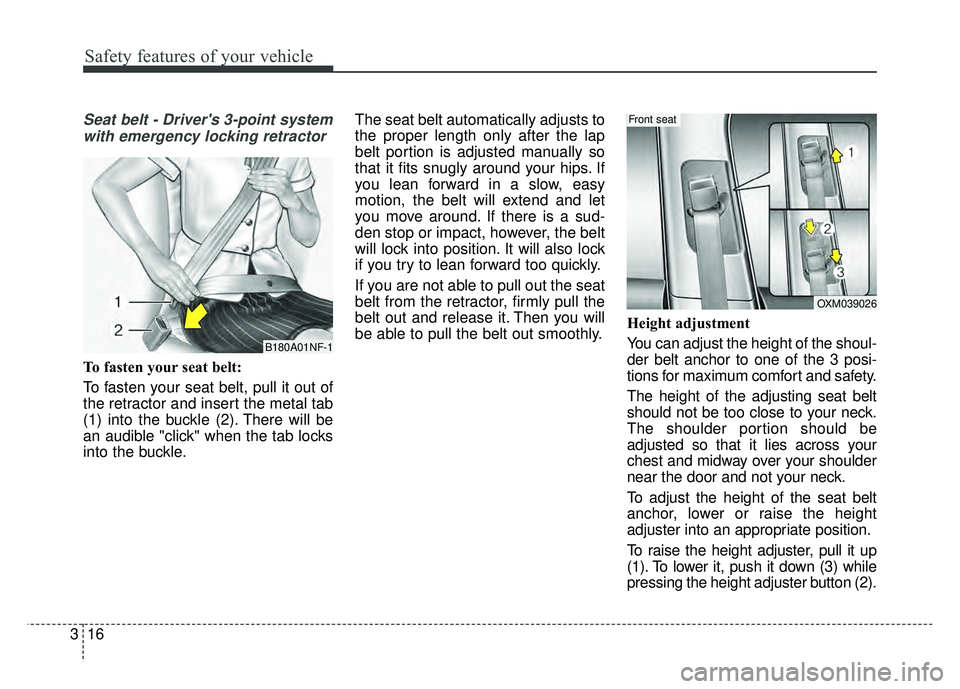
To fasten your seat belt:
To fasten your seat belt, pull it out of
the retractor and insert the metal tab
(1) into the buckle (2). There will be
an audible "click" when the tab locks
into the buckle. The seat belt automatically adjusts to
the proper length only after the lap
belt portion is adjusted manually so
that it fits snugly around your hips. If
you lean forward in a slow, easy
motion, the belt will extend and let
you move around. If there is a sud-
den stop or impact, however, the belt
will lock into position. It will also lock
if you try to lean forward too quickly.
If you are not able to pull out the seat
belt from the retractor, firmly pull the
belt out and release it. Then you will
be able to pull the belt out smoothly.
Height adjustment
You can adjust the height of the shoul-
der belt anchor to one of the 3 posi-
tions for maximum comfort and safety.
The height of the adjusting seat belt
should not be too close to your neck.
The shoulder portion should be
adjusted so that it lies across your
chest and midway over your shoulder
near the door and not your neck.
To adjust the height of the seat belt
anchor, lower or raise the height
adjuster into an appropriate position.
To raise the height adjuster, pull it up
(1). To lower it, push it down (3) while
pressing the height adjuster button (2).
B180A01NF-1
OXM039026
Front seat
Page 166 of 496
435
Features of your vehicle
MIRRORS
Inside rearview mirror
Adjust the rearview mirror so that the
center view through the rear window
is seen. Make this adjustment before
you start driving.
Do not place objects in the rear seat or
cargo area which would interfere with
your vision through the rear window.
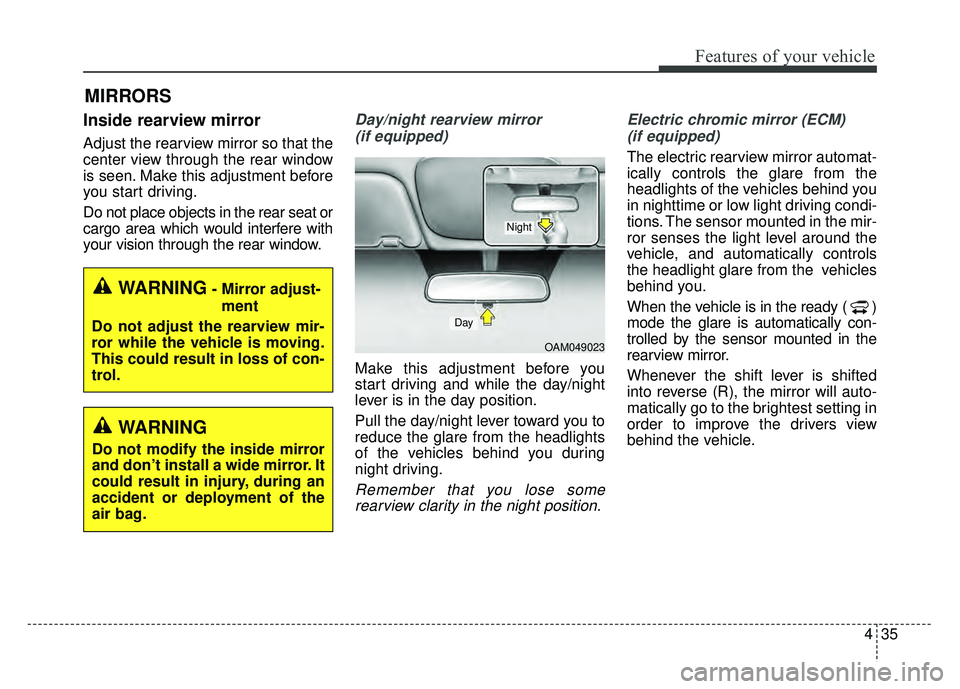
Day/night rearview mirror (if equipped)
Make this adjustment before you
start driving and while the day/night
lever is in the day position.
Pull the day/night lever toward you to
reduce the glare from the headlights
of the vehicles behind you during
night driving.
Remember that you lose somerearview clarity in the night position. Electric chromic mirror (ECM)
(if equipped)
The electric rearview mirror automat-
ically controls the glare from the
headlights of the vehicles behind you
in nighttime or low light driving condi-
tions. The sensor mounted in the mir-
ror senses the light level around the
vehicle, and automatically controls
the headlight glare from the vehicles
behind you.
When the vehicle is in the ready ( )
mode the glare is automatically con-
trolled by the sensor mounted in the
rearview mirror.
Whenever the shift lever is shifted
into reverse (R), the mirror will auto-
matically go to the brightest setting in
order to improve the drivers view
behind the vehicle.
OAM049023
Day
Night
WARNING- Mirror adjust- ment
Do not adjust the rearview mir-
ror while the vehicle is moving.
This could result in loss of con-
trol.
WARNING
Do not modify the inside mirror
and don’t install a wide mirror. It
could result in injury, during an
accident or deployment of the
air bag.
Page 488 of 496
Index
4I
Defroster . . . . . . . . . . . . . . . . . . . . . . . . . . . . . . . . . . . 4-\
93Outside mirror defroster . . . . . . . . . . . . . . . . . . . . . . 4-93
Rear window defroster . . . . . . . . . . . . . . . . . . . . . . . 4-93
Dimensions . . . . . . . . . . . . . . . . . . . . . . . . . . . . . . . . . . . 8-\
2
Display illumination, see instrument panel illumination . . 4-41
Displays, see instrument cluster . . . . . . . . . . . . . . . . . . 4-40
Door locks. . . . . . . . . . . . . . . . . . . . . . . . . . . . . . . . . . . 4-\
10 Auto door lock/unlock feature . . . . . . . . . . . . . . . . . 4-13
Central door lock switch . . . . . . . . . . . . . . . . . . . . . 4-13
Child-protector rear door lock . . . . . . . . . . . . . . . . . 4-13
from inside the vehicle . . . . . . . . . . . . . . . . . . . . . . . 4-11
from outside the vehicle . . . . . . . . . . . . . . . . . . . . . . 4-10
Impact sensing door unlock system . . . . . . . . . . . . . 4-13
Speed sensing door lock system . . . . . . . . . . . . . . . 4-13
Driver's and passenger's front air bag . . . . . . . . . . . . . . 3-46
Driving at night . . . . . . . . . . . . . . . . . . . . . . . . . . . . . . . 5-42
Driving in flooded areas . . . . . . . . . . . . . . . . . . . . . . . . 5-43
Driving in the rain. . . . . . . . . . . . . . . . . . . . . . . . . . . . . 5-43
Driving off-road . . . . . . . . . . . . . . . . . . . . . . . . . . . . . . 5-44
Economical operation . . . . . . . . . . . . . . . . . . . . . . . . . . 5-38
Electric chromic mirror (ECM) . . . . . . . . . . . . . . . . . . 4-35
Electronic parking brake (EPB) . . . . . . . . . . . . . . . . . . 5-19
Electric power steering . . . . . . . . . . . . . . . . . . . . . . . . . 4-30
Electronic stability control (ESC) . . . . . . . . . . . . . . . . 5-25 Emergency starting . . . . . . . . . . . . . . . . . . . . . . . . . . . . . 6-5
Jump starting . . . . . . . . . . . . . . . . . . . . . . . . . . . . . . . 6-5
Emergency tailgate safety release. . . . . . . . . . . . . . . . . 4-15
Emergency while driving . . . . . . . . . . . . . . . . . . . . . . . . 6-3
Energy consumption . . . . . . . . . . . . . . . . . . . . . . . . . . . 4-61
EV information mode . . . . . . . . . . . . . . . . . . . . . . . . . . 4-47
Explanation of scheduled maintenance items . . . . . . . 7-19
Exterior care . . . . . . . . . . . . . . . . . . . . . . . . . . . . . . . . . 7-73
Exterior overview . . . . . . . . . . . . . . . . . . . . . . . . . . . . . . 2-2
Flat tire . . . . . . . . . . . . . . . . . . . . . . . . . . . . . . . . . . . . \
. 6-14 Tire Mobility Kit . . . . . . . . . . . . . . . . . . . . . . . . . . . 6-14
FLEX Steer . . . . . . . . . . . . . . . . . . . . . . . . . . . . . . . . . . 4-33\
Floor mat anchor(s) . . . . . . . . . . . . . . . . . . . . . . . . . . 4-124
Fluid Brakes fluid . . . . . . . . . . . . . . . . . . . . . . . . . . . . . . . 7-24
Washer fluid . . . . . . . . . . . . . . . . . . . . . . . . . . . . . . . 7-26
Fog light (Front) . . . . . . . . . . . . . . . . . . . . . . . . . . . . . . 4-86
Front seat adjustment . . . . . . . . . . . . . . . . . . . . . . . . . . . 3-5
Fuse switch . . . . . . . . . . . . . . . . . . . . . . . . . . . . . . . . . . 7-53\
Fuses . . . . . . . . . . . . . . . . . . . . . . . . . . . . . . . . . . . . \
. . . 7-51 Fuse switch . . . . . . . . . . . . . . . . . . . . . . . . . . . . . . . . 7-53
Fuse/relay panel description. . . . . . . . . . . . . . . . . . . 7-56
Instrument panel fuse . . . . . . . . . . . . . . . . . . . . . . . . 7-52
Multi fuse . . . . . . . . . . . . . . . . . . . . . . . . . . . . . . . . . 7-55
E
F