2018 KIA SORENTO engine oil
[x] Cancel search: engine oilPage 462 of 536

751
Maintenance
Recharging battery
When recharging the battery,
observe the following precautions:
The battery must be removed fromthe vehicle and placed in an area
with good ventilation.
Do not allow cigarettes, sparks, or flame near the battery.
Watch the battery during charging, and stop or reduce the charging
rate if the battery cells begin
gassing (boiling) violently or if the
temperature of the electrolyte of
any cell exceeds 49°C (120°F).
Wear eye protection when check- ing the battery during charging.
Disconnect the battery charger in the following order.
1. Turn off the battery charger main switch.
2. Unhook the negative clamp from the negative battery terminal.
3. Unhook the positive clamp from the positive battery terminal. Before performing maintenance or
recharging the battery, turn off all
accessories and stop the engine.
The negative battery cable must be removed first and installed last
when the battery is disconnected.
Reset items
Items should be reset after the bat-
tery has been discharged or the bat-
tery has been disconnected.
Auto up/down window (See chapter 4)
Sunroof (See chapter 4)
Trip computer (See chapter 4)
Climate control system (See chapter 4)
Integrated Memory System (See chapter 3)
Audio (See chapter 4)
Page 477 of 536

Maintenance
66
7
FUSES
A vehicle’s electrical system is pro-
tected from electrical overload dam-
age by fuses.
This vehicle has 2 (or 3) fuse panels,
one located in the driver’s side panel
bolster, the other in the engine com-
partment near the battery.
If any of your vehicle’s lights, acces-
sories, or controls do not work, check
the appropriate circuit fuse. If a fuse
has blown, the element inside the
fuse will melt.
If the electrical system does not
work, first check the driver’s side
fuse panel.
Always replace a blown fuse with
one of the same rating.
If the replacement fuse blows, this
indicates an electrical problem. Avoid
using the system involved and imme-
diately consult an authorized Kia
dealer.
Three kinds of fuses are used: blade
type for lower amperage rating, car-tridge type, and multi fuse for higheramperage ratings.
WARNING - Fuse
replacement
Never replace a fuse with any- thing but another fuse of the
same rating.
A higher capacity fuse could cause damage and possibly a
fire.
Never install a wire or alu- minum foil instead of the
proper fuse - even as a tem-
porary repair. It may cause
extensive wiring damage and
a possible fire.
Do not arbitrarily modify or add-on electric wiring of the
vehicle.
CAUTION
Do not use a screwdriver or anyother metal object to removefuses because it may cause ashort circuit and damage thesystem.
OUM074043L
Normal
■
Blade type
■ Cartridge type
■ Multi fuse Blown
N N
N N
o o
o o
r r
r r
m m
m m
a a
a a
l l
l l B B
B B
l l
l l
o o
o o
w w
w w
n n
n n
Normal Blo
wn
■
BFT N N
N N
o o
o o
r r
r r
m m
m m
a a
a a
l l
l l B B
B B
l l
l l
o o
o o
w w
w w
n n
n n
Page 505 of 536

Maintenance
94
7
High-pressure washing
When using high-pressure wash-
ers, make sure to maintain suffi-
cient distance from the vehicle.
Insufficient clearance or excessive
pressure can lead to component
damage or water penetration.
Do not spray the camera, sensors or its surrounding area directly with
a high pressure washer. Shock
applied from high pressure water
may cause the device to not oper-
ate normally.
Do not bring the nozzle tip close to boots (rubber or plastic covers) or
connectors as they may be dam-
aged if they come into contact with
high pressure water. Waxing
Wax the vehicle when water will no
longer bead on the paint.
Always wash and dry the vehicle
before waxing. Use a good quality
liquid or paste wax, and follow the
manufacturer’s instructions. Wax all
metal trim to protect it and to main-
tain its luster.
Removing oil, tar, and similar materi-
als with a spot remover will usually
strip the wax from the finish. Be sure
to re-wax these areas even if the rest
of the vehicle does not yet need wax-
ing.
Do not apply wax on embossed
unpainted unit, as it may tarnish the
unit.
CAUTION - Wet engine
Water washing in the engine
compartment including highpressure water washing maycause the failure of electricalcircuits located in the enginecompartment.
Never allow water or other liq- uids to come in contact withelectrical/electronic compo-nents inside the vehicle asthis may damage them.
OJB037800
Page 522 of 536

87
Specifications & Consumer information
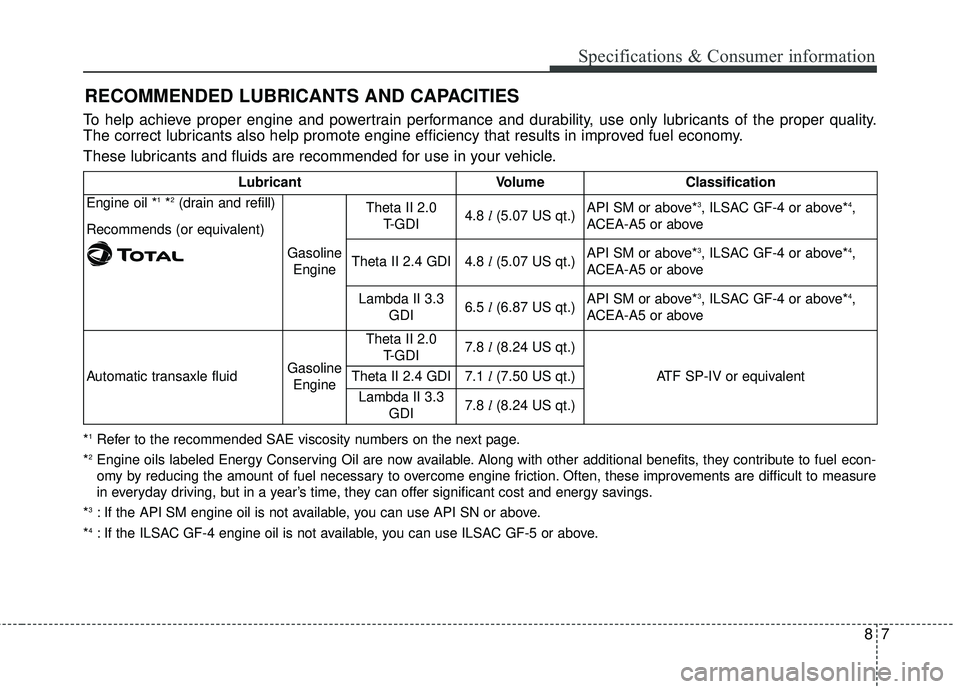
RECOMMENDED LUBRICANTS AND CAPACITIES
To help achieve proper engine and powertrain performance and durability, use only lubricants of the proper quality.
The correct lubricants also help promote engine efficiency that results in improved fuel economy.
These lubricants and fluids are recommended for use in your vehicle.
Lubricant VolumeClassification
Engine oil *1*2(drain and refill)
Recommends (or equivalent)
Gasoline Engine
Theta II 2.0 T-GDI4.8 l(5.07 US qt.)API SM or above*3, ILSAC GF-4 or above*4,
ACEA-A5 or above
Theta II 2.4 GDI4.8 l(5.07 US qt.)API SM or above*3, ILSAC GF-4 or above*4,
ACEA-A5 or above
Lambda II 3.3 GDI6.5 l(6.87 US qt.)API SM or above*3, ILSAC GF-4 or above*4,
ACEA-A5 or above
Automatic transaxle fluidGasoline Engine
Theta II 2.0 T-GDI7.8 l(8.24 US qt.)
ATF SP-IV or equivalentTheta II 2.4 GDI7.1 l(7.50 US qt.)
Lambda II 3.3
GDI7.8 l(8.24 US qt.)
*1Refer to the recommended SAE viscosity numbers on the next page.
*
2Engine oils labeled Energy Conserving Oil are now available. Along with other additional benefits, they contribute to fuel econ-
omy by reducing the amount of fuel necessary to overcome engine friction. Often, these improvements are difficult to measure
in everyday driving, but in a year’s time, they can offer significant cost and energy savings.
*
3: If the API SM engine oil is not available, you can use API SN or above.
*
4: If the ILSAC GF-4 engine oil is not available, you can use ILSAC GF-5 or above.
Page 523 of 536

88
Specifications & Consumer information
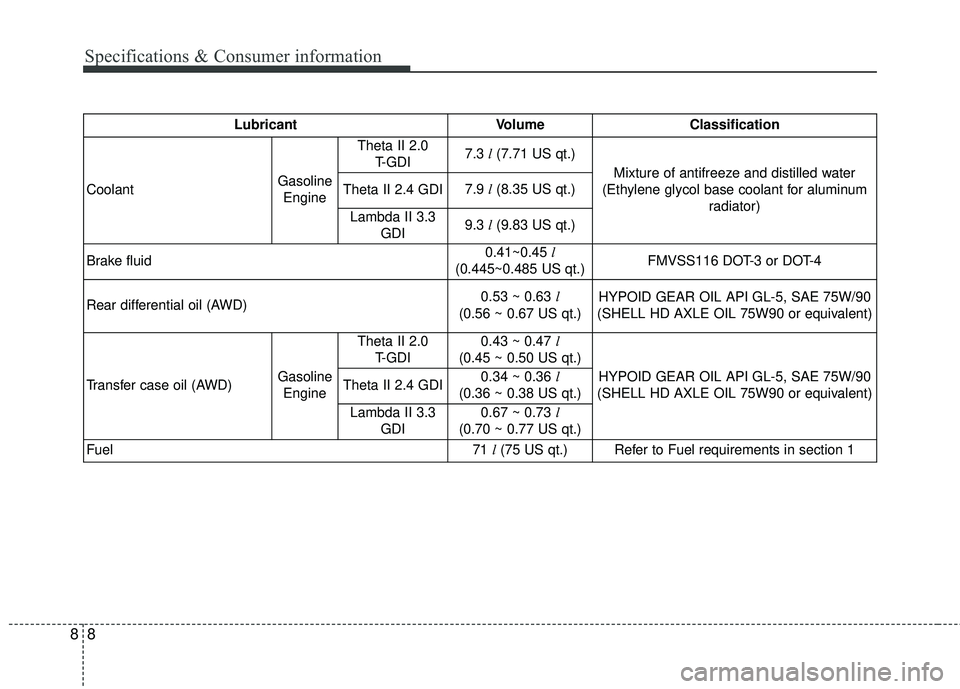
Lubricant VolumeClassification
CoolantGasolineEngine
Theta II 2.0 T-GDI7.3 l(7.71 US qt.)
Mixture of antifreeze and distilled water
(Ethylene glycol base coolant for aluminum radiator)
Theta II 2.4 GDI7.9 l(8.35 US qt.)
Lambda II 3.3
GDI9.3 l(9.83 US qt.)
Brake fluid0.41~0.45 l
(0.445~0.485 US qt.)FMVSS116 DOT-3 or DOT-4
Rear differential oil (AWD)0.53 ~ 0.63 l
(0.56 ~ 0.67 US qt.)HYPOID GEAR OIL API GL-5, SAE 75W/90
(SHELL HD AXLE OIL 75W90 or equivalent)
Transfer case oil (AWD)Gasoline Engine
Theta II 2.0 T-GDI0.43 ~ 0.47 l
(0.45 ~ 0.50 US qt.)
HYPOID GEAR OIL API GL-5, SAE 75W/90
(SHELL HD AXLE OIL 75W90 or equivalent)Theta II 2.4 GDI0.34 ~ 0.36 l
(0.36 ~ 0.38 US qt.)
Lambda II 3.3 GDI0.67 ~ 0.73 l
(0.70 ~ 0.77 US qt.)
Fuel71 l(75 US qt.)Refer to Fuel requirements in section 1
Page 524 of 536

89
Specifications & Consumer information
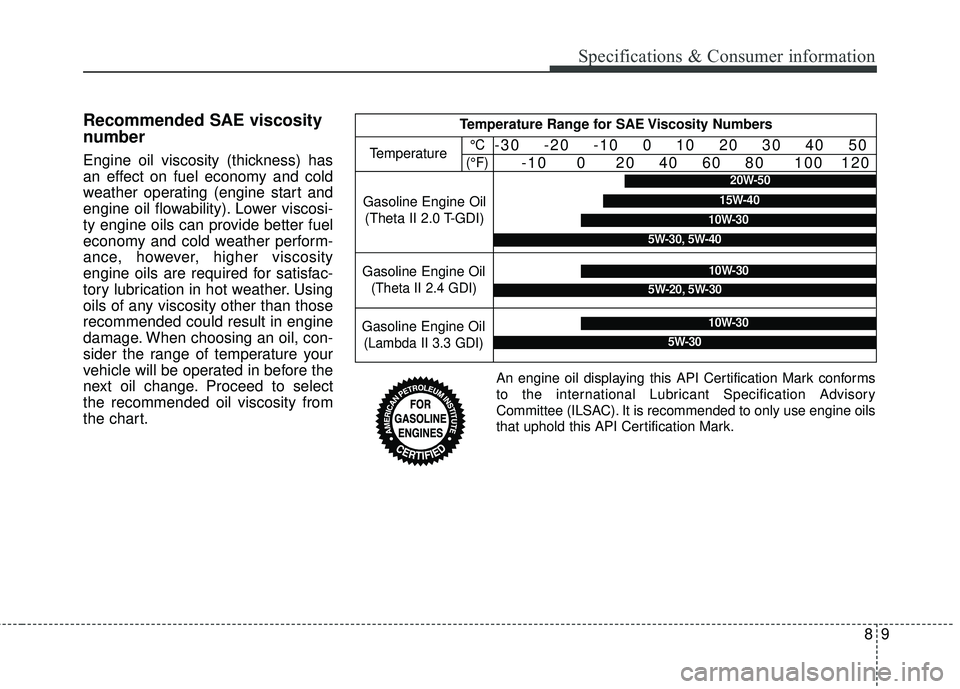
Recommended SAE viscosity
number
Engine oil viscosity (thickness) has
an effect on fuel economy and cold
weather operating (engine start and
engine oil flowability). Lower viscosi-
ty engine oils can provide better fuel
economy and cold weather perform-
ance, however, higher viscosity
engine oils are required for satisfac-
tory lubrication in hot weather. Using
oils of any viscosity other than those
recommended could result in engine
damage. When choosing an oil, con-
sider the range of temperature your
vehicle will be operated in before the
next oil change. Proceed to select
the recommended oil viscosity from
the chart.
Temperature Range for SAE Viscosity Numbers
Temperature°C
(°F)-30 -20 -10 0 10 20 30 40 50 -10 0 20 40 60 80 100 120
Gasoline Engine Oil
(Theta II 2.0 T-GDI)
20W-50
10W-30
15W-40
5W-30, 5W-40
An engine oil displaying this API Certification Mark conforms
to the international Lubricant Specification Advisory
Committee (ILSAC). It is recommended to only use engine oils
that uphold this API Certification Mark.
Gasoline Engine Oil (
Theta II 2.4 GDI)
10W-30
5W-20, 5W-30
Gasoline Engine Oil(
Lambda II 3.3 GDI)
10W-30
5W-30
Page 530 of 536

Index
4I
Defroster . . . . . . . . . . . . . . . . . . . . . . . . . . . . . . . . . . . 4-\
129Rear window defroster . . . . . . . . . . . . . . . . . . . . . . 4-129
Dimensions . . . . . . . . . . . . . . . . . . . . . . . . . . . . . . . . . . . 8-\
2
Door locks. . . . . . . . . . . . . . . . . . . . . . . . . . . . . . . . . . . 4-\
22 Child-protector rear door lock . . . . . . . . . . . . . . . . . 4-25
Impact sensing door unlock system . . . . . . . . . . . . . 4-25
Operating door locks from inside the vehicle . . . . . 4-23
Operating door locks from outside the vehicle . . . . 4-22
Drive mode integrated control system . . . . . . . . . . . . . 5-81 Drive mode . . . . . . . . . . . . . . . . . . . . . . . . . . . . . . . . 5-81
Economical operation . . . . . . . . . . . . . . . . . . . . . . . . . . 5-97
Emergency starting . . . . . . . . . . . . . . . . . . . . . . . . . . . . . 6-5 Jump starting . . . . . . . . . . . . . . . . . . . . . . . . . . . . . . . 6-5
Push-starting . . . . . . . . . . . . . . . . . . . . . . . . . . . . . . . . 6-6
Emission control system . . . . . . . . . . . . . . . . . . . . . . . 7-101 Crankcase emission control system . . . . . . . . . . . . 7-101
Evaporative emission control (including ORVR:Onboard refueling vapor recovery) system . . . . . 7-101
Exhaust emission control system . . . . . . . . . . . . . . 7-102
Engine . . . . . . . . . . . . . . . . . . . . . . . . . . . . . . . . . . . . \
. . . 8-2
Engine compartment . . . . . . . . . . . . . . . . . . . . . . . . . . . . 2-6
Engine compartment . . . . . . . . . . . . . . . . . . . . . . . . . . . . 7-3
Engine coolant . . . . . . . . . . . . . . . . . . . . . . . . . . . . . . . 7-36 Changing the coolant . . . . . . . . . . . . . . . . . . . . . . . . 7-38
Checking the coolant level . . . . . . . . . . . . . . . . . . . . 7-36
Engine number . . . . . . . . . . . . . . . . . . . . . . . . . . . . . . . 8-11
Engine oil . . . . . . . . . . . . . . . . . . . . . . . . . . . . . . . . . . . 7-\
34 Changing the engine oil and filter . . . . . . . . . . . . . . 7-35
Checking the engine oil level. . . . . . . . . . . . . . . . . . 7-34
Engine start/stop button . . . . . . . . . . . . . . . . . . . . . . . . . 5-9 Engine start/stop button position . . . . . . . . . . . . . . . . 5-9
Illuminated engine start/stop button. . . . . . . . . . . . . . 5-9
Starting the engine with a smart key . . . . . . . . . . . . 5-11
Explanation of scheduled maintenance items . . . . . . . 7-29
Exterior features . . . . . . . . . . . . . . . . . . . . . . . . . . . . . 4-173 Roof rack . . . . . . . . . . . . . . . . . . . . . . . . . . . . . . . . 4-173
Exterior overview . . . . . . . . . . . . . . . . . . . . . . . . . . . . . . 2-2
Folding key . . . . . . . . . . . . . . . . . . . . . . . . . . . . . . . . . . . 4-\
5 Battery replacement . . . . . . . . . . . . . . . . . . . . . . . . . . 4-8
Immobilizer system . . . . . . . . . . . . . . . . . . . . . . . . . . 4-9
Key operations . . . . . . . . . . . . . . . . . . . . . . . . . . . . . . 4-5
Record your key number . . . . . . . . . . . . . . . . . . . . . . 4-5
Transmitter precautions . . . . . . . . . . . . . . . . . . . . . . . 4-7
Fuel filler lid . . . . . . . . . . . . . . . . . . . . . . . . . . . . . . . . . 4-46 Closing the fuel filler lid . . . . . . . . . . . . . . . . . . . . . 4-46
Emergency fuel filler lid release . . . . . . . . . . . . . . . 4-48
Opening the fuel filler lid. . . . . . . . . . . . . . . . . . . . . 4-46
Fuel requirements . . . . . . . . . . . . . . . . . . . . . . . . . . . . . . 1-2
F
E
D