Page 497 of 536

Maintenance
86
7
6. Insert a new bulb by inserting it
into the socket and rotating it until
it locks into place.
7. Install the socket in the assembly by aligning the tabs on the socket
with the slots in the assembly.
Push the socket into the assembly
and turn the socket clockwise.
✽ ✽NOTICE
If bulb will not rotate inside socket,
remove bulb, rotate 180°, and try
again.
Front fog lamp bulbs
(if equipped)
1. Remove the front bumper under cover.
2. Reach your hand into the back of the front bumper.
3. Disconnect the power connector from the socket.
4. Remove the bulb-socket from the housing by turning the socket
counter clockwise until the tabs on
the socket align with the slots on
the housing. 5. Install the new bulb-socket into the
housing by aligning the tabs on
the socket with the slots in the
housing. Push the socket into the
housing and turn the socket clock-
wise.
6. Connect the power connector to the socket.
7. Reinstall the front bumper under cover.
✽ ✽NOTICE
Always have the headlamp aiming
adjusted after an accident or after
the headlamp assembly is reinstalled
at an authorized Kia dealer.OUMA074109
Page 499 of 536
Maintenance
88
7
Rear combination lamp bulb
replacementOutside lampTy p e A
1. Open the liftgate.
2. Open the service cover.
3. Remove the nuts from the vehicle.
4. Remove the rear combination
lamp assembly from the body of
the vehicle.
OUMA074031
OUM074032
OUM074033
OUM074030L
OUM074029
■Type A
■ Type B
Stop&tail Tail
Turn signal Back up
Turn signal Back up
Stop&tailStop&tail
Side marker
Side marker
Page 500 of 536

789
Maintenance
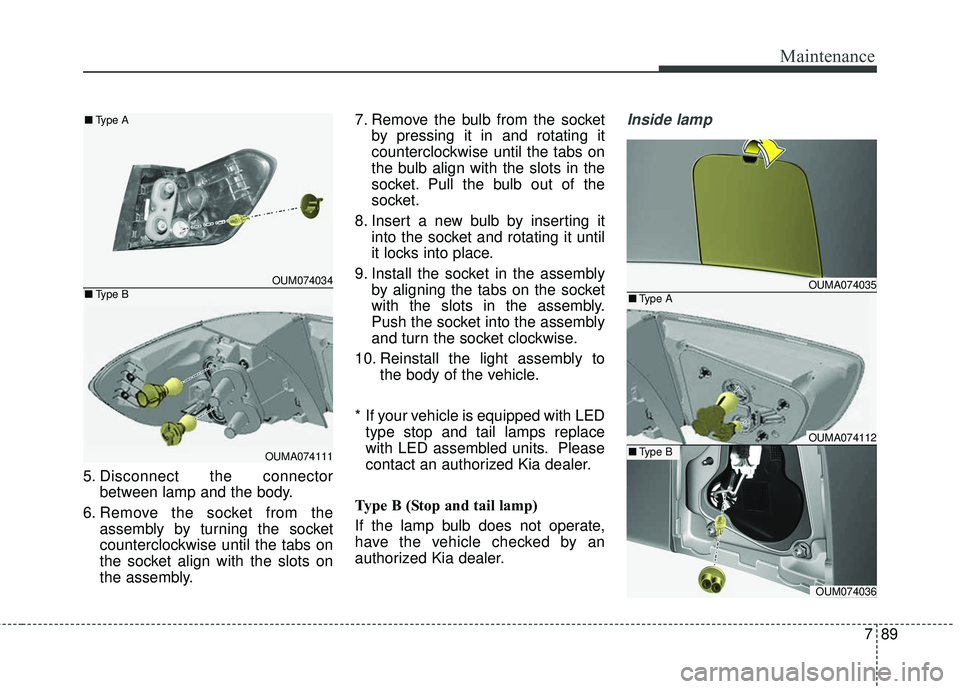
5. Disconnect the connectorbetween lamp and the body.
6. Remove the socket from the assembly by turning the socket
counterclockwise until the tabs on
the socket align with the slots on
the assembly. 7. Remove the bulb from the socket
by pressing it in and rotating it
counterclockwise until the tabs on
the bulb align with the slots in the
socket. Pull the bulb out of the
socket.
8. Insert a new bulb by inserting it into the socket and rotating it until
it locks into place.
9. Install the socket in the assembly by aligning the tabs on the socket
with the slots in the assembly.
Push the socket into the assembly
and turn the socket clockwise.
10. Reinstall the light assembly to the body of the vehicle.
* If your vehicle is equipped with LED type stop and tail lamps replace
with LED assembled units. Please
contact an authorized Kia dealer.
Type B (Stop and tail lamp)
If the lamp bulb does not operate,
have the vehicle checked by an
authorized Kia dealer.
Inside lamp
OUMA074035
OUMA074112
OUM074036
■ Type A
■Type B
OUM074034
OUMA074111
■
Type A
■ Type B
Page 501 of 536

Maintenance
90
7
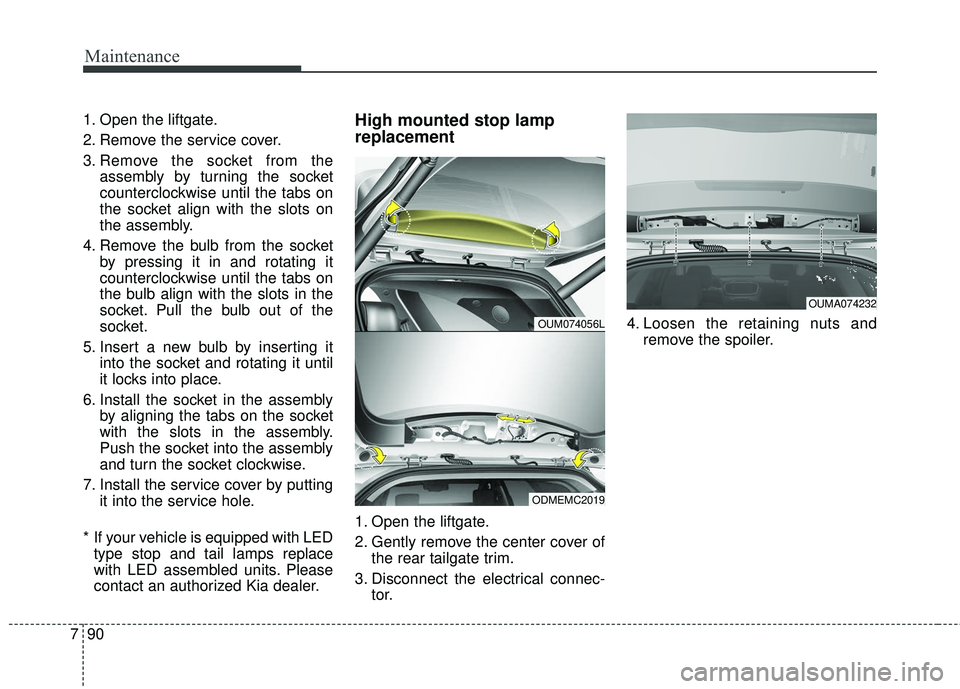
1. Open the liftgate.
2. Remove the service cover.
3. Remove the socket from the
assembly by turning the socket
counterclockwise until the tabs on
the socket align with the slots on
the assembly.
4. Remove the bulb from the socket by pressing it in and rotating it
counterclockwise until the tabs on
the bulb align with the slots in the
socket. Pull the bulb out of the
socket.
5. Insert a new bulb by inserting it into the socket and rotating it until
it locks into place.
6. Install the socket in the assembly by aligning the tabs on the socket
with the slots in the assembly.
Push the socket into the assembly
and turn the socket clockwise.
7. Install the service cover by putting it into the service hole.
* If your vehicle is equipped with LED type stop and tail lamps replace
with LED assembled units. Please
contact an authorized Kia dealer.High mounted stop lamp
replacement
1. Open the liftgate.
2. Gently remove the center cover of the rear tailgate trim.
3. Disconnect the electrical connec- tor. 4. Loosen the retaining nuts and
remove the spoiler.
OUM074056L
ODMEMC2019
OUMA074232
Page 502 of 536
791
Maintenance
5. Remove the high mounted stoplamp assembly (A) after loosening
the nuts and washer nozzle (B).
6. Reinstall a new lamp assembly in the reverse order of removal.
License plate lamp bulb
replacement
1. Loosen the lens retaining screwswith a phillips head screwdriver.
2. Remove the lens.
3. Remove the bulb by pulling it straight out.
4. Install a new bulb.
5. Reinstall the lens securely with the lens retaining screws.
OUMA074231
OUMA074230
B
A
Page 503 of 536
Maintenance
92
7
Interior lamp bulb replacement
1. Using a flat-blade screwdriver,
gently pry the lens from the interi-
or light housing.
2. Remove the bulb by pulling it straight out.
3. Install a new bulb in the socket.
4. Align the lens tabs with the interior light housing notches and snap
the lens into place.
✽ ✽NOTICE
If the LED lamp does not operate,
we recommend that you checked on
authorized Kia dealer.
WARNING - Interior
lamps
Prior to working on the Interior
Lights, ensure that the “OFF”
button is depressed to avoid
burning your fingers or receiv-
ing an electric shock.
■Room lamp
■Map lamp
■Glove box lamp
■Luggage lamp
■Vanity mirror lamp
OUMA078230N/OUM074040/OUM074041/ OYP074032K/OXM079041
Page 504 of 536

793
Maintenance
APPEARANCE CARE
Exterior care
Exterior general caution
It is very important to follow the label
directions when using any chemical
cleaner or polish. Read all warning
and caution statements that appear
on the label.
Finish maintenance
Washing
To help protect your vehicle’s finish
from rust and deterioration, wash it
thoroughly and frequently at least
once a month with lukewarm or cold
water.
If you use your vehicle for off-road
driving, you should wash it after each
off-road trip. Pay special attention to
the removal of any accumulation of
salt, dirt, mud, and other foreign
materials. Make sure the drain holes
in the lower edges of the doors and
rocker panels are kept clear and
clean.
Insects, tar, tree sap, bird droppings,
industrial pollution and similar
deposits can damage your vehicle’s
finish if not removed immediately.
Even prompt washing with plain
water may not completely remove all
these deposits. A mild soap, safe for
use on painted surfaces, may be
used.
After washing, rinse the vehicle thor-
oughly with lukewarm or cold water.
Do not allow soap to dry on the fin-
ish.After washing the vehicle, test the
brakes while driving slowly to see if
they have been affected by water. If
braking performance is impaired, dry
the brakes by applying them lightly
while maintaining a slow forward
speed.
CAUTION - Headlight Lens
To prevent damage, do not
clean headlight lens with chem-ical solvents or strong deter-gents.
Page 505 of 536

Maintenance
94
7
High-pressure washing
When using high-pressure wash-
ers, make sure to maintain suffi-
cient distance from the vehicle.
Insufficient clearance or excessive
pressure can lead to component
damage or water penetration.
Do not spray the camera, sensors or its surrounding area directly with
a high pressure washer. Shock
applied from high pressure water
may cause the device to not oper-
ate normally.
Do not bring the nozzle tip close to boots (rubber or plastic covers) or
connectors as they may be dam-
aged if they come into contact with
high pressure water. Waxing
Wax the vehicle when water will no
longer bead on the paint.
Always wash and dry the vehicle
before waxing. Use a good quality
liquid or paste wax, and follow the
manufacturer’s instructions. Wax all
metal trim to protect it and to main-
tain its luster.
Removing oil, tar, and similar materi-
als with a spot remover will usually
strip the wax from the finish. Be sure
to re-wax these areas even if the rest
of the vehicle does not yet need wax-
ing.
Do not apply wax on embossed
unpainted unit, as it may tarnish the
unit.
CAUTION - Wet engine
Water washing in the engine
compartment including highpressure water washing maycause the failure of electricalcircuits located in the enginecompartment.
Never allow water or other liq- uids to come in contact withelectrical/electronic compo-nents inside the vehicle asthis may damage them.
OJB037800