2018 KIA SORENTO ignition
[x] Cancel search: ignitionPage 10 of 54

SORENTO FEATURES & FUNCTIONS GUIDE8*IF EQUIPPED
Drive Mode Integrated Control Video
To view a video on your mobile device, snap this QR Code or visit the listed website .
Refer to page 2 for more information .
www.youtube.com/KiaFeatureVideos
ECO Mode (Active ECO)*
The Active ECO system helps improve fuel
economy by controlling several vehicle
components . When activated, it optimizes
drivetrain operations such as engine power and
transmission to help improve fuel economy .
To turn ON, press the DRIVE MODE button B
and scroll through options until in the ECO mode .
The ECO mode indicator in the instrument cluster
will illuminate, indicating that the vehicle is in ECO
mode and Active ECO is operating . The Active
ECO system will remain on even when the ignition
is cycled .
To turn the Active ECO system OFF, press the
DRIVE MODE button B again and change to
another mode .
For more information on Active ECO, refer to your Owner’s Manual or contact your local dealership.
Drive Mode Integrated Control System*
The Drive Mode may be selected depending on driver’s
preferences and road conditions .
To cycle through the different Drive Modes A, press the
DRIVE MODE button B . The Instrument Cluster will display
SPORT or ECO when selected . When in Normal mode, it will
not display in the Instrument Cluster .
REMINDERS:
•
The system is turned ON and in Normal mode when ignition is in the ON position
•
When ECO mode is selected, the indicator will display and system remains on, even when ignition is cycled
•Steering effort may be slightly increased in Sport mode
(Located on Center Panel below Gear Shift)*
(Appears on LCD in Instrument Cluster)
A
B
QR CODE
To help improve your fuel economy: •Drive at a moderate speed, accelerating smoothly and at a moderate rate •Keep tires inflated to the recommended pressure •Be sure the wheels are properly aligned
QUICK TIPS
INSTRUMENT CLUSTER
Page 11 of 54

9ALWAYS CHECK THE OWNER’S MANUAL FOR COMPLETE OPER ATING INFORMATION AND SAFET Y WARNINGS . *IF EQUIPPED
The ESC system is designed to help stabilize the vehicle during
cornering maneuvers . It is a good idea to keep the ESC turned on for
daily driving whenever possible .
Press ESC OFF button A to turn Traction Control OFF/ON .
To turn OFF both the Traction Control and Stability Control, press and
hold for more than 3 seconds . Press again to turn ON .
HAC helps prevent the vehicle from rolling backwards when
accelerating from a stop while on a steep incline . The HAC automatically
activates whether the ESC is OFF or ON but does NOT activate when the
ESC has malfunctioned .
REMINDERS:
•
ESC is active by default at vehicle start-up . When ignition is cycled, ESC will turn ON again
•
The ESC Indicator Light in the instrument cluster will illuminate whenever the ESC is in operation
For more information on Electronic Stability Control (ESC) and its specific features and operations, please refer to your Owner’s Manual.
Electronic Stability Control (ESC)
Hill-Start Assist Control (HAC)
REMINDER: The HAC does not operate when the gear shift is in the P (Park) or the N (Neutral) position .
(Outlet located on back of Center Console*)
(Button panel located left of Steering Wheel)
BCA
Instrument Panel Dimmer
AC Inverter*
With parking lights/headlights ON, press button B (+) or (-) to adjust
the brightness of the instrument panel illumination .
REMINDERS:
• The Instrument Panel Dimmer does not change brightness when headlights are turned off .
• The Instrument Panel Dimmer does not adjust brightness on the UVO eServices* nor the UVO eServices with Premium Navigation system* screens . Use those system's settings to adjust brightness on the screens .
The AC Inverter supplies 115V/150W electrical power to operate
accessories or equipment . Press AC Inverter button C to activate .
AC115V
MAX150W •
•When HAC is active (e .g ., during initial acceleration from a stop on an incline), you may notice that the brakes will momentarily remain engaged after you depress the accelerator – this is normal HAC operation . •HAC provides a 2-second delay before the vehicle may start rolling backwards
QUICK TIPS
DRIVER'S PANEL
Page 13 of 54

11ALWAYS CHECK THE OWNER’S MANUAL FOR COMPLETE OPER ATING INFORMATION AND SAFET Y WARNINGS . *IF EQUIPPED
Lane Departure Warning System Video
To view a video on your mobile device, snap this QR Code or visit the listed website .
Refer to page 2 for more information .
www.youtube.com/KiaFeatureVideos
Lane Departure Warning System (LDWS)*
Autonomous Emergency Braking (AEB)/Forward Collision Warning (FCW)*
With the Engine Start /Stop button in the ON position, press
the LDWS button E (shown on previous page) to turn system ON .
The instrument cluster indicator will illuminate white .
If the LDWS detects that you are veering outside of your lane,
the system may issue a warning on the LCD screen and an alert
may sound, under these conditions:
•The vehicle exceeds approximately 40 mph
•The LDWS system recognizes the lane the vehicle is traveling in
If LDWS button is ON/OFF and ignition is cycled, the system returns
to its previous state .
The AEB helps to alert the driver when rapidly approaching a vehicle that is slowing down,
braking or stopped A . A warning message will appear on the LCD screen and a chime
will sound . The AEB will become active when the vehicle is traveling more than 6 mph .
To turn the AEB off, go to User Settings in the LCD Instrument Cluster modes .
REMINDER: The AEB will be activated by default when vehicle power is cycled on, even when previously set to off
Autonomous (Assist) Emergency Braking is not a substitute for safe driving, and may not detect all objects in front of vehicle. Always drive safely and use caution.
REMINDER: LDWS will not issue a warning if the turn signal or hazard lights are activated .
The Lane Departure Warning System (LDWS) is not a substitute for safe and proper driving. Always drive safely and use caution. LDWS may not always alert the driver if the vehicle is driven outside of its lane.
When the LDWS sensor detects the lane traveling in, the lane is illuminated
When the LDWS sensor does not detect the lane traveling in the lanes is not illuminated
When the LDWS sensor detects the vehicle veering outside of the lane traveling in, the lane the vehicle’s crossing will blink (shown in both images above)
Lane DepartureLane Departure
Lane DepartureLane DepartureLane DepartureLane Departure
Lane DepartureLane Departure
Lane DepartureLane Departure
Lane DepartureLane DepartureLane DepartureLane Departure
Lane DepartureLane Departure
A
QR CODE
DRIVER'S PANEL
Page 20 of 54

SORENTO FEATURES & FUNCTIONS GUIDE18*IF EQUIPPED
MODE CRUISE
CANCEL
RES
OK
SET
REMINDER: Standard Cruise Control is a part of the Advanced Smart Cruise Control (ASCC)* and can be set as the operating mode . To switch from ASCC to Standard Cruise Control, press and hold the CRUISE button (the ASCC system must not be activated to change modes) . Repeat to switch back to ASCC mode .
Your vehicle’s steering wheel buttons may differ from those in the illustrations. See your Owner’s Manual for more details
Audio ControlsStandard Cruise Control
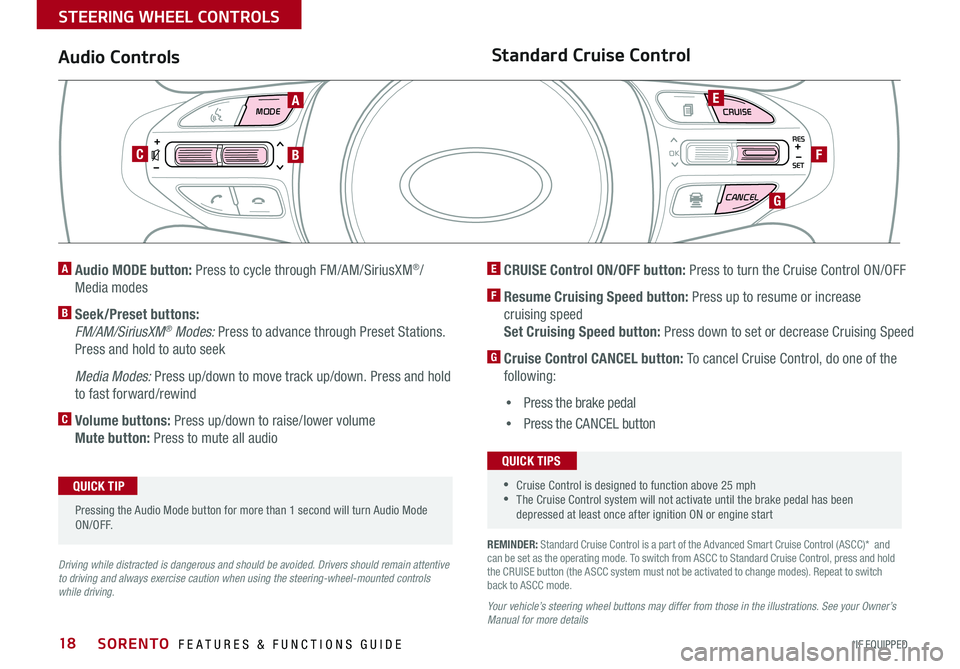
E CRUISE Control ON/OFF button: Press to turn the Cruise Control ON/OFF
F Resume Cruising Speed button: Press up to resume or increase
cruising speed
Set Cruising Speed button: Press down to set or decrease Cruising Speed
G Cruise Control CANCEL button: To cancel Cruise Control, do one of the
following:
•Press the brake pedal
•Press the CANCEL button
A Audio MODE button: Press to cycle through FM/AM/SiriusXM®/
Media modes
B Seek/Preset buttons:
FM/AM/SiriusXM® Modes: Press to advance through Preset Stations .
Press and hold to auto seek
Media Modes: Press up/down to move track up/down . Press and hold
to fast forward/rewind
C Volume buttons: Press up/down to raise/lower volume
Mute button: Press to mute all audio
Driving while distracted is dangerous and should be avoided. Drivers should remain attentive to driving and always exercise caution when using the steering-wheel-mounted controls while driving.
A
CB
E
F
G
Pressing the Audio Mode button for more than 1 second will turn Audio Mode ON/OFF .
QUICK TIP
•Cruise Control is designed to function above 25 mph •The Cruise Control system will not activate until the brake pedal has been depressed at least once after ignition ON or engine start
QUICK TIPS
STEERING WHEEL CONTROLS
Page 32 of 54

SORENTO FEATURES & FUNCTIONS GUIDE30*IF EQUIPPED
Electronic Parking Brake (EPB)*
The Electronic Parking Brake (EPB) system utilizes an electric motor to
engage the parking brake .
Applying the Parking Brake
Depress the brake pedal and pull up the EPB switch A . Ensure that the
indicator light is illuminated on the instrument cluster .
Releasing the Parking Brake
The EPB will automatically release when the shifter is placed in Reverse
or Drive .
To release EPB manually, depress the brake pedal, then press the EPB
switch A, with the ignition switch in the ON position . Ensure that the
indicator light is OFF .
REMINDERS:
•
As a bulb check, the EPB malfunction indicator will illuminate for approximately 3 seconds when the ignition switch is turned ON
•
If the warning light does not illuminate temporarily, or continues to remain lit, take your vehicle to an authorized Kia dealer and have the system checked
•The EPB should not be operated while the vehicle is moving
•
A click or electric brake motor sound may be heard while operating or releasing the EPB, but these conditions are normal and indicate that the EPB is functioning properly
A
B
Auto Hold*
The Auto Hold maintains the vehicle in a standstill even though the
brake pedal is not depressed after the driver brings the vehicle to a
complete stop by depressing the brake pedal .
Depress the brake pedal, start the engine and then press the AUTO
HOLD button B . The white Auto Hold indicator will come on indicating
the system is in standby .
Before the Auto Hold will engage, the driver's door, engine hood and
trunk must be closed and the driver's seat belt must be fastened .
When coming to a complete stop by depressing the brake pedal,
the Auto Hold indicator changes from white to green indicating the
Auto Hold is engaged and EPB is applied . The vehicle will remain at a
standstill even if you release the brake pedal .
If EPB is applied, Auto Hold will be released .
•When leaving your keys with parking lot attendants or valet, make sure to inform them how to operate the EPB •If parked on a steep incline/decline, pull up the EPB switch for more than 3 seconds for a firmer EPB application
QUICK TIPS
CENTER PANEL
Page 33 of 54

31ALWAYS CHECK THE OWNER’S MANUAL FOR COMPLETE OPER ATING INFORMATION AND SAFET Y WARNINGS . *IF EQUIPPED
Heated Steering Wheel*
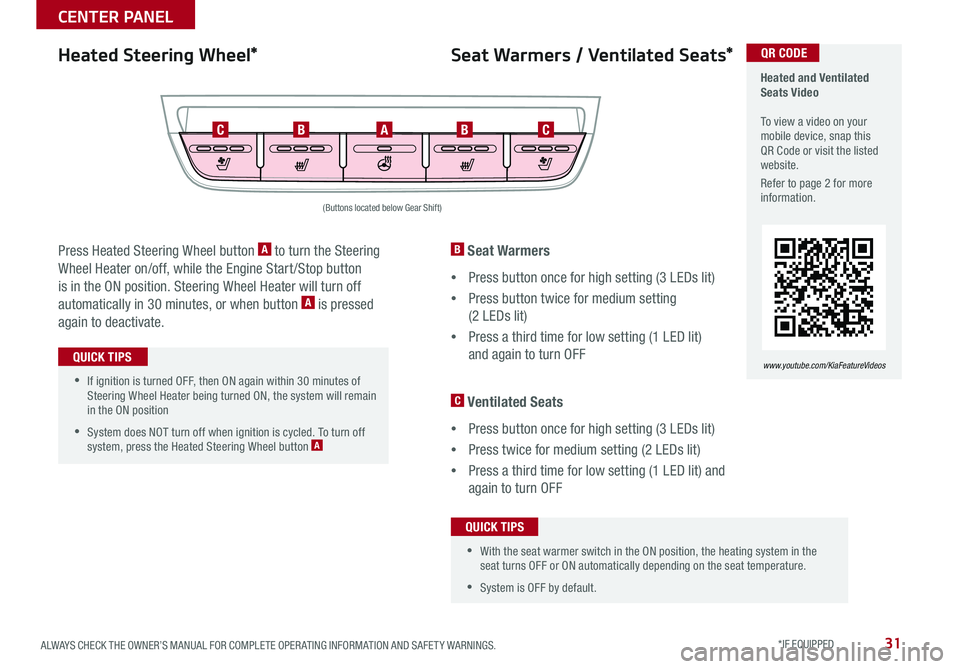
Press Heated Steering Wheel button A to turn the Steering
Wheel Heater on/off, while the Engine Start /Stop button
is in the ON position . Steering Wheel Heater will turn off
automatically in 30 minutes, or when button A is pressed
again to deactivate .
(Buttons located below Gear Shift)
Heated and Ventilated Seats Video To view a video on your mobile device, snap this QR Code or visit the listed website .
Refer to page 2 for more information .
www.youtube.com/KiaFeatureVideos
B Seat Warmers
•Press button once for high setting (3 LEDs lit)
•Press button twice for medium setting
(2 LEDs lit)
•Press a third time for low setting (1 LED lit)
and again to turn OFF
C Ventilated Seats
•Press button once for high setting (3 LEDs lit)
•Press twice for medium setting (2 LEDs lit)
•Press a third time for low setting (1 LED lit) and
again to turn OFF
Seat Warmers / Ventilated Seats*
ACBCB
QR CODE
•With the seat warmer switch in the ON position, the heating system in the seat turns OFF or ON automatically depending on the seat temperature .
•System is OFF by default .
QUICK TIPS
•If ignition is turned OFF, then ON again within 30 minutes of Steering Wheel Heater being turned ON, the system will remain in the ON position
•System does NOT turn off when ignition is cycled . To turn off system, press the Heated Steering Wheel button A
QUICK TIPS
CENTER PANEL
Page 41 of 54

39ALWAYS CHECK THE OWNER’S MANUAL FOR COMPLETE OPER ATING INFORMATION AND SAFET Y WARNINGS . *IF EQUIPPED
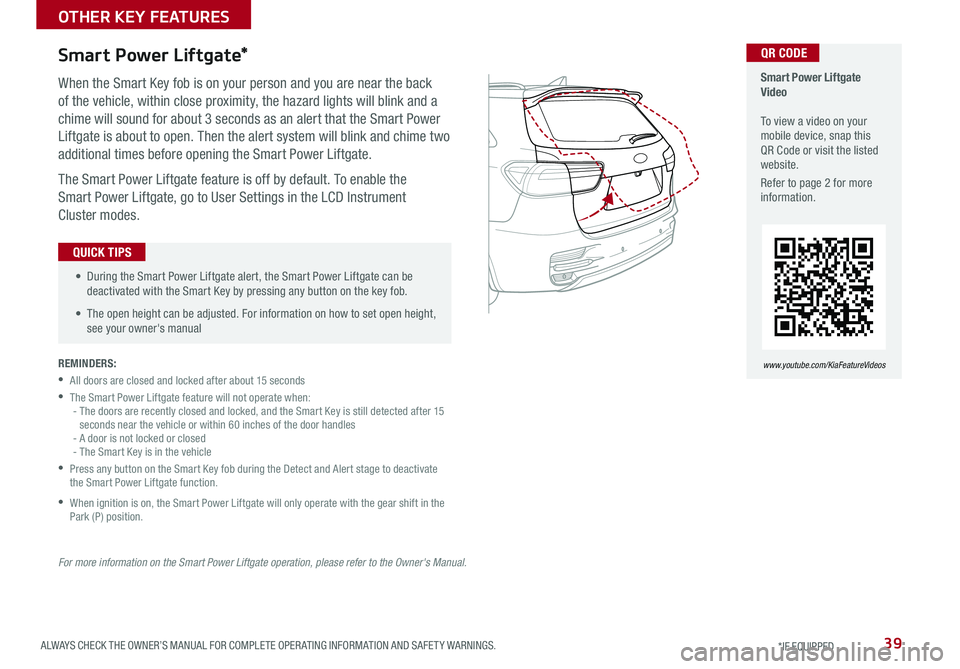
When the Smart Key fob is on your person and you are near the back
of the vehicle, within close proximity, the hazard lights will blink and a
chime will sound for about 3 seconds as an alert that the Smart Power
Liftgate is about to open . Then the alert system will blink and chime two
additional times before opening the Smart Power Liftgate .
The Smart Power Liftgate feature is off by default . To enable the
Smart Power Liftgate, go to User Settings in the LCD Instrument
Cluster modes .
REMINDERS:
•All doors are closed and locked after about 15 seconds
•The Smart Power Liftgate feature will not operate when:- The doors are recently closed and locked, and the Smart Key is still detected after 15 seconds near the vehicle or within 60 inches of the door handles- A door is not locked or closed- The Smart Key is in the vehicle
•
Press any button on the Smart Key fob during the Detect and Alert stage to deactivate the Smart Power Liftgate function .
•
When ignition is on, the Smart Power Liftgate will only operate with the gear shift in the Park (P) position .
Smart Power Liftgate*
For more information on the Smart Power Liftgate operation, please refer to the Owner's Manual.
• During the Smart Power Liftgate alert, the Smart Power Liftgate can be deactivated with the Smart Key by pressing any button on the key fob .
• The open height can be adjusted . For information on how to set open height, see your owner's manual
QUICK TIPS
OTHER KEY FEATURES
Smart Power Liftgate Video To view a video on your mobile device, snap this QR Code or visit the listed website .
Refer to page 2 for more information .
www.youtube.com/KiaFeatureVideos
QR CODE
Page 43 of 54

41ALWAYS CHECK THE OWNER’S MANUAL FOR COMPLETE OPER ATING INFORMATION AND SAFET Y WARNINGS . *IF EQUIPPED
Map / Room Lamps
Automatic turn off function*
The interior lights automatically turn off approximately
30 seconds after the Engine Start /Stop button is OFF .
Map/Room Lamp Operation
Press the button A to turn the Map Lamp ON/OFF . Press
button B to turn the Driver's/Passenger's Map Lamps
ON/OFF . This light produces a spot beam for convenient
use as a map lamp or as a personal lamp for the driver or the
front passenger .
The Map Lamp turns ON when any door is opened or the
ignition is turned OFF . When all doors are locked or the ignition
is ON, the Map Lamp will turn OFF immediately .
Map/Room Lamp button C – When pressed and a door is
opened, or doors are unlocked from the Smart Key, the Map
and Room Lamps turn ON for approximately 30 seconds .
Room Lamp – Press the lens D to turn the Room Lamp
ON/OFF .
BBE
AC
D
•When doors are unlocked by the Smart Key*, the lamp turns ON for approximately 30 seconds •If your vehicle is equipped with the theft alarm system, the interior lights automatically turn off approximately 3 seconds after the system is in armed stage •Using interior lights for an extended period of time may cause battery discharge
QUICK TIPS
Panoramic Sunroof with Power Sunshade
The Sunroof and Sunshade operation is controlled through multidirectional lever E .
The ignition needs to be ON to operate the sunroof/sunshade .
REMINDERS: The sunroof can be operated for approximately 30 seconds after the ignition is turned off . If the front door’s are opened, the sunroof cannot be operated even within the 30 second period .
To slide the Sunshade and Sunroof:
•Auto Open: Slide the lever E backward to the farthest position and release
•Auto Close (Sunroof only): Slide the lever E forward to the farthest position
(second detent) and release
Tilting the Sunroof open/closed:
•Open/Raise: Push lever E upward
•Close/Lower: Pull lever E downward
•Auto Close Sunroof and Sunshade: Slide the Sunroof lever E forward to the
farthest position
REMINDERS: Sunshade needs to remain OPEN while Sunroof is open and vehicle is moving
To stop the Sunroof/Sunshade at any position, push or pull the Sunroof control lever in any direction .
QUICK TIP
(Front overhead console)
OTHER KEY FEATURES