2018 KIA SEDONA remove seats
[x] Cancel search: remove seatsPage 28 of 586

Safety features of your vehicle
12
3
Easy access function
(if equipped)
The system will move the driver's
seat automatically as follows :
Without smart key system
- It will move the driver’s seat rear-ward when the ignition key is
removed.
- It will move the driver’s seat for- ward when the ignition key is
inserted.
With smart key system - It will move the driver’s seat rear-ward when the engine start/stop
button is changed to the OFF
position.
- It will move the driver’s seat for- ward when the engine start/stop
button is changed to the ACC or
START position.
You can activate or deactivate this fea-
ture. Refer to "User settings" in chap-
ter 4.
Headrest (for front seat)
The driver's and front passenger's
seats are equipped with a headrest
for the occupant's safety and comfort.
The headrest not only provides com-
fort for the driver and front passenger,
but also helps protect the head and
neck in the event of a rear collision. For maximum effectiveness in case
of an accident, the headrest should
be adjusted so the middle of the
headrest is at the same height of the
center of gravity of an occupant's
head. Generally, the center of gravity
of most people's head is similar with
the height of the top of their eyes.
Also, adjust the headrest as close to
your head as possible. For this rea-
son, the use of a cushion that holds
the body away from the seatback is
not recommended.
OYP034285N
Page 40 of 586
Safety features of your vehicle
24
3
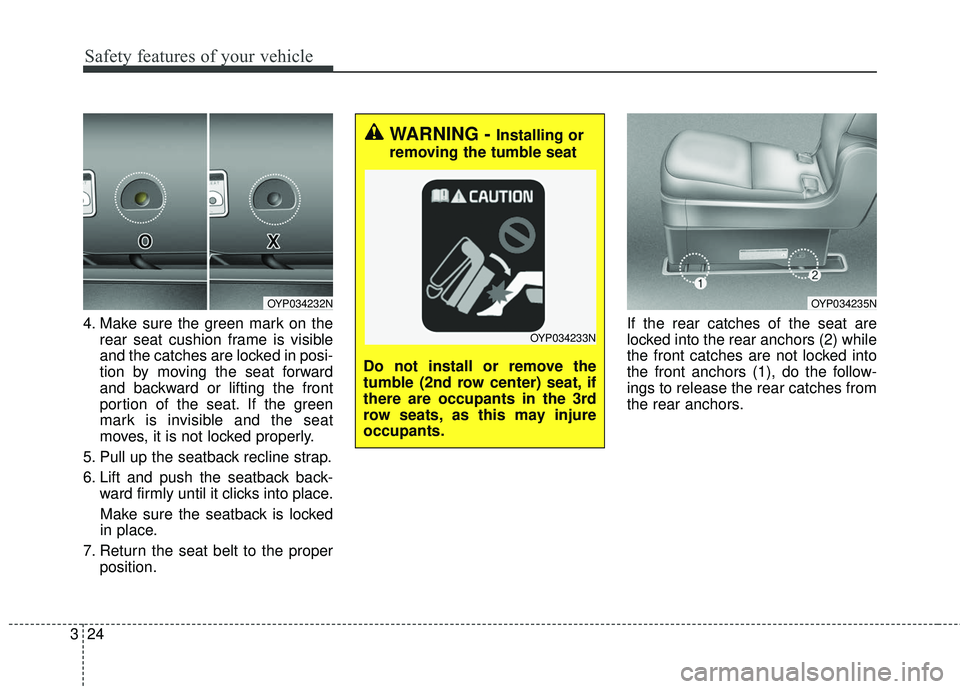
4. Make sure the green mark on the
rear seat cushion frame is visible
and the catches are locked in posi-
tion by moving the seat forward
and backward or lifting the front
portion of the seat. If the green
mark is invisible and the seat
moves, it is not locked properly.
5. Pull up the seatback recline strap.
6. Lift and push the seatback back- ward firmly until it clicks into place.
Make sure the seatback is locked
in place.
7. Return the seat belt to the proper position. If the rear catches of the seat are
locked into the rear anchors (2) while
the front catches are not locked into
the front anchors (1), do the follow-
ings to release the rear catches from
the rear anchors.
OYP034232N
WARNING - Installing or
removing the tumble seat
Do not install or remove the
tumble (2nd row center) seat, if
there are occupants in the 3rd
row seats, as this may injure
occupants.
OYP034233N
OYP034235N
Page 60 of 586
Safety features of your vehicle
44
3
Stowing the rear seat belt
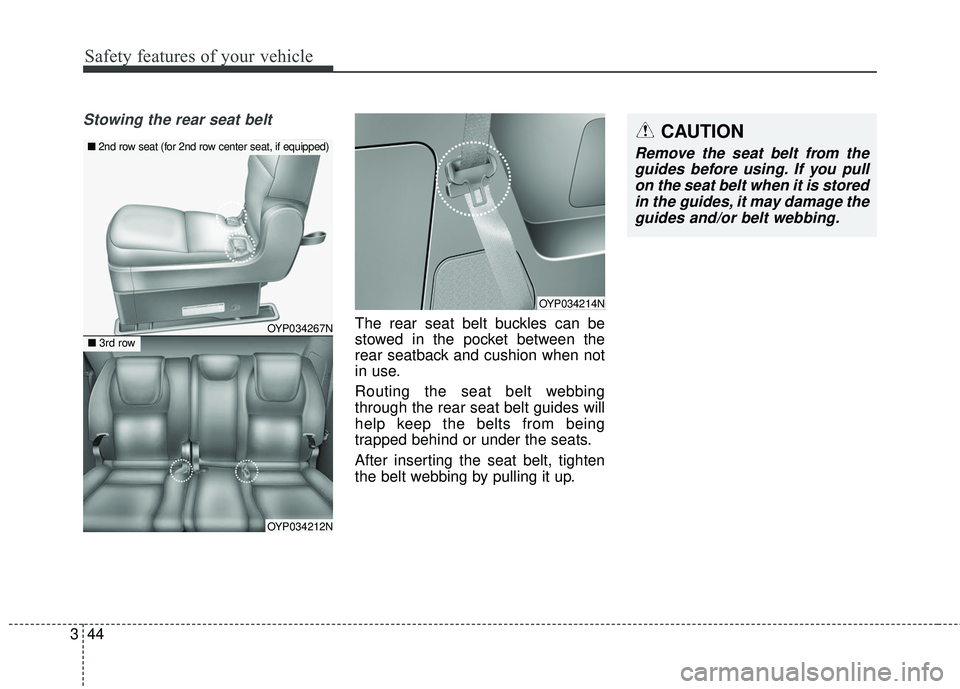
The rear seat belt buckles can be
stowed in the pocket between the
rear seatback and cushion when not
in use.
Routing the seat belt webbing
through the rear seat belt guides will
help keep the belts from being
trapped behind or under the seats.
After inserting the seat belt, tighten
the belt webbing by pulling it up.
CAUTION
Remove the seat belt from the
guides before using. If you pullon the seat belt when it is storedin the guides, it may damage theguides and/or belt webbing.
OYP034214N
OYP034267N
OYP034212N
■ 2nd row seat (for 2nd row center seat, if equipped)
■ 3rd row
Page 72 of 586
Safety features of your vehicle
56
3
Securing a child restraint seat
with tether anchor system
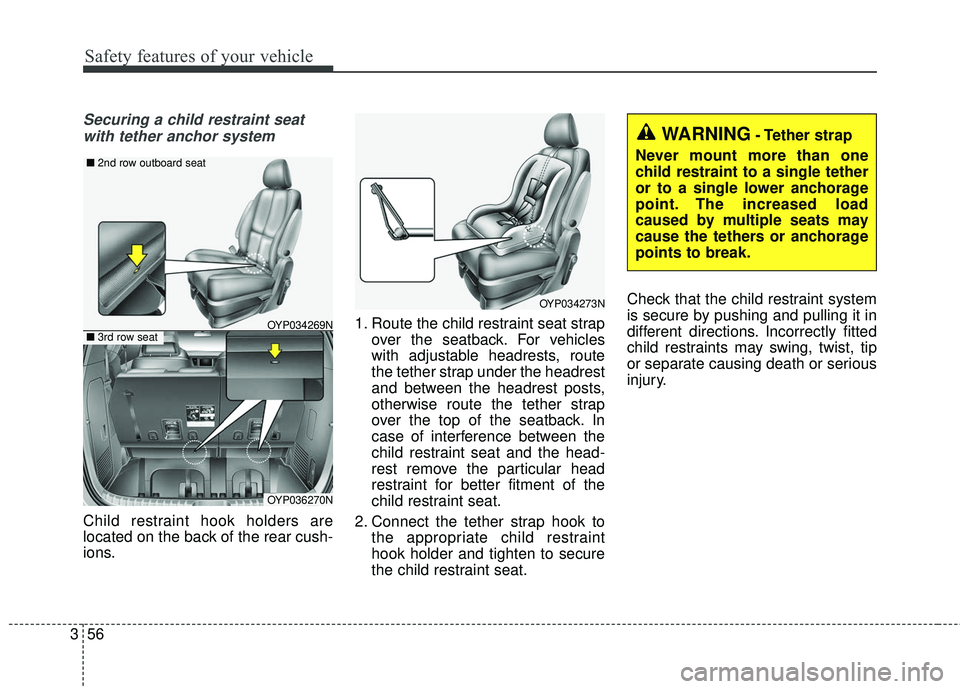
Child restraint hook holders are
located on the back of the rear cush-
ions. 1. Route the child restraint seat strap
over the seatback. For vehicles
with adjustable headrests, route
the tether strap under the headrest
and between the headrest posts,
otherwise route the tether strap
over the top of the seatback. In
case of interference between the
child restraint seat and the head-
rest remove the particular head
restraint for better fitment of the
child restraint seat.
2. Connect the tether strap hook to the appropriate child restraint
hook holder and tighten to secure
the child restraint seat. Check that the child restraint system
is secure by pushing and pulling it in
different directions. Incorrectly fitted
child restraints may swing, twist, tip
or separate causing death or serious
injury.
OYP034273N
WARNING- Tether strap
Never mount more than one
child restraint to a single tether
or to a single lower anchorage
point. The increased load
caused by multiple seats may
cause the tethers or anchorage
points to break.
OYP036270N
OYP034269N
■ 2nd row outboard seat
■3rd row seat
Page 562 of 586
Maintenance
92
7
Taking care of leather seats
Vacuum the seat periodically to
remove dust and sand on the seat.
It will prevent abrasion or damage of
the leather and maintain its quality.
Wipe the natural leather seat cover often with dry or soft cloth.
Sufficient use of a leather protec- tive may prevent abrasion of the
cover and helps maintain the color.
Be sure to read the instructions
and consult a specialist when
using leather coating or protective
agents.
Leather with bright colors(beige, cream beige) is easily contaminat-
ed and clear in appearance. Clean
the seats frequently.
Avoid wiping with wet cloth. It may cause the surface to crack.
Cleaning the leather seats
Remove all contaminations instant-ly. Refer to instructions below for
removal of each contaminant.
Cosmetic products(sunscreen, foundation, etc.)
- Apply cleansing cream on a clothand wipe the contaminated point.
Wipe off the cream with a wet
cloth and remove water with a dry
cloth.
Beverages(coffee, soft drink, etc.) - Apply a small amount of neutraldetergent and wipe until contami-
nations do not smear.
Oil - Remove oil instantly withabsorbable cloth and wipe with
stain remover for natural leather
only.
Chewing gum - Harden the gum with ice andremove gradually.CAUTION - Electrical
components
Never allow water or other liq-uids to come in contact withelectrical/electronic compo-nents inside the vehicle as thismay damage them.
CAUTION - Leather
When cleaning leather products(steering wheel, seats etc.), useneutral detergents or low alco-hol content solutions. If you usehigh alcohol content solutionsor acid/alkaline detergents, thecolor of the leather may fade orthe surface may get stripped off.
Page 563 of 586
793
Maintenance
Fabric seat cover using precau-tions (If equipped)
Please clean the fabric seats regu-
larly with a vacuum cleaner in con-
sideration of fabric material charac-
teristics. If they are heavily soiled
with beverage stains, etc., use a suit-
able interior cleaner. To prevent dam-
age to seat covers, wipe off the seat
covers down to the seams with a
large wiping motion and moderate
pressure using a soft sponge or
microfiber cloth.
Velcro closures on clothing or sharp
objects may cause snagging or
scratches on the surface of the
seats. Make sure not to rub such
objects against the surface.
Cleaning the upholstery and inte-rior trim
Vinyl
Remove dust and loose dirt from
vinyl with a whisk broom or vacuum
cleaner. Clean vinyl surfaces with a
vinyl cleaner.
Fabric
Remove dust and loose dirt from fab-
ric with a whisk broom or vacuum
cleaner. Clean with a mild soap solu-
tion recommended for upholstery or
carpets. Remove fresh spots imme-
diately with a fabric spot cleaner. If
fresh spots do not receive immediate
attention, the fabric can be stained
and its color can be affected. Also, its
fire-resistant properties can be
reduced if the material is not proper-
ly maintained.
Using anything but recommended
cleaners and procedures may affect
the fabric’s appearance and fire-
resistant properties.
Cleaning the lap/shoulder beltwebbing
Clean the belt webbing with any mild
soap solution recommended for
cleaning upholstery or carpet. Follow
the instructions provided with the
soap. Do not bleach or re-dye the
webbing because this may weaken it.
Cleaning the interior windowglass
If the interior glass surfaces of the
vehicle become fogged (that is, cov-
ered with an oily, greasy or waxy
film), they should be cleaned with a
glass cleaner. Follow the directions
on the glass cleaner container.
CAUTION - Rear window
Do not scrape or scratch theinside of the rear window. Thismay result in damage of the rearwindow defroster grid.