Page 340 of 586

4 238
Features of your vehicle
✽ ✽NOTICE
• Only supported contacts format
can be downloaded and displayed
from the Bluetooth
®Wireless
Technology device, contacts from
some applications will not be
included.
• Up to 2,000 contacts can be saved.
• In some cases, additional confir- mation from your Bluetooth
®
Wireless Technology device is nec-
essary when downloading con-
tacts. If downloading of contacts
unsuccessful, consult your
Bluetooth
®Wireless Technology
device’s settings or the audio
screen to approve the download.
• Contacts without phone numbers are not displayed.
Dial
Select the [PHONE] button on the
audio ➟Select [Dial].
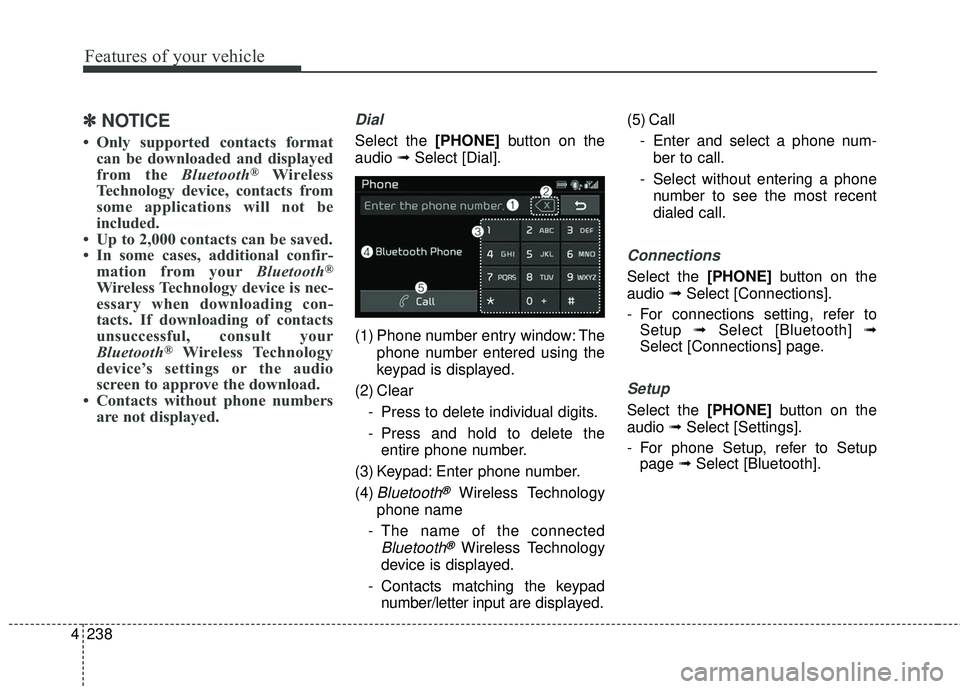
(1) Phone number entry window: The phone number entered using the
keypad is displayed.
(2) Clear - Press to delete individual digits.
- Press and hold to delete theentire phone number.
(3) Keypad: Enter phone number.
(4)
Bluetooth®Wireless Technology
phone name
- The name of the connected
Bluetooth®Wireless Technology
device is displayed.
- Contacts matching the keypad number/letter input are displayed.(5) Call
- Enter and select a phone num-ber to call.
- Select without entering a phone number to see the most recent
dialed call.
Connections
Select the [PHONE] button on the
audio ➟Select [Connections].
- For connections setting, refer to Setup ➟Select [Bluetooth] ➟
Select [Connections] page.
Setup
Select the [PHONE] button on the
audio ➟Select [Settings].
- For phone Setup, refer to Setup page ➟Select [Bluetooth].
Page 341 of 586

239
4
Features of your vehicle
Siri
✽ ✽
NOTICE - Using Siri
• Android device is not supported to
use Siri.
• If you want to use Siri, you have to connect your iOS device to multi-
media system through Bluetooth
®
Wireless Technology. (Please
check whether your iOS device
supports Siri and turning Siri On)
• If the iOS version is changed, the functions and response may be dif-
ferent according to the iOS device
and the latest version.
• Siri automatically stops in the fol- lowing events.
1) Outgoing and incoming phone calls.
2) Media (USB, etc.) is connected. (Siri mode is maintained when
iPod
®s are connected)
3) Rear camera is activated. (option)
4) Vehicle is started or engine is turned off. (Continued)(Continued)
5) Screen transition buttons, such as RADIO or MEDIA, are
selected.
6) When a pop-up message is dis- played on the screen due to
accidental execution of Siri.
• The microphone is located above the driver’s seat. To ensure proper
Siri, state your voice while main-
taining proper driving posture.
Starting Siri
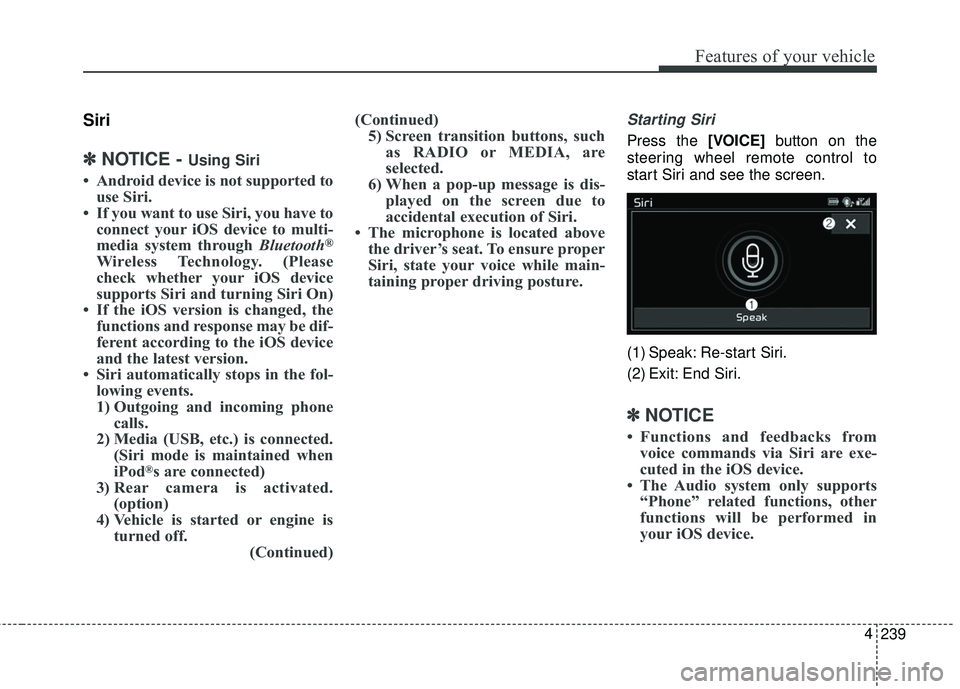
Press the [VOICE] button on the
steering wheel remote control to
start Siri and see the screen.
(1) Speak: Re-start Siri.
(2) Exit: End Siri.
✽ ✽ NOTICE
• Functions and feedbacks from
voice commands via Siri are exe-
cuted in the iOS device.
• The Audio system only supports “Phone” related functions, other
functions will be performed in
your iOS device.
Page 342 of 586
![KIA SEDONA 2018 Owners Manual 4 240
Features of your vehicle
Setup
Access Display, Sound, Bluetooth,
System and Display Off settings.
Select the [SETUP]button on the
audio system.
Display
Select the [SETUP] button on the
audio sy KIA SEDONA 2018 Owners Manual 4 240
Features of your vehicle
Setup
Access Display, Sound, Bluetooth,
System and Display Off settings.
Select the [SETUP]button on the
audio system.
Display
Select the [SETUP] button on the
audio sy](/manual-img/2/40452/w960_40452-341.png)
4 240
Features of your vehicle
Setup
Access Display, Sound, Bluetooth,
System and Display Off settings.
Select the [SETUP]button on the
audio system.
Display
Select the [SETUP] button on the
audio system ➟ Select [Display].
Mode: Audio screen brightness can be adjusted to the time of day.
Illumination: The brightness of the audio screen can be changed.
Sound
Select the [SETUP] button on the
audio system ➟ Select [Sound].
Position: Sound balance and pan- ning can be adjusted.
Tone: Sound tone color can be adjusted.
Speed Dependent Volume: Automatically adjust volume based
on vehicle speed.
Beep: Select whether to play a sound when the screen is touched.
Bluetooth
Select the [SETUP] button on the
audio system ➟ Select [Bluetooth].
Connections: Control pairing, dele- tion, connection and disconnection
of
Bluetooth®Wireless Technology
devices.
Auto Connection Priority: Set the connection priority of
Bluetooth®
Wireless Technology devices when
the vehicle is started.
Download Contacts: Contacts can be downloaded from connected
Bluetooth®Wireless Technology
devices.
Bluetooth Voice Prompts: Play or mute voice prompts for
Bluetooth®
Wireless Technology device pair-
ing, connection and errors.
Page 343 of 586
241
4
Features of your vehicle
✽ ✽
NOTICE
• When paired devices are deleted,
the call history and contacts of the
device saved to the audio system
are deleted.
• For Bluetooth
®Wireless Technology
connections with low connection
priority, some time may be
required for the connection to be
established.
• Contacts can be downloaded only from the currently connected
Bluetooth
®Wireless Technology
device.
If no Bluetooth
®Wireless Technology
device is connected, the download
contacts button is disabled.
System
Select the [SETUP] button on the
audio system ➟ Select [System].
Memory Information: View My Music memory usage.
Language: Change the user lan- guage.
Default: Reset the audio system.
✽ ✽ NOTICE
The system resets to the default val-
ues, and all saved data and settings
are lost.
Display Off
To prevent glare, the screen can be
turned off with the audio system in
operation.
Select the [SETUP] button on the
audio system ➟ Select [Display Off].
Page 518 of 586
Maintenance
48
7
Before performing maintenance or
recharging the battery, turn off all
accessories and stop the engine.
The negative battery cable must be removed first and installed last
when the battery is disconnected.Reset items
Items should be reset after the bat-
tery has been discharged or the bat-
tery has been disconnected.
Auto up/down window (See chapter 4)
Sunroof (See chapter 4)
Trip computer (See chapter 4)
Climate control system (See chapter 4)
Clock (See chapter 4)
Audio (See chapter 4)
Page 536 of 586

Maintenance
66
7
If you do not have a spare, use a
fuse of the same rating from a circuityou may not need for operating thevehicle, such as the power outletfuse.
If the headlights or other electrical
components do not work and the
fuses are OK, check the fuse panel
in the engine compartment. If a fuse
is blown, it must be replaced.
Fuse switch
Always, put the fuse switch at the ON
position.
If you move the switch to the OFF
position, some items such as audio
and digital clock must be reset and
transmitter (or smart key) may not
work properly. When the switch is
Off, the caution will be displayed on
the instrument cluster.
Always place the fuse switch in the
ON position while driving the vehicle.
Engine compartment fuse
replacement
1. Turn the ignition switch and all other switches off.
2. Remove the fuse panel cover by pressing the tab and pulling the
cover up.
When the blade type fuse is dis- connected, remove it by using the
clip designed for changing fuses
located in the engine room fuse
box. Upon removal, securely
insert reserve fuse of equal quan-
tity.
OYP076011
OYP074012N
Page 540 of 586

Maintenance
70
7
Fuse Name Fuse rating Circuit Protected
MULTIMEDIA 15A USB Charger #1/#2, MTS Module, Audio, A/V & Navigation Head Unit S/ROOF FRT 20A Front Sunroof Motor AMP 25A AMP IG1 20A PCB BLOCK (Fuse - ABS3, TCU, MDPS, CRUISE)
SMART KEY2 7.5A Smart Key Control Module
INTERIOR LAMP 10A Portable Lamp, Overhead Console Lamp, Cargo Lamp, Front Vinity Lamp Switch LH/RH, Glove Box
Lamp, Key Warning Switch
START 7.5A With IMMO./Smart Key : Transmission Range Switch, W/O IMMO. : PCB Block (B/Alarm Relay)
S/ROOF RR 25A Rear Sunroof Motor
DOOR LOCK 20A Tail Gate Relay, Door Lock/Unlock Relay, Sliding Door Lock/Unlock Relay
FOG LAMP REAR 10A -
MODULE1 10A Audio, A/V & Navigation Head Unit, Around View Unit, BCM, Overhead Console Lamp, MTS Module,
Digital Clock, USB Charger #1/#2
AIR BAG 15A SRS Control Module, Passenger Occupant Detection Sensor
A/CON2 7.5A A/C Control Module, Blower Resistor (Manual)
HEATED MIRROR 10A Passenger Power Outside Mirror, A/C Control Module BRAKE SWITCH 7.5A Smart Key Control Module, Stop Lamp Switch
P/WINDOW LH 25ADriver Safety Window Module, Driver Door Module, Rear Power Window Switch LH, Rear Safety Power
Window Switch LH, Rear Safety Power Window Module LH
MODULE7 7.5A Key Inter Lock Solenoid, Fuel Lid Switch, ATM Lever Switch, Rear A/C Control Switch, Electro Chromic
Mirror
POWER OUTLET1 20A Front Power Outlet P/SEAT (DRV) 30A Driver Manual Switch, Driver Lumbar Support Switch, Driver IMS Control Module
P/WINDOW RH 25APassenger Safety Window Module, Passenger Power Window Motor, Passenger Door Module, Rear
Power Window Switch RH, Rear Safety Power Window Switch RH, Rear Safety Power Window Module
RH
S/HEATER FRT 20A Heater Control Module, Passenger Ventilation Seat Control Module
Page 543 of 586

773
Maintenance
Fuse Name Fuse ratingCircuit Protected
BLOWER RR 40A Blower RR Relay BLOWER 40A Blower Relay
SENSOR (B+) 10A Battery Sensor
B/ALARM HORN 10A B/Alarm Horn Relay FUEL LID 10A Fuel Lid Relay DEICER 15A Deicer Relay
FUEL PUMP 15A Fuel Pump Relay HORN 15A Horn Relay
WIPER 25A Front Wiper (Low) Relay
ECU3 30A Engine Control Relay, Fuse - ECU1
REAR HEATED 40A Rear Heated Relay TCU 15A Transmission Range Switch
MDPS 10A MDPS Unit (Rack)
CRUISE 10A Smart Cruise Control Radar
B/UP LAMP 10A Audio, A/V & Navigation Head Unit, Rear Combination Lamp (IN) LH/RH, Electro Chromic \
Mirror A/CON 7.5A Rear A/C Control Switch, A/C Control Module
ECU1 15A PCM ABS3 7.5A ESC Module, Steering Angle Sensor
ECU2 10A Injector Drive Box
SENSOR1 15A Oxygen Sensor #1/#2/#3/#4, PCM, E/R Junction Box (Cooling Fan1 Relay)
SENSOR2 10A PCM, Canister Close Valve, Variable Intake Solenoid Valve #1/#2, Purge Control Solenoid Valve, Oil Control
Valve #1/#2 (Intake), Oil Control Valve #1/#2 (Exhaust)
SENSOR3 10A PCM, Fuel Pump Relay IGN COIL 20A Ignition Coil #1~#6, Condensor #1/#2