2018 KIA SEDONA height
[x] Cancel search: heightPage 48 of 586
Safety features of your vehicle
32
3
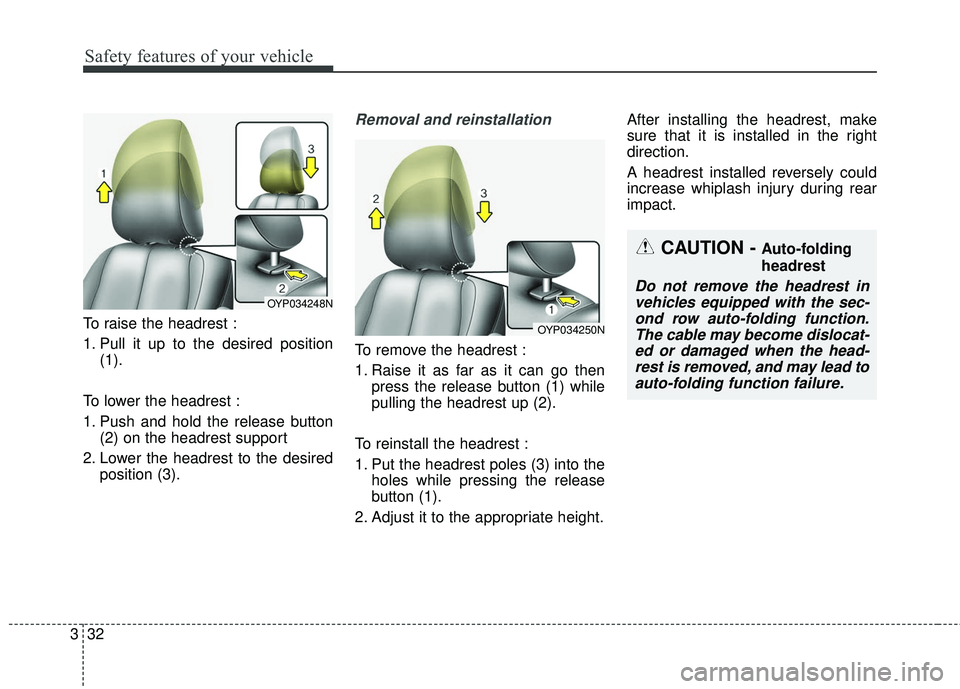
To raise the headrest :
1. Pull it up to the desired position
(1).
To lower the headrest :
1. Push and hold the release button (2) on the headrest support
2. Lower the headrest to the desired position (3).
Removal and reinstallation
To remove the headrest :
1. Raise it as far as it can go thenpress the release button (1) while
pulling the headrest up (2).
To reinstall the headrest :
1. Put the headrest poles (3) into the holes while pressing the release
button (1).
2. Adjust it to the appropriate height. After installing the headrest, make
sure that it is installed in the right
direction.
A headrest installed reversely could
increase whiplash injury during rear
impact.
OYP034248N
OYP034250N
CAUTION - Auto-folding
headrest
Do not remove the headrest in
vehicles equipped with the sec-ond row auto-folding function.The cable may become dislocat-ed or damaged when the head-rest is removed, and may lead toauto-folding function failure.
Page 54 of 586
Safety features of your vehicle
38
3
✽ ✽
NOTICE
If you are not able to pull out the
seat belt from the retractor, firmly
pull the belt out and release it. Then
you will be able to pull the belt out
smoothly.
Height adjustment
You can adjust the height of the shoul-
der belt anchor to one of the 3 posi-
tions for maximum comfort and safety.
The height of the adjusting seat belt
should not be too close to your neck.
The shoulder portion should be
adjusted so that it lies across your
chest and midway over your shoulder
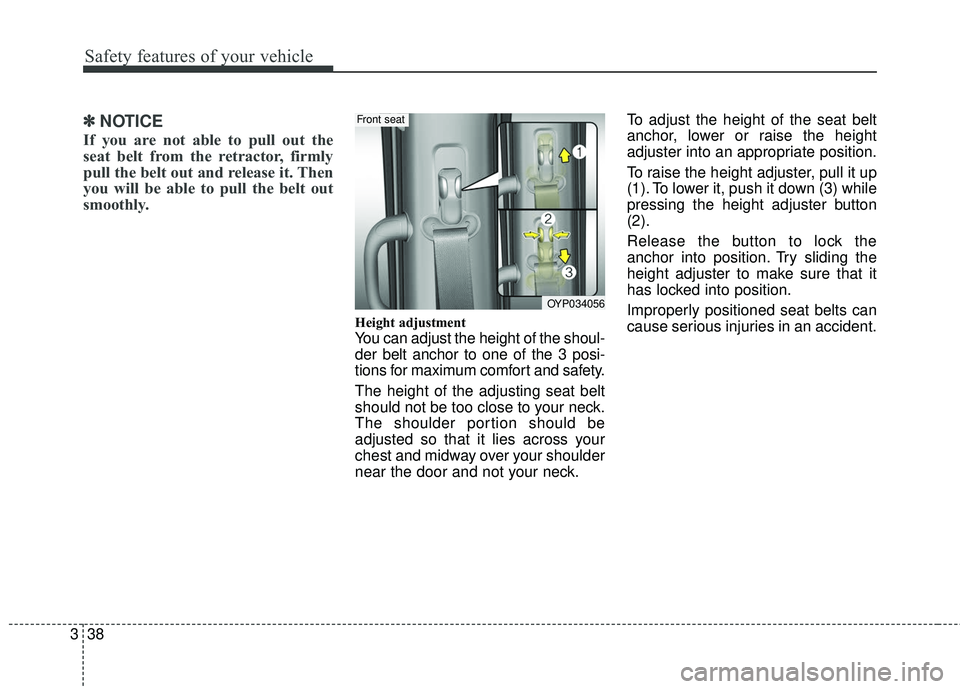
near the door and not your neck. To adjust the height of the seat belt
anchor, lower or raise the height
adjuster into an appropriate position.
To raise the height adjuster, pull it up
(1). To lower it, push it down (3) while
pressing the height adjuster button
(2).
Release the button to lock the
anchor into position. Try sliding the
height adjuster to make sure that it
has locked into position.
Improperly positioned seat belts can
cause serious injuries in an accident.
OYP034056
Front seat
Page 55 of 586
339
Safety features of your vehicle
Seat belts - Front passenger andrear seat 3-point system withcombination locking retractor
To fasten your seat belt :
Combination retractor type seat belts
are installed in the rear seat posi-
tions to help accommodate the
installation of child restraint systems.
Although a combination retractor is
also installed in the front passenger
seat position, it is strongly recom-
mended that children always be
seated in the rear seat. NEVER
place any infant restraint system in
the front seat of the vehicle.
This type of seat belt combines the
features of both an emergency lock-
ing retractor seat belt and an auto-
matic locking retractor seat belt. To
fasten your seat belt, pull it out of the
retractor and insert the metal tab into
the buckle. There will be an audible
"click" when the tab locks into the
buckle. When not securing a child
restraint, the seat belt operates in the
same way as the driver's seat belt
(Emergency Locking Retractor Type). It automatically adjusts to the proper
length only after the lap belt portion
of the seat belt is adjusted manually
so that it fits snugly around your hips.
When the seat belt is fully extended
from the retractor to allow the instal-
lation of a child restraint system, the
seat belt operation changes to allow
the belt to retract, but not to extend
(Automatic Locking Retractor Type).
Refer to “Using a child restraint sys-
tem” in this section.
WARNING- Seat belt
replacement
Replace your seat belts after
being in an accident. Failure to
replace seat belts after an acci-
dent could leave you with dam-
aged seat belts that will not pro-
vide protection in the event of
another collision.
WARNING- Shoulder belt positioning
Verify the shoulder belt anchor
is locked into position at the
appropriate height.
Never position the shoulder belt
across your neck or face.
Page 64 of 586
Safety features of your vehicle
48
3
✽ ✽
NOTICE
Small children are best protected
from injury in an accident when
properly restrained in the rear seat by
a child restraint system that meets the
requirements of the safety standards
of your country. Before buying any
child restraint system, make sure that
it has a label certifying that it meets
safety standards of your country. The
restraint must be appropriate for
your child's height and weight. Check
the label on the child restraint for this
information. Refer to “Child restraint
system” in this chapter.
Larger children
Children who are too large for child
restraint systems should always
occupy the rear seat and use the
available lap/shoulder belts. The lap
portion should be fastened and
snugged on the hips and as low as
possible. Check if the belt fits period-
ically. A child's squirming could put
the belt out of position. Children are
given the most safety in the event of
an accident when they are restrained
by a proper restraint system in the
rear seat. If a larger child (over age
12) must be seated in the front seat,
the child should be securely
restrained by the available lap/shoul-
der belt and the seat should be
placed in the rearmost position.
Children age 12 and under should be
restrained securely in the rear seat.
NEVER place a child age 12 and
under in the front seat. NEVER place
a rear facing child seat in the front
seat of a vehicle. If the shoulder belt portion slightly
touches the child’s neck or face, try
placing the child closer to the center of
the vehicle. If the shoulder belt still
touches their face or neck they need to
be returned to a child restraint system.
Page 68 of 586
Safety features of your vehicle
52
3
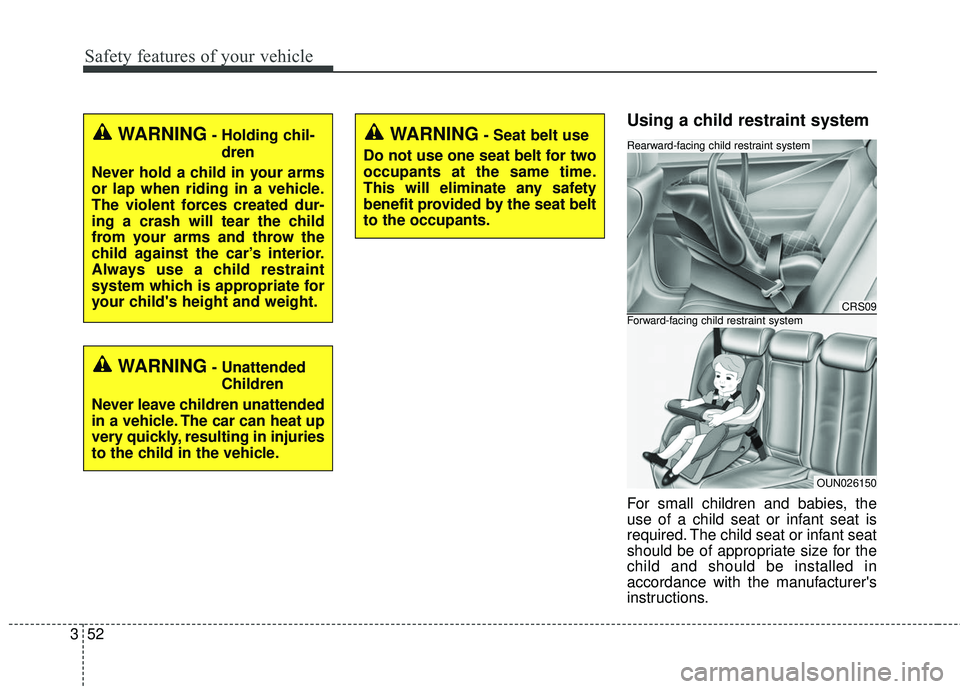
Using a child restraint system
For small children and babies, the
use of a child seat or infant seat is
required. The child seat or infant seat
should be of appropriate size for the
child and should be installed in
accordance with the manufacturer's
instructions.
WARNING- Holding chil-
dren
Never hold a child in your arms
or lap when riding in a vehicle.
The violent forces created dur-
ing a crash will tear the child
from your arms and throw the
child against the car’s interior.
Always use a child restraint
system which is appropriate for
your child's height and weight.
WARNING- Unattended Children
Never leave children unattended
in a vehicle. The car can heat up
very quickly, resulting in injuries
to the child in the vehicle.
WARNING- Seat belt use
Do not use one seat belt for two
occupants at the same time.
This will eliminate any safety
benefit provided by the seat belt
to the occupants.
CRS09
OUN026150
Forward-facing child restraint system
Rearward-facing child restraint system
Page 102 of 586

Adding equipment to or modi-
fying your air bag-equipped
vehicle
If you modify your vehicle by chang-
ing your vehicle's frame, bumper sys-
tem, front end or side sheet metal or
ride height, this may affect the opera-
tion of your vehicle's air bag system.
Air bag warning label
Air bag warning labels, some
required by the Canada Motor
Vehicle Safety Standards (CMVSS),
are attached to the sunvisor to alert
the driver and passengers of poten-
tial risks of the air bag system.
WARNING- Tamperingwith SRS
Do not tamper with or discon-
nect SRS wiring, or other com-
ponents of the SRS system.
Doing so could result in the
accidental inflation of the air
bags or by rendering the SRS
inoperative.
WARNING- Towing Vehicle
Always have the ignition off
when your vehicle is being
towed. The side air bags may
inflate if the vehicle is tilted
such as when being towed
because of the rollover sensors
in the vehicle.
OYP034284N
OYP034047N
386
Safety features of your vehicle
Page 103 of 586

Features of your vehicle
Folding key . . . . . . . . . . . . . . . . . . . . . . . . . . . . . . . . 4-5
• Record your key number . . . . . . . . . . . . . . . . . . . . . . . 4-5
• Key operations . . . . . . . . . . . . . . . . . . . . . . . . . . . . . . . . 4-5
• Transmitter precautions . . . . . . . . . . . . . . . . . . . . . . . . 4-8
• Battery replacement . . . . . . . . . . . . . . . . . . . . . . . . . . . 4-9
• Immobilizer system . . . . . . . . . . . . . . . . . . . . . . . . . . . 4-10
• Limp home (override) procedure . . . . . . . . . . . . . . . 4-12
Smart key . . . . . . . . . . . . . . . . . . . . . . . . . . . . . . . . 4-14
• Record your key number . . . . . . . . . . . . . . . . . . . . . . 4-14
• Smart key function . . . . . . . . . . . . . . . . . . . . . . . . . . . 4-14
• Loss of the smart key . . . . . . . . . . . . . . . . . . . . . . . . . 4-18
• Smart key precautions . . . . . . . . . . . . . . . . . . . . . . . . 4-19
• Battery replacement . . . . . . . . . . . . . . . . . . . . . . . . . . 4-20
• Smart key immobilizer system . . . . . . . . . . . . . . . . . . 4-21
Theft-alarm system . . . . . . . . . . . . . . . . . . . . . . . . 4-22
• Armed stage . . . . . . . . . . . . . . . . . . . . . . . . . . . . . . . . . 4-22
• Theft-alarm stage . . . . . . . . . . . . . . . . . . . . . . . . . . . . 4-23
• Disarmed stage. . . . . . . . . . . . . . . . . . . . . . . . . . . . . . . 4-23
Door locks . . . . . . . . . . . . . . . . . . . . . . . . . . . . . . . . 4-25
• Operating door locks from outside the vehicle . . . . 4-25
• Operating door locks from inside the vehicle . . . . . . 4-27
• Impact sensing door unlock system . . . . . . . . . . . . . . 4-30
• Automatic door lock system . . . . . . . . . . . . . . . . . . . . 4-30
• Child-protector rear door lock. . . . . . . . . . . . . . . . . . 4-30
Tailgate (for manual tailgate) . . . . . . . . . . . . . . . . 4-31
• Opening the tailgate . . . . . . . . . . . . . . . . . . . . . . . . . . 4-31
• Closing the tailgate . . . . . . . . . . . . . . . . . . . . . . . . . . . 4-32
• Emergency tailgate safety release . . . . . . . . . . . . . . . 4-33
Power sliding door and power tailgate. . . . . . . . . 4-34
• Automatic stop and reversal . . . . . . . . . . . . . . . . . . . 4-36
• How to reset the power sliding door and powertailgate . . . . . . . . . . . . . . . . . . . . . . . . . . . . . . . . . . . . \
4-36
• Power door ON/OFF button. . . . . . . . . . . . . . . . . . . . 4-37
• Power sliding door operation . . . . . . . . . . . . . . . . . . . 4-38
• Power tailgate operation . . . . . . . . . . . . . . . . . . . . . . . 4-42
• Power tailgate non-opening conditions . . . . . . . . . . . 4-44
• Power tailgate opening height user setting . . . . . . . . 4-44
• Emergency tailgate safety release . . . . . . . . . . . . . . . 4-45
• Smart Tailgate . . . . . . . . . . . . . . . . . . . . . . . . . . . . . . . 4-46
Windows . . . . . . . . . . . . . . . . . . . . . . . . . . . . . . . . . 4-51
• Power windows . . . . . . . . . . . . . . . . . . . . . . . . . . . . . . 4-52
Hood. . . . . . . . . . . . . . . . . . . . . . . . . . . . . . . . . . . . \
. 4-56
• Opening the hood . . . . . . . . . . . . . . . . . . . . . . . . . . . . 4-56
• Hood open warning . . . . . . . . . . . . . . . . . . . . . . . . . . . 4-56
• Closing the hood . . . . . . . . . . . . . . . . . . . . . . . . . . . . . 4-57
Fuel filler lid . . . . . . . . . . . . . . . . . . . . . . . . . . . . . . 4-58
• Opening the fuel filler lid . . . . . . . . . . . . . . . . . . . . . . 4-58
• Closing the fuel filler lid . . . . . . . . . . . . . . . . . . . . . . . 4-58
• Emergency fuel filler lid release . . . . . . . . . . . . . . . . 4-61
4
Page 146 of 586
Features of your vehicle
44
4
If the power tailgate is operated
while the tailgate is in the partially
closed position (less than degrees),
the tailgate will open fully.
If the power tailgate is operated while the tailgate is in the partially opened
position (less than 9degrees), the
tailgate will stop at approximately
9degree open position.Power tailgate non-opening
conditions
The power tailgate will not open
automatically, but will close under the
following conditions.
When the ignition switch is in the ON
position,
1. Vehicle is moving above 3 km/h (2 mph).
2. The gearshift lever is not in P (Park) for automatic transaxle.
The chime will sound continuously if
you drive over 3 km/h (2 mph) with
the tailgate opened. Stop your vehi-
cle at a safe place as soon as possi-
ble to check if your tailgate is
opened.
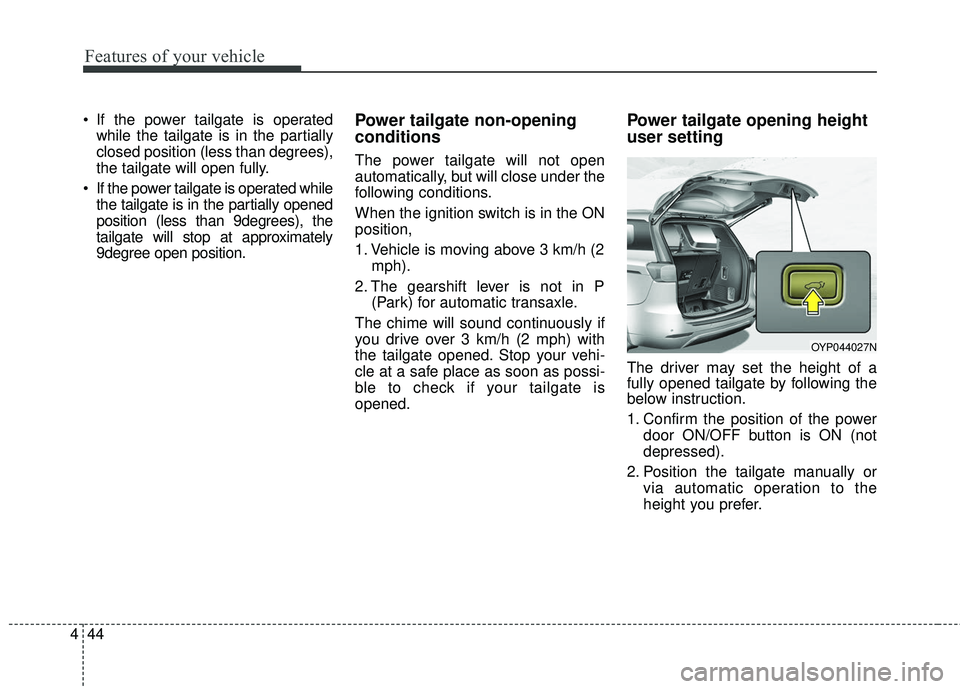
Power tailgate opening height
user setting
The driver may set the height of a
fully opened tailgate by following the
below instruction.
1. Confirm the position of the power door ON/OFF button is ON (not
depressed).
2. Position the tailgate manually or via automatic operation to the
height you prefer.
OYP044027N