2018 KIA SEDONA steering
[x] Cancel search: steeringPage 493 of 586
723
Maintenance
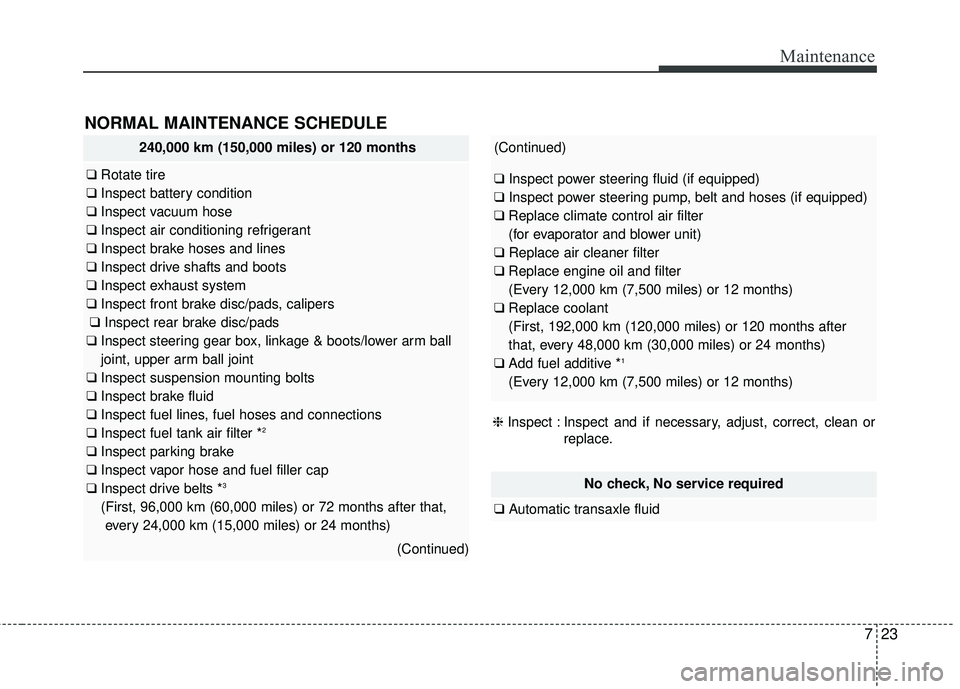
NORMAL MAINTENANCE SCHEDULE
No check, No service required
❑Automatic transaxle fluid
240,000 km (150,000 miles) or 120 months
❑Rotate tire
❑ Inspect battery condition
❑ Inspect vacuum hose
❑ Inspect air conditioning refrigerant
❑ Inspect brake hoses and lines
❑ Inspect drive shafts and boots
❑ Inspect exhaust system
❑ Inspect front brake disc/pads, calipers
❑ Inspect rear brake disc/pads
❑ Inspect steering gear box, linkage & boots/lower arm ball
joint, upper arm ball joint
❑ Inspect suspension mounting bolts
❑ Inspect brake fluid
❑ Inspect fuel lines, fuel hoses and connections
❑ Inspect fuel tank air filter *
2
❑Inspect parking brake
❑ Inspect vapor hose and fuel filler cap
❑ Inspect drive belts *
3
(First, 96,000 km (60,000 miles) or 72 months after that,
every 24,000 km (15,000 miles) or 24 months)
(Continued)
(Continued)
❑ Inspect power steering fluid (if equipped)
❑ Inspect power steering pump, belt and hoses (if equipped)
❑ Replace climate control air filter
(for evaporator and blower unit)
❑ Replace air cleaner filter
❑ Replace engine oil and filter
(Every 12,000 km (7,500 miles) or 12 months)
❑ Replace coolant
(First, 192,000 km (120,000 miles) or 120 months after
that, every 48,000 km (30,000 miles) or 24 months)
❑ Add fuel additive *
1
(Every 12,000 km (7,500 miles) or 12 months)
❈ Inspect : Inspect and if necessary, adjust, correct, clean or
replace.
Page 495 of 586
725
Maintenance
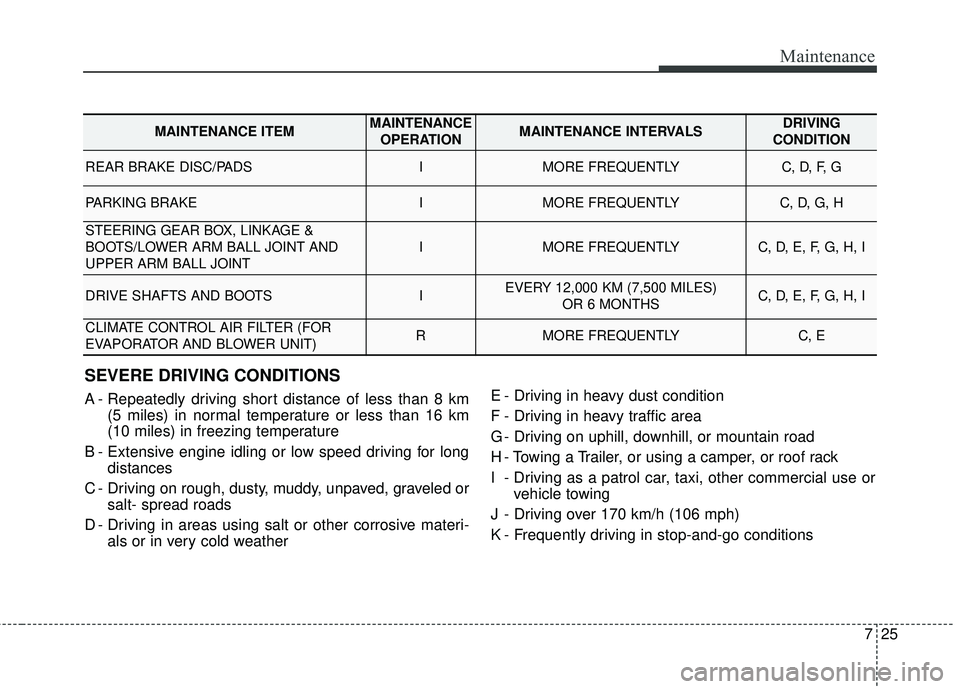
SEVERE DRIVING CONDITIONS
A - Repeatedly driving short distance of less than 8 km(5 miles) in normal temperature or less than 16 km
(10 miles) in freezing temperature
B - Extensive engine idling or low speed driving for long distances
C - Driving on rough, dusty, muddy, unpaved, graveled or salt- spread roads
D - Driving in areas using salt or other corrosive materi- als or in very cold weather E - Driving in heavy dust condition
F - Driving in heavy traffic area
G - Driving on uphill, downhill, or mountain road
H - Towing a Trailer, or using a camper, or roof rack
I - Driving as a patrol car, taxi, other commercial use or
vehicle towing
J - Driving over 170 km/h (106 mph)
K - Frequently driving in stop-and-go conditions
MAINTENANCE ITEMMAINTENANCE OPERATIONMAINTENANCE INTERVALSDRIVING
CONDITION
REAR BRAKE DISC/PADSIMORE FREQUENTLYC, D, F, G
PARKING BRAKEIMORE FREQUENTLYC, D, G, H
STEERING GEAR BOX, LINKAGE &
BOOTS/LOWER ARM BALL JOINT AND
UPPER ARM BALL JOINT
IMORE FREQUENTLYC, D, E, F, G, H, I
DRIVE SHAFTS AND BOOTSIEVERY 12,000 KM (7,500 MILES) OR 6 MONTHSC, D, E, F, G, H, I
CLIMATE CONTROL AIR FILTER (FOR
EVAPORATOR AND BLOWER UNIT)RMORE FREQUENTLYC, E
Page 498 of 586
Maintenance
28
7
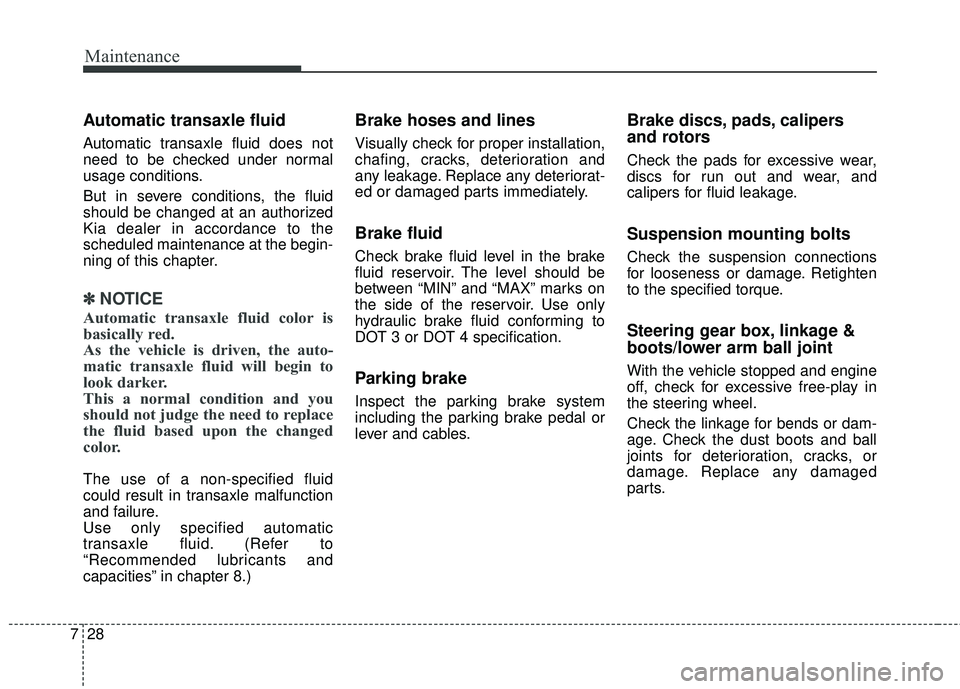
Automatic transaxle fluid
Automatic transaxle fluid does not
need to be checked under normal
usage conditions.
But in severe conditions, the fluid
should be changed at an authorized
Kia dealer in accordance to the
scheduled maintenance at the begin-
ning of this chapter.
✽ ✽
NOTICE
Automatic transaxle fluid color is
basically red.
As the vehicle is driven, the auto-
matic transaxle fluid will begin to
look darker.
This a normal condition and you
should not judge the need to replace
the fluid based upon the changed
color.
The use of a non-specified fluid
could result in transaxle malfunction
and failure.
Use only specified automatic
transaxle fluid. (Refer to
“Recommended lubricants and
capacities” in chapter 8.)
Brake hoses and lines
Visually check for proper installation,
chafing, cracks, deterioration and
any leakage. Replace any deteriorat-
ed or damaged parts immediately.
Brake fluid
Check brake fluid level in the brake
fluid reservoir. The level should be
between “MIN” and “MAX” marks on
the side of the reservoir. Use only
hydraulic brake fluid conforming to
DOT 3 or DOT 4 specification.
Parking brake
Inspect the parking brake system
including the parking brake pedal or
lever and cables.
Brake discs, pads, calipers
and rotors
Check the pads for excessive wear,
discs for run out and wear, and
calipers for fluid leakage.
Suspension mounting bolts
Check the suspension connections
for looseness or damage. Retighten
to the specified torque.
Steering gear box, linkage &
boots/lower arm ball joint
With the vehicle stopped and engine
off, check for excessive free-play in
the steering wheel.
Check the linkage for bends or dam-
age. Check the dust boots and ball
joints for deterioration, cracks, or
damage. Replace any damaged
parts.
Page 499 of 586
729
Maintenance
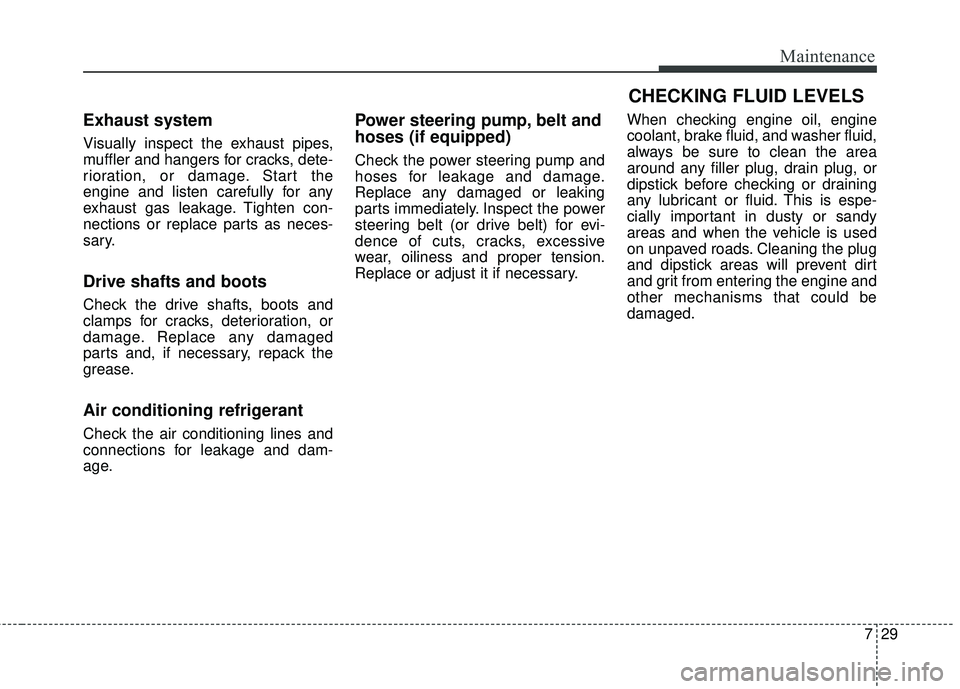
Exhaust system
Visually inspect the exhaust pipes,
muffler and hangers for cracks, dete-
rioration, or damage. Start the
engine and listen carefully for any
exhaust gas leakage. Tighten con-
nections or replace parts as neces-
sary.
Drive shafts and boots
Check the drive shafts, boots and
clamps for cracks, deterioration, or
damage. Replace any damaged
parts and, if necessary, repack the
grease.
Air conditioning refrigerant
Check the air conditioning lines and
connections for leakage and dam-
age.
Power steering pump, belt and
hoses (if equipped)
Check the power steering pump and
hoses for leakage and damage.
Replace any damaged or leaking
parts immediately. Inspect the power
steering belt (or drive belt) for evi-
dence of cuts, cracks, excessive
wear, oiliness and proper tension.
Replace or adjust it if necessary.When checking engine oil, engine
coolant, brake fluid, and washer fluid,
always be sure to clean the area
around any filler plug, drain plug, or
dipstick before checking or draining
any lubricant or fluid. This is espe-
cially important in dusty or sandy
areas and when the vehicle is used
on unpaved roads. Cleaning the plug
and dipstick areas will prevent dirt
and grit from entering the engine and
other mechanisms that could be
damaged.
CHECKING FLUID LEVELS
Page 506 of 586
Maintenance
36
7
POWER STEERING FLUID (IF EQUIPPED)
Checking the power steering
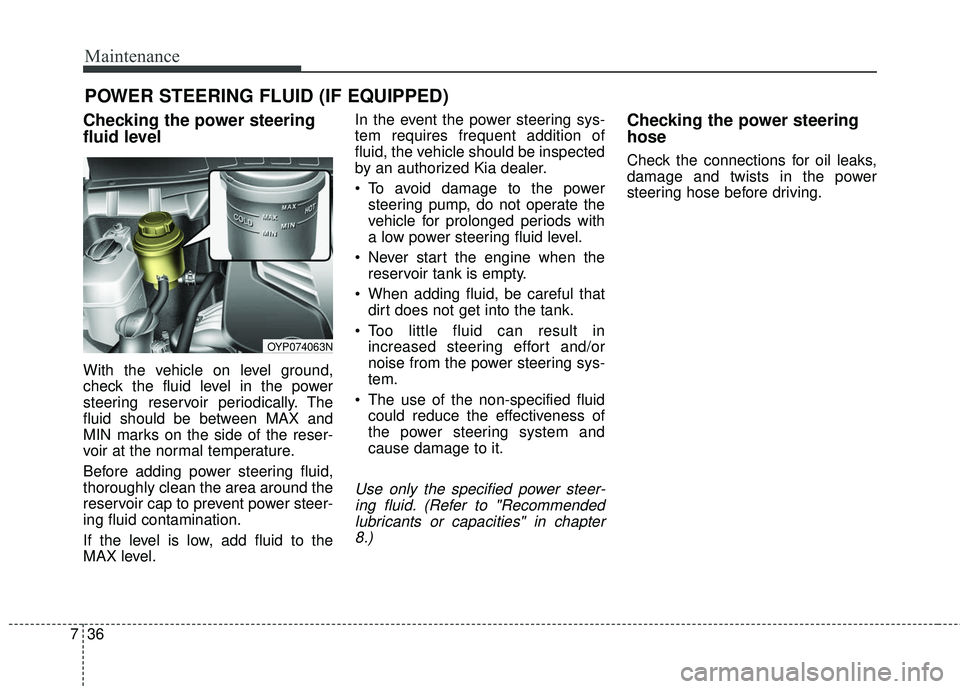
fluid level
With the vehicle on level ground,
check the fluid level in the power
steering reservoir periodically. The
fluid should be between MAX and
MIN marks on the side of the reser-
voir at the normal temperature.
Before adding power steering fluid,
thoroughly clean the area around the
reservoir cap to prevent power steer-
ing fluid contamination.
If the level is low, add fluid to the
MAX level. In the event the power steering sys-
tem requires frequent addition of
fluid, the vehicle should be inspected
by an authorized Kia dealer.
To avoid damage to the power
steering pump, do not operate the
vehicle for prolonged periods with
a low power steering fluid level.
Never start the engine when the reservoir tank is empty.
When adding fluid, be careful that dirt does not get into the tank.
Too little fluid can result in increased steering effort and/or
noise from the power steering sys-
tem.
The use of the non-specified fluid could reduce the effectiveness of
the power steering system and
cause damage to it.
Use only the specified power steer-ing fluid. (Refer to "Recommendedlubricants or capacities" in chapter8.)
Checking the power steering
hose
Check the connections for oil leaks,
damage and twists in the power
steering hose before driving.
OYP074063N
Page 539 of 586

769
Maintenance
Inner fuse panel
Fuse Name Fuse ratingCircuit Protected
ECU 10A PCM, Injector Drive Box, Smart Key Control Module/Immobilizer Module
MODULE4 7.5AHead Lamp Leveling Device Actuator LH/RH, Multipurpose Check Connector, Bezel Switch, MTS
Module, Electro Chromic, A/V & Navigation Head Unit, A/C Control Module, Heater Control Module,
Passenger Ventilation Seat Control Module, Driver IMS Control Module, Rear Seat Heater Control
Module, Auto Head Leveling Device Module, ATM Shift Lever ILL.
MODULE3 10A LDWS Module, Stop Lamp, Front Parking Assist Sensor LH/RH, Front Parking Assist Sensor LH/RH
(CENTER), Rear Parking Assist Buzzer, Rear Parking Assist Sensor LH/RH, Rear Parking Assist
Sensor LH/RH (CENTER), Blind Spot Detection Radar LH/RH
MODULE5 7.5A Rear Seat Heater Control Module, AC Inverter Unit, Heater Control Module, Passenger Ventilation Seat
Control Module, Portable Lamp, Around View Unit
MODULE6 7.5A BCM, Smart Key Control Module
WIPER RR 15A Rear Wiper Motor, Wiper RR Relay
CLUSTER 7.5A Instrument Cluster
A/CON1 7.5A A/C Control Module, Ionizer, Rear A/C Control Switch, PCB Block (Blower Relay, Blower RR Relay)
MEMORY2 10A Data Link Connector, Instrument Cluster, Digital Clock, A/C Control Module, BCM, Power Sliding Door
Module, Driver Door Module, Passenger Safety Power Window Switch, Driver IMS Control Module
SMART KEY3 10A Start/Stop Button Switch, Immobilizer Module
POWER OUTLET2 20A Console Power Outlet A/BAG IND 7.5A Instrument Cluster, Digital Clock, A/C Control Module(Auto)
WASHER 15A Multifunction Switch, BCM
HEATED STEERING 15A Clock Spring (Steering Wheel Switch) MEMORY1 10A Clock Spring (Steering Wheel Switch)
SMART KEY1 25A Smart Key Control Module
POWER OUTLET3 20A Rear Power Outlet MODULE2 7.5A BCM, Driver Door Module, Passenger Door Module
Page 543 of 586

773
Maintenance
Fuse Name Fuse ratingCircuit Protected
BLOWER RR 40A Blower RR Relay BLOWER 40A Blower Relay
SENSOR (B+) 10A Battery Sensor
B/ALARM HORN 10A B/Alarm Horn Relay FUEL LID 10A Fuel Lid Relay DEICER 15A Deicer Relay
FUEL PUMP 15A Fuel Pump Relay HORN 15A Horn Relay
WIPER 25A Front Wiper (Low) Relay
ECU3 30A Engine Control Relay, Fuse - ECU1
REAR HEATED 40A Rear Heated Relay TCU 15A Transmission Range Switch
MDPS 10A MDPS Unit (Rack)
CRUISE 10A Smart Cruise Control Radar
B/UP LAMP 10A Audio, A/V & Navigation Head Unit, Rear Combination Lamp (IN) LH/RH, Electro Chromic \
Mirror A/CON 7.5A Rear A/C Control Switch, A/C Control Module
ECU1 15A PCM ABS3 7.5A ESC Module, Steering Angle Sensor
ECU2 10A Injector Drive Box
SENSOR1 15A Oxygen Sensor #1/#2/#3/#4, PCM, E/R Junction Box (Cooling Fan1 Relay)
SENSOR2 10A PCM, Canister Close Valve, Variable Intake Solenoid Valve #1/#2, Purge Control Solenoid Valve, Oil Control
Valve #1/#2 (Intake), Oil Control Valve #1/#2 (Exhaust)
SENSOR3 10A PCM, Fuel Pump Relay IGN COIL 20A Ignition Coil #1~#6, Condensor #1/#2
Page 562 of 586
Maintenance
92
7
Taking care of leather seats
Vacuum the seat periodically to
remove dust and sand on the seat.
It will prevent abrasion or damage of
the leather and maintain its quality.
Wipe the natural leather seat cover often with dry or soft cloth.
Sufficient use of a leather protec- tive may prevent abrasion of the
cover and helps maintain the color.
Be sure to read the instructions
and consult a specialist when
using leather coating or protective
agents.
Leather with bright colors(beige, cream beige) is easily contaminat-
ed and clear in appearance. Clean
the seats frequently.
Avoid wiping with wet cloth. It may cause the surface to crack.
Cleaning the leather seats
Remove all contaminations instant-ly. Refer to instructions below for
removal of each contaminant.
Cosmetic products(sunscreen, foundation, etc.)
- Apply cleansing cream on a clothand wipe the contaminated point.
Wipe off the cream with a wet
cloth and remove water with a dry
cloth.
Beverages(coffee, soft drink, etc.) - Apply a small amount of neutraldetergent and wipe until contami-
nations do not smear.
Oil - Remove oil instantly withabsorbable cloth and wipe with
stain remover for natural leather
only.
Chewing gum - Harden the gum with ice andremove gradually.CAUTION - Electrical
components
Never allow water or other liq-uids to come in contact withelectrical/electronic compo-nents inside the vehicle as thismay damage them.
CAUTION - Leather
When cleaning leather products(steering wheel, seats etc.), useneutral detergents or low alco-hol content solutions. If you usehigh alcohol content solutionsor acid/alkaline detergents, thecolor of the leather may fade orthe surface may get stripped off.