2018 KIA SEDONA audio
[x] Cancel search: audioPage 24 of 54

AUDIO SYSTEMS
SEDONA FEATURES & FUNCTIONS GUIDE22*IF EQUIPPED
Your vehicle’s audio system may differ from that in the illustration. For further UVO eServices System operations, refer to the Car Multimedia System User's Manual. For other audio system information, refer to pages 19 -21.
CD IN
Press to Power ON/OFF Rotate to adjust Volume
Press to enter PHONE mode
Press to select FM/AM/SiriusXM® modes
Press to enter MEDIA mode
Press to display SE TUP/Settings mode Press to select UVO eServices mode
Press to display the Map screen for the current position/ Voice mode
Press to display the Destination menu screen
Press to display information mode
Press to eject CD
Press to select previous/next Radio/SiriusXM® stations/Media tracks/ files Press and hold to move quickly through stations/tracks/files
Insert CD
Indicates a CD is inserted
Rotate to change Radio/SiriusXM® Station/Media tracks/ files
UVO eServices with Premium Navigation Videos To view a video on your mobile device, snap this QR Code or visit the listed website
Refer to page 2 for more information
QR CODE
www.youtube.com/KiaFeatureVideos
Sound Settings
To adjust the sound settings (Position, Tone, Priority, Advanced, Default, Beep) from any audio mode:
1 Press the SETUP key on the audio control unit or the on-screen MENU button, when in MEDIA mode
2 Select the on-screen SOUND button, or SOUND SET TINGS
3 Select the menu item (Position, Tone, Advanced, Default)
4 Use the onscreen buttons to adjust settings
5 Press the return button to save settings
•When using the voice command feature, wait for the system to BEEP before speaking the command •At any time, you can interrupt UVO eServices System Command Feedback by pressing the TALK button •Prolonged use of the UVO eServices system in ACC mode may drain the vehicle’s battery •A warning screen may appear periodically to remind users that the navigation system should be operated when the engine is running to prevent battery discharge
QUICK TIPS
UVO eServices with Premium Navigation*
– FM/AM/SiriusXM®/Media (CD, USB, iPod®, My Music, Aux, Bluetooth® Au d io)
REMINDER: To help minimize driver distraction, some audio system functionalities have been modified while the vehicle is in Drive, Reverse or moved out of Park
Page 25 of 54

23ALWAYS CHECK THE OWNER’S MANUAL FOR COMPLETE OPER ATING INFORMATION AND SAFET Y WARNINGS *IF EQUIPPED
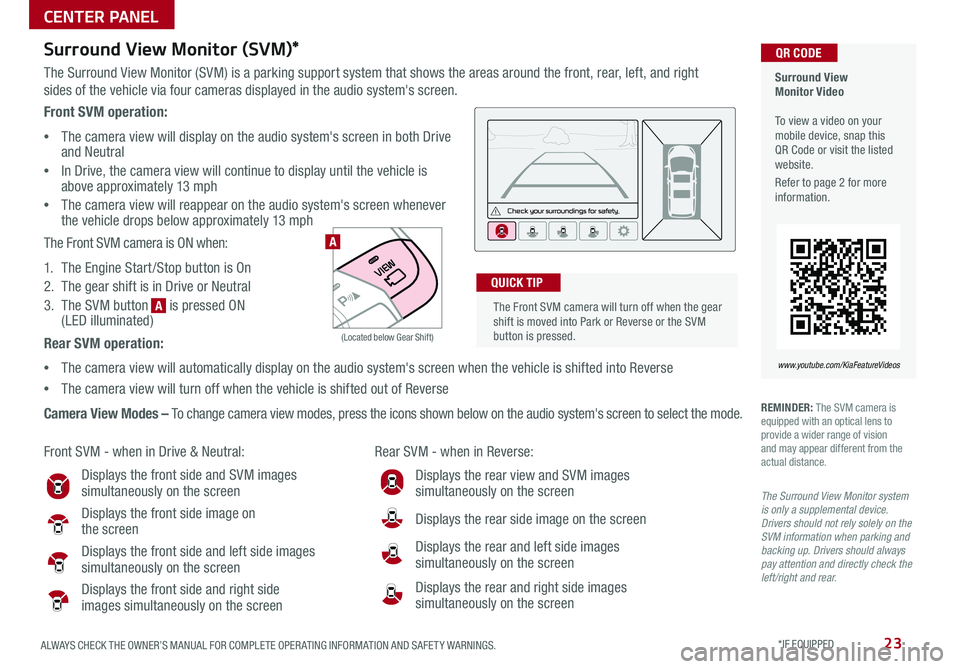
Surround View Monitor (SVM)*
The Surround View Monitor (SVM) is a parking support system that shows the areas around the front, rear, left, and right
sides of the vehicle via four cameras displayed in the audio system's screen
Surround View Monitor Video To view a video on your mobile device, snap this QR Code or visit the listed website
Refer to page 2 for more information
QR CODE
www.youtube.com/KiaFeatureVideos
Front SVM - when in Drive & Neutral: Rear SVM - when in Reverse:
Displays the front side and SVM images simultaneously on the screen
Displays the front side image on the screen
Displays the front side and left side images
simultaneously on the screen
Displays the front side and right side images simultaneously on the screen
Displays the rear view and SVM images simultaneously on the screen
Displays the rear side image on the screen
Displays the rear and left side images simultaneously on the screen
Displays the rear and right side images simultaneously on the screen
REMINDER: The SVM camera is equipped with an optical lens to provide a wider range of vision and may appear different from the actual distance
The Surround View Monitor system is only a supplemental device. Drivers should not rely solely on the SVM information when parking and backing up. Drivers should always pay attention and directly check the left/right and rear.
Front SVM operation:
•The camera view will display on the audio system's screen in both Drive and Neutral
•In Drive, the camera view will continue to display until the vehicle is above approximately 13 mph
•The camera view will reappear on the audio system's screen whenever the vehicle drops below approximately 13 mph
The Front SVM camera is ON when:
1 The Engine Start /Stop button is On
2 The gear shift is in Drive or Neutral
3 The SVM button is pressed ON (LED illuminated)
Rear SVM operation:
•The camera view will automatically display on the audio system's screen when the vehicle is shifted into Reverse
•The camera view will turn off when the vehicle is shifted out of Reverse
Camera View Modes – To change camera view modes, press the icons shown below on the audio system's screen to select the mode
The Front SVM camera will turn off when the gear shift is moved into Park or Reverse or the SVM button is pressed
QUICK TIP
A
A
(Located below Gear Shift)
CENTER PANEL
Page 29 of 54

27ALWAYS CHECK THE OWNER’S MANUAL FOR COMPLETE OPER ATING INFORMATION AND SAFET Y WARNINGS *IF EQUIPPED
Standard Audio System* Clock Setup:
Press the H button to advance the time by one hour Press the M button to
advance the time by one minute
UVO eServices System/ UVO eServices with Premium Navigation
System* Clock Setup:
Press the SETUP key, then the CLOCK button to display the Clock and Date
setting screen Then use the on-screen buttons to adjust time and date
REMINDER: The Center Panel Digital Clock and Navigation System Clock are not synchronized and may differ slightly
AB
(Clock /buttons located on Center Panel)
Aux/USB/iPod® Ports, AC Inverter*
and Power Outlets
AUX/USB/iPod® ports A - Use the AUX port to connect audio
devices and the USB port to connect USB audio devices, smartphones
and iPod® devices
AC Inverter* B - 115V/100 watt power inverters are located in the
back of the center console and in the luggage zone* (See page 8 for
ON/OFF button information)
USB chargers* are located in the center panel and in the back of the
center console
Power outlets are located on the center panel, in front of the gear
Press and hold both for more than 3 seconds to switch from 12- to 24-hour formats
QUICK TIP
The power outlets are inactive when the Engine Start /Stop* button is OFF
QUICK TIP
REMINDERS:
• Using the power outlets (accessory plugs) for prolonged periods of time with the ENGINE START/STOP button in the ACC position (Engine OFF ) may cause the battery to discharge
• Use manufacturer cables only that came with your device Third party cables may cause damage to device
For more information on the Aux/USB/iPod® Port, AC Inverter* and Power Outlets, refer to the Owner's Manual.
Digital Clock*
• Press the RETURN button on the navigation screen to ensure changes are saved
• When needed, Daylight Savings must be enabled in the Clock Settings screen
• To access manual date and time setting, turn GPS time OFF in the Clock Settings (UVO eServices with Premium Navigation System*)
QUICK TIPS
CENTER PANEL
Page 42 of 54

SEDONA FEATURES & FUNCTIONS GUIDE40*IF EQUIPPED
(Navigation screen display shown)
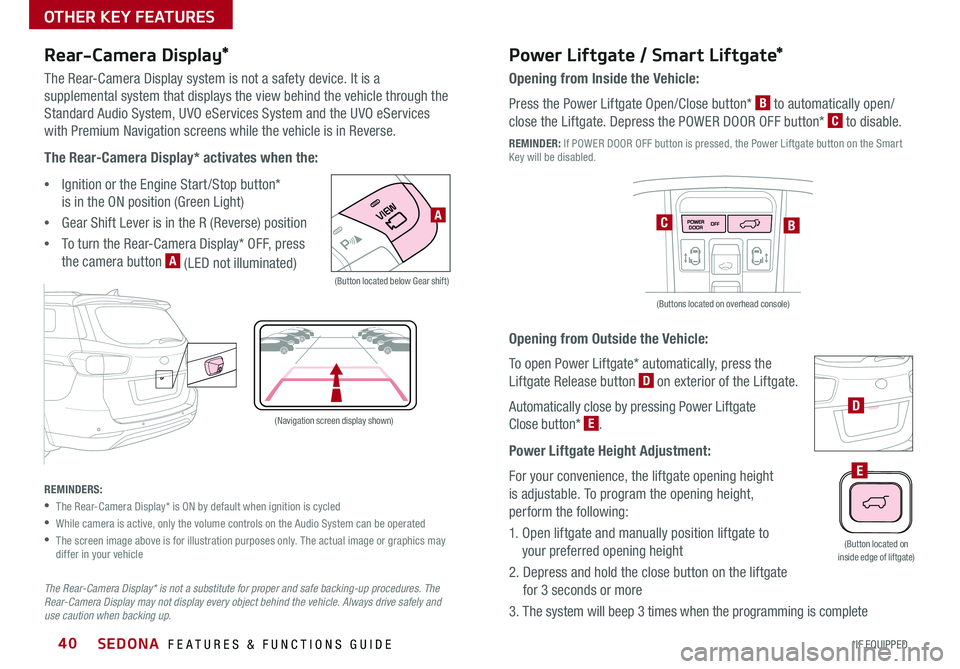
Rear-Camera Display*
The Rear-Camera Display system is not a safety device It is a
supplemental system that displays the view behind the vehicle through the
Standard Audio System, UVO eServices System and the UVO eServices
with Premium Navigation screens while the vehicle is in Reverse
The Rear-Camera Display* activates when the:
•Ignition or the Engine Start /Stop button*
is in the ON position (Green Light)
•Gear Shift Lever is in the R (Reverse) position
•To turn the Rear-Camera Display* OFF, press
the camera button A (LED not illuminated)
(Button located below Gear shift)
A
REMINDERS:
•The Rear-Camera Display* is ON by default when ignition is cycled
•While camera is active, only the volume controls on the Audio System can be operated
•
The screen image above is for illustration purposes only The actual image or graphics may differ in your vehicle
The Rear-Camera Display* is not a substitute for proper and safe backing-up procedures. The Rear-Camera Display may not display every object behind the vehicle. Always drive safely and use caution when backing up.
P
R
N
DSHIFTLOCK
RELEASE
Power Liftgate / Smart Liftgate*
Opening from Inside the Vehicle:
Press the Power Liftgate Open/Close button* B to automatically open/
close the Liftgate Depress the POWER DOOR OFF button* C to disable
REMINDER: If POWER DOOR OFF button is pressed, the Power Liftgate button on the Smart Key will be disabled
Opening from Outside the Vehicle:
To open Power Liftgate* automatically, press the
Liftgate Release button D on exterior of the Liftgate
Automatically close by pressing Power Liftgate
Close button* E
Power Liftgate Height Adjustment:
For your convenience, the liftgate opening height
is adjustable To program the opening height,
perform the following:
1 Open liftgate and manually position liftgate to
your preferred opening height
2 Depress and hold the close button on the liftgate
for 3 seconds or more
3 The system will beep 3 times when the programming is complete
E
D
(Button located on inside edge of liftgate)
FRONT
REARFRONTREARFRONTREARFRONT
REAR
REAR
REAR
BC
(Buttons located on overhead console)
OTHER KEY FEATURES
Page 52 of 54

SEDONA
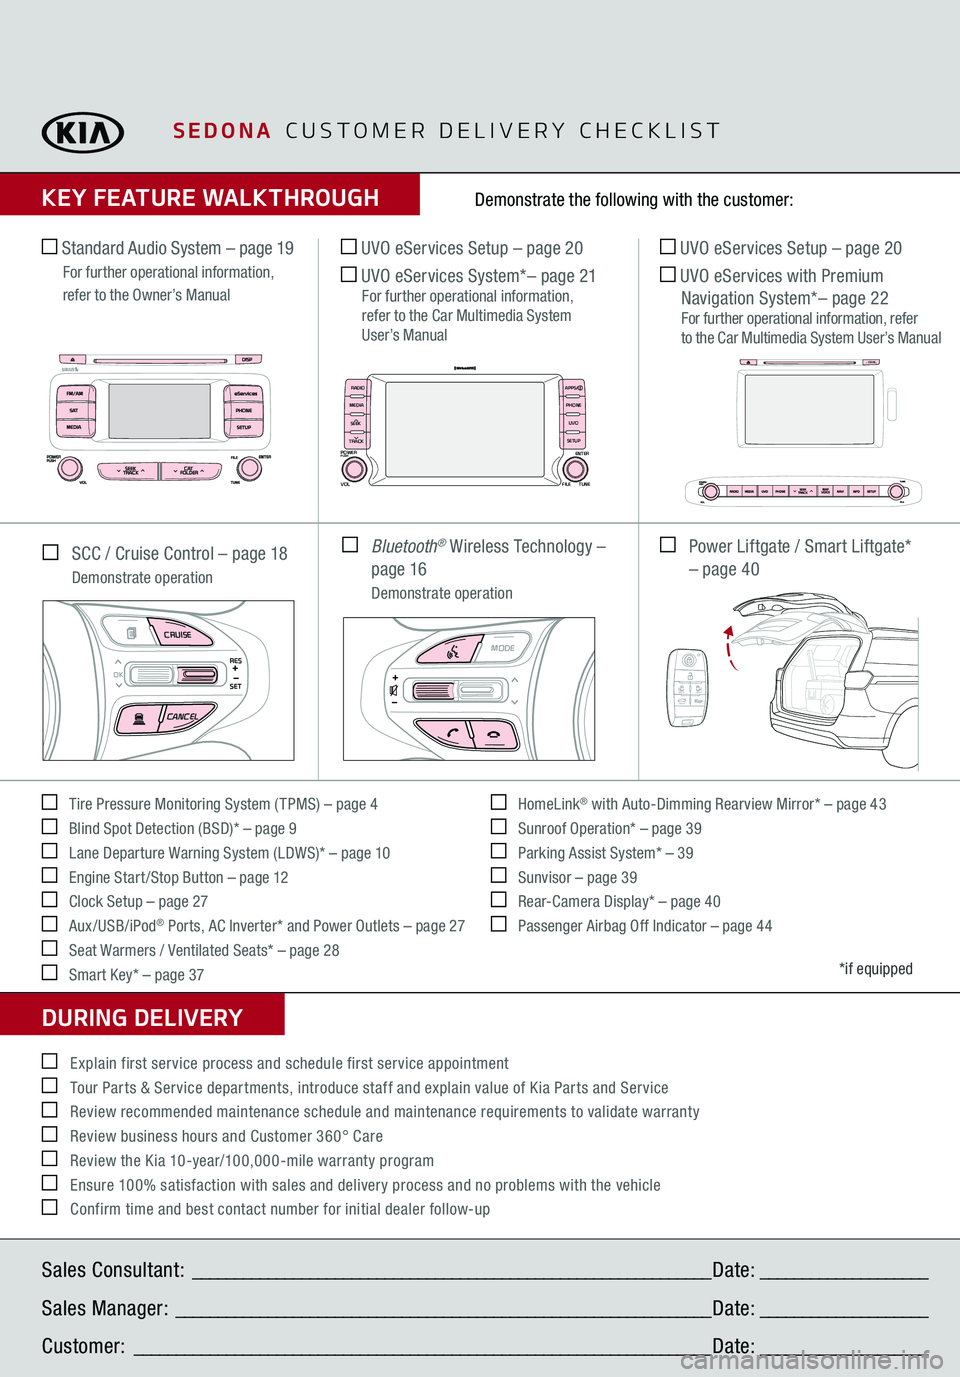
CUSTOMER DELIVERY CHECKLIST
KEY FEATURE WALKTHROUGHDURING DELIVERY Tire Pressure Monitoring System ( TPMS) – page 4 Blind Spot Detection (BSD)* – page 9 Lane Departure Warning System (LDWS)* – page 10 Engine Start /Stop Button – page 12 Clock Setup – page 27 Aux/USB/iPod
® Ports, AC Inverter* and Power Outlets – page 27
Seat Warmers / Ventilated Seats* – page 28 Smart Key* – page 37
HomeLink
® with Auto-Dimming Rearview Mirror* – page 43
Sunroof Operation* – page 39 Parking Assist System* – 39 Sunvisor – page 39 Rear-Camera Display* – page 40 Passenger Airbag Off Indicator – page 44
Demonstrate the following with the customer:
*if equipped
Explain first service process and schedule first service appointment Tour Parts & Service departments, introduce staff and explain value of Kia Parts and Service Review recommended maintenance schedule and maintenance requirements to validate warranty Review business hours and Customer 360° Care Review the Kia 10-year/100,000-mile warranty program Ensure 100% satisfaction with sales and delivery process and no problems with the vehicle Confirm time and best contact number for initial dealer follow-up SCC / Cruise Control – page 18
Demonstrate operation Standard Audio System – page 19
For further operational information, refer to the Owner’s Manual
UVO eServices Setup – page 20 UVO eServices System
*– page
21
For further operational information, refer to the Car Multimedia System User’s Manual
UVO eServices Setup – page 20 UVO eServices with Premium Navigation System*– page 22
For further operational information, refer to the Car Multimedia System User’s Manual
Bluetooth
® Wireless Technology –
page 16
Demonstrate operation
Power Liftgate / Smart Liftgate*
– page 40
MODE
CRUISECANCEL
RES
OKSET
MODE
CRUISECANCEL
RES
OKSET
MODE
CRUISECANCEL
RES
OKSET
MODE
CRUISECANCEL
RES
OKSET
MODE
CRUISECANCEL
RES
OKSET
MODE
CRUISECANCEL
RES
OKSET
MODE
CRUISECANCEL
RES
OKSET
MODE
CRUISECANCEL
RES
OKSET
Sales Consultant:
______________________________________________________________
Date:
____________________
Sales Manager:
________________________________________________________________
Date:
____________________
Customer:
_____________________________________________________________________
Date:
____________________
CD IN
APPS
RADIO
MEDIA PHONE
SEEK UVO
TRACK SETUP
POWERPUSHVOL
FILEENTER
TUNE
vv
HOLD HOLDHOLD