2018 KIA RIO instrument cluster
[x] Cancel search: instrument clusterPage 16 of 490

Your vehicle at a glance
62
INSTRUMENT PANEL OVERVIEW
OSC017004N
1. Instrument cluster.............................4-53
2. Horn .................................................4-48
3. Driver’s front air bag .........................3-44
4. Light control/Turn signals .................4-88
5. Wiper/Washer ...................................4-93
6. Ignition switch or ENGINE START/STOP button......6-6, 6-8
7. Hazard warning flasher switch ................7-2
8. Audio ..................................................5-7
9. Central door lock switch ...................4-19
10. Climate control system .....4-104, 4-114
11. Aux, USB port ..................................5-3
12. Shift lever ..............................6-15, 6-18
13. Parking brake lever ........................6-25
14. Passenger’s front air bag ...............3-44
15. Power outlet .................................4-133
16. Glove box .....................................4-128
17. Steering wheel audio control ............. 5-10
18. Seat warmer .................................4-132
19. Heated steering wheel switch ........4-49
20. Sport mode system ........................6-53
21. USB charger.................................4-134
22. Center console storage …………4-128
Page 74 of 490
. . . . . . . . . . . . . . . . . . . . . . . . . 4-46
Steering wheel . . . . . . . . . . . . . . . . . . . . . . . . . . . . . 4-47
. . . . . . . . . . . . . . . . . . 4-47
. . . . . . . . . . . . . . . . . . . . . 4-48
. . . . . . . . . . . . . . . . . . . . . . . . . . . . . . . . . . . . \
. . . 4-48
. . . . . . . . . . . . . . . . . . . . . . . . . 4-49
Mirrors . . . . . . . . . . . . . . . . . . . . . . . . . . . . . . . . . . 4-50\
. . . . . . . . . . . . . . . . . . . . . . . . 4-50
. . . . . . . . . . . . . . . . . . . . . . . 4-50
Instrument cluster . . . . . . . . . . . . . . . . . . . . . . . . . 4-53
. . . . . . . . . . . . . . . . . . . . . 4-54
. . . . . . . . . . . . . . . . . . . . . . . . . . 4-54
. . . . . . . . . . . . . . . . . . . . . . . . . . . . . . . . . . . . \
. 4-55
. . . . . . . . . . . . . . . . . . . . . . . 4-58
LCD windows . . . . . . . . . . . . . . . . . . . . . . . . . . . . . 4-60
. . . . . . . . . . . . . . . . . . . . . . . . . . . . . . . . . . . 4-\
60
. . . . . . . . . . . . . . . . 4-65
. . . . . . . . . . . . . . . . . . . . . . . . . . . . . . . . 4-66
. . . . . . . . . . 4-66
Warning and indicator lights . . . . . . . . . . . . . . . . 4-74
. . . . . . . . . . . . . . . . . . . . . . . . . . . . . . . 4-74
Rearview camera . . . . . . . . . . . . . . . . . . . . . . . . . . 4-86
Lighting . . . . . . . . . . . . . . . . . . . . . . . . . . . . . . . . . . 4-87\
. . . . . . . . . . . . . . . . . . . . . . 4-87
. . . . . . . . . . . . . . . . . . . . 4-87
. . . . . . . . . . . . . . . . . . . . . . . . . 4-88
. . . . . . . . . . . . . . . . . . . . . . . . . . . . . . 4-88
. . . . . . . . . . . . 4-91
. . . . . . . . . . . . . . . . . . . . . . . . . . . . . . . 4-92
Wipers and washers . . . . . . . . . . . . . . . . . . . . . . . . 4-93
. . . . . . . . . . . . . . . . . . . . . . . . . . . . 4-94
. . . . . . . . . . . . . . . . . . . . 4-95
. . . 4-96
Interior light . . . . . . . . . . . . . . . . . . . . . . . . . . . . . . 4-98
. . . . . . . . . . . . . . . . . . . . 4-98
. . . . . . . . . . . . . . . . . . . . . . . . . . . . . . . . . . . 4-\
98
. . . . . . . . . . . . . . . . . . . . . . . . . . . . . . . . . . 4-99\
. . . . . . . . . . . . . . . . . . . . . . . . . 4-101
. . . . . . . . . . . . . . . . . . . . . . . . . . . . . 4-101
. . . . . . . . . . . . . . . . . . . . . . . . . . 4-102
Defroster . . . . . . . . . . . . . . . . . . . . . . . . . . . . . . . . 4-103
. . . . . . . . . . . . . . . . . . . . . . . 4-103
4
Page 125 of 490

453
Features of your vehicle
INSTRUMENT CLUSTER
1. Tachometer
2. Speedometer
3. Engine coolant temperature gauge
4. Fuel gauge
5. Warning and indicator lights
6. LCD display
OSC047100C/OSC047101C
■ ■Type A
❈The actual cluster and contents of the
LCD display in the vehicle may differ from
the illustration.
■ ■ Type B
Page 126 of 490
Features of your vehicle
54
4
Instrument Cluster Control
Adjusting Instrument Cluster
Illumination
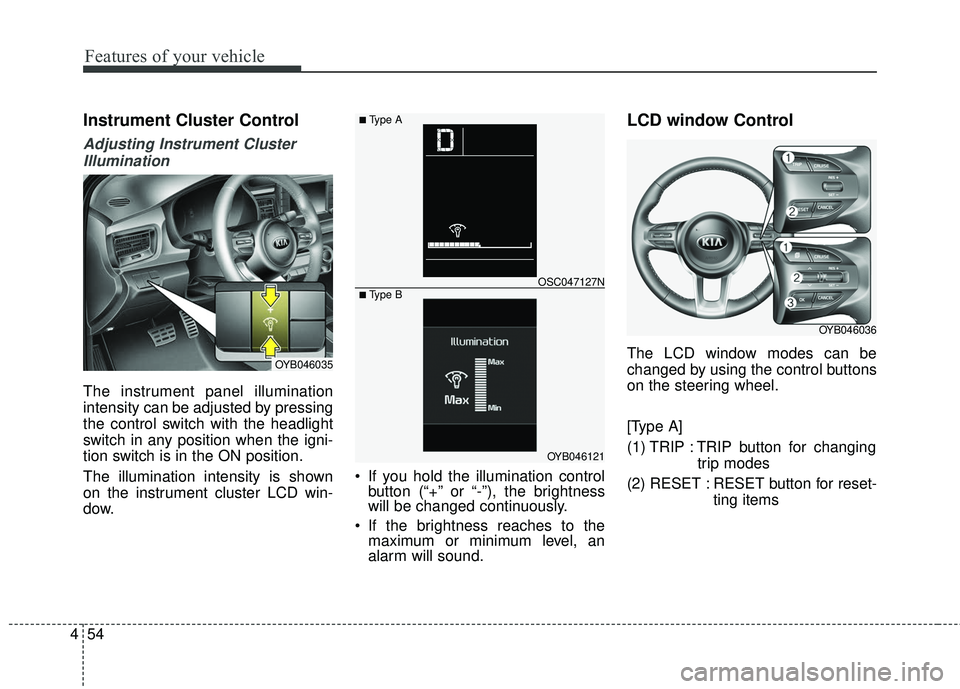
The instrument panel illumination
intensity can be adjusted by pressing
the control switch with the headlight
switch in any position when the igni-
tion switch is in the ON position.
The illumination intensity is shown
on the instrument cluster LCD win-
dow. If you hold the illumination control
button (“+” or “-”), the brightness
will be changed continuously.
If the brightness reaches to the maximum or minimum level, an
alarm will sound.
LCD window Control
The LCD window modes can be
changed by using the control buttons
on the steering wheel.
[Type A]
(1) TRIP : TRIP button for changing
trip modes
(2) RESET : RESET button for reset- ting itemsOYB046035
OYB046121
OSC047127N
■ Type A
■ Type B
OYB046036
Page 141 of 490
469
Features of your vehicle
Other Features
Fuel Economy Auto Reset
- Off : The average fuel economy willnot reset automatically whenever
refueling.
- After Ignition : The average fuel economy will reset automatically
whenever it has passed 4 hours
after turning OFF the engine.
- After Refueling : The average fuel economy will reset automatically
when refueling.
Fuel Economy Unit To select the fuel economy unit.
(UK gallon ↔ US gallon)
Temperature Unit To select the temperature unit.
(°C,°F)
Tire Pressure Unit (if equipped) :
Choose the tire pressure unit. (psi,
kPa, bar) Language
Choose the language
Reset
You can reset the menus in the User
Settings Mode. All menus in the User
Settings Mode are initialized, except
language and service interval.Warning messages
Warning messages appear on the
LCD to warn the driver. It is located in
the center of the instrument cluster.
The warning message may appear
differently depending on the type of
instrument cluster and some may not
show the warning message at all.
The warning message is shown in
either symbol, symbol and text, or
text type only. You can choose the
preferred language (for Type B only)
by selecting the User setting menu in
LCD mode.
Page 267 of 490
619
Driving your vehicle
For smooth operation, depress thebrake pedal when shifting from N(Neutral) to a forward or reversegear.When stopped on an upgrade, do not
hold the vehicle with engine power.
Use the service brake or the parking
brake.
Transaxle ranges
The indicator light in the instrument
cluster displays the shift lever posi-
tion when the ignition switch is in the
ON position.
P (Park)
Always come to a complete stop
before shifting into P (Park). This
position locks the transaxle and pre-
vents the front wheels from rotating.
Shifting into P (Park) while the vehi-
cle is in motion will cause the drive
wheels to lock which will cause you
to lose control of the vehicle. R (Reverse)
Use this position to drive the vehicle
backward.
N (Neutral)
The wheels and transaxle are not
engaged. The vehicle will roll freely
even on the slightest incline unless
the parking brake or service brakes
are applied.
CAUTION - Transaxle
To avoid damage to your
transaxle, do not accelerate theengine in R (Reverse) or any for-ward gear position with thebrakes on. The transaxle may bedamaged if you shift into P(Park) while the vehicle is inmotion.
WARNING- Automatic
Transaxle
Before leaving the driver's seat,
always make sure the shift lever
is engaged in P (Park), set the
parking brake fully and shut the
engine off. Unexpected and
sudden vehicle movement may
occur if these precautions are
not followed.
CAUTION - Shifting
Always come to a complete stop before shifting into or out of R(Reverse); you may damage thetransaxle if you shift into R(Reverse) while the vehicle is inmotion, except when “Rockingthe Vehicle” explained in thissection.
Page 282 of 490
Driving your vehicle
34
6
Vehicle stability management
(VSM)
This system provides further
enhancements to vehicle stability
and steering responses when a vehi-
cle is driving on a slippery road or a
vehicle detected changes in coeffi-
cient of friction between right wheels
and left wheels when braking.
VSM operation
When the VSM is in operation, ESC
indicator light ( ) blinks.
When the vehicle stability manage-
ment is operating properly, you can
feel a slight pulsation in the vehicle
and/or abnormal steering responses
(EPS). This is only the effect of brake
and EPS control and indicates noth-
ing unusual. The VSM does not operate when:
Driving on bank roads such as gra-
dient or incline
Driving rearward
ESC OFF indicator light ( ) remains on the instrument cluster
EPS indicator light remains on the instrument cluster
VSM operation off
If you press the ESC OFF button to
turn off the ESC, the VSM will also
cancel and the ESC OFF indicator
light ( ) illuminates.
To turn on the VSM, press the button
again. The ESC OFF indicator light
goes out.
Malfunction indicator
The VSM can be deactivated even if
you don’t cancel the VSM operation
by pressing the ESC OFF button. It
indicates that a malfunction has
been detected somewhere in the
Electric Power Steering system or
VSM system. If the ESC indicator
light ( ) or EPS warning light
remains on, take your vehicle to an
authorized Kia dealer and have the
system checked.
The VSM is designed to functionabove approximately 15 km/h (9
mph) on curves.
Page 286 of 490
Driving your vehicle
38
6
The warning light illumi-
nates on the LCD display,
when you cancel the AEB
system. It illuminates even
with the ESC (Electronic Stability
Control) state 2 OFF. The driver can
monitor the AEB ON/OFF status on
the LCD display. When the warning
light remains ON with the AEB acti-
vated, we recommend you to have
the system checked by an authorized
Kia dealer.
The driver can select the initial warn-
ing activation time in the User
Settings in the instrument cluster
LCD display. The options for the ini-
tial Forward Collision Warning
include the following:
selected, the initial
Forward Collision Warning
is activated earlier than
normal. If the “EARLY”
warning seems to be too
sensitive, change it to
“NORMAL”. If the vehicle
ahead suddenly stops, the
warning may seem to be
late even if the “EARLY”
condition was selected.
selected, the initial
Forward Collision
Warning is activated nor-
mally.
selected, the initial Forward
Collision Warning is activat-
ed later than normal. Select
this condition only when
traffic is light and you are
driving at low speed.Prerequisite for activation
The AEB will activate when the AEB
is selected on the LCD display, and
when the following prerequisites are
satisfied:
- The ESC (Electronic StabilityControl) is activated.
- The driving speed is over 6 mph. (The AEB only works within a cer-
tain range of vehicle speeds)
- When the AEB recognizes a vehi- cle in front. (The AEB may not rec-
ognize every obstacle or provide
warnings and braking in every situ-
ation, so do not rely on the AEB to
stop the vehicle in instances where
the driver sees an obstacle and
has the ability to apply the brakes)