Page 335 of 490

717
What to do in an emergency
You may not be able to identify a low
tire by simply looking at it. Always
use a good quality tire pressure
gauge to measure the tire's inflation
pressure. Please note that a tire that
is hot (from being driven) will have a
higher pressure measurement than a
tire that is cold (from sitting station-
ary for at least 3 hours and driven
less than 1.6 km (1 mile) during that
3 hour period).
Allow the tire to cool before measur-
ing the inflation pressure. Always be
sure the tire is cold before inflating to
the recommended pressure.
A cold tire means the vehicle has
been sitting for 3 hours and driven for
less than 1.6 km (1 mile) in that 3
hour period.
Never use tire sealant if your vehicle
is equipped with a Tire Pressure
Monitoring System. The liquid
sealant can damage the tire pres-
sure sensors. The TPMS cannot alert you to
severe and sudden tire damage
caused by external factors such as
nails or road debris.
If you feel any vehicle instability, immediately take your foot off the
accelerator, apply the brakes grad-
ually and with light force, and slow-
ly move to a safe position off the
road.
✽ ✽ NOTICE - Protecting TPMS
Tampering with, modifying, or dis-
abling the Tire Pressure Monitoring
System (TPMS) components may
interfere with the system's ability to
warn the driver of low tire pressure
conditions and/or TPMS malfunc-
tions. Tampering with, modifying,
or disabling the Tire Pressure
Monitoring System (TPMS) compo-
nents may void the warranty for
that portion of the vehicle.
This device complies with
Industry Canada licence-exempt
RSS standard(s).
Operation is subject to the following
two conditions:
(1) This device may not cause inter-
ference, and
(2) This device must accept any interference, including interfer-
ence that may cause undesired
operation of the device.
Page 342 of 490

What to do in an emergency
24
7
Call for road side service or towing.
When you use the Tire Mobility Kit,
the tire pressure sensors and wheel
may be stained by sealant. Therefore,
remove the tire pressure sensors and
wheel stained by sealant and have
your vehicle inspected by an author-
ized Kia dealer.Checking the tire inflation
pressure
1. After driving approximately 7 ~ 10
km or about 10 min (4 ~ 6 miles),
stop at a safe location.
2. Connect the filling hose (3) of the compressor (clip mounted side)
directly and then connect the fill
ing hose (3) (opposite side) to the
tire valve.
3. Connect between compressor and the vehicle power outlet using the
cable and connectors. 4.Adjust the tire inflation pressure to
the recomended tire inflation.
With the ignition switch on, pro-
ceed as follows.
- To increase the inflation pres-sure : Switch on the compressor,
position I. To check the current
inflation pressure setting, briefly
switch off the compressor.
✽ ✽ NOTICE
The pressure gauge may show high-
er than actual reading when the
compressor is running. To get an
accurate tire reading, the compres-
sor needs to be turned off.
Page 343 of 490

725
What to do in an emergency
- To reduce the inflation pres-sure: Press the button (9) on the
compressor.Technical Data
System voltage: DC 12 V
Working voltage: DC 10 - 15 V
Amperage rating: max. 10A ± 1A
(at DC 12V operation)
Suitable for use at temperatures: -30 ~ +70°C (-22 ~ +158°F)
Max. working pressure: 6 bar (87 psi)
Size
Compressor: 161 X 150 X 55.8 mm
(6.3 X 5.9 X 2.2 in.)
Sealant bottle: 81 x 85 ø mm (3.2 x 3.3 ø in.)
Compressor weight: 735 g ± 25 g (1.62 lbs ± 0.06 lbs)
Sealant volume:
200 ml (12.2 cu. in.) ❈
Sealant and spare parts can be
obtained and replaced at an
authorized vehicle or tire dealer.
Empty sealant bottles may be dis-
posed of at home. Liquid residue
from the sealant should be dis-
posed of by your vehicle or tire
dealer or in accordance with local
waste disposal regulations.
CAUTION - Tire pressure
sensor
When you use the Tire MobilityKit including sealant notapproved by Kia, the tire pres-sure sensors may be damagedby sealant. The sealant on thetire pressure sensor and wheelshould be removed when youreplace the tire with a new oneand inspect the tire pressuresensors at an authorized dealer.
Page 354 of 490

What to do in an emergency
36
7
TOWING
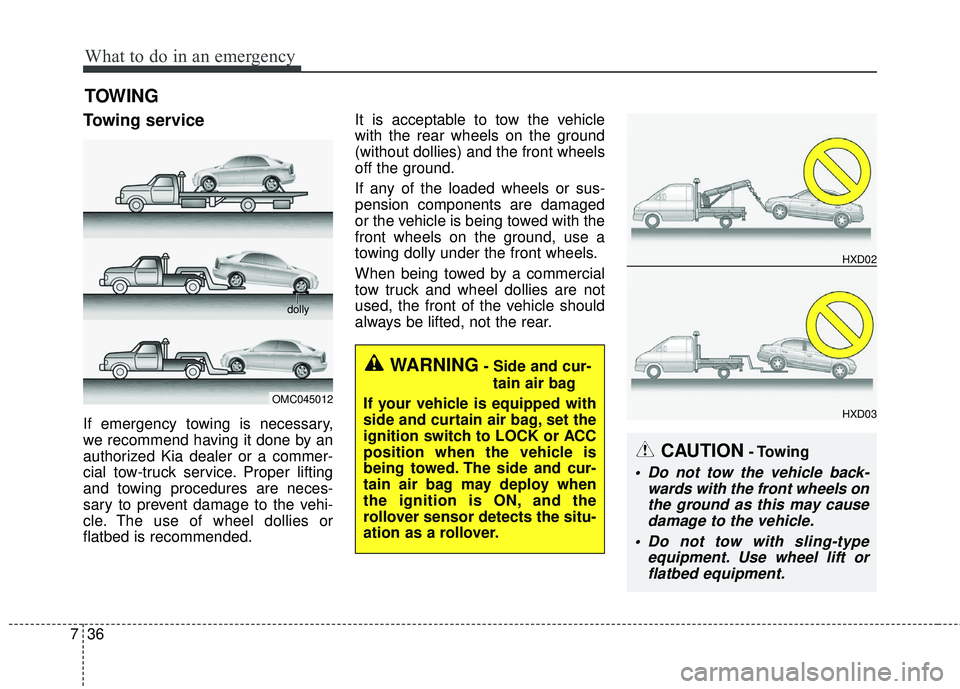
Towing service
If emergency towing is necessary,
we recommend having it done by an
authorized Kia dealer or a commer-
cial tow-truck service. Proper lifting
and towing procedures are neces-
sary to prevent damage to the vehi-
cle. The use of wheel dollies or
flatbed is recommended. It is acceptable to tow the vehicle
with the rear wheels on the ground
(without dollies) and the front wheels
off the ground.
If any of the loaded wheels or sus-
pension components are damaged
or the vehicle is being towed with the
front wheels on the ground, use a
towing dolly under the front wheels.
When being towed by a commercial
tow truck and wheel dollies are not
used, the front of the vehicle should
always be lifted, not the rear.
CAUTION- Towing
Do not tow the vehicle back-
wards with the front wheels onthe ground as this may causedamage to the vehicle.
Do not tow with sling-type equipment. Use wheel lift orflatbed equipment.
OMC045012 dolly
HXD02
HXD03
WARNING- Side and cur-
tain air bag
If your vehicle is equipped with
side and curtain air bag, set the
ignition switch to LOCK or ACC
position when the vehicle is
being towed. The side and cur-
tain air bag may deploy when
the ignition is ON, and the
rollover sensor detects the situ-
ation as a rollover.
Page 393 of 490
Maintenance
36
8
Replace the filter according to the
Maintenance Schedule.
If the vehicle is operated in extreme-
ly dusty or sandy areas, replace theelement more often than the usualrecommended intervals. (Refer to“Maintenance under severe usageconditions” in this chapter.)
CAUTION - Air filter
maintenance
Do not drive with the air clean- er removed; this will result inexcessive engine wear.
When removing the air cleaner filter, be careful that dust ordirt does not enter the airintake, or damage may result.
Use a Kia genuine part. Use of a non-genuine part coulddamage the air flow sensor.
Page 425 of 490

Maintenance
68
8
Fuse NameFuse ratingCircuit Protected
TCU15AEngine Room Junction Block(Back-Up Lamp Switch), Auto Transmission Shift Lever, Transaxle Range
Switch, Stop Lamp Switch
P/WINDOW LH25APower Window Main Switch
SPARE125ASpare
FOG LAMP REAR10A-
HEATED STEERING15AClock Spring
TAIL LAMP LH7.5AHead Lamp Left Handle side, License Lamp Left Handle side, Rear Combination Lamp (OUT) Left
Handle side, Rear Combination Lamp (IN) Left Handle side, Glove Box Lamp
MODULE37.5AFront Seat Warmer Control Module, Audio, Electro Chromic Mirror, Air Conditioner Control Module,
Audio/Video & Navigation Head Unit, Clock Spring, Auto Transmission Shift Lever Indicator
ABS7.5AEngine Room Junction Block(Multipurpose Check Connector), ESC (Electronic Stability Control) Module
BRAKE SWITCH10ASmart Key Control Module, Stop Lamp Switch
SPARE415ASpare
FOG LAMP FRONT15AFront Fog Lamp Relay
A/CON17.5AEngine Room Junction Block(Blower Relay), Air Conditioner Control Module
MODULE510AEngine Room Junction Block(Head Lamp Relay, Head Lamp Hi Relay), Rain Sensor, Sunroof Motor,
Front Seat Warmer Control Module, Driver Safety Power Window Module
MODULE710ATPMS (Tire Pressure Monitoring System) Unit
ECU10AECM (Engine Control Module)/PCM (Power train Control Module), Immobilizer Module, Smart Key
Control Module
Page 426 of 490
869
Maintenance
Fuse NameFuse ratingCircuit Protected
SUNROOF15ASunroof Motor
IMMO10AImmobilizer Module
MODULE610AKey Solenoid, Center Facia Switch
SPARE210ASpare
MODULE47.5ASLM (Seat Belt & Lighting Module), BCM (Body Control Module), Smart Key Control Module
SPARE510ASpare
AIR BAG10AACU (Airbag Control Unit), Passenger Occupant Detection Sensor
MODULE17.5ABCM (Body Control Module), SLM (Seat Belt & Lighting Module), Key Interlock
SMART KEY25ASmart Key Control Module
A/CON27.5A-
WIPER RR15AMultifunction Switch, Rear Wiper Motor, Rear Wiper Relay
WIPER FRT25AMultifunction Switch, Front Wiper Motor, Engine Room Junction Block(Wiper Low Relay)
ACC10APower Outlet Relay, BCM (Body Control Module), SLM (Seat Belt & Lighting Module), Audio, Key Interlock,
Audio/Video & Navigation Head Unit, USB Charging Connector, Power Outside Mirror Switch, Smart Key
Control Module
Page 427 of 490
Maintenance
70
8
Fuse NameFuse ratingCircuit Protected
SPARE320ASpare
A/BAG IND7.5AInstrument Cluster
CLUSTER7.5AInstrument Cluster
MDPS7.5AMDPS (Motor Driven Power Steering) Unit
AUDIO20AAudio, Audio/Video & Navigation Head Unit
ROOM LP10ARoom Lamp Relay, Glove Box Lamp, Air Conditioner Control Module, SLM (Seat Belt & Lighting Module),
BCM (Body Control Module), Auto Light & Photo Sensor, TPMS (Tire Pressure Monitoring System) Unit,
Instrument Cluster, Data Link Connector, Room Lamp, Trunk Room Lamp