Page 425 of 490

Maintenance
68
8
Fuse NameFuse ratingCircuit Protected
TCU15AEngine Room Junction Block(Back-Up Lamp Switch), Auto Transmission Shift Lever, Transaxle Range
Switch, Stop Lamp Switch
P/WINDOW LH25APower Window Main Switch
SPARE125ASpare
FOG LAMP REAR10A-
HEATED STEERING15AClock Spring
TAIL LAMP LH7.5AHead Lamp Left Handle side, License Lamp Left Handle side, Rear Combination Lamp (OUT) Left
Handle side, Rear Combination Lamp (IN) Left Handle side, Glove Box Lamp
MODULE37.5AFront Seat Warmer Control Module, Audio, Electro Chromic Mirror, Air Conditioner Control Module,
Audio/Video & Navigation Head Unit, Clock Spring, Auto Transmission Shift Lever Indicator
ABS7.5AEngine Room Junction Block(Multipurpose Check Connector), ESC (Electronic Stability Control) Module
BRAKE SWITCH10ASmart Key Control Module, Stop Lamp Switch
SPARE415ASpare
FOG LAMP FRONT15AFront Fog Lamp Relay
A/CON17.5AEngine Room Junction Block(Blower Relay), Air Conditioner Control Module
MODULE510AEngine Room Junction Block(Head Lamp Relay, Head Lamp Hi Relay), Rain Sensor, Sunroof Motor,
Front Seat Warmer Control Module, Driver Safety Power Window Module
MODULE710ATPMS (Tire Pressure Monitoring System) Unit
ECU10AECM (Engine Control Module)/PCM (Power train Control Module), Immobilizer Module, Smart Key
Control Module
Page 429 of 490

Maintenance
72
8
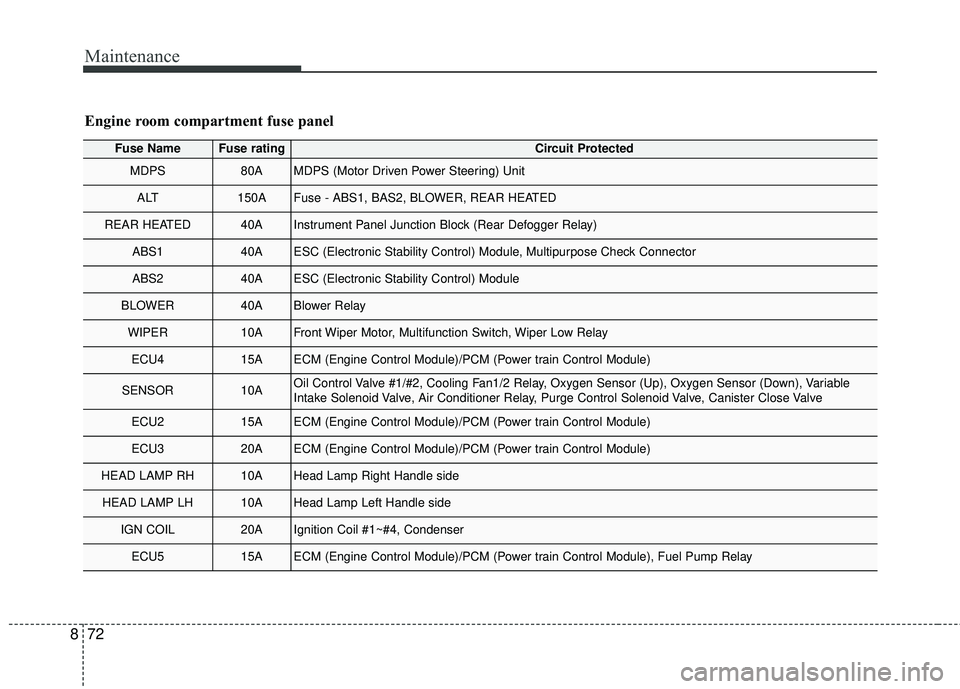
Engine room compartment fuse panel
Fuse NameFuse ratingCircuit Protected
MDPS80AMDPS (Motor Driven Power Steering) Unit
ALT150AFuse - ABS1, BAS2, BLOWER, REAR HEATED
REAR HEATED40AInstrument Panel Junction Block (Rear Defogger Relay)
ABS140AESC (Electronic Stability Control) Module, Multipurpose Check Connector
ABS240AESC (Electronic Stability Control) Module
BLOWER40ABlower Relay
WIPER10AFront Wiper Motor, Multifunction Switch, Wiper Low Relay
ECU415AECM (Engine Control Module)/PCM (Power train Control Module)
SENSOR10AOil Control Valve #1/#2, Cooling Fan1/2 Relay, Oxygen Sensor (Up), Oxygen Sensor (Down), Variable
Intake Solenoid Valve, Air Conditioner Relay, Purge Control Solenoid Valve, Canister Close Valve
ECU215AECM (Engine Control Module)/PCM (Power train Control Module)
ECU320AECM (Engine Control Module)/PCM (Power train Control Module)
HEAD LAMP RH10AHead Lamp Right Handle side
HEAD LAMP LH10AHead Lamp Left Handle side
IGN COIL20AIgnition Coil #1~#4, Condenser
ECU515AECM (Engine Control Module)/PCM (Power train Control Module), Fuel Pump Relay
Page 438 of 490

881
Maintenance
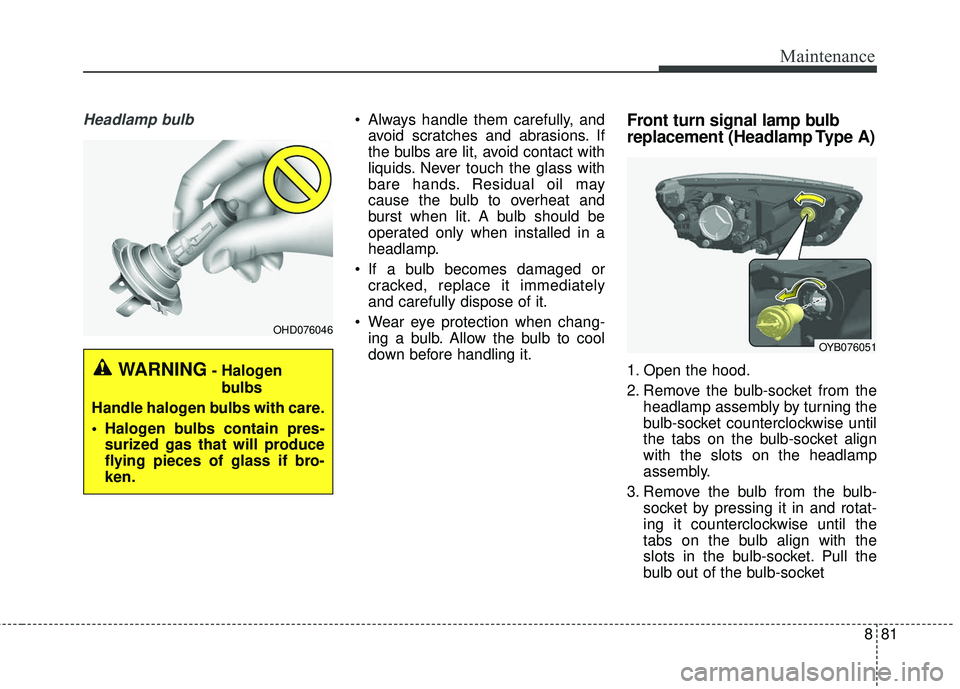
Headlamp bulb Always handle them carefully, andavoid scratches and abrasions. If
the bulbs are lit, avoid contact with
liquids. Never touch the glass with
bare hands. Residual oil may
cause the bulb to overheat and
burst when lit. A bulb should be
operated only when installed in a
headlamp.
If a bulb becomes damaged or cracked, replace it immediately
and carefully dispose of it.
Wear eye protection when chang- ing a bulb. Allow the bulb to cool
down before handling it.Front turn signal lamp bulb
replacement (Headlamp Type A)
1. Open the hood.
2. Remove the bulb-socket from the headlamp assembly by turning the
bulb-socket counterclockwise until
the tabs on the bulb-socket align
with the slots on the headlamp
assembly.
3. Remove the bulb from the bulb- socket by pressing it in and rotat-
ing it counterclockwise until the
tabs on the bulb align with the
slots in the bulb-socket. Pull the
bulb out of the bulb-socketWARNING- Halogen
bulbs
Handle halogen bulbs with care.
Halogen bulbs contain pres- surized gas that will produce
flying pieces of glass if bro-
ken.
OHD076046
OYB076051
Page 439 of 490

Maintenance
82
8
4. Insert a new bulb by inserting it
into the bulb-socket and rotating it
until it locks into place.
5. Install the socket in the headlamp assembly by aligning the tabs on
the bulb-socket with the slots in
the assembly. Push the bulb-sock-
et into the headlamp assembly
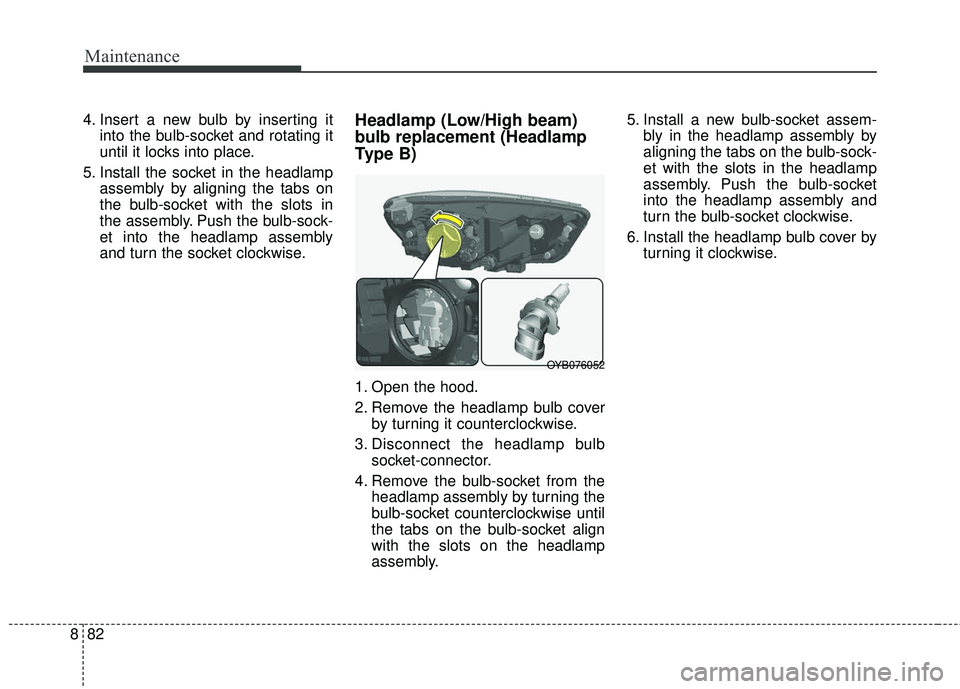
and turn the socket clockwise.Headlamp (Low/High beam)
bulb replacement (Headlamp
Type B)
1. Open the hood.
2. Remove the headlamp bulb coverby turning it counterclockwise.
3. Disconnect the headlamp bulb socket-connector.
4. Remove the bulb-socket from the headlamp assembly by turning the
bulb-socket counterclockwise until
the tabs on the bulb-socket align
with the slots on the headlamp
assembly. 5. Install a new bulb-socket assem-
bly in the headlamp assembly by
aligning the tabs on the bulb-sock-
et with the slots in the headlamp
assembly. Push the bulb-socket
into the headlamp assembly and
turn the bulb-socket clockwise.
6. Install the headlamp bulb cover by turning it clockwise.
OYB076052
Page 440 of 490
883
Maintenance
Headlamp bulb Always handle them carefully, andavoid scratches and abrasions. If
the bulbs are lit, avoid contact with
liquids. Never touch the glass with
bare hands. Residual oil may
cause the bulb to overheat and
burst when lit. A bulb should be
operated only when installed in a
headlamp.
If a bulb becomes damaged or cracked, replace it immediately
and carefully dispose of it.
Wear eye protection when chang- ing a bulb. Allow the bulb to cool
down before handling it.Front turn signal lamp bulb
replacement (Headlamp Type B)
1. Open the hood.
2. Remove the headlamp bulb cover by turning it counterclockwise.
3. Remove the bulb-socket from the headlamp assembly by turning the
bulb-socket counterclockwise until
the tabs on the bulb-socket align
with the slots on the headlamp
assembly.
OQL075058
WARNING- Halogen
bulbs
Handle halogen bulbs with care.
Halogen bulbs contain pres- surized gas that will produce
flying pieces of glass if bro-
ken.
OYB076054
Page 441 of 490

Maintenance
84
8
4. Remove the bulb from the bulb
socket by pressing it in and rotat-
ing it counterclockwise until the
tabs on the bulb align with the
slots in the bulb-socket. Pull the
bulb out of the bulb-socket
5. Insert a new bulb by inserting it into the bulb-socket and rotating it
until it locks into place.
6. Install the socket in the headlamp assembly by aligning the tabs on
the bulb-socket with the slots in
the assembly. Push the bulb-sock
et into the headlamp assembly
and turn the socket clockwise.
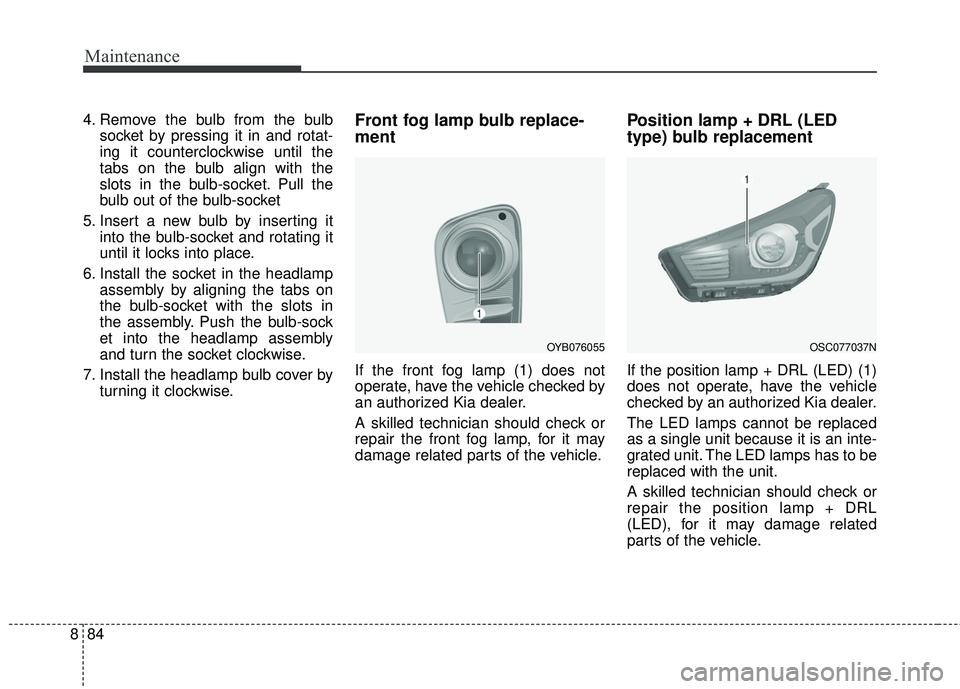
7. Install the headlamp bulb cover by turning it clockwise.Front fog lamp bulb replace-
ment
If the front fog lamp (1) does not
operate, have the vehicle checked by
an authorized Kia dealer.
A skilled technician should check or
repair the front fog lamp, for it may
damage related parts of the vehicle.
Position lamp + DRL (LED
type) bulb replacement
If the position lamp + DRL (LED) (1)
does not operate, have the vehicle
checked by an authorized Kia dealer.
The LED lamps cannot be replaced
as a single unit because it is an inte-
grated unit. The LED lamps has to be
replaced with the unit.
A skilled technician should check or
repair the position lamp + DRL
(LED), for it may damage related
parts of the vehicle.
OYB076055OSC077037N
Page 443 of 490
Maintenance
86
8
Side repeater lamp (bulb type)
bulb Replacement
1. Remove the lamp assembly from
the vehicle by prying the lens and
pulling the assembly out.
2. Disconnect the bulb electrical con- nector.
3. Separate the socket and the lens parts by turning the socket coun-
terclockwise until the tabs on the
socket align with the slots on the
lens part. 4. Remove the bulb by pulling it
straight out.
5. Insert a new bulb in the socket.
6. Reassemble the socket and the lens part.
7. Connect the bulb electrical con- nector.
8. Reinstall the lamp assembly to the body of the vehicle.
Stop and tail lamp bulb
replacement (5 Door)
1. Open the trunk lid.
2. Loosen the light assembly retain-ing screws with a cross-tip screw-
driver.
OYB076059OYB076060
Page 444 of 490
887
Maintenance
3. Remove the rear combinationlamp assembly from the body of
the vehicle.
4. Disconnect the rear combination lamp connector. 5. Remove the socket from the
assembly by turning the socket
counterclockwise until the tabs on
the socket align with the slots on
the assembly.
6. Remove the bulb from the socket by pressing it in and rotating it counter-
clockwise until the tabs on the bulb
align with the slots in the socket.
Pull the bulb out of the socket.
7. Insert a new bulb by inserting it into the socket and rotating it until
it locks into place. 8. Install the socket in the assembly
by aligning the tabs on the socket
with the slots in the assembly.
Push the socket into the assembly
and turn the socket clockwise.
9. Install the rear combination lamp assembly to the body of the vehi-
cle.
OYB076061OYB076062