Page 26 of 50

23ALWAYS CHECK THE OWNER’S MANUAL FOR COMPLETE OPER ATING INFORMATION AND SAFET Y WARNINGS . *IF EQUIPPED
AUDIO SYSTEMS
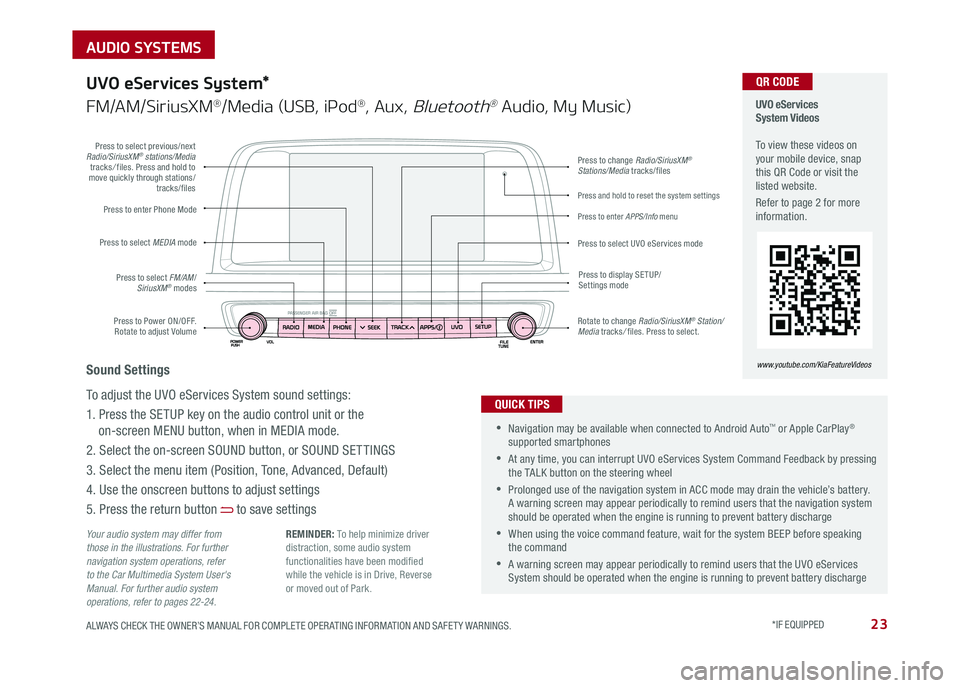
Press to Power ON/OFF . Rotate to adjust Volume
Press to enter Phone Mode
Press to select FM/AM/SiriusXM® modes
Press to select MEDIA mode
Press to display SE TUP/Settings mode
Press to change Radio/SiriusXM® Stations/Media tracks/files
Press to enter APPS/Info menu
Press and hold to reset the system settings
Press to select UVO eServices mode
Press to select previous/next Radio/SiriusXM® stations/Media tracks/ files . Press and hold to move quickly through stations/tracks/files
Rotate to change Radio/SiriusXM® Station/Media tracks/ files . Press to select .
UVO eServices System Videos To view these videos on your mobile device, snap this QR Code or visit the listed website .
Refer to page 2 for more information .
www.youtube.com/KiaFeatureVideos
QR CODE
Your audio system may differ from those in the illustrations. For further navigation system operations, refer to the Car Multimedia System User's Manual. For further audio system operations, refer to pages 22-24.
UVO eServices System*
FM/AM/SiriusXM®/Media (USB, iPod®, Aux, Bluetooth® Audio, My Music)
•Navigation may be available when connected to Android Auto™ or Apple CarPlay® supported smartphones
•At any time, you can interrupt UVO eServices System Command Feedback by pressing the TALK button on the steering wheel
•Prolonged use of the navigation system in ACC mode may drain the vehicle’s battery . A warning screen may appear periodically to remind users that the navigation system should be operated when the engine is running to prevent battery discharge
•When using the voice command feature, wait for the system BEEP before speaking the command
•A warning screen may appear periodically to remind users that the UVO eServices System should be operated when the engine is running to prevent battery discharge
QUICK TIPS
Sound Settings
To adjust the UVO eServices System sound settings:
1 . Press the SETUP key on the audio control unit or the
on-screen MENU button, when in MEDIA mode .
2 . Select the on-screen SOUND button, or SOUND SET TINGS
3 . Select the menu item (Position, Tone, Advanced, Default)
4 . Use the onscreen buttons to adjust settings
5 . Press the return button to save settings
REMINDER: To help minimize driver distraction, some audio system functionalities have been modified while the vehicle is in Drive, Reverse or moved out of Park .
Page 36 of 50

33ALWAYS CHECK THE OWNER’S MANUAL FOR COMPLETE OPER ATING INFORMATION AND SAFET Y WARNINGS . *IF EQUIPPED
SEATING
When adjusting seat forward or backwards, ensure seat clicks or locks into place before driving vehicle .
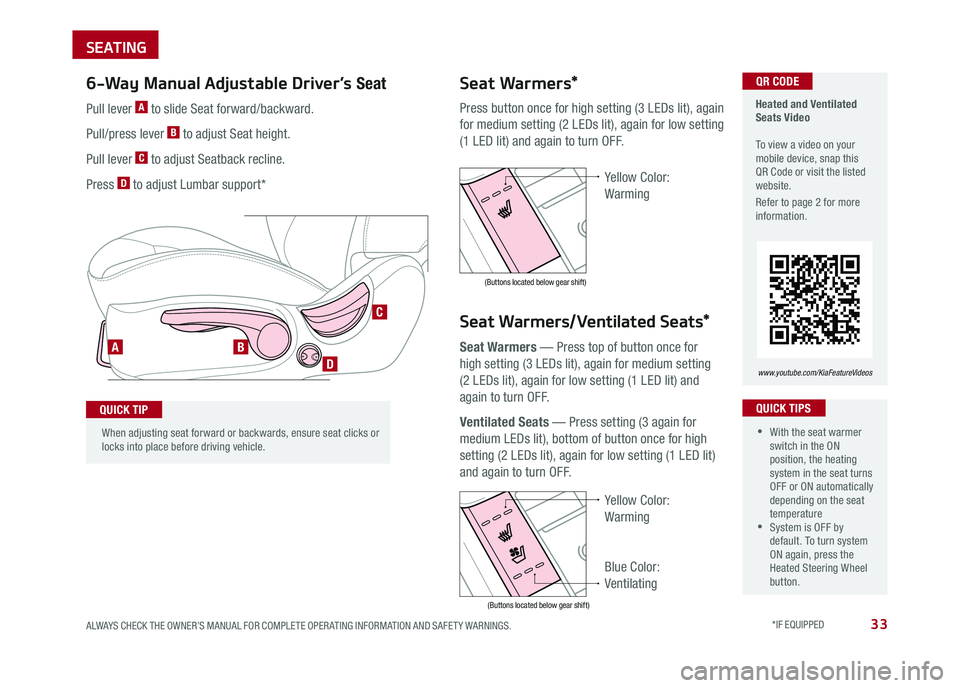
Press button once for high setting (3 LEDs lit), again
for medium setting (2 LEDs lit), again for low setting
(1 LED lit) and again to turn OFF .
Seat Warmers — Press top of button once for
high setting (3 LEDs lit), again for medium setting
(2 LEDs lit), again for low setting (1 LED lit) and
again to turn OFF .
Ventilated Seats — Press setting (3 again for
medium LEDs lit), bottom of button once for high
setting (2 LEDs lit), again for low setting (1 LED lit)
and again to turn OFF .
Yellow Color:
Warming
Blue Color:
Ventilating
Seat Warmers/Ventilated Seats*
Seat Warmers* Heated and Ventilated Seats Video To view a video on your mobile device, snap this QR Code or visit the listed website .
Refer to page 2 for more information .
www.youtube.com/KiaFeatureVideos
•With the seat warmer switch in the ON position, the heating system in the seat turns OFF or ON automatically depending on the seat temperature •System is OFF by default . To turn system ON again, press the Heated Steering Wheel button .
QUICK TIPS
AB
D
C
QR CODE6-Way Manual Adjustable Driver’s Seat
QUICK TIP
Pull lever A to slide Seat forward/backward .
Pull/press lever B to adjust Seat height .
Pull lever C to adjust Seatback recline .
Press D to adjust Lumbar support*Yellow Color:
Warming
(Buttons located below gear shift)
(Buttons located below gear shift)
Page 40 of 50

37ALWAYS CHECK THE OWNER’S MANUAL FOR COMPLETE OPER ATING INFORMATION AND SAFET Y WARNINGS . *IF EQUIPPED
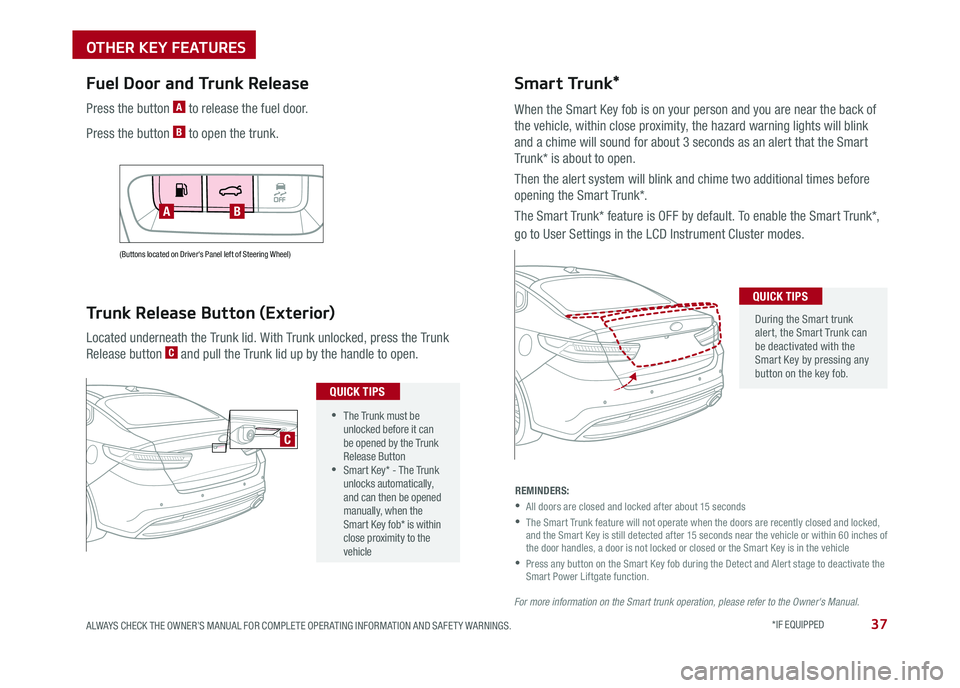
(Buttons located on Driver's Panel left of Steering Wheel)
Fuel Door and Trunk Release
Located underneath the Trunk lid . With Trunk unlocked, press the Trunk
Release button C and pull the Trunk lid up by the handle to open .
Trunk Release Button (Exterior)
AB
•The Trunk must be unlocked before it can be opened by the Trunk Release Button •Smart Key* - The Trunk unlocks automatically, and can then be opened manually, when the Smart Key fob* is within close proximity to the vehicle
QUICK TIPS
C
Press the button A to release the fuel door .
Press the button B to open the trunk .
Smart Trunk*
When the Smart Key fob is on your person and you are near the back of
the vehicle, within close proximity, the hazard warning lights will blink
and a chime will sound for about 3 seconds as an alert that the Smart
Trunk* is about to open .
Then the alert system will blink and chime two additional times before
opening the Smart Trunk* .
The Smart Trunk* feature is OFF by default . To enable the Smart Trunk*,
go to User Settings in the LCD Instrument Cluster modes .
During the Smart trunk alert, the Smart Trunk can be deactivated with the Smart Key by pressing any button on the key fob .
QUICK TIPS
REMINDERS:
•
All doors are closed and locked after about 15 seconds
•
The Smart Trunk feature will not operate when the doors are recently closed and locked, and the Smart Key is still detected after 15 seconds near the vehicle or within 60 inches of the door handles, a door is not locked or closed or the Smart Key is in the vehicle
•
Press any button on the Smart Key fob during the Detect and Alert stage to deactivate the Smart Power Liftgate function .
For more information on the Smart trunk operation, please refer to the Owner's Manual.
OTHER KEY FEATURES
Page:
< prev 1-8 9-16 17-24