2018 KIA OPTIMA steering
[x] Cancel search: steeringPage 24 of 50

21ALWAYS CHECK THE OWNER’S MANUAL FOR COMPLETE OPERATING INFORMATION AND SAFETY WARNINGS . *IF EQUIPPED
REMINDER:
Standard Cruise Control is a part of the Advanced Smart Cruise Control (ASCC)* and can be set as the operating mode . To switch from ASCC to standard Cruise Control, press and hold the CRUISE button (the ASCC system must not be activated to change modes) .Repeat to switch back to ASCC mode .
Your vehicle’s steering wheel buttons may differ from those in the illustrations. See your Owner’s Manual for more details.
Audio Controls*Cruise Control*
E CRUISE Control ON/OFF button: Press to turn the Cruise
Control ON/OFF
F Resume Cruising Speed button: Press up to resume or
increase Cruising Speed
Set Cruising Speed button: Press down to set or decrease
Cruising Speed
G Cruise Control CANCEL button: To cancel Cruise Control
setting, do one of the following:
•Press the brake pedal
•Press the CANCEL button
A
Audio MODE button: Press to cycle through FM 1-2/AM/SAT 1-3/USB/
Aux/iPod®
Audio System ON/OFF: Press and hold to turn power on; Press to turn
power off
B Seek/Preset button: FM/AM/SiriusXM® Modes: Press to advance
through Preset Stations . Press and hold to auto seek
Media Mode: Press to move Track Up/Down . Press & hold to FF/REW
C Volume button: Press up/down to raise/lower volume
D Mute button: Press to mute all audio
For further audio system operations, refer to pages 22-24.
Driving while distracted is dangerous and should be avoided. Drivers should remain attentive to driving and always exercise caution when using the steering-wheel-mounted controls while driving.
Pressing the Audio Mode button for more than 1 second will turn Audio Mode ON/OFF .
QUICK TIP
•Cruise Control is designed to function above 25 mph •The Cruise Control system will not activate until the brake pedal has been depressed at least once after ignition ON or engine start
QUICK TIPS
AE
F
G
DCB
STEERING WHEEL CONTROLS
Page 26 of 50

23ALWAYS CHECK THE OWNER’S MANUAL FOR COMPLETE OPER ATING INFORMATION AND SAFET Y WARNINGS . *IF EQUIPPED
AUDIO SYSTEMS
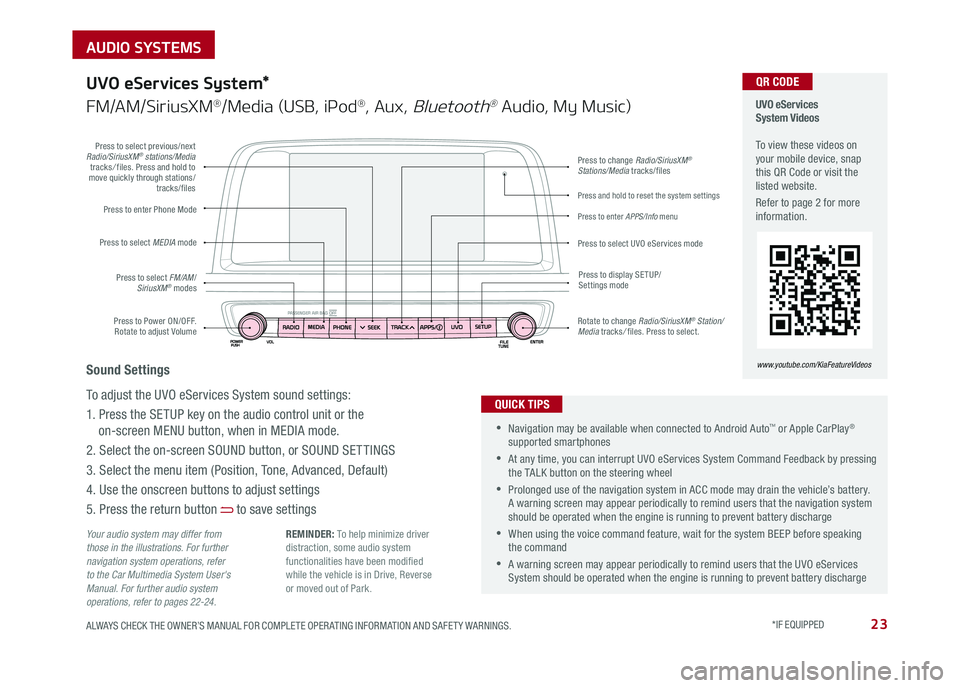
Press to Power ON/OFF . Rotate to adjust Volume
Press to enter Phone Mode
Press to select FM/AM/SiriusXM® modes
Press to select MEDIA mode
Press to display SE TUP/Settings mode
Press to change Radio/SiriusXM® Stations/Media tracks/files
Press to enter APPS/Info menu
Press and hold to reset the system settings
Press to select UVO eServices mode
Press to select previous/next Radio/SiriusXM® stations/Media tracks/ files . Press and hold to move quickly through stations/tracks/files
Rotate to change Radio/SiriusXM® Station/Media tracks/ files . Press to select .
UVO eServices System Videos To view these videos on your mobile device, snap this QR Code or visit the listed website .
Refer to page 2 for more information .
www.youtube.com/KiaFeatureVideos
QR CODE
Your audio system may differ from those in the illustrations. For further navigation system operations, refer to the Car Multimedia System User's Manual. For further audio system operations, refer to pages 22-24.
UVO eServices System*
FM/AM/SiriusXM®/Media (USB, iPod®, Aux, Bluetooth® Audio, My Music)
•Navigation may be available when connected to Android Auto™ or Apple CarPlay® supported smartphones
•At any time, you can interrupt UVO eServices System Command Feedback by pressing the TALK button on the steering wheel
•Prolonged use of the navigation system in ACC mode may drain the vehicle’s battery . A warning screen may appear periodically to remind users that the navigation system should be operated when the engine is running to prevent battery discharge
•When using the voice command feature, wait for the system BEEP before speaking the command
•A warning screen may appear periodically to remind users that the UVO eServices System should be operated when the engine is running to prevent battery discharge
QUICK TIPS
Sound Settings
To adjust the UVO eServices System sound settings:
1 . Press the SETUP key on the audio control unit or the
on-screen MENU button, when in MEDIA mode .
2 . Select the on-screen SOUND button, or SOUND SET TINGS
3 . Select the menu item (Position, Tone, Advanced, Default)
4 . Use the onscreen buttons to adjust settings
5 . Press the return button to save settings
REMINDER: To help minimize driver distraction, some audio system functionalities have been modified while the vehicle is in Drive, Reverse or moved out of Park .
Page 36 of 50

33ALWAYS CHECK THE OWNER’S MANUAL FOR COMPLETE OPER ATING INFORMATION AND SAFET Y WARNINGS . *IF EQUIPPED
SEATING
When adjusting seat forward or backwards, ensure seat clicks or locks into place before driving vehicle .
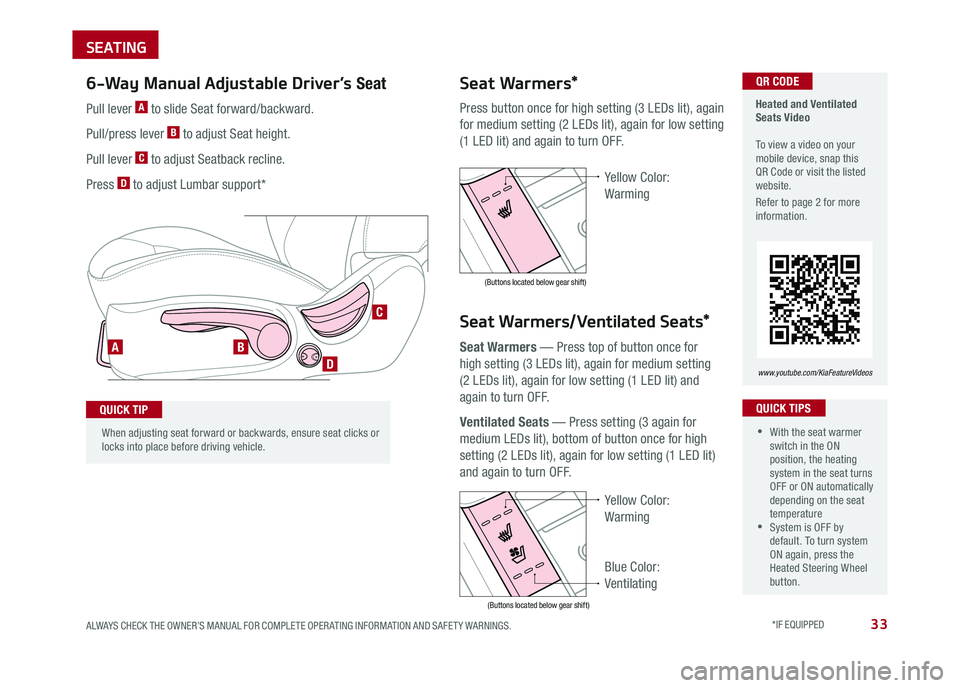
Press button once for high setting (3 LEDs lit), again
for medium setting (2 LEDs lit), again for low setting
(1 LED lit) and again to turn OFF .
Seat Warmers — Press top of button once for
high setting (3 LEDs lit), again for medium setting
(2 LEDs lit), again for low setting (1 LED lit) and
again to turn OFF .
Ventilated Seats — Press setting (3 again for
medium LEDs lit), bottom of button once for high
setting (2 LEDs lit), again for low setting (1 LED lit)
and again to turn OFF .
Yellow Color:
Warming
Blue Color:
Ventilating
Seat Warmers/Ventilated Seats*
Seat Warmers* Heated and Ventilated Seats Video To view a video on your mobile device, snap this QR Code or visit the listed website .
Refer to page 2 for more information .
www.youtube.com/KiaFeatureVideos
•With the seat warmer switch in the ON position, the heating system in the seat turns OFF or ON automatically depending on the seat temperature •System is OFF by default . To turn system ON again, press the Heated Steering Wheel button .
QUICK TIPS
AB
D
C
QR CODE6-Way Manual Adjustable Driver’s Seat
QUICK TIP
Pull lever A to slide Seat forward/backward .
Pull/press lever B to adjust Seat height .
Pull lever C to adjust Seatback recline .
Press D to adjust Lumbar support*Yellow Color:
Warming
(Buttons located below gear shift)
(Buttons located below gear shift)
Page 40 of 50

37ALWAYS CHECK THE OWNER’S MANUAL FOR COMPLETE OPER ATING INFORMATION AND SAFET Y WARNINGS . *IF EQUIPPED
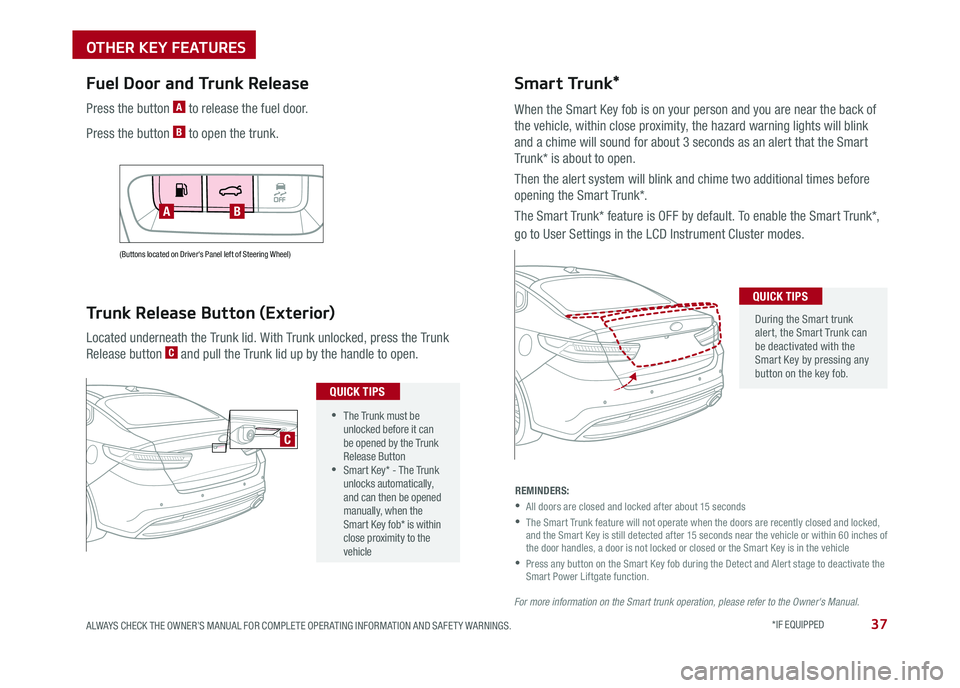
(Buttons located on Driver's Panel left of Steering Wheel)
Fuel Door and Trunk Release
Located underneath the Trunk lid . With Trunk unlocked, press the Trunk
Release button C and pull the Trunk lid up by the handle to open .
Trunk Release Button (Exterior)
AB
•The Trunk must be unlocked before it can be opened by the Trunk Release Button •Smart Key* - The Trunk unlocks automatically, and can then be opened manually, when the Smart Key fob* is within close proximity to the vehicle
QUICK TIPS
C
Press the button A to release the fuel door .
Press the button B to open the trunk .
Smart Trunk*
When the Smart Key fob is on your person and you are near the back of
the vehicle, within close proximity, the hazard warning lights will blink
and a chime will sound for about 3 seconds as an alert that the Smart
Trunk* is about to open .
Then the alert system will blink and chime two additional times before
opening the Smart Trunk* .
The Smart Trunk* feature is OFF by default . To enable the Smart Trunk*,
go to User Settings in the LCD Instrument Cluster modes .
During the Smart trunk alert, the Smart Trunk can be deactivated with the Smart Key by pressing any button on the key fob .
QUICK TIPS
REMINDERS:
•
All doors are closed and locked after about 15 seconds
•
The Smart Trunk feature will not operate when the doors are recently closed and locked, and the Smart Key is still detected after 15 seconds near the vehicle or within 60 inches of the door handles, a door is not locked or closed or the Smart Key is in the vehicle
•
Press any button on the Smart Key fob during the Detect and Alert stage to deactivate the Smart Power Liftgate function .
For more information on the Smart trunk operation, please refer to the Owner's Manual.
OTHER KEY FEATURES
Page 44 of 50

41ALWAYS CHECK THE OWNER’S MANUAL FOR COMPLETE OPER ATING INFORMATION AND SAFET Y WARNINGS . *IF EQUIPPED
Check your Maintenance Schedule or schedule an appointment with a dealer using your UVO eServices account by logging into your UVO App or your account on MyUVO . com ( Vehicles equipped with UVO eServices only - See page 22 for setup information)
Normal Maintenance Schedule
When your vehicle requires service, remember that your dealer knows your vehicle best . Your dealer has factory-trained technicians, recommended special tools,
genuine Kia replacement parts and is dedicated to your complete satisfaction . For expert advice and quality service, see your authorized Kia dealer .
7,500 miles
PERFORM
•Add fuel additive1
•Rotate tires - including tire pressure and tread wear
REPLACE
•Engine oil and filter (2 .4 GDI - every 7,500 miles;
1 .6 Turbo GDI / 2 .0 Turbo GDI - every 6,500 miles)
INSPECT*
•Air cleaner filter
•Vacuum hose
•Intercooler, in/out hose, air intake hose ( Turbo GDI)
*Inspect and, if necessary, adjust, correct, clean, or replace . 1 If TOP TIER Detergent Gasoline is not available, one bottle of additive is recommended . Additives are available from your authorized Kia dealer along with information on how to use them . Do not mix other additives .
15,000 miles
PERFORM
•Add fuel additive1
•Rotate tires - including tire pressure and tread wear
REPLACE
•Climate control air filter (For evaporator and blower unit)
•Engine oil and filter: (2 .4 GDI - every 7,500 miles;
1 .6 Turbo GDI / 2 .0 Turbo GDI - every 6,500 miles)
INSPECT*
•Air cleaner filter
•Vacuum hose
•Air conditioning refrigerant
•Brake hoses and lines
•Drive shafts and boots
•Exhaust pipe and muffler
•Front brake disc/pads, calipers
•Rear brake disc/pads
•Steering gear box, linkage &
boots/lower arm ball joint, upper
arm ball joint
•Suspension mounting bolts
•Intercooler, in/out hose, air intake
hose ( Turbo GDI)
*Inspect and, if necessary, adjust, correct, clean, or replace . 1 If TOP TIER Detergent Gasoline is not available, one bottle of additive is recommended . Additives are available from your authorized Kia dealer along with information on how to use them . Do not mix other additives .
QUICK TIP
MAINTENANCE
Page 45 of 50

OPTIMA FEATURES & FUNCTIONS GUIDE42*IF EQUIPPED
22,500 miles
PERFORM
•Add fuel additive1
• Rotate tires - including tire pressure and tread wear
REPLACE
•Engine oil and filter (2 .4 GDI - every 7,500 miles;
1 .6 Turbo GDI / 2 .0 Turbo GDI - every 6,500 miles)
INSPECT*
•Air cleaner filter
•Vacuum hose
•Intercooler, in/out hose, air intake hose ( Turbo GDI)
*Inspect and, if necessary, adjust, correct, clean, or replace . 1 If TOP TIER Detergent Gasoline is not available, one bottle of additive is recommended . Additives are available from your authorized Kia dealer along with information on how to use them . Do not mix other additives .
30,000 miles
PERFORM
•Add fuel additive1
•Rotate tires - including tire pressure and tread wear
REPLACE
•Engine oil and filter (2 .4 GDI - every 7,500 miles;
1 .6 Turbo GDI / 2 .0 Turbo GDI - every 6,500 miles)
•Air cleaner filter
•Climate control air filter (For evaporator and blower unit)
INSPECT*
•Vacuum hose
•Air conditioning refrigerant
•Brake hoses and lines
•Drive shafts and boots
•Exhaust pipe and muffler
•Front brake disc/pads, calipers
•Rear brake disc/pads
•Steering gear box, linkage &
boots/lower arm ball joint, upper
arm ball joint
•Suspension mounting bolts
•Brake fluid
•Fuel filter2
•Fuel cap, fuel lines, fuel hoses
and connections
•Fuel tank air filter2 (if equipped)
•Parking brake
•Vapor hose and fuel filler cap
•Intercooler, in/out hose, air
intake hose ( Turbo GDI)
*Inspect and, if necessary, adjust, correct, clean, or replace .1 If TOP TIER Detergent Gasoline is not available, one bottle of additive is recommended . Additives are available from your authorized Kia dealer along with information on how to use them . Do not mix other additives . 2 Fuel filter & Fuel tank filter are considered to be maintenance free but periodic inspection is recommended for this maintenance schedule depends on fuel quality . If there are some important safety matters like fuel flow restriction, surging, loss of power, hard starting problem etc, replace fuel filter immediately regardless of maintenance schedule and consult an authorized Kia dealer for details .
MAINTENANCE
Page 46 of 50

43ALWAYS CHECK THE OWNER’S MANUAL FOR COMPLETE OPER ATING INFORMATION AND SAFET Y WARNINGS . *IF EQUIPPED
37,500 miles
PERFORM
•Add fuel additive1
•Rotate tires - including tire pressure and tread wear
REPLACE
•Engine oil and filter (2 .4 GDI - every 7,500 miles;
1 .6 Turbo GDI / 2 .0 Turbo GDI - every 6,500 miles)
INSPECT*
•Air cleaner filter
•Vacuum hose
•Intercooler, in/out hose, air intake hose ( Turbo GDI)
*Inspect and, if necessary, adjust, correct, clean, or replace .1 If TOP TIER Detergent Gasoline is not available, one bottle of additive is recommended . Additives are available from your authorized Kia dealer along with information on how to use them . Do not mix other additives .
45,000 miles
PERFORM
•Add fuel additive1
•Rotate tires - including tire pressure and tread wear
REPLACE
•Engine oil and filter (2 .4 GDI - every 7,500 miles;
1 .6 Turbo GDI / 2 .0 Turbo GDI - every 6,500 miles)
•Spark plugs (Iridium coated; 1 .6 Turbo GDI / 2 .0 Turbo GDI)
•Climate control air filter (For evaporator and blower unit)
INSPECT*
•Air cleaner filter
•Vacuum hose
•Air conditioning refrigerant
•Brake hoses and lines
•Drive shafts and boots
•Exhaust pipe and muffler
•Front brake disc/pads, calipers
•Rear brake disc/pads
•Steering gear box, linkage &
boots/lower arm ball joint, upper
arm ball joint
•Suspension mounting bolts
•Intercooler, in/out hose, air intake
hose ( Turbo GDI)
*Inspect and, if necessary, adjust, correct, clean, or replace1 If TOP TIER Detergent Gasoline is not available, one bottle of additive is recommended . Additives are available from your authorized Kia dealer along with information on how to use them . Do not mix other additives
MAINTENANCE
Page 47 of 50

OPTIMA FEATURES & FUNCTIONS GUIDE44
52,500 miles
PERFORM
•Add fuel additive1
•Rotate tires - including tire pressure and tread wear
REPLACE
•Engine oil and filter (2 .4 GDI - every 7,500 miles;
1 .6 Turbo GDI / 2 .0 Turbo GDI - every 6,500 miles)
INSPECT*
•Air cleaner filter
•Vacuum hose
•Intercooler, in/out hose, air intake hose ( Turbo GDI)
60,000 miles
PERFORM
•Add fuel additive1
•Rotate tires - including tire pressure and tread wear
REPLACE
•Climate control air filter (for evaporator and blower unit
•Engine oil and filter (2 .4 GDI - every 7,500 miles;
1 .6 Turbo GDI / 2 .0 Turbo GDI - every 6,500 miles)
•Coolant (First at 60,000 miles, then every 30,000 miles)
INSPECT*
•Vacuum hose
•Air conditioning refrigerant
•Brake hoses and lines
•Drive shafts and boots
•Exhaust pipe and muffler
•Front brake disc/pads, calipers
•Rear brake disc/pads
•Steering gear box, linkage &
boots/lower arm ball joint, upper
arm ball joint
•Suspension mounting bolts
•Brake fluid
•Fuel filter2
•Fuel cap, fuel lines, fuel hoses
and connections
•Fuel tank air filter (if equipped)2
•Parking brake
•Vapor hose and fuel filler cap,
fuel tank
•Valve clearance (if equipped)3
•Drive belts (First at 60,000
miles, then every 15,000 miles)
•Intercooler, in/out hose, air intake
hose ( Turbo GDI)
*Inspect and, if necessary, adjust, correct, clean, or replace .1 If TOP TIER Detergent Gasoline is not available, one bottle of additive is recommended . Additives are available from your authorized Kia dealer along with information on how to use them . Do not mix other additives
*Inspect and, if necessary, adjust, correct, clean, or replace . 1 If TOP TIER Detergent Gasoline is not available, one bottle of additive is recommended . Additives are available from your authorized Kia dealer along with information on how to use them . Do not mix other additives . 2 Fuel filter & Fuel tank filter are considered to be maintenance free but periodic inspection is recommended for this maintenance schedule depends on fuel quality . If there are some important safety matters like fuel flow restriction, surging, loss of power, hard starting problem etc, replace fuel filter immediately regardless of maintenance schedule and consult an authorized Kia dealer for details . 3 Inspect for excessive tappet noise and/or engine vibration and adjust if necessary .
MAINTENANCE