2018 KIA NIRO road sign
[x] Cancel search: road signPage 426 of 616
Driving your vehicle
92
6
Driving at night
Because night driving presents more
hazards than driving in the daylight,
here are some important tips to
remember:
Slow down and keep more dis-
tance between you and other vehi-
cles, as it may be more difficult to
see at night, especially in areas
where there may not be any street
lights.
Adjust your mirrors to reduce the glare from other driver's head-
lights.
Keep your headlights clean and properly aimed. (On vehicles not
equipped with the automatic head-
light aiming feature.) Dirty or
improperly aimed headlights will
make it much more difficult to see
at night.
Avoid staring directly at the head- lights of oncoming vehicles. You
could be temporarily blinded, and it
will take several seconds for your
eyes to readjust to the darkness.
Driving in the rain
Rain and wet roads can make driving
dangerous, especially if you’re not
prepared for the slick pavement.
Here are a few things to consider
when driving in the rain: A heavy rainfall will make it harder
to see and will increase the dis-
tance needed to stop your vehicle,
so slow down.
Keep your windshield wiping equipment in good shape. Replace
your windshield wiper blades when
they show signs of streaking or
missing areas on the windshield.
If your tires are not in good condi- tion, making a quick stop on wet
pavement can cause a skid and
possibly lead to an accident. Be
sure your tires are in good shape.
Turn on your headlights to make it easier for others to see you.
Driving too fast through large pud- dles can affect your brakes. If you
must go through puddles, try to
drive through them slowly.
If you believe you may have gotten your brakes wet, apply them lightly
while driving until normal braking
operation returns.
Page 438 of 616
What to do in an emergency
27
ROAD WARNING
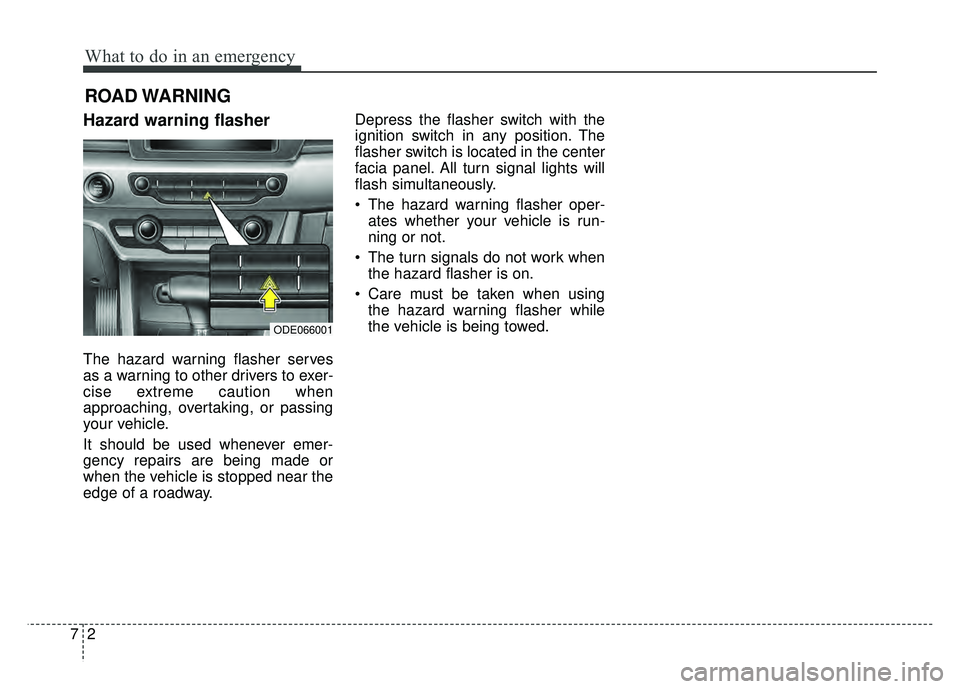
Hazard warning flasher
The hazard warning flasher serves
as a warning to other drivers to exer-
cise extreme caution when
approaching, overtaking, or passing
your vehicle.
It should be used whenever emer-
gency repairs are being made or
when the vehicle is stopped near the
edge of a roadway.Depress the flasher switch with the
ignition switch in any position. The
flasher switch is located in the center
facia panel. All turn signal lights will
flash simultaneously.
• The hazard warning flasher oper-
ates whether your vehicle is run-
ning or not.
The turn signals do not work when the hazard flasher is on.
Care must be taken when using the hazard warning flasher while
the vehicle is being towed.
ODE066001
Page 451 of 616

715
What to do in an emergency
When you drive your vehicle from a
warm area to a cold area or from a
cold area to a warm area, or the out-
side temperature is greatly higher or
lower, you should check the tire infla-
tion pressure and adjust the tires to
the recommended tire inflation pres-
sure.TPMS (Tire PressureMonitoring System)malfunction indicator
The low tire pressure telltale will illu-
minate after it blinks for approximate-
ly one minute when there is a prob-
lem with the Tire Pressure
Monitoring System. If the system is
able to correctly detect an underinfla-
tion warning at the same time as sys-
tem failure then it will illuminate both
the TPMS malfunction and low tire
pressure position telltales e.g. if
Front Left sensor fails, the TPMS
malfunction indicator illuminates, but
if the Front Right, Rear Left, or Rear
Right tire is under-inflated, the low
tire pressure position telltales may
illuminate together with the TPMS
malfunction indicator.
Have the system checked by an
authorized Kia dealer as soon as
possible to determine the cause of
the problem. The TPMS malfunction indicator
may be illuminated if the vehicle is
moving around electric power sup-
ply cables or radios transmitters
such as at police stations, govern-
ment and public offices, broadcast-
ing stations, military installations,
airports, or transmitting towers,
etc. This can interfere with normal
operation of the Tire Pressure
Monitoring System (TPMS).
The TPMS malfunction indicator may be illuminated if snow chains
are used or some separate elec-
tronic devices such as notebook
computer, mobile charger, remote
starter or navigation etc., are used
in the vehicle. This can interfere
with normal operation of the Tire
Pressure Monitoring System
(TPMS).
WARNING- Low pressure
damage
Do not drive on low pressure
tires. Significantly low tire pres-
sure can cause the tires to over-
heat and fail making the vehicle
unstable resulting in increased
braking distances and a loss of
vehicle control.
Page 455 of 616
719
What to do in an emergency
With the Tire Mobility Kit you stay
mobile even after experiencing a tire
puncture.
The system of compressor and seal-
ing compound effectively and com-
fortably seals most punctures in a
passenger car tire caused by nails or
similar objects and reinflates the tire.
After you ensured that the tire is prop-
erly sealed you can drive cautiously
on the tire (up to 120 miles (200 km))
at a max. speed of 50 mph (80 km/h)
in order to reach a service station or
tire dealer to have the tire replace-
ment.
It is possible that some tires, espe-
cially with larger punctures or damage
to the sidewall, cannot be sealed
completely.
Air pressure loss in the tire may
adversely affect tire performance.
For this reason, you should avoid
abrupt steering or other driving
maneuvers, especially if the vehicle is
heavily loaded or if a trailer is in use.
The Tire Mobility Kit is not designed
or intended as a permanent tire
repair method and is to be used for
one tire only.This instruction shows you step by
step procedure to temporarily seal
the puncture.
Read the section “Notes on the safe
use of the Tire Mobility Kit”.Notes on the safe use of the
Tire Mobility Kit
Park your car at the side of the
road so that you can work with the
Tire Mobility Kit away from moving
traffic.
To be sure your vehicle will not move, even when you're on fairly
level ground, always set your park-
ing brake.
Only use the Tire Mobility Kit for sealing/inflation passenger car
tires. Only punctured areas located
within the tread region of the tire
can be sealed using the Tire
Mobility Kit.
Do not use on motorcycles, bicy- cles or any other type of tires.
When the tire and wheel are dam- aged, do not use Tire Mobility Kit
for your safety.
Page 493 of 616
Maintenance
24
8
✽
✽
NOTICE - NHTSA Safety
Corrosion Alert
NHTSA has warned all vehicle own-
ers of all brands that they must main-
tain their vehicles in a manner which
will prevent brake hose and brake line
failures due to corrosion when such
vehicles are exposed to winter road
salt and related chemicals. While seri-
ous corrosion conditions typically only
manifest themselves as safety issues
after 7 years of vehicle use, the corro-
sion process starts immediately and
thus underbody cleaning maintenance
must commence from your vehicle's
first exposure to road salts and chem-
icals. NHTSA urges vehicle owners to
take the following steps to prevent
corrosion:
(Continued)(Continued)
1. Wash the undercarriage of your
vehicle regularly throughout the
winter and do a thorough washing
in the spring to remove road salt
and other de-icing chemicals.
2. Monitor the brake system for signs of corrosion by having regu-
lar professional inspections and
watching for signs of problems,
including loss of brake fluid,
unusual leaks and soft or spongy
feel in the brake pedal.
3. Replace the entire brake pipe assembly if you find severe corro-
sion that causes scaling or flaking
of brake components.
Brake fluid
Check the brake fluid level in the
brake fluid reservoir. The level should
be between “MIN” and “MAX” marks
on the side of the reservoir. Use only
hydraulic brake fluid conforming to
DOT 3 or DOT 4 specification.
Parking brake
Inspect the parking brake system
including the parking brake pedal
and cables.
Brake discs, pads, calipers
and rotors
Check the pads for excessive wear,
discs for run out and wear, and
calipers for fluid leakage.
Page 525 of 616
Maintenance
56
8
Tread wear
The tread wear grade is a compara-
tive rating based on the wear rate of
the tire when tested under controlled
conditions on a specified govern-
ment test course. For example, a tire
graded 150 would wear one-and-a-
half times (1½) as well on the gov-
ernment course as a tire graded 100.
The relative performance of tires
depends upon the actual conditions
of their use, however, and may
depart significantly from the norm
due to variations in driving habits,
service practices and differences in
road characteristics and climate. Tires degrade over time, even when
they are not being used. Regardless
of the remaining tread, we recom-
mend that tires be replaced after
approximately six (6) years of normal
service. Heat caused by hot climates
or frequent high loading conditions
can accelerate the aging process.
These grades are molded on the
side-walls of passenger vehicle tires.
The tires available as standard or
optional equipment on your vehicles
may vary with respect to grade.
Traction - AA, A, B & C
The traction grades, from highest to
lowest, are AA, A, B and C. Those
grades represent the tires ability to
stop on wet pavement as measured
under controlled conditions on spec-
ified government test surfaces of
asphalt and concrete. A tire marked
C may have poor traction perform-
ance.
The traction grade assigned to this
tire is based on straight-ahead brak-
ing traction tests, and does not
include acceleration, cornering,
hydroplaning, or peak traction char-
acteristics.
Page 528 of 616
859
Maintenance
Production options weight:The
combined weight of installed regular
production options weighing over 5
lb.(2.3 kg) in excess of the standard
items which they replace, not previ-
ously considered in curb weight or
accessory weight, including heavy
duty brakes, ride levelers, roof rack,
heavy duty battery, and special trim.
Recommended Inflation Pressure:
Vehicle manufacturer's recommend-
ed tire inflation pressure and shown
on the tire placard.
Radial Ply Tire: A pneumatic tire in
which the ply cords that extend to the
beads are laid at 90 degrees to the
centerline of the tread.
Rim: A metal support for a tire and
upon which the tire beads are seat-
ed.
Sidewall: The portion of a tire
between the tread and the bead. Speed Rating:
An alphanumeric
code assigned to a tire indicating the
maximum speed at which a tire can
operate.
Traction: The friction between the
tire and the road surface. The
amount of grip provided.
Tread: The portion of a tire that
comes into contact with the road.
Treadwear Indicators: Narrow
bands, sometimes called "wear
bars," that show across the tread of a
tire when only 1/16 inch of tread
remains.
UTQGS: Uniform Tire Quality
Grading Standards, a tire information
system that provides consumers with
ratings for a tire's traction, tempera-
ture and treadwear. Ratings are
determined by tire manufacturers
using government testing proce-
dures. The ratings are molded into
the sidewall of the tire.
Vehicle Capacity Weight: The num-
ber of designated seating positions
multiplied by 150 lbs. (68kg) plus the
rated cargo and luggage load. Vehicle Maximum Load on the
Tire:
Load on an individual tire due
to curb and accessory weight plus
maximum occupant and cargo
weight.
Vehicle Normal Load on the Tire:
Load on an individual tire that is
determined by distributing to each
axle its share of the curb weight,
accessory weight, and normal occu-
pant weight and driving by 2.
Vehicle Placard: A label permanent-
ly attached to a vehicle showing the
original equipment tire size and rec-
ommended inflation pressure.
Page 577 of 616
Maintenance
108
8
Aluminum wheel maintenance
The aluminum wheels are coated with
a clear protective finish.
Do not use any abrasive cleaner,
polishing compound, solvent, or wire
brushes on aluminum wheels. They
may scratch the finish.
Clean the wheel when it has cooled.
Use only a mild soap or neutral detergent, and rinse thoroughly with
water. Also, be sure to clean the
wheels after driving on salted roads.
This helps prevent corrosion.
Avoid washing the wheels with high- speed vehicle wash brushes.
Do not use any alkaline or acid detergents It may damage and cor-
rode the aluminum wheels coated
with a clear protective finish.
Corrosion protection
Protecting your vehicle from corrosion
By using the most advanced design
and construction practices to combat
corrosion, we produce vehicles of
the highest quality. However, this is
only part of the job. To achieve the
long-term corrosion resistance your
vehicle can deliver, the owner's
cooperation and assistance is also
required.
Common causes of corrosion
The most common causes of corro-
sion on your vehicle are:
Road salt, dirt and moisture that isallowed to accumulate underneath
the vehicle.
Removal of paint or protective coatings by stones, gravel, abra-
sion or minor scrapes and dents
which leave unprotected metal
exposed to corrosion. High-corrosion areas
If you live in an area where your vehi-
cle is regularly exposed to corrosive
materials, corrosion protection is
particularly important. Some of the
common causes of accelerated cor-
rosion are road salts, dust control
chemicals, ocean air and industrial
pollution.
Moisture breeds corrosion
Moisture creates the conditions in
which corrosion is most likely to
occur. For example, corrosion is
accelerated by high humidity, partic-
ularly when temperatures are just
above freezing. In such conditions,
the corrosive material is kept in con-
tact with the vehicle’s surface by
moisture that evaporates slowly.
Mud is particularly corrosive
because it dries slowly and holds
moisture in contact with the vehicle.
Although the mud appears to be dry,
it can still retain the moisture and
promote corrosion.
WARNING
After washing the vehicle, test
the brakes while driving slowly
to see if they have been affected
by water. If braking performance
is impaired, dry the brakes by
applying them lightly while main-
taining a slow forward speed.