Page 17 of 54

15*IF EQUIPPED ALWAYS CHECK THE OWNER’S MANUAL FOR COMPLETE OPER ATING INFORMATION AND SAFET Y WARNINGS .
PLUG-IN HYBRID SYSTEM
F
G
POWER
CHARGE
FAULT
E
REMINDER: For more detail and/or subsequent steps in charging your vehicle, please see the Owner’s Manual .
Charging the Plug-In Hybrid Vehicle (Continued)
To charge the Optima Plug-In Hybrid vehicle using a normal/trickle charger:
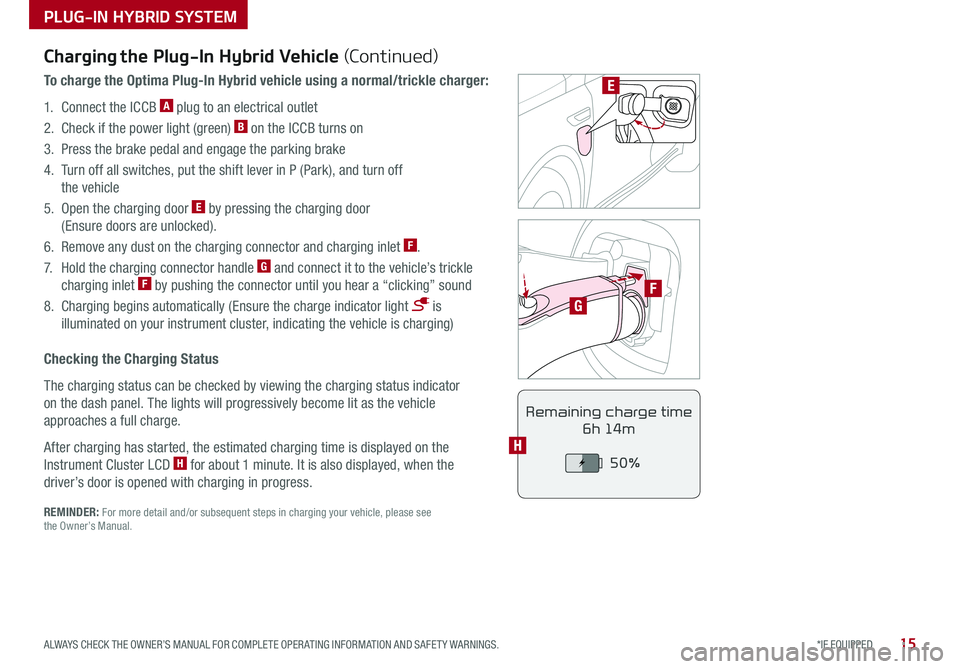
1 . Connect the ICCB A plug to an electrical outlet
2 . Check if the power light (green) B on the ICCB turns on
3 . Press the brake pedal and engage the parking brake
4 . Turn off all switches, put the shift lever in P (Park), and turn off
the vehicle
5 . Open the charging door E by pressing the charging door
(Ensure doors are unlocked) .
6 . Remove any dust on the charging connector and charging inlet F .
7 . Hold the charging connector handle G and connect it to the vehicle’s trickle
charging inlet F by pushing the connector until you hear a “clicking” sound
8 . Charging begins automatically (Ensure the charge indicator light is
illuminated on your instrument cluster, indicating the vehicle is charging)
Checking the Charging Status
The charging status can be checked by viewing the charging status indicator
on the dash panel . The lights will progressively become lit as the vehicle
approaches a full charge .
After charging has started, the estimated charging time is displayed on the
Instrument Cluster LCD H for about 1 minute . It is also displayed, when the
driver’s door is opened with charging in progress .
Remaining charge time
6h 14m
50%
H
Page 18 of 54

NIRO PLUG-IN HYBRID FEATURES & FUNCTIONS GUIDE16*IF EQUIPPED
AUTOOFF
(Buttons are located left of the Steering Wheel)
AB
PLUG-IN HYBRID SYSTEM
Charging Connector Auto/Lock Mode Scheduled C
harging
Charging times can be set using the UVO eco with Navigation* settings
when in EV Mode . You can also use the Scheduled Charging* App on your
sm
artphone .
Charging with the UVO eco Smartphone App:
The UVO eco smartphone app can help you find the nearest charging station,
displays charging-status and the Scheduled Charging information . On your
Smartphone, go to an app store or marketplace to download the UVO eco
Smartphone app .
REM
INDER: When S cheduled Charging is s et and the c harger is p lugged in, charging o f the
electric vehicle will not begin until the time and date set .
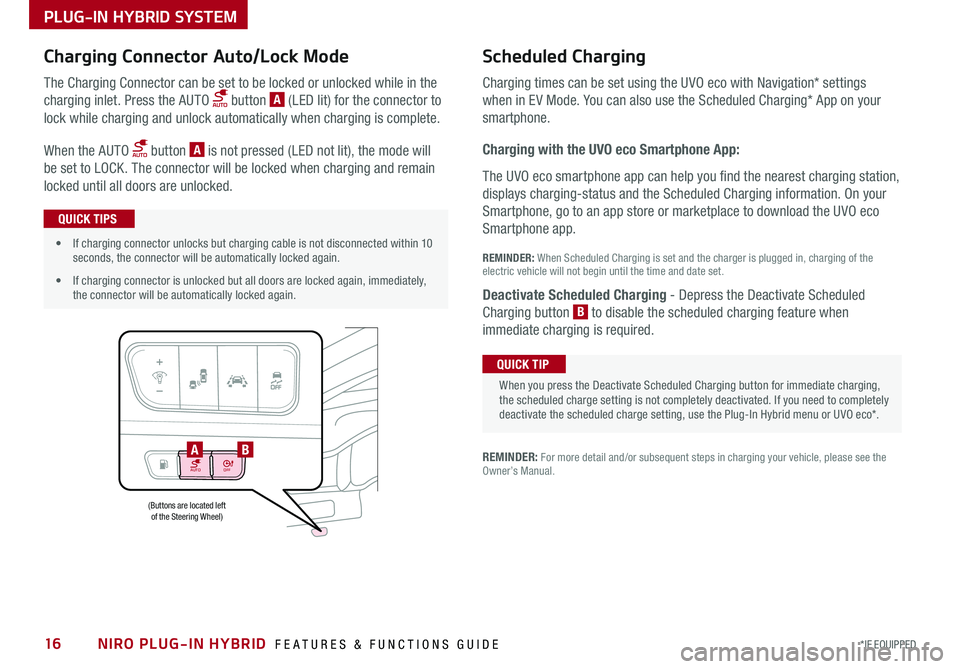
Deactivate Scheduled Charging
- Depress the Deactivate Scheduled
Charging b utton B
t o disable the scheduled charging feature when
immediate c harging is required .
The Charging Connector can be set to be locked or unlocked while in the
charging inlet . Press the AUTO button A (LED lit) for the connector to
lock while charging and unlock automatically when charging is complete .
When the AUTO button A is not pressed (LED not lit), the mode will
be set to LOCK . The connector will be locked when charging and remain
locked until all doors are unlocked .
REMINDER: For more detail and/or subsequent steps in charging your vehicle, please see the Owner’s Manual .
When you press the Deactivate Scheduled Charging button for immediate charging, the scheduled charge setting is not completely deactivated . If you need to completely deactivate the scheduled charge setting, use the Plug-In Hybrid menu or UVO eco* .
QUICK TIP
•If charging connector unlocks but charging cable is not disconnected within 10 seconds, the connector will be automatically locked again .
•If charging connector is unlocked but all doors are locked again, immediately, the connector will be automatically locked again .
QUICK TIPS
Page 35 of 54

33*IF EQUIPPED ALWAYS CHECK THE OWNER’S MANUAL FOR COMPLETE OPER ATING INFORMATION AND SAFET Y WARNINGS .
REMINDERS:
•
Avoid placing other metal items in the bin while charging as to not impede the charging area
•
This vehicle is equipped with wireless charging technology which allows for a device to be charged using inductive charging, however, device compatibility varies . See your owner’s manual for more detailed information and the back page for legal disclaimers
•
Inductive charging systems are less ef ficient than conventional charging through cable . As a result, higher device operating temperatures may be experienced during use
•
Charging Performance - Device position on the wireless charging system can affect charging performance . Other factor that may affect the charging rate includes foreign objects, such as coins or pens, and phone case thickness
Wireless Charging Video To view a video on your mobile device, snap this QR Code or visit the listed website .
Refer to page 2 for more information .
QR CODEWireless Smartphone Charging System*
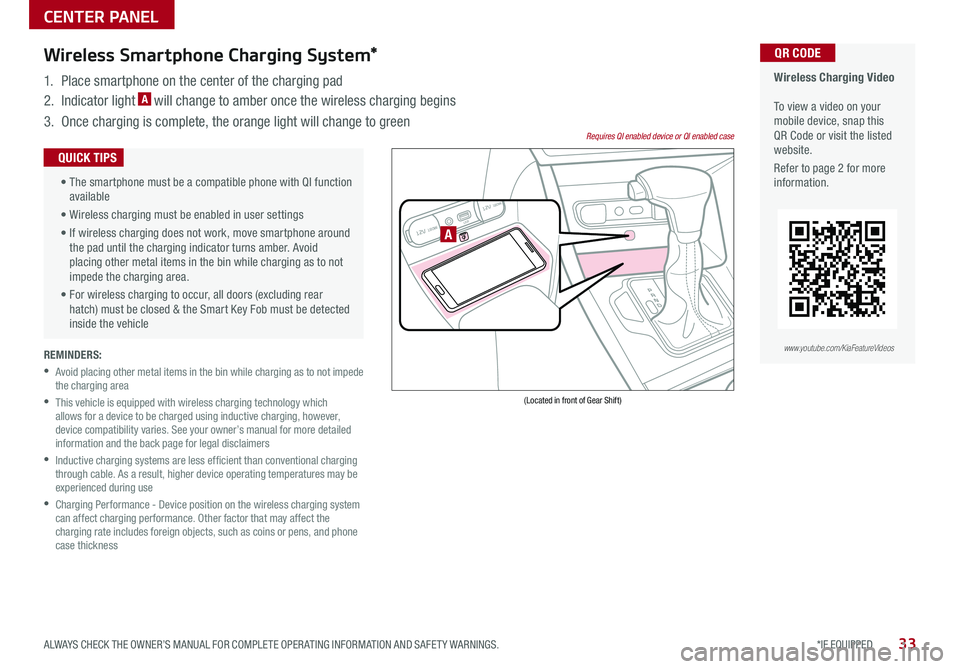
1 . Place smartphone on the center of the charging pad
2 . Indicator light A will change to amber once the wireless charging begins
3 . Once charging is complete, the orange light will change to green
12V 180WAUX USB
12V 180W
(Located in front of Gear Shift)
Requires QI enabled device or QI enabled case
A
•
The smartphone must be a compatible phone with QI function available
• Wireless charging must be enabled in user settings
• If wireless charging does not work, move smartphone around the pad until the charging indicator turns amber . Avoid placing other metal items in the bin while charging as to not impede the charging area .
• For wireless charging to occur, all doors (excluding rear hatch) must be closed & the Smart Key Fob must be detected inside the vehicle
QUICK TIPS
www.youtube.com/KiaFeatureVideos
CENTER PANEL