Page 15 of 544

INSTRUMENT PANEL OVERVIEW
Your vehicle at a glance
2
2-5
1. Instrument cluster ..............................4-67
2. Horn...................................................4-47
3. Driver's front air bag ..........................3-52
4. Engine start/stop button ......................5-6
5. Audio / Video / Navigation ...............4-181
6. Climate control system ....................4-144
7. Clock................................................4-174
8. Hazard warning flasher .......................6-2
9. Passenger's front air bag...................3-52
10. Glove box.......................................4-165
11. SBC(Shift by cable) control lever.....5-11
12. SBW(Shift by wire) control lever......5-16
13. Drive mode button ...........................5-54
14. Auto hold button ..............................5-37
15. Electric parking brake switch ...........5-31
16. DIS central key ..............................4-181
17. Front blind spot monitoring systemOn/Off button .................................4-126
18. Rear curtain folding button ............4-178
19. Surround View Monitoring System On/Off button .................................4-127
20. Snow mode button ..........................5-54
21. Center console storage box ..........4-164
OKH015004N
❈ The actual shape may differ from the illustration.
KH USA 2:2016 4/21/2017 1:33 PM Page 5
Page 118 of 544

Features of your vehicle
4
4-37
FUEL FILLER LID
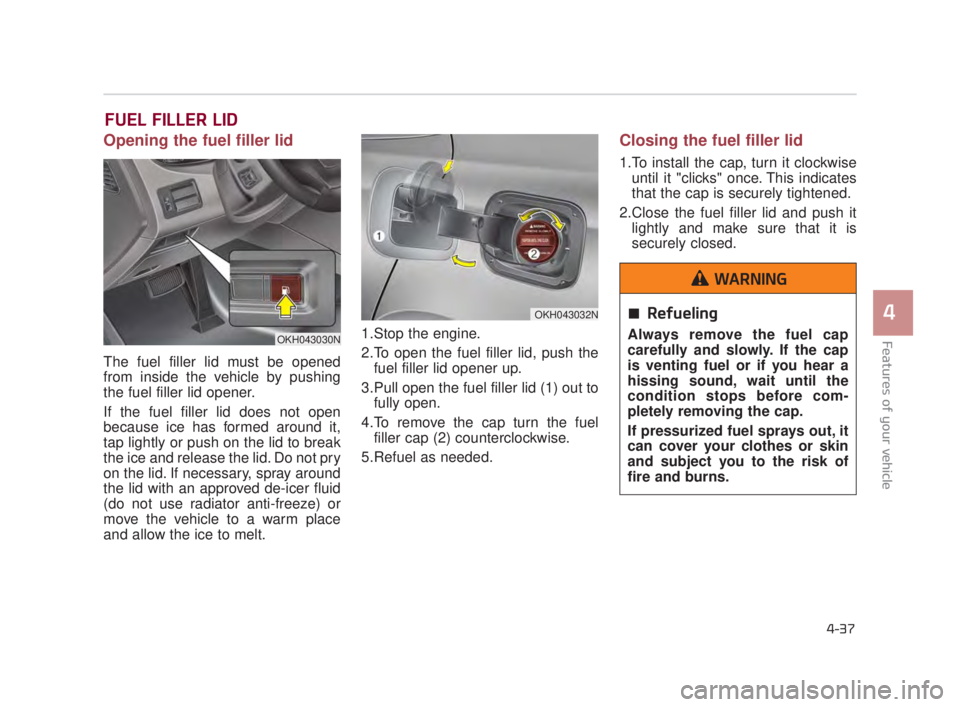
Opening the fuel filler lid
The fuel filler lid must be opened
from inside the vehicle by pushing
the fuel filler lid opener.
If the fuel filler lid does not open
because ice has formed around it,
tap lightly or push on the lid to break
the ice and release the lid. Do not pry
on the lid. If necessary, spray around
the lid with an approved de-icer fluid
(do not use radiator anti-freeze) or
move the vehicle to a warm place
and allow the ice to melt.1.Stop the engine.
2.To open the fuel filler lid, push the
fuel filler lid opener up.
3.Pull open the fuel filler lid (1) out to fully open.
4.To remove the cap turn the fuel filler cap (2) counterclockwise.
5.Refuel as needed.
Closing the fuel filler lid
1.To install the cap, turn it clockwise until it "clicks" once. This indicates
that the cap is securely tightened.
2.Close the fuel filler lid and push it lightly and make sure that it is
securely closed.
Refueling
Always remove the fuel cap
carefully and slowly. If the cap
is venting fuel or if you hear a
hissing sound, wait until the
condition stops before com-
pletely removing the cap.
If pressurized fuel sprays out, it
can cover your clothes or skin
and subject you to the risk of
fire and burns.
WARNING
OKH043030N
OKH043032N
KH USA 4:2018 4/18/2017 5:56 PM Page 37
Page 255 of 544
Features of your vehicle
4-174
✽NOTICE - Air intake
There is an air intake for the rear air
ventilation at the lower part of the
rear center seatback. If the air
intake is blocked, efficiency of the
rear air ventilation will be lower. Be
careful not to block the air intake.
Clock
Whenever the battery terminals or
related fuses are disconnected, you
must reset the time.
You can set the clock by using the
AVN (Audio or Navigation)
For the details, refer to the AVN man-
ual.
OKH045241N
Clock Setting Distraction
Do not adjust the clock while
driving. Such adjustments may
distract you for too long from
the roadway and lead to a colli-
sion.
WARNING
KH USA 4:2018 4/18/2017 6:04 PM Page 174
Page 288 of 544
Driving your vehicle
5
5-23
■When the battery is dis-charged:
When the battery is discharged, the
automatic transmission (shift by wire)
is not shifted.
In emergency, if you want to shift into
[N], follow actions
You can shift into [N] by using the
driver if the jump starting is impossi-
ble to do.
1) Open the storage cover.
2) Remove the rubber on bottom ofstorage box.
3) Insert the driver (-) to service hole as direction of clockwise 10 times.
The shifting is changed to [N]
from [P] position. If you want to
shift to [P] position, turn the driver
counter-clockwise.
OKH053045N
Shifting from park
Always fully depress the brake
pedal before and while shifting
out of the P (Park) position into
another position to help avoid
inadvertent motion of the vehicle.
WARNING
KH USA 5:2018 4/12/2017 9:59 AM Page 23
Page 393 of 544
Removing and storing the
spare tire
Turn the tire hold-down wing bolt
counterclockwise.
Store the tire in the reverse order of
removal.
To prevent the spare tire and tools
from “rattling” while the vehicle is in
motion, store them properly.
6-18
What to do in an emergency
Tire Jack
Never use the bumper orother parts of the vehicle to
support the vehicle jack. The
vehicle can easily roll off the
jack causing serious injury or
death.
Do not place any portion of your body under a vehicle that
is supported only by a jack.
Use vehicle support stands.
WARNING
Running vehicle on jack
Do not start or run the engine of
the vehicle while the vehicle is
on the jack as this may cause
the vehicle to fall off the jack.
WARNING
OKH063006N
KH USA 6:2018 4/12/2017 10:21 AM Page 18
Page 394 of 544
What to do in an emergency
6
6-19
If it is hard to loosen the tire hold-
down wing bolt by a hand, you can
loosen it easily using the Jack handle.
1.Put the Jack handle (1) into theinside of tire hold-down wing bolt.
2.Turn the tire hold-down wing bolt counterclockwise by the Jack han-
dle to utilize the principles of the
lever and fulcrum.
Changing tires
1.Park on a level surface and applythe parking brake firmly.
2.Shift the shift lever into P (Park).
3.Activate the hazard warning flasher.
OKH063003N
When you remove or store the
spare tire, do not contact or
bump the battery with the spare
tire. Contacting or bumping the
battery may cause failure of
electrical circuits.
CAUTION
OKH065030N
KH USA 6:2018 4/12/2017 10:21 AM Page 19
Page 396 of 544
What to do in an emergency
6
6-21
7.Loosen the wheel lug nuts counter-clockwise one turn each in
sequence of number, but do not
remove any nut until the tire has
been raised off the ground.
8.Place the jack at the front (1) orrear (2) jacking position closest to
the tire you are changing. Place the
jack at the designated locations
under the frame. The jacking posi-
tions are plates welded to the
frame with two tabs and a raised
dot to index with the jack.
OKH065010N
OKH063026N
OKH063011N
Place the jack not to damage to
the plastic guard. If you place
the jack at the plastic guard and
jack up the vehicle, the plastic
guard may be damaged.
CAUTION
Jack location
To reduce the possibility of
injury, be sure to use only the
jack provided with the vehicle
and in the correct jack position;
never use any other part of the
vehicle for jack support.
WARNING
KH USA 6:2018 4/12/2017 10:21 AM Page 21
Page 397 of 544

6-22
What to do in an emergency
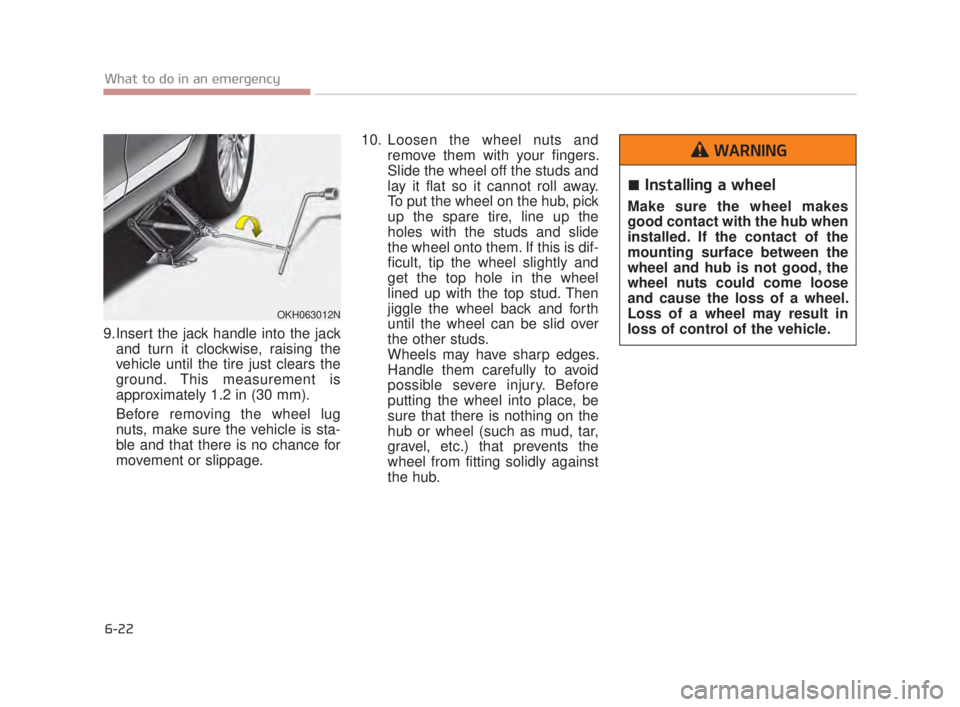
9.Insert the jack handle into the jackand turn it clockwise, raising the
vehicle until the tire just clears the
ground. This measurement is
approximately 1.2 in (30 mm).
Before removing the wheel lug
nuts, make sure the vehicle is sta-
ble and that there is no chance for
movement or slippage. 10. Loosen the wheel nuts and
remove them with your fingers.
Slide the wheel off the studs and
lay it flat so it cannot roll away.
To put the wheel on the hub, pick
up the spare tire, line up the
holes with the studs and slide
the wheel onto them. If this is dif-
ficult, tip the wheel slightly and
get the top hole in the wheel
lined up with the top stud. Then
jiggle the wheel back and forth
until the wheel can be slid over
the other studs.
Wheels may have sharp edges.
Handle them carefully to avoid
possible severe injury. Before
putting the wheel into place, be
sure that there is nothing on the
hub or wheel (such as mud, tar,
gravel, etc.) that prevents the
wheel from fitting solidly against
the hub.
OKH063012N
Installing a wheel
Make sure the wheel makes
good contact with the hub when
installed. If the contact of the
mounting surface between the
wheel and hub is not good, the
wheel nuts could come loose
and cause the loss of a wheel.
Loss of a wheel may result in
loss of control of the vehicle.
WARNING
KH USA 6:2018 4/12/2017 10:21 AM Page 22