2018 KIA K900 service
[x] Cancel search: servicePage 419 of 544
Maintenance
7
7-11
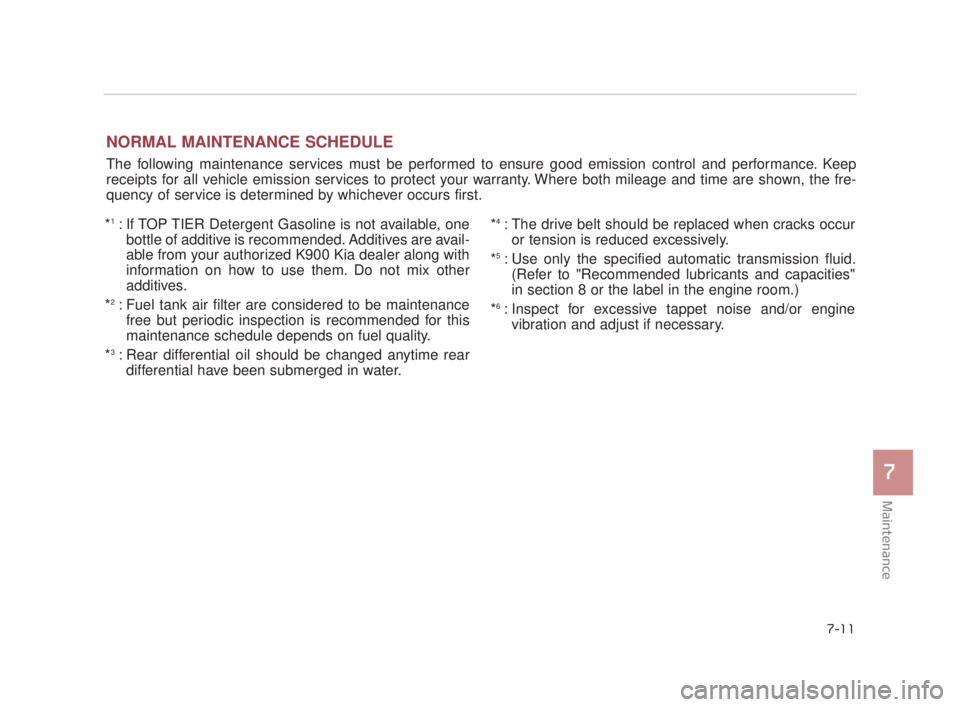
NORMAL MAINTENANCE SCHEDULE
The following maintenance services must be performed to ensure good emission control and performance. Keep
receipts for all vehicle emission services to protect your warranty. Where both mileage and time are shown, the fre-
quency of service is determined by whichever occurs first.
*
1: If TOP TIER Detergent Gasoline is not available, one bottle of additive is recommended. Additives are avail-
able from your authorized K900 Kia dealer along with
information on how to use them. Do not mix other
additives.
*
2: Fuel tank air filter are considered to be maintenance free but periodic inspection is recommended for this
maintenance schedule depends on fuel quality.
*
3: Rear differential oil should be changed anytime rear differential have been submerged in water. *
4: The drive belt should be replaced when cracks occur
or tension is reduced excessively.
*
5: Use only the specified automatic transmission fluid. (Refer to "Recommended lubricants and capacities"
in section 8 or the label in the engine room.)
*
6: Inspect for excessive tappet noise and/or engine vibration and adjust if necessary.
KH USA 7:2018 4/14/2017 6:37 PM Page 11
Page 434 of 544
7-26
Maintenance
No check, No service required
❑Automatic transmission fluid *5
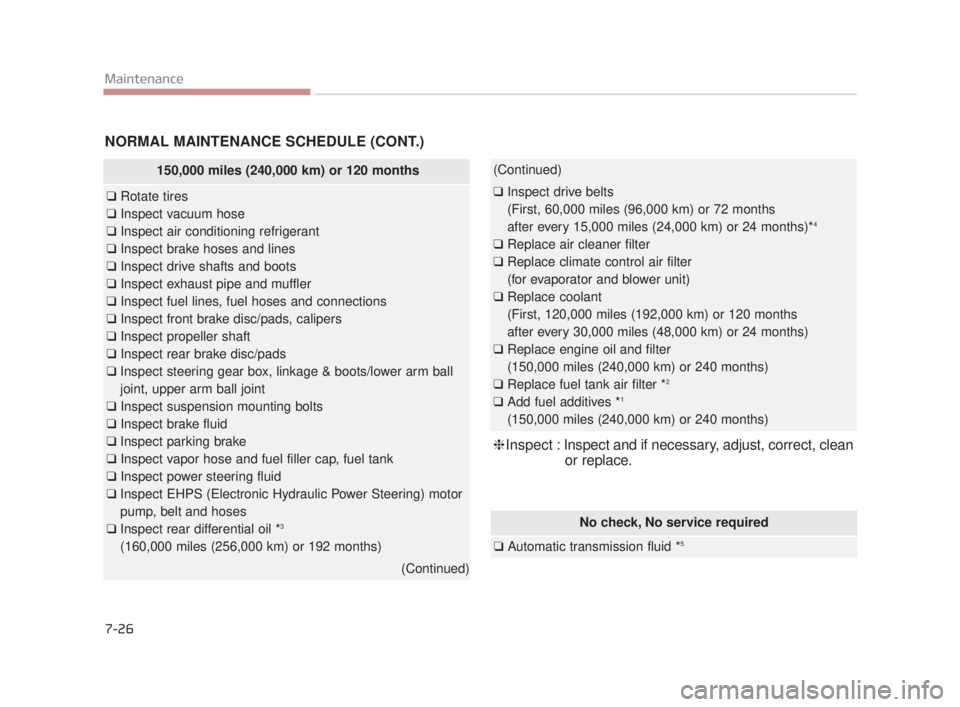
NORMAL MAINTENANCE SCHEDULE (CONT.)
150,000 miles (240,000 km) or 120 months
❑Rotate tires
❑ Inspect vacuum hose
❑ Inspect air conditioning refrigerant
❑ Inspect brake hoses and lines
❑ Inspect drive shafts and boots
❑ Inspect exhaust pipe and muffler
❑ Inspect fuel lines, fuel hoses and connections
❑ Inspect front brake disc/pads, calipers
❑ Inspect propeller shaft
❑ Inspect rear brake disc/pads
❑ Inspect steering gear box, linkage & boots/lower arm ball
joint, upper arm ball joint
❑ Inspect suspension mounting bolts
❑ Inspect brake fluid
❑ Inspect parking brake
❑ Inspect vapor hose and fuel filler cap, fuel tank
❑ Inspect power steering fluid
❑ Inspect EHPS (Electronic Hydraulic Power Steering) motor
pump, belt and hoses
❑ Inspect rear differential oil *
3
(160,000 miles (256,000 km) or 192 months)
(Continued)
(Continued)
❑Inspect drive belts
(First, 60,000 miles (96,000 km) or 72 months
after every 15,000 miles (24,000 km) or 24 months)*
4
❑ Replace air cleaner filter
❑ Replace climate control air filter
(for evaporator and blower unit)
❑ Replace coolant
(First, 120,000 miles (192,000 km) or 120 months
after every 30,000 miles (48,000 km) or 24 months)
❑ Replace engine oil and filter
(150,000 miles (240,000 km) or 240 months)
❑ Replace fuel tank air filter *
2
❑Add fuel additives *1
(150,000 miles (240,000 km) or 240 months)
❈Inspect : Inspect and if necessary, adjust, correct, clean
or replace.
KH USA 7:2018 4/14/2017 6:37 PM Page 26
Page 435 of 544
Maintenance
7
7-27
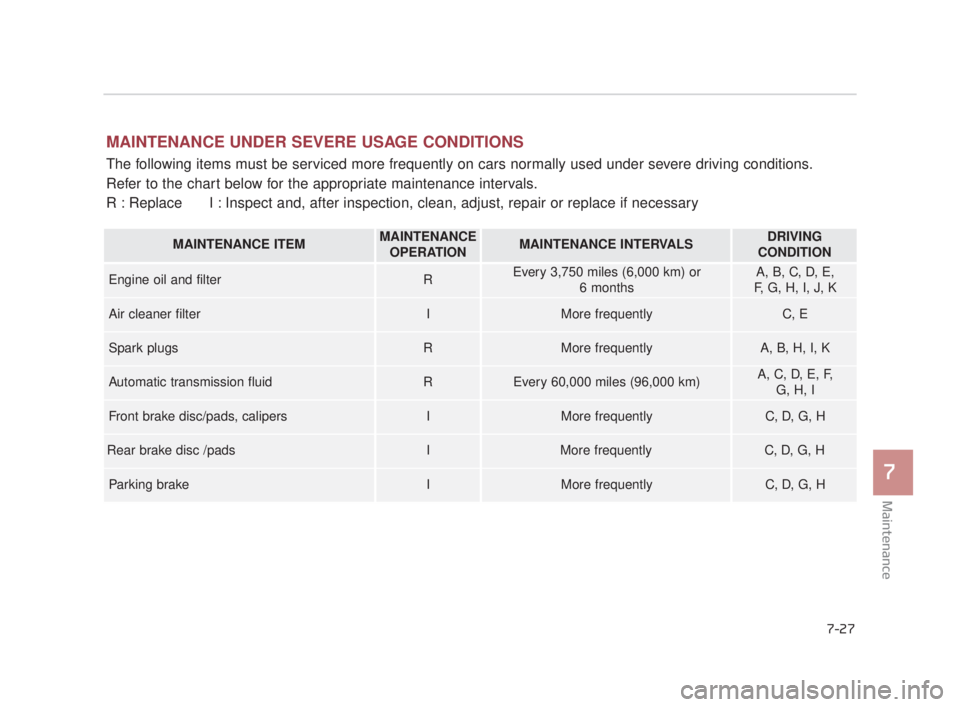
MAINTENANCE UNDER SEVERE USAGE CONDITIONS
The following items must be serviced more frequently on cars normally used under severe driving conditions.
Refer to the chart below for the appropriate maintenance intervals.
R : Replace I : Inspect and, after inspection, clean, adjust, repair or replace if nece\
ssary
MAINTENANCE ITEMMAINTENANCEOPERATIONMAINTENANCE INTERVALSDRIVING
CONDITION
Engine oil and filterREvery 3,750 miles (6,000 km) or 6 monthsA, B, C, D, E,
F, G, H, I, J, K
Air cleaner filterIMore frequentlyC, E
Spark plugsRMore frequentlyA, B, H, I, K
Automatic transmission fluidREvery 60,000 miles (96,000 km) A, C, D, E, F, G, H, I
Front brake disc/pads, calipersIMore frequentlyC, D, G, H
Rear brake disc /padsIMore frequentlyC, D, G, H
Parking brakeIMore frequentlyC, D, G, H
KH USA 7:2018 4/14/2017 6:37 PM Page 27
Page 449 of 544
Maintenance
7
7-41
AIR CLEANER
Filter replacement
It must be replaced when necessary,
and should not be washed.
You can clean the filter when inspect-
ing the air cleaner element.
Clean the filter by using compressed
air.
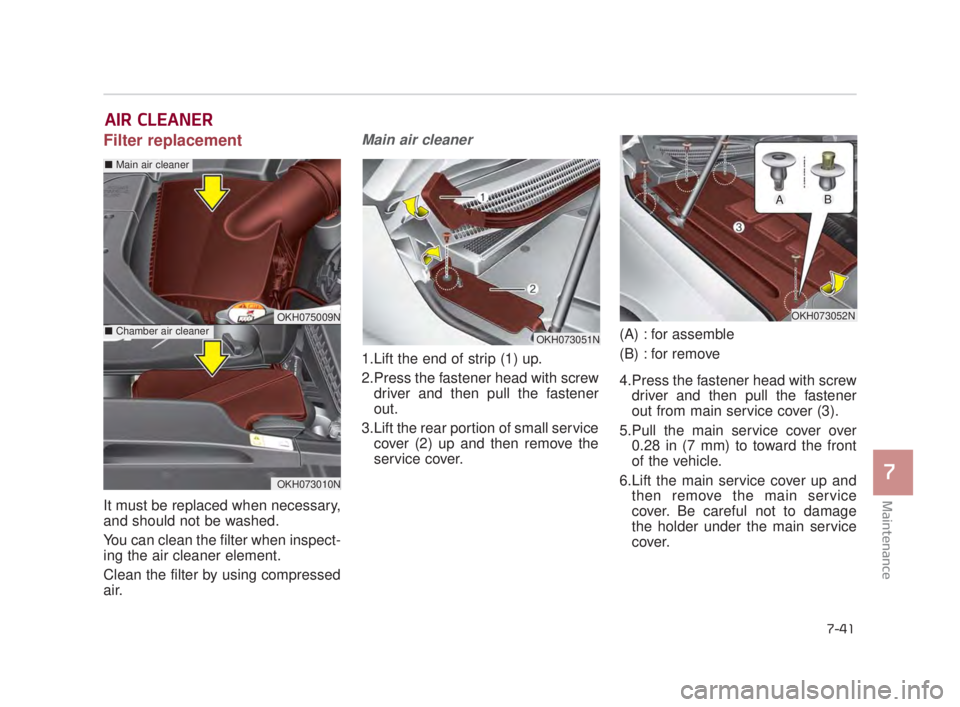
Main air cleaner
1.Lift the end of strip (1) up.
2.Press the fastener head with screwdriver and then pull the fastener
out.
3.Lift the rear portion of small service cover (2) up and then remove the
service cover. (A) : for assemble
(B) : for remove
4.Press the fastener head with screw
driver and then pull the fastener
out from main service cover (3).
5.Pull the main service cover over 0.28 in (7 mm) to toward the front
of the vehicle.
6.Lift the main service cover up and then remove the main service
cover. Be careful not to damage
the holder under the main service
cover.
OKH075009N
OKH073010N
■ Main air cleaner
■ Chamber air cleaner
OKH073052N
OKH073051N
AB
KH USA 7:2018 4/14/2017 6:38 PM Page 41
Page 457 of 544
Maintenance
7
7-49
BATTERY
For best battery service
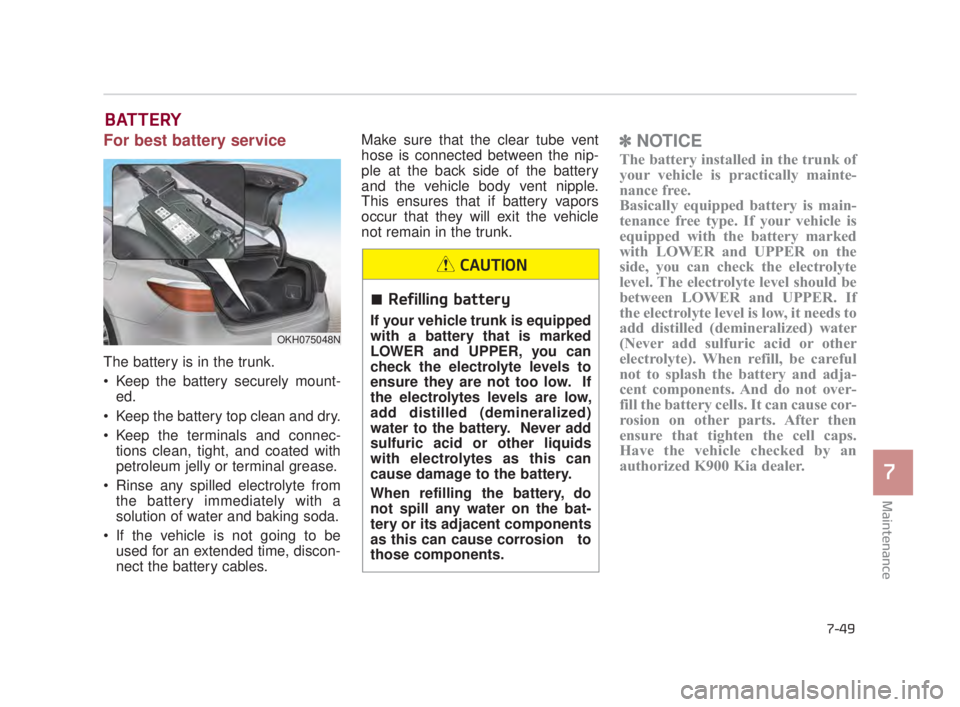
The battery is in the trunk.
Keep the battery securely mount-ed.
Keep the battery top clean and dry.
Keep the terminals and connec- tions clean, tight, and coated with
petroleum jelly or terminal grease.
Rinse any spilled electrolyte from the battery immediately with a
solution of water and baking soda.
If the vehicle is not going to be used for an extended time, discon-
nect the battery cables. Make sure that the clear tube vent
hose is connected between the nip-
ple at the back side of the battery
and the vehicle body vent nipple.
This ensures that if battery vapors
occur that they will exit the vehicle
not remain in the trunk.
✽
NOTICE
The battery installed in the trunk of
your vehicle is practically mainte-
nance free.
Basically equipped battery is main-
tenance free type. If your vehicle is
equipped with the battery marked
with LOWER and UPPER on the
side, you can check the electrolyte
level. The electrolyte level should be
between LOWER and UPPER. If
the electrolyte level is low, it needs to
add distilled (demineralized) water
(Never add sulfuric acid or other
electrolyte). When refill, be careful
not to splash the battery and adja-
cent components. And do not over-
fill the battery cells. It can cause cor-
rosion on other parts. After then
ensure that tighten the cell caps.
Have the vehicle checked by an
authorized K900 Kia dealer.
OKH075048N
Refilling battery
If your vehicle trunk is equipped
with a battery that is marked
LOWER and UPPER, you can
check the electrolyte levels to
ensure they are not too low. If
the electrolytes levels are low,
add distilled (demineralized)
water to the battery. Never add
sulfuric acid or other liquids
with electrolytes as this can
cause damage to the battery.
When refilling the battery, do
not spill any water on the bat-
tery or its adjacent components
as this can cause corrosion to
those components.
CAUTION
KH USA 7:2018 4/14/2017 6:38 PM Page 49
Page 460 of 544
7-52
Maintenance
Battery recharging by battery
charger
Your vehicle has a maintenance-free,
calcium-based battery.
If the battery becomes dischargedin a short time (because, for exam-
ple, the headlights or interior lights
were left on while the vehicle was
not in use), recharge it by slow
charging (trickle) for 10 hours.
If the battery gradually discharges because of high electric load while
the vehicle is being used, recharge
it at 20-30A for two hours.
Absorbent Glass Matt (AGM) bat- teries are maintenance-free and
we recommend that the AGM bat-
tery be serviced by an authorized
K900 Kia dealer. For charging your
AGM battery, use only fully auto-
matic battery chargers that are
specially developed for AGM bat-
teries.
When replacing the AGM battery, we recommend that you use parts
for replacement from an authorized
K900 Kia dealer.
Battery recharging by vehicle
After a jump start from a good bat-
tery, run the engine for 20-30 min-
utes at idle or driving the vehicle
before it is shutoff. Vehicle may not
restart if you shut it off before the
battery had chance to adequately
recharge.
When recharging the battery,
observe the following precautions:
The battery must be removed fromthe vehicle and placed in an area
with good ventilation.
Do not allow cigarettes, sparks, or flame near the battery.
Watch the battery during charging, and stop or reduce the charging
rate if the battery cells begin
gassing (boiling) violently or if the
temperature of the electrolyte of
any cell exceeds 120°F (49°C).
Wear eye protection when check- ing the battery during charging.
AGM battery(if equipped)
Do not open or remove the cap
on top of the battery. This may
cause leaks of internal elec-
trolyte that could result in
severe injury.
WARNING
KH USA 7:2018 4/14/2017 6:38 PM Page 52
Page 471 of 544
Maintenance
7
7-63
Tread wear
The tread wear grade is a compara-
tive rating based on the wear rate of
the tire when tested under controlled
conditions on a specified govern-
ment test course. For example, a tire
graded 150 would wear one-and-a-
half times (1½) as well on the gov-
ernment course as a tire graded 100.
The relative performance of tires
depends upon the actual conditions
of their use, however, and may
depart significantly from the norm
due to variations in driving habits,
service practices and differences in
road characteristics and climate.
These grades are molded on the
side-walls of passenger vehicle tires.
The tires available as standard or
optional equipment on your vehicle
may vary with respect to grade. Traction - AA, A, B & C
The traction grades, from highest to
lowest, are AA, A, B and C. Those
grades represent the tire’s ability to
stop on wet pavement as measured
under controlled conditions on spec-
ified government test surfaces of
asphalt and concrete. A tire marked
C may have poor traction perform-
ance.
The traction grade assigned to this
tire is based on straight-ahead brak-
ing traction tests, and does not
include acceleration, cornering,
hydroplaning, or peak traction char-
acteristics.
Temperature -A, B & C
The temperature grades are A (the
highest), B and C representing the
tire’s resistance to the generation of
heat and its ability to dissipate heat
when tested under controlled condi-
tions on a specified indoor laboratory
test wheel.
Sustained high temperature can
cause the material of the tire to
degenerate and reduce tire life, and
excessive temperature can lead to
sudden tire failure. The grade C cor-
responds to a level of performance
which all passenger car tires must
meet under the Federal Motor
Vehicle Safety Standard No. 109.
Grades B and A represent higher
levels of performance on the labora-
tory test wheel than the minimum
required by law.
KH USA 7:2018 4/14/2017 6:39 PM Page 63
Page 480 of 544
7-72
Maintenance
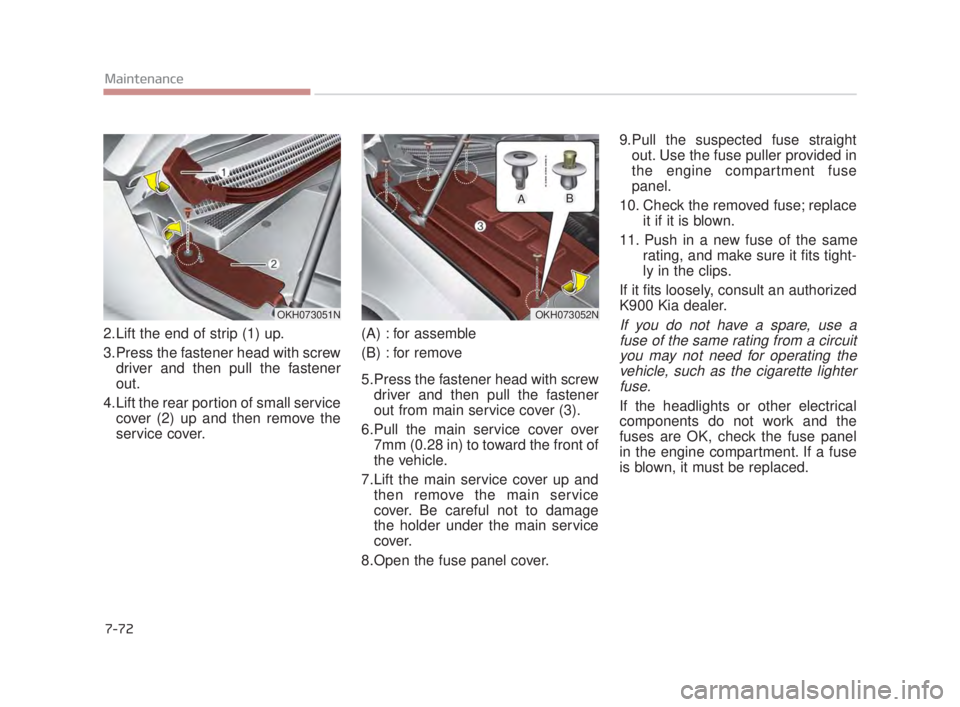
2.Lift the end of strip (1) up.
3.Press the fastener head with screwdriver and then pull the fastener
out.
4.Lift the rear portion of small service cover (2) up and then remove the
service cover. (A) : for assemble
(B) : for remove
5.Press the fastener head with screw
driver and then pull the fastener
out from main service cover (3).
6.Pull the main service cover over 7mm (0.28 in) to toward the front of
the vehicle.
7.Lift the main service cover up and then remove the main service
cover. Be careful not to damage
the holder under the main service
cover.
8.Open the fuse panel cover. 9.Pull the suspected fuse straight
out. Use the fuse puller provided in
the engine compartment fuse
panel.
10. Check the removed fuse; replace it if it is blown.
11. Push in a new fuse of the same rating, and make sure it fits tight-
ly in the clips.
If it fits loosely, consult an authorized
K900 Kia dealer.If you do not have a spare, use a fuse of the same rating from a circuityou may not need for operating thevehicle, such as the cigarette lighterfuse.
If the headlights or other electrical
components do not work and the
fuses are OK, check the fuse panel
in the engine compartment. If a fuse
is blown, it must be replaced.
OKH073052N
AB
OKH073051N
KH USA 7:2018 4/14/2017 6:39 PM Page 72