2018 KIA CARENS RHD turn signal
[x] Cancel search: turn signalPage 72 of 723

Safety features of your vehicle
54
3
How does the air bag system operate
Air bags are activated (able to
inflate if necessary) only when the
ignition switch is turned to the ON
or START position.
Air bags inflate instantly in the event of serious frontal or side col-lision (if equipped with side air bag
or curtain air bag) in order to help
protect the occupants from serious
physical injury.
There is no single speed at which the air bags will inflate.
Generally, air bags are designed to
inflate based upon the severity of a
collision and its direction. These
two factors determine whether thesensors produce an electronic
deployment/ inflation signal.
Air bag deployment depends on a number of factors including vehiclespeed, angles of impact and the
density and stiffness of the vehi-
cles or objects which your vehicle
hits in the collision. The determin-
ing, factors are not limited to those
mentioned above. The front air bags will completely
inflate and deflate in an instant.
It is virtually impossible for you to
see the air bags inflate during an
accident. It is much more likely that
you will simply see the deflated air
bags hanging out of their storage
compartments after the collision.
In order to help provide protection in a severe collision, the air bags
must inflate rapidly. The speed ofair bag inflation is a consequence
of extremely short time in which acollision occurs and the need to
get the air bag between the occu-
pant and the vehicle structures
before the occupant impacts those
structures. This speed of inflation
reduces the risk of serious or life-
threatening injuries in a severe col-
lision and is thus a necessary partof air bag design.
However, air bag inflation can also
cause injuries which can include
facial abrasions, bruises and bro-
ken bones because the inflationspeed also causes the air bags to
expand with a great deal of force.WARNING
Even in vehicles with air bags, you and your passengers must
always wear the safety belts
provided in order to minimise
the risk and severity of injury
in the event of a collision or in
most rollover situation.
SRS and pretensioners con- tain explosive chemicals.
If scrapping a vehicle without
removing SRS and pre-ten-
sioners from vehicle, it may
cause fire.
Before scrapping a vehicle,
contact a professional work-
shop. Kia recommends to visit
an authorised Kia dealer/serv-
ice partner.
Keep the SRS parts and wirings away from water or any
liquid. If the SRS components
are inoperative due to expo-
sure to water or liquids, it may
cause fire or severe injury.
Page 111 of 723

415
Features of your vehicle
(Continued)When the smart key does not work
properly, open and close the door
with the mechanical key. If you
have a problem with the smart
key, Kia recommends to visit an
authorised Kia dealer/service
partner.
If the smart key is in close proximity to your cell phone or smart phone,
the signal from the smart key could
be blocked by normal operation of
your cell phone or smart phone. This
is especially important when the
phone is active such as making call,
receiving calls, text messaging,
and/or sending/receiving emails.
Avoid placing the smart key and
your cell phone or smart phone in
the same pants or jacket pocket and
maintain adequate distance between
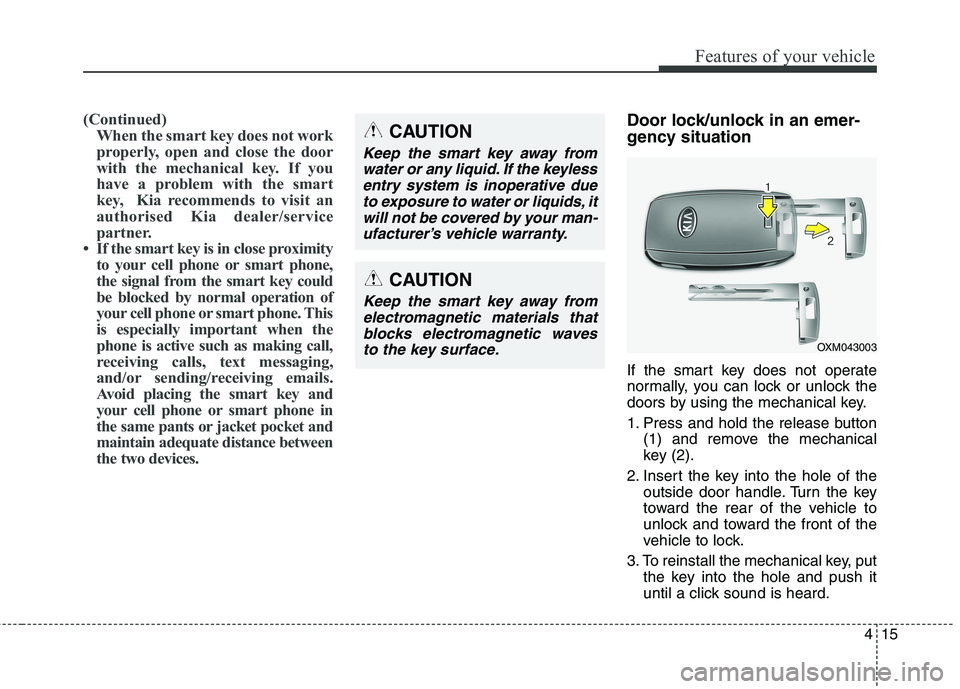
the two devices.Door lock/unlock in an emer-
gency situation
If the smart key does not operate
normally, you can lock or unlock the
doors by using the mechanical key.
1. Press and hold the release button (1) and remove the mechanical
key (2).
2. Insert the key into the hole of the outside door handle. Turn the key
toward the rear of the vehicle to
unlock and toward the front of the
vehicle to lock.
3. To reinstall the mechanical key, put the key into the hole and push it
until a click sound is heard.CAUTION
Keep the smart key away from
water or any liquid. If the keylessentry system is inoperative due to exposure to water or liquids, itwill not be covered by your man-ufacturer’s vehicle warranty.
OXM043003
CAUTION
Keep the smart key away fromelectromagnetic materials thatblocks electromagnetic waves to the key surface.
Page 153 of 723

457
Features of your vehicle
INSTRUMENT CLUSTER
1. Tachometer
2. Speedometer
3. Engine coolant temperature gauge
4. Fuel gauge
5. LCD display
6. Warning and indicator lights (if equipped)
7. Turn signal indicator lightsORP046040L/ORP046041L
■■Type A
❈The actual cluster in the vehicle may differ
from the illustration.
For more details, refer to the "Gauges" in
this chapter.
■■ Type B
Page 167 of 723

471
Features of your vehicle
Lights
One Touch Turn Signal : If this
item is checked, the lane change
signals will blink 3, 5 or 7 times
when the turn signal lever is moved
slightly.
Head Lamp Delay (if equipped) :
If this item is checked, the head-
lamp delay and headlamp wel-
come function will be activated.
Welcome Light (if equipped) :If
this item is checked, the welcomeight function of the puddle lamp will
be activated.
Sound
Park Assist System Vol. (if equipped) : Adjust the Park Assist
System volume. (Level 1~3)
❈ For more details, refer to “Parking
Assist System” in this chapter.
Welcome Sound (if equipped) :If
this item checked, the welcome
sound function will be activated.
Service interval
Service Interval : On this mode,
you can activate the service inter-
val function with mileage (km or
mi.) and period (months).
- Off : The service interval function will be deactivated.
- On : You can set the service inter- val (mileage and months).
Other Features
Fuel Economy Auto Reset
- Off : The average fuel economy will not reset automatically whenever refuelling.
- On (Auto Reset) : The average fuel economy will reset automaticallywhen refuelling.
❈ For more details, refer to “Trip
Computer” in this chapter.
Temperature Unit : Choose the
temperature unit. (°C,°F)
Language
Choose the language. Turn By Turn Mode (if equipped)
This mode displays the state of the
navigation.
ORP046318L
Page 189 of 723

493
Features of your vehicle
This indicator light illuminates for 2
seconds and goes off:
When the vehicle can not detectthe smart key which is in the vehi-
cle whilst the Engine Start/StopButton is ON.
In this case, have the vehicle
inspected by a professional work-
shop. Kia recommends to visit an
authorised Kia dealer/service part-
ner.
This indicator light blinks:
When the battery of the smart key is weak.
- At this time, you can not start theengine. However, you can start the
engine if you press the Engine
Start/Stop Button with the smart
key. (For more details, refer to
“Starting the Engine” in chapter 6).
When there is a malfunction with the immobiliser system.
In this case, have the vehicle
inspected by a professional work-
shop. Kia recommends to visit an
authorised Kia dealer/service part-
ner.Turn Signal Indicator
Light
This indicator light blinks:
When you turn the turn signal light on.
If any of the following occurs, there
may a malfunction with the turn signal
system. In this case, have the vehicle
inspected by a professional work-
shop. Kia recommends to visit an
authorised Kia dealer/service partner. - The indicator light does not blinkbut illuminates.
- The indicator light blinks more rapidly.
- The indicator light does not illumi- nate at all.
Low Beam Indicator
Light (if equipped)
This indicator light illuminates:
When the headlights are on.
High Beam IndicatorLight
This indicator light illuminates:
When the headlights are on and in the high beam position
When the turn signal lever is pulled into the Flash-to-Pass position.
Light ON Indicator Light
This indicator light illuminates:
When the tail lights or headlightsare on.
Page 218 of 723

Features of your vehicle
122
4
The high-beam indicator will light
when the headlight high beams are
switched on.
To prevent the battery from being discharged, do not leave the lights
on for a prolonged time whilst the
engine is not running.Flashing headlights
Pull the lever towards you. It will
return to the normal position when
released. The headlight switch doesnot need to be on to use this flashing
feature. Turn signals and lane change signals
The ignition switch must be on for the
turn signals to function. To turn on
the turn signals, move the lever up or
down (A). Green arrow indicators on
the instrument panel indicate which
turn signal is operating.
ORP042120
ORP042120R
■
Type A
■Type BORP042121
ORP042121R
■Type A
■Type B
WARNING
Do not use high beam when
there are other vehicles. Usinghigh beam could obstruct theother driver's vision.
Page 219 of 723

4123
Features of your vehicle
They will self-cancel after a turn is
completed. If the indicator continues
to flash after a turn, manually return
the lever to the OFF position.
To signal a lane change, move the
turn signal lever slightly and hold it in
position (B). The lever will return tothe OFF position when released.
If an indicator stays on and does not
flash or if it flashes abnormally, one of
the turn signal bulbs may be burnedout and will require replacement.One-touch lane change function
To activate an one-touch lane
change function, move the turn sig-
nal lever slightly and then release it.
The lane change signals will blink 3,
5 or 7 times.
You can choose one-touch lane
change blinking function in “One
touch turn lamp” of “User setting”.
Refer to “User setting” in chapter 4.
✽✽NOTICE
If an indicator flash is abnormally
quick or slow, bulb may be burned
out or have a poor electrical connec-
tion in the circuit.
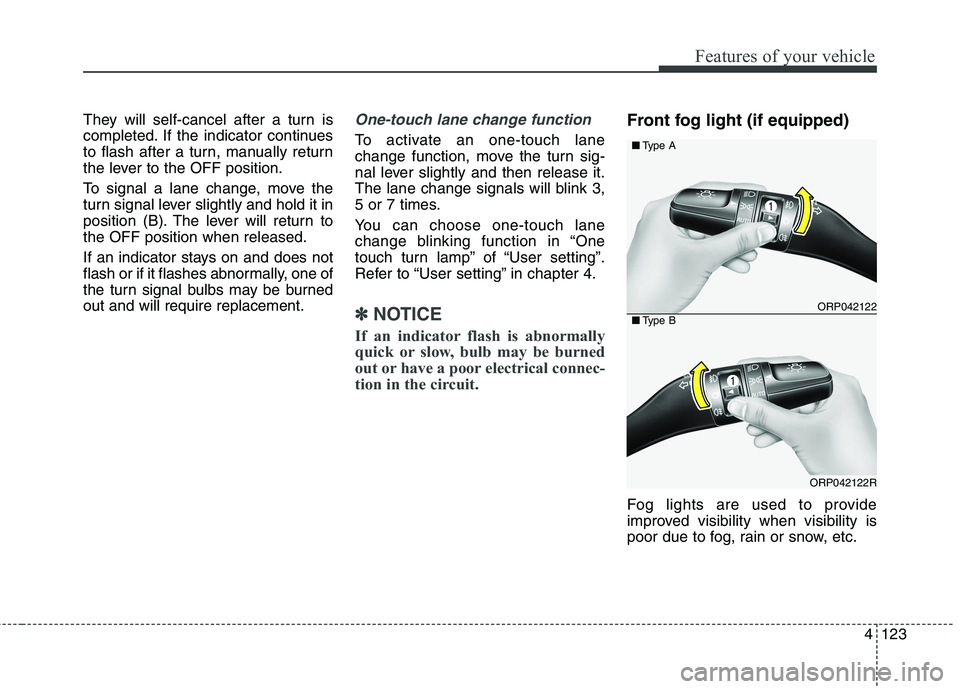
Front fog light (if equipped)
Fog lights are used to provide
improved visibility when visibility is
poor due to fog, rain or snow, etc.
ORP042122
ORP042122R
■ Type A
■Type B
Page 285 of 723

Audio system
2
5
✽✽
NOTICE
If you install an aftermarket HID
head lamp, your vehicle’s audio and
electronic device may malfunction.Antenna
Pole type antenna (if equipped)
Your car uses a roof antenna to
receive both AM and FM broadcast
signals. This antenna is a removable
type. To remove the antenna, turn it
counterclockwise. To install the
antenna, turn it clockwise.
Shark fin antenna (if equipped)
The shark fin antenna will receive the
transmit data.
AUDIO SYSTEM
CAUTION
- Pole type
antenna
• Before entering a place with a low height clearance or a carwash, remove the antenna by rotating it counterclockwise. Ifnot, the antenna may be dam-aged.
When reinstalling your anten- na, it is important that it isfully tightened and adjusted tothe upright position to ensureproper reception. But it could be removed when parking thevehicle or when loading cargoon the roof rack.
When cargo is loaded on the roof rack, do not place thecargo near the antenna pole toensure proper reception.
ORP042188/ORP045188C
■
Type A ■Type B