2018 JEEP WRANGLER UNLIMITED ignition
[x] Cancel search: ignitionPage 204 of 348

TOWING A DISABLED
VEHICLE
This section describes procedures for towing
a disabled vehicle using a commercial towing
service. If the transmission and drivetrain are
operable, disabled vehicles may also be
towed as described under “Recreational Tow-
ing” in the “Starting And Operating” section.
Towing Condition Wheels OFF The Ground 4WD MODELS
Flat Tow NONESee instructions under “Recreational Towing” in “Starting And Oper-
ating”.
• Automatic Transmission inPARK
• Transfer Case inNEUTRAL
• Disconnect negative battery cable
• Tow inforwarddirection
Wheel Lift Or Dolly TowFrontNOT ALLOWED
RearNOT ALLOWED
FlatbedALL BEST METHOD
Proper towing or lifting equipment is required
to prevent damage to your vehicle. Use only
tow bars and other equipment designed for
this purpose, following equipment manufac-
turer’s instructions. Use of safety chains is
mandatory. Attach a tow bar or other towingdevice to main structural members of the
vehicle, not to bumpers or associated brack-
ets. State and local laws regarding vehicles
under tow must be observed.If you must use the accessories (wipers, de-
frosters, etc.) while being towed, the ignition
must be in the ON/RUN position, not the ACC
position.
IN CASE OF EMERGENCY
202
Page 205 of 348

If the vehicle's battery is discharged, refer to
"Manual Park Release" in this section for
instructions on shifting the automatic trans-
mission out of PARK in order to move the
vehicle.
CAUTION!
• Do not use sling type equipment when
towing. Vehicle damage may occur.
• When securing the vehicle to a flatbed
truck, do not attach to front or rear
suspension components. Damage to
your vehicle may result from improper
towing.
• If the vehicle being towed requires steer-
ing, the ignition switch must be in the
ACC or ON/RUN mode, not in the OFF
mode.
Without The Key Fob
Special care must be taken when the vehicle
is towed with the ignition in the OFF mode.
The only approved method of towing without
the key fob is with a flatbed truck. Proper
towing equipment is necessary to prevent
damage to the vehicle.
Four–Wheel Drive Models
The manufacturer recommends towing with
all wheelsOFFthe ground. Acceptable meth-
ods are to tow the vehicle on a flatbed or with
one end of the vehicle raised and the opposite
end on a towing dolly.
If flatbed equipment is not available and the
transfer case is operable, the vehicle may be
towed (in the forward direction, withALL
wheels on the ground),IFthe transfer case is
inNEUTRAL(N) and the transmission is in
PARK. Refer to “Recreational Towing” in
“Starting And Operating” for detailed
instructions.
CAUTION!
• Front or rear wheel lifts must not be used
(if the remaining wheels are on the
ground). Internal damage to the trans-
mission or transfer case will occur if a
front or rear wheel lift is used when
towing.
• Towing this vehicle in violation of the
above requirements can cause severe
transmission and/or transfer case dam-
CAUTION!
age. Damage from improper towing is
not covered under the New Vehicle Lim-
ited Warranty.
Tow Eye Usage
Your vehicle is equipped with a tow eye that
can be used to move a disabled vehicle.
When using a tow eye be sure to follow the
“Tow Eye Usage Precautions” and the “Tow-
ing A Disabled Vehicle” instructions in this
section.
The tow eyes are mounted below the front and
rear bumpers.
Tow Eye Usage Precautions
WARNING!
Stand clear of vehicles when pulling with
tow eyes.
• Do not use a chain with a tow eye.
Chains may break, causing serious injury
or death.
203
Page 226 of 348

Installing The Rear Wiper
1. Lift the wiper arm off of the glass.
2. Insert the wiper blade pivot pin into the
opening on the end of the wiper arm and
rotate the wiper in to place.
3. Place with wiper on the glass and close
the tail gate.
Cooling System
WARNING!
• You or others can be badly burned by hot
engine coolant (antifreeze) or steam
from your radiator. If you see or hear
steam coming from under the hood, do
not open the hood until the radiator has
had time to cool. Never open a cooling
system pressure cap when the radiator
or coolant bottle is hot.
• Keep hands, tools, clothing, and jewelry
away from the radiator cooling fan when
the hood is raised. The fan starts auto-
matically and may start at any time,
whether the engine is running or not.
WARNING!
• When working near the radiator cooling
fan, turn the ignition to the OFF mode.
The fan is temperature controlled and
can start at any time the ignition is in the
ON mode.
Coolant Checks
Check the engine and, intercooler (if
equipped) coolant (antifreeze) protection ev-
ery 12 months (before the onset of freezing
weather, where applicable). If the engine
and, intercooler (if equipped) is dirty or rusty
in appearance, the system should be drained,
flushed and refilled with fresh OAT coolant
(conforming to MS.90032) by an authorized
dealer. Check the front of the A/C condenser
(if equipped) or radiator for any accumulation
of bugs, leaves, etc. If dirty, clean by gently
spraying water from a garden hose vertically
down the face of the A/C condenser (if
equipped) or the back of the radiator core.
Check the engine and, intercooler (if
equipped) cooling system hoses for brittle
rubber, cracking, tears, cuts, and tightness ofthe connection at the coolant recovery bottle
and radiator. Inspect the entire system for
leaks. DO NOT REMOVE THE COOLANT
PRESSURE CAP WHEN THE COOLING SYS-
TEM IS HOT.
Brake System
In order to assure brake system performance,
all brake system components should be in-
spected periodically. Refer to the “Mainte-
nance Plan” in this section for the proper
maintenance intervals.
WARNING!
Riding the brakes can lead to brake failure
and possibly a collision. Driving with your
foot resting or riding on the brake pedal
can result in abnormally high brake tem-
peratures, excessive lining wear, and pos-
sible brake damage. You would not have
your full braking capacity in an emergency.
Fluid Level Check — Brake Master Cylinder
The fluid level of the master cylinder should
be checked whenever the vehicle is serviced,
or immediately if the brake system warning
SERVICING AND MAINTENANCE
224
Page 275 of 348

• Press the “+” or “–” buttons on the touch-
screen, or press and drag over the level bar
for each of the equalizer bands. The level
value, which spans between plus or minus
nine, is displayed at the bottom of each of
the bands.
Speed Adjusted Volume
• Press the “Speed Adjusted Volume” button
on the touchscreen to activate the Speed
Adjusted Volume screen. The Speed Ad-
justed Volume is adjusted by pressing the
volume level indicator. This alters the auto-
matic adjustment of the audio volume with
variation to vehicle speed.
Loudness — If Equipped
• Press the “On” button on the touchscreen
to activate Loudness. Press “Off” to deac-
tivate this feature. When Loudness is On,
the sound quality at lower volumes
improves.
AUX Volume Offset
• Press the “AUX Volume Offset” button on
the touchscreen to activate the AUX Vol-
ume Offset screen. The AUX Volume Offset
is adjusted by pressing of the “+” and “–”buttons. This alters the AUX input audio
volume. The level value, which spans be-
tween plus or minus three, is displayed
above the adjustment bar.
Auto Play — If Equipped
• Press the “Auto Play” button on the touch-
screen to activate the Auto Play screen. The
Auto Play feature has two settings “On” and
“Off.” With Auto Play on, music begins
playing from a connected device, immedi-
ately after it is connected to the radio.
Auto On Radio — If Equipped
• The Radio automatically turns on when
vehicle is in run or will recall whether it was
on or off at last ignition off.
Radio Off With Door — If Equipped
• Press the “Radio Off With Door” button on
the touchscreen to activate the Radio Off
With Door screen. The Radio Off With Door
feature, when activated, keeps the radio on
until the driver or passenger door is opened,
or when the Radio Off Delay selected time
has expired.Drag & Drop Menu Bar
The Uconnect features and services in the
main menu bar are easily changed for your
convenience. Simply follow these steps:
1. Press the “Apps
” button to open the
App screen.
2. Press and hold, then drag the selected
App to replace an existing shortcut in the
main menu bar.
The new app shortcut, that was dragged down
onto the main menu bar, will now be an active
App/shortcut.
NOTE:
This feature is only available if the vehicle is
in PARK.
Uconnect 4 Main Menu
273
Page 302 of 348

The Uconnect Phone feature enables you to
place and receive hands-free mobile phone
calls. Drivers can also place mobile phone
calls using their voice or by using the buttons
on the touchscreen (see Voice Command sec-
tion).
The hands-free calling feature is made pos-
sible through Bluetooth technology — the
global standard that enables different elec-
tronic devices to connect to each other wire-
lessly.
If the Uconnect Phone Button
exists on
your steering wheel, you then have the
Uconnect Phone features.
NOTE:
• The Uconnect Phone requires a mobile
phone equipped with the Bluetooth Hands-
Free Profile, Version 1.0 or higher.
• Most mobile phones/devices are compat-
ible with the Uconnect system, however
some mobile phones/devices may not be
equipped with all of the required features
to utilize all of the Uconnect system fea-
tures.• For Uconnect Customer Care:
• Visit: DriveUconnect.eu
• Or visit an authorized dealer
Pairing (Wirelessly Connecting) Your
Mobile Phone To The Uconnect System
Mobile phone pairing is the process of estab-
lishing a wireless connection between a cel-
lular phone and the Uconnect system.
NOTE:
• To use the Uconnect Phone feature, you
first must determine if your mobile phone
and software are compatible with the
Uconnect system. Please visit
www.DriveUconnect.eu or an authorized
dealer for complete mobile phone compat-
ibility information.
• Mobile phone pairing is not available while
the vehicle is in motion.
• A maximum of ten mobile phones can be
paired to the Uconnect system.Start Pairing Procedure On The Radio
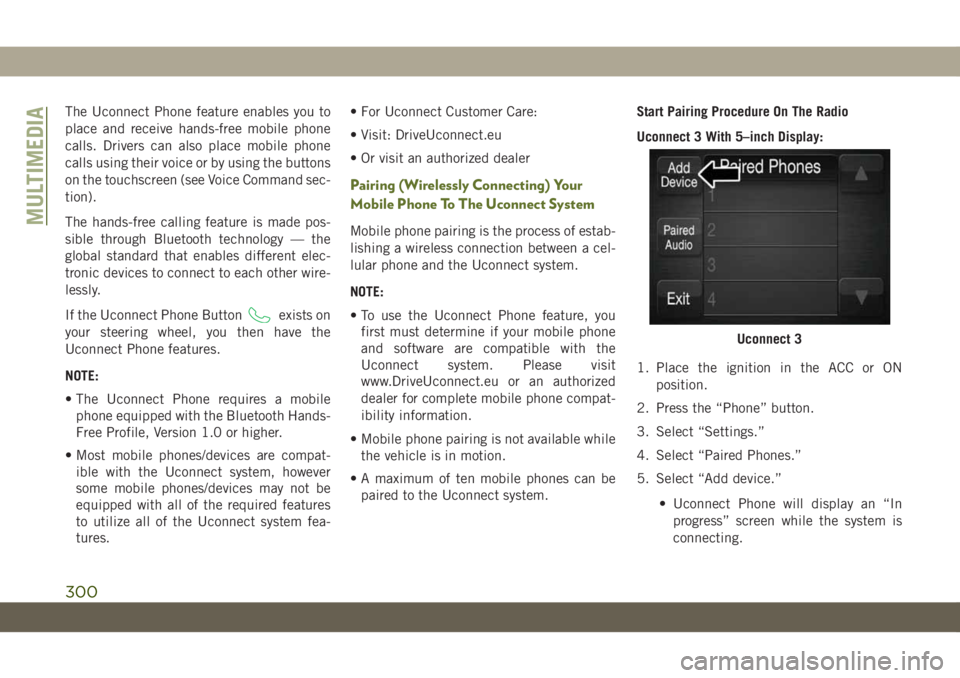
Uconnect 3 With 5–inch Display:
1. Place the ignition in the ACC or ON
position.
2. Press the “Phone” button.
3. Select “Settings.”
4. Select “Paired Phones.”
5. Select “Add device.”
• Uconnect Phone will display an “In
progress” screen while the system is
connecting.
Uconnect 3
MULTIMEDIA
300
Page 303 of 348

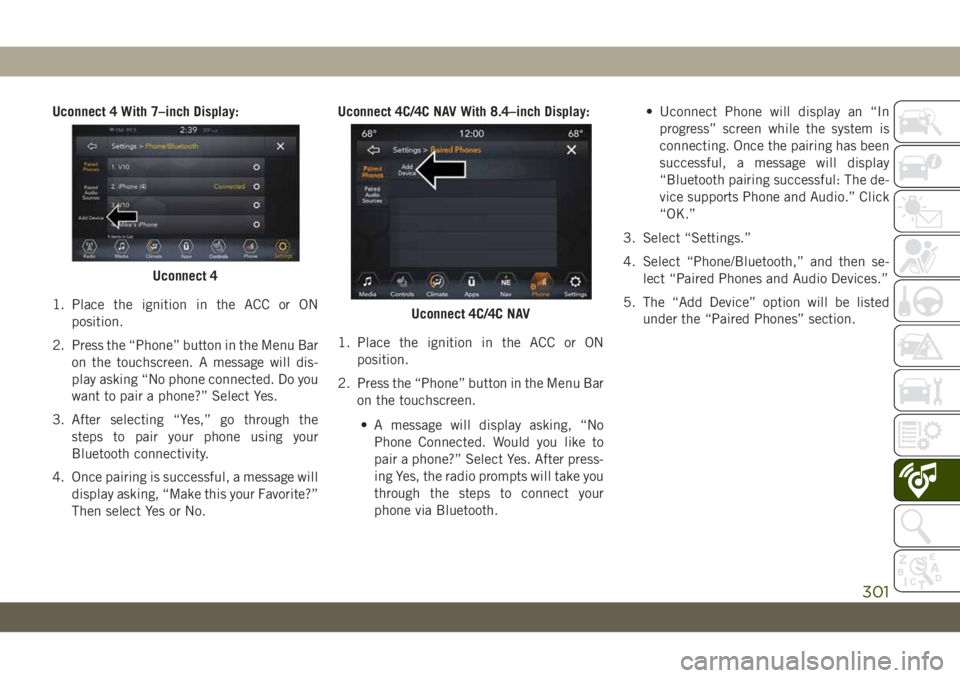
Uconnect 4 With 7–inch Display:
1. Place the ignition in the ACC or ON
position.
2. Press the “Phone” button in the Menu Bar
on the touchscreen. A message will dis-
play asking “No phone connected. Do you
want to pair a phone?” Select Yes.
3. After selecting “Yes,” go through the
steps to pair your phone using your
Bluetooth connectivity.
4. Once pairing is successful, a message will
display asking, “Make this your Favorite?”
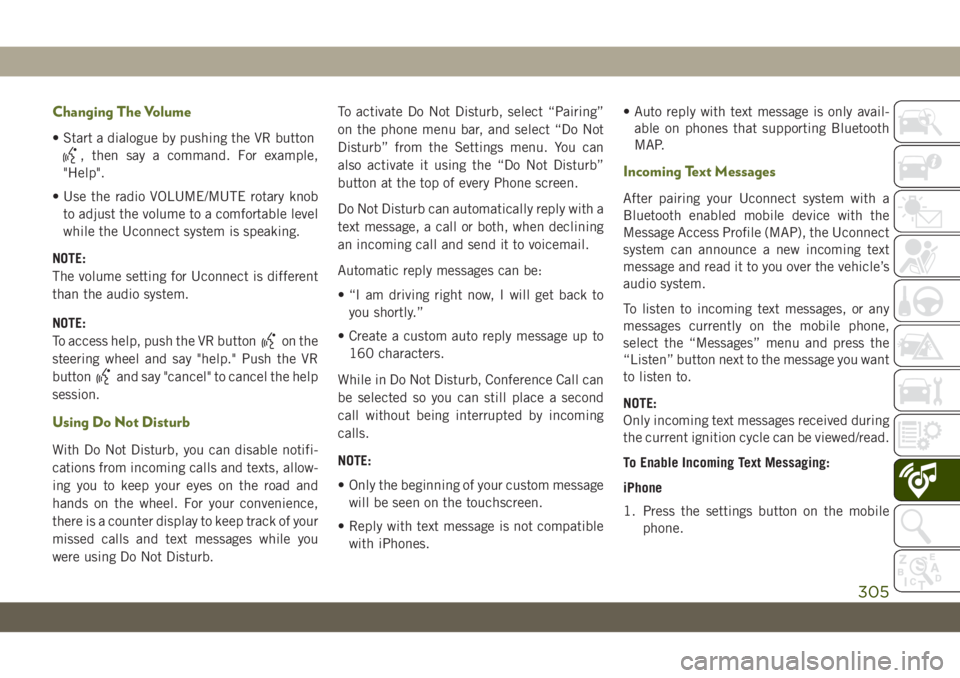
Then select Yes or No.Uconnect 4C/4C NAV With 8.4–inch Display:
1. Place the ignition in the ACC or ON
position.
2. Press the “Phone” button in the Menu Bar
on the touchscreen.
• A message will display asking, “No
Phone Connected. Would you like to
pair a phone?” Select Yes. After press-
ing Yes, the radio prompts will take you
through the steps to connect your
phone via Bluetooth.• Uconnect Phone will display an “In
progress” screen while the system is
connecting. Once the pairing has been
successful, a message will display
“Bluetooth pairing successful: The de-
vice supports Phone and Audio.” Click
“OK.”
3. Select “Settings.”
4. Select “Phone/Bluetooth,” and then se-
lect “Paired Phones and Audio Devices.”
5. The “Add Device” option will be listed
under the “Paired Phones” section.
Uconnect 4
Uconnect 4C/4C NAV
301
Page 307 of 348

Changing The Volume
• Start a dialogue by pushing the VR button
, then say a command. For example,
"Help".
• Use the radio VOLUME/MUTE rotary knob
to adjust the volume to a comfortable level
while the Uconnect system is speaking.
NOTE:
The volume setting for Uconnect is different
than the audio system.
NOTE:
To access help, push the VR button
on the
steering wheel and say "help." Push the VR
button
and say "cancel" to cancel the help
session.
Using Do Not Disturb
With Do Not Disturb, you can disable notifi-
cations from incoming calls and texts, allow-
ing you to keep your eyes on the road and
hands on the wheel. For your convenience,
there is a counter display to keep track of your
missed calls and text messages while you
were using Do Not Disturb.To activate Do Not Disturb, select “Pairing”
on the phone menu bar, and select “Do Not
Disturb” from the Settings menu. You can
also activate it using the “Do Not Disturb”
button at the top of every Phone screen.
Do Not Disturb can automatically reply with a
text message, a call or both, when declining
an incoming call and send it to voicemail.
Automatic reply messages can be:
• “I am driving right now, I will get back to
you shortly.”
• Create a custom auto reply message up to
160 characters.
While in Do Not Disturb, Conference Call can
be selected so you can still place a second
call without being interrupted by incoming
calls.
NOTE:
• Only the beginning of your custom message
will be seen on the touchscreen.
• Reply with text message is not compatible
with iPhones.• Auto reply with text message is only avail-
able on phones that supporting Bluetooth
MAP.
Incoming Text Messages
After pairing your Uconnect system with a
Bluetooth enabled mobile device with the
Message Access Profile (MAP), the Uconnect
system can announce a new incoming text
message and read it to you over the vehicle’s
audio system.
To listen to incoming text messages, or any
messages currently on the mobile phone,
select the “Messages” menu and press the
“Listen” button next to the message you want
to listen to.
NOTE:
Only incoming text messages received during
the current ignition cycle can be viewed/read.
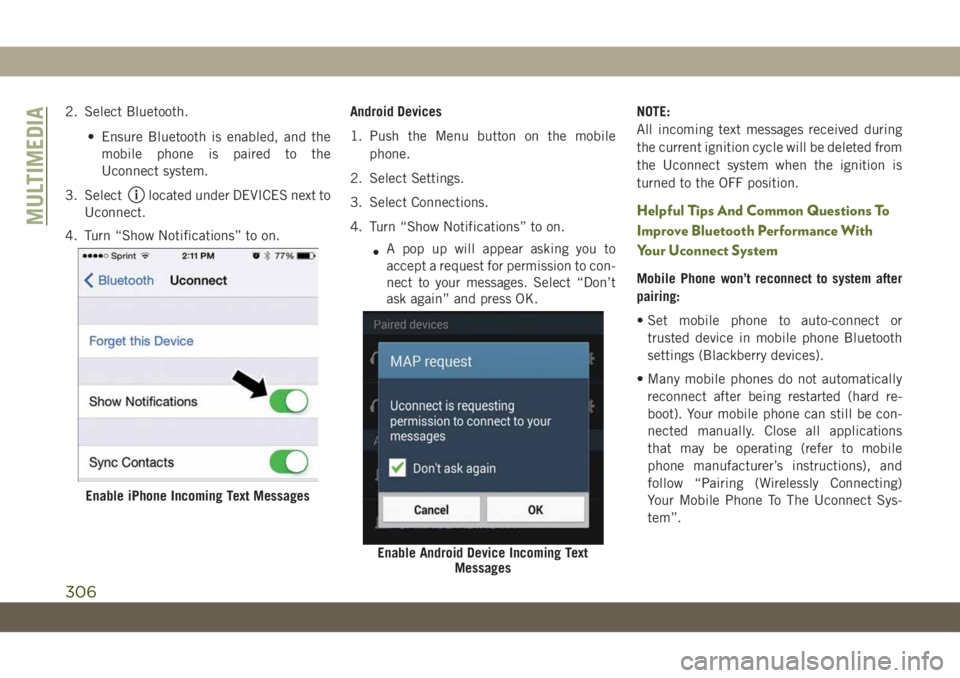
To Enable Incoming Text Messaging:
iPhone
1. Press the settings button on the mobile
phone.
305
Page 308 of 348

2. Select Bluetooth.
• Ensure Bluetooth is enabled, and the
mobile phone is paired to the
Uconnect system.
3. Select
located under DEVICES next to
Uconnect.
4. Turn “Show Notifications” to on.Android Devices
1. Push the Menu button on the mobile
phone.
2. Select Settings.
3. Select Connections.
4. Turn “Show Notifications” to on.
•A pop up will appear asking you to
accept a request for permission to con-
nect to your messages. Select “Don’t
ask again” and press OK.NOTE:
All incoming text messages received during
the current ignition cycle will be deleted from
the Uconnect system when the ignition is
turned to the OFF position.Helpful Tips And Common Questions To
Improve Bluetooth Performance With
Your Uconnect System
Mobile Phone won’t reconnect to system after
pairing:
• Set mobile phone to auto-connect or
trusted device in mobile phone Bluetooth
settings (Blackberry devices).
• Many mobile phones do not automatically
reconnect after being restarted (hard re-
boot). Your mobile phone can still be con-
nected manually. Close all applications
that may be operating (refer to mobile
phone manufacturer’s instructions), and
follow “Pairing (Wirelessly Connecting)
Your Mobile Phone To The Uconnect Sys-
tem”.
Enable iPhone Incoming Text Messages
Enable Android Device Incoming Text
Messages
MULTIMEDIA
306