2018 JEEP WRANGLER door lock
[x] Cancel search: door lockPage 26 of 276

To return the seat to a sitting position, rotate
the seatback upright until it locks and push
the seat rearward until the track locks.
NOTE:
• The front passenger seats have a track
memory, which returns the seat to just past
the halfway point of the track regardless of
its original position.
• The recliner and easy entry levers should
not be used during the automatic returning
of the seat to its sitting position.
Tip ‘n Slide Seats — Two Door Models
This feature allows the front seats to be
rotated toward the instrument panel to allow
easier entry into the rear seats.
Driver's Seat
Pull upward on the recline lever and bring the
seatback to its full forward position.
Rotate the entire seat assembly toward the
instrument panel.
Passenger Seat
In addition to Easy Entry, the front passenger
seat is also equipped with Tip ‘n Slide. This
feature allows for easier entry for rear passen-
gers.
Pull upward on the recline lever and slide the
entire seat forward (Easy Entry).
With the seat forward, pull the entire seat
assembly toward the instrument panel.
Removing The Rear Seat — Two Door
Models
NOTE:
• Prior to folding the rear seat, it may be
necessary to reposition the front seats.
• Be sure that the front seats are fully upright
and positioned forward. This will allow the
rear seat to fold down easily.
1. Lift the seatback release lever and fold
the seatback forward.2. Slowly flip the entire seat forward.
WARNING!
Do not drive the vehicle with the seat in
the forward tumble position. The seat
must be latched to all floor attachments
when the vehicle is in motion.
Seatback Release Lever
GETTING TO KNOW YOUR VEHICLE
24
Page 28 of 276

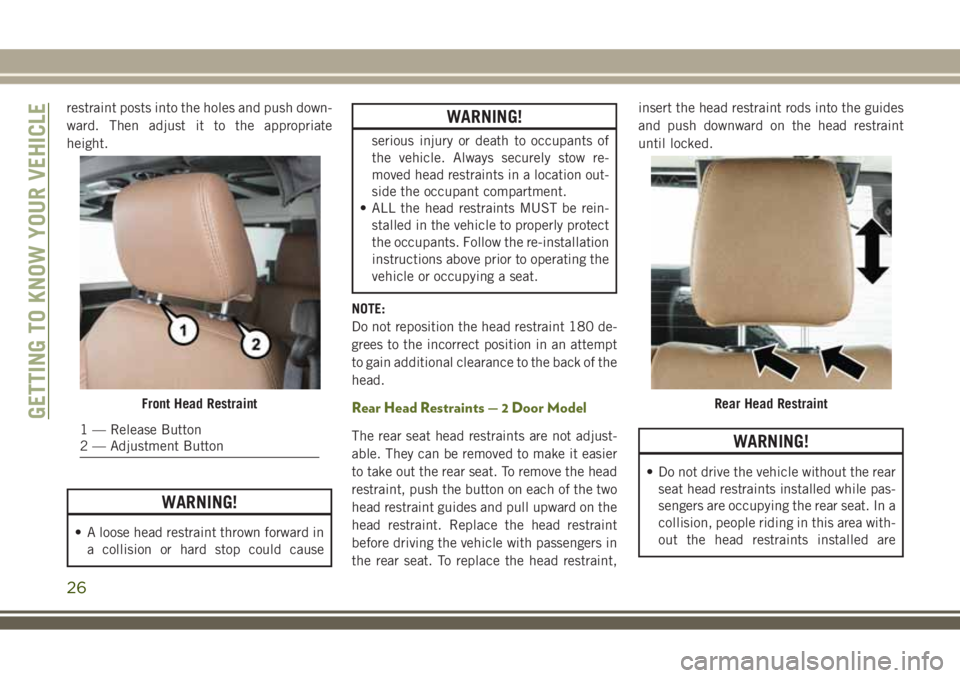
restraint posts into the holes and push down-
ward. Then adjust it to the appropriate
height.
WARNING!
• A loose head restraint thrown forward in
a collision or hard stop could cause
WARNING!
serious injury or death to occupants of
the vehicle. Always securely stow re-
moved head restraints in a location out-
side the occupant compartment.
• ALL the head restraints MUST be rein-
stalled in the vehicle to properly protect
the occupants. Follow the re-installation
instructions above prior to operating the
vehicle or occupying a seat.
NOTE:
Do not reposition the head restraint 180 de-
grees to the incorrect position in an attempt
to gain additional clearance to the back of the
head.
Rear Head Restraints — 2 Door Model
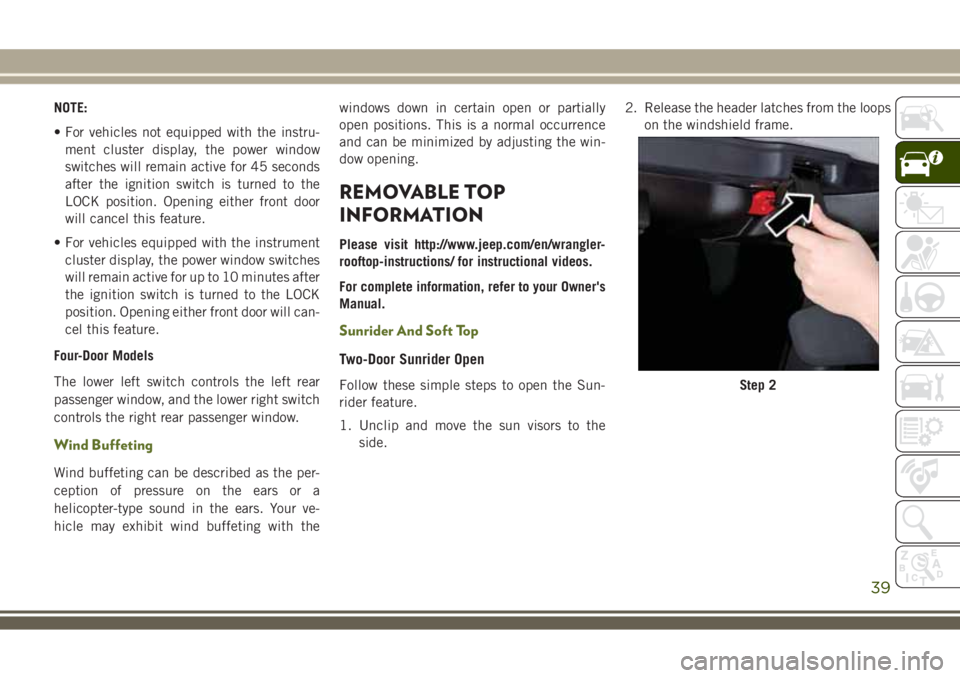
The rear seat head restraints are not adjust-
able. They can be removed to make it easier
to take out the rear seat. To remove the head
restraint, push the button on each of the two
head restraint guides and pull upward on the
head restraint. Replace the head restraint
before driving the vehicle with passengers in
the rear seat. To replace the head restraint,insert the head restraint rods into the guides
and push downward on the head restraint
until locked.WARNING!
• Do not drive the vehicle without the rear
seat head restraints installed while pas-
sengers are occupying the rear seat. In a
collision, people riding in this area with-
out the head restraints installed are
Front Head Restraint
1 — Release Button
2 — Adjustment Button
Rear Head RestraintGETTING TO KNOW YOUR VEHICLE
26
Page 41 of 276

NOTE:
• For vehicles not equipped with the instru-
ment cluster display, the power window
switches will remain active for 45 seconds
after the ignition switch is turned to the
LOCK position. Opening either front door
will cancel this feature.
• For vehicles equipped with the instrument
cluster display, the power window switches
will remain active for up to 10 minutes after
the ignition switch is turned to the LOCK
position. Opening either front door will can-
cel this feature.
Four-Door Models
The lower left switch controls the left rear
passenger window, and the lower right switch
controls the right rear passenger window.
Wind Buffeting
Wind buffeting can be described as the per-
ception of pressure on the ears or a
helicopter-type sound in the ears. Your ve-
hicle may exhibit wind buffeting with thewindows down in certain open or partially
open positions. This is a normal occurrence
and can be minimized by adjusting the win-
dow opening.
REMOVABLE TOP
INFORMATION
Please visit http://www.jeep.com/en/wrangler-
rooftop-instructions/ for instructional videos.
For complete information, refer to your Owner's
Manual.
Sunrider And Soft Top
Two-Door Sunrider Open
Follow these simple steps to open the Sun-
rider feature.
1. Unclip and move the sun visors to the
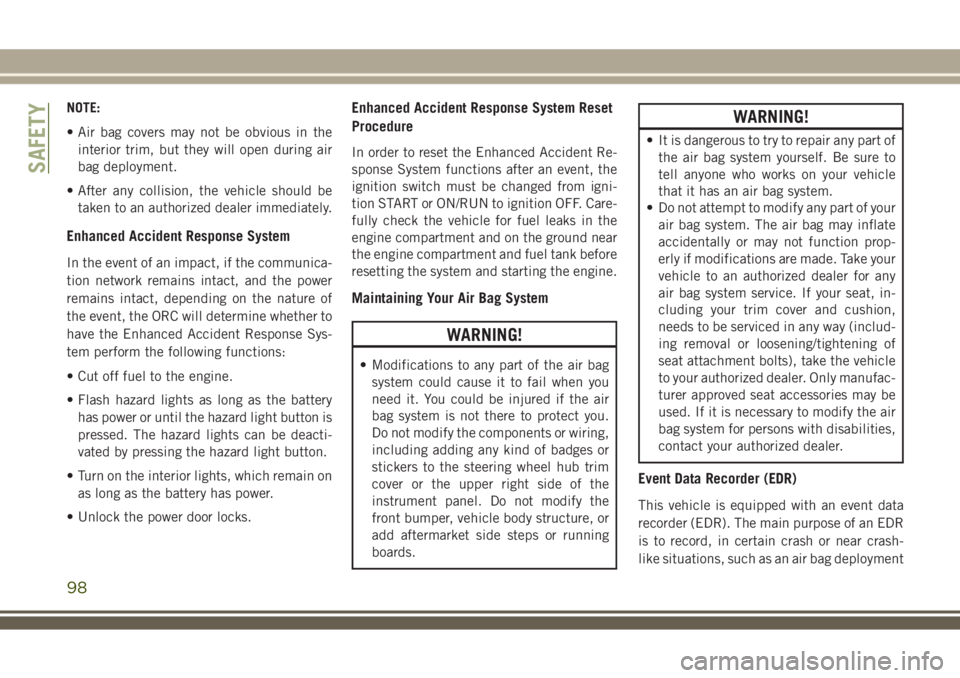
side.2. Release the header latches from the loops
on the windshield frame.Step 2
39
Page 46 of 276

5. Fold back the front section of the top and
gently rest the header on top of the rear
portion of the deck.
6. Secure the top by using the two provided
straps. Each strap will wrap around the
side bow and Velcro to itself; use one strap
on each side of the vehicle.NOTE:
• Failure to fold the fabric rearward will allow
the material to sag and may block the
rearview mirror.
• If you are going to be driving faster than
40 mph (64 km/h) with the Sunrider fea-
ture open, it is recommended that you
remove the rear window of the vehicle.
• To close the Sunrider feature, perform the
above steps in the opposite order.Four-Door Soft Top Down
Follow these simple steps to lower the Four-
Door soft top.
1. Remove the side and back windows.
Step 5
Step 6
Step 1
GETTING TO KNOW YOUR VEHICLE
44
Page 53 of 276

Wind Buffeting
Wind buffeting can be described as a
helicopter-type percussion sound. If buffet-
ing occurs with the rear windows open, adjust
the front and rear windows together.
HOOD
Opening The Hood
Release both the hood latches.Raise the hood and locate the safety latch,
located in the middle of the hood opening.
Push the safety latch to the left side of the
vehicle, to open the hood. You may have to
push down slightly on the hood before push-
ing the safety latch. Insert the support rod
into the slot on the hood.
Closing The Hood
To close the hood, remove the support rod
from the hood panel and place it in the
retaining clip. Lower the hood slowly. Secure
both of the hood latches.
WARNING!
Be sure the hood is fully latched before
driving your vehicle. If the hood is not fully
latched, it could open when the vehicle is
in motion and block your vision. Failure to
follow this warning could result in serious
injury or death.
REAR SWING GATE
The rear swing gate can be unlocked by using
the key, Remote Keyless Entry key fob, or by
activating the power door lock switches lo-
cated on the front doors.
To open the swing gate, push the button on
the gate handle.
NOTE:
Close the rear flip-up window before attempt-
ing to close the swing gate (hard top models
only).
Hood Latch Location
Swing Gate Handle
51
Page 90 of 276

Lap/Shoulder Belt Operating Instructions
1. Enter the vehicle and close the door. Sit
back and adjust the seat.
2. The seat belt latch plate is above the back
of the front seat, and next to your arm in
the rear seat (for vehicles equipped with a
rear seat). Grasp the latch plate and pull
out the seat belt. Slide the latch plate up
the webbing as far as necessary to allow
the seat belt to go around your lap.3. When the seat belt is long enough to fit,
insert the latch plate into the buckle until
you hear a “click.”
4. Position the lap belt so that it is snug and
lies low across your hips, below your ab-
domen. To remove slack in the lap belt
portion, pull up on the shoulder belt. To
loosen the lap belt if it is too tight, tilt the
latch plate and pull on the lap belt. A snug
seat belt reduces the risk of sliding under
the seat belt in a collision.
5. Position the shoulder belt across the
shoulder and chest with minimal, if any
slack so that it is comfortable and not
resting on your neck. The retractor will
withdraw any slack in the shoulder belt.
6. To release the seat belt, push the red
button on the buckle. The seat belt will
automatically retract to its stowed posi-
tion. If necessary, slide the latch plate
down the webbing to allow the seat belt to
retract fully.
Rear Center Lap/Shoulder Belt Retractor
Lockout
This feature is designed to lock the retractor
whenever the rear seatback is not fully
latched. This prevents someone from wearing
the rear center lap/shoulder belt when the
rear seatback is not fully latched.
NOTE:
If the rear center lap/shoulder belt cannot be
pulled out, check that the rear seatback is
fully latched. If the rear seatback is properly
latched and the rear center lap/shoulder belt
still cannot be pulled out, the Automatic-
Locking Retractor (ALR) system may be acti-
vated. To reset this feature you must let all of
the seat belt webbing return into the retrac-
tor. You will not be able to pull out more
webbing until all of the webbing has been
returned back into the retractor.
WARNING!
The rear center lap/shoulder belt is
equipped with a lock-out feature to ensure
that the rear seatback is in the fully up-
right and locked position when occupied.
Pulling Out The Latch Plate
1 — Seat Belt Latch Plate
2 — Seat Belt Buckle
SAFETY
88
Page 93 of 276

If the passenger seating position is equipped
with an ALR and is being used for normal
usage, only pull the seat belt webbing out far
enough to comfortably wrap around the occu-
pant’s mid-section so as to not activate the
ALR. If the ALR is activated, you will hear a
clicking sound as the seat belt retracts. Allow
the webbing to retract completely in this case
and then carefully pull out only the amount of
webbing necessary to comfortably wrap
around the occupant’s mid-section. Slide the
latch plate into the buckle until you hear a
"click."
In Automatic Locking Mode, the shoulder
belt is automatically pre-locked. The seat
belt will still retract to remove any slack in the
shoulder belt. Use the Automatic Locking
Mode anytime a child restraint is installed in
a seating position that has a seat belt with
this feature. Children 12 years old and under
should always be properly restrained in a
vehicle with a rear seat.WARNING!
• NEVER use a rearward facing child re-
straint on a seat protected by an ACTIVE
AIRBAG in front of it, DEATH or SERI-
OUS INJURY to the CHILD can occur.
• Only use a rear-facing child restraint in a
vehicle with a rear seat.
• A deploying passenger front air bag can
cause death or serious injury to a child
12 years or younger, including a child in
a rear-facing child restraint.
How To Engage The Automatic Locking Mode
1. Buckle the combination lap and shoulder
belt.
2. Grasp the shoulder portion and pull down-
ward until the entire seat belt is extracted.
3. Allow the seat belt to retract. As the seat
belt retracts, you will hear a clicking
sound. This indicates the seat belt is now
in the Automatic Locking Mode.
ALR — Switchable Automatic Locking
Retractor (Two-Door Models)
ALR — Switchable Automatic Locking
Retractor (Four-Door Models)
91
Page 100 of 276

NOTE:
• Air bag covers may not be obvious in the
interior trim, but they will open during air
bag deployment.
• After any collision, the vehicle should be
taken to an authorized dealer immediately.
Enhanced Accident Response System
In the event of an impact, if the communica-
tion network remains intact, and the power
remains intact, depending on the nature of
the event, the ORC will determine whether to
have the Enhanced Accident Response Sys-
tem perform the following functions:
• Cut off fuel to the engine.
• Flash hazard lights as long as the battery
has power or until the hazard light button is
pressed. The hazard lights can be deacti-
vated by pressing the hazard light button.
• Turn on the interior lights, which remain on
as long as the battery has power.
• Unlock the power door locks.
Enhanced Accident Response System Reset
Procedure
In order to reset the Enhanced Accident Re-
sponse System functions after an event, the
ignition switch must be changed from igni-
tion START or ON/RUN to ignition OFF. Care-
fully check the vehicle for fuel leaks in the
engine compartment and on the ground near
the engine compartment and fuel tank before
resetting the system and starting the engine.
Maintaining Your Air Bag System
WARNING!
• Modifications to any part of the air bag
system could cause it to fail when you
need it. You could be injured if the air
bag system is not there to protect you.
Do not modify the components or wiring,
including adding any kind of badges or
stickers to the steering wheel hub trim
cover or the upper right side of the
instrument panel. Do not modify the
front bumper, vehicle body structure, or
add aftermarket side steps or running
boards.
WARNING!
• It is dangerous to try to repair any part of
the air bag system yourself. Be sure to
tell anyone who works on your vehicle
that it has an air bag system.
• Do not attempt to modify any part of your
air bag system. The air bag may inflate
accidentally or may not function prop-
erly if modifications are made. Take your
vehicle to an authorized dealer for any
air bag system service. If your seat, in-
cluding your trim cover and cushion,
needs to be serviced in any way (includ-
ing removal or loosening/tightening of
seat attachment bolts), take the vehicle
to your authorized dealer. Only manufac-
turer approved seat accessories may be
used. If it is necessary to modify the air
bag system for persons with disabilities,
contact your authorized dealer.
Event Data Recorder (EDR)
This vehicle is equipped with an event data
recorder (EDR). The main purpose of an EDR
is to record, in certain crash or near crash-
like situations, such as an air bag deployment
SAFETY
98