2018 JEEP COMPASS ESP
[x] Cancel search: ESPPage 251 of 348

CAUTION!
• Use of power washers exceeding
1,200 psi (8,274 kPa) can result in
damage or removal of paint and decals.
Special Care
• If you drive on salted or dusty roads or if you
drive near the ocean, hose off the undercar-
riage at least once a month.
• It is important that the drain holes in the
lower edges of the doors, rocker panels, and
trunk be kept clear and open.
• If you detect any stone chips or scratches in
the paint, touch them up immediately. The
cost of such repairs is considered the re-
sponsibility of the owner.
• If your vehicle is damaged due to a collision
or similar cause that destroys the paint and
protective coating, have your vehicle re-
paired as soon as possible. The cost of such
repairs is considered the responsibility of
the owner.• If you carry special cargo such as chemi-
cals, fertilizers, de-icer salt, etc., be sure
that such materials are well packaged and
sealed.
• If a lot of driving is done on gravel roads,
consider mud or stone shields behind each
wheel.
• An authorized dealer has touch up paint to
match the color of your vehicle.
INTERIORS
Seats And Fabric Parts
Use Mopar Total Clean to clean fabric uphol-
stery and carpeting.
WARNING!
Do not use volatile solvents for cleaning
purposes. Many are potentially flammable,
and if used in closed areas they may cause
respiratory harm.
Stain Repel Fabric Cleaning Procedure — If
Equipped
Stain Repel seats may be cleaned in the
following manner:
• Remove as much of the stain as possible by
blotting with a clean, dry towel.
• Blot any remaining stain with a clean,
damp towel.
• For tough stains, apply Mopar Total Clean,
or a mild soap solution to a clean, damp
cloth and remove stain. Use a fresh, damp
towel to remove soap residue.
• For grease stains, apply Mopar Multi-
Purpose Cleaner to a clean, damp cloth and
remove stain. Use a fresh, damp towel to
remove soap residue.
• Do not use any harsh solvents or any other
form of protectants on Stain Repel
products.
249
Page 258 of 348

Light spark knock at low engine speeds is not
harmful to your engine. However, continued
heavy spark knock at high speeds can cause
damage, and immediate service is required.
Poor quality gasoline can cause problems
such as hard starting, stalling, and hesita-
tions. If you experience these symptoms, try
another brand of gasoline before considering
service for the vehicle.
Poor quality gasoline can cause problems
such as hard starting, stalling, and hesita-
tions. If you experience these symptoms, try
another brand of gasoline before considering
service for the vehicle.
Ethanol
The manufacturer recommends that your ve-
hicle be operated on fuel containing no more
than 10% ethanol. Purchasing your fuel from
a reputable supplier may reduce the risk of
exceeding this 10% limit and/or of receiving
fuel with abnormal properties.
CAUTION!
Use of fuel with Ethanol content higher
than 10% may result in engine malfunc-
tion, starting and operating difficulties,
and materials degradation. These adverse
effects could result in permanent damage
to your vehicle.
Materials Added To Fuel
Indiscriminate use of fuel system cleaning
agents should be avoided. Many of these
materials intended for gum and varnish re-
moval may contain active solvents or similar
ingredients. These can harm fuel system gas-
ket and diaphragm materials.
Fuel System Cautions
CAUTION!
Follow these guidelines to maintain your
vehicle’s performance:
• The use of leaded gasoline is prohibited
by law. Using leaded gasoline can impair
CAUTION!
engine performance and damage the
emissions control system.
• An out-of-tune engine or certain fuel or
ignition malfunctions can cause the
catalytic converter to overheat. If you
notice a pungent burning odor or some
light smoke, your engine may be out of
tune or malfunctioning and may require
immediate service. Contact an autho-
rized dealer for service assistance.
• The use of fuel additives, which are now
being sold as octane enhancers, is not
recommended. Most of these products
contain high concentrations of metha-
nol. Fuel system damage or vehicle per-
formance problems resulting from the
use of such fuels or additives is not the
responsibility of the manufacturer and
may void or not be covered under the
New Vehicle Limited Warranty.
NOTE:
Intentional tampering with the emissions
control system can result in civil penalties
being assessed against you.
TECHNICAL SPECIFICATIONS
256
Page 266 of 348

TIPS CONTROLS AND
GENERAL INFORMATION
Steering Wheel Audio Controls
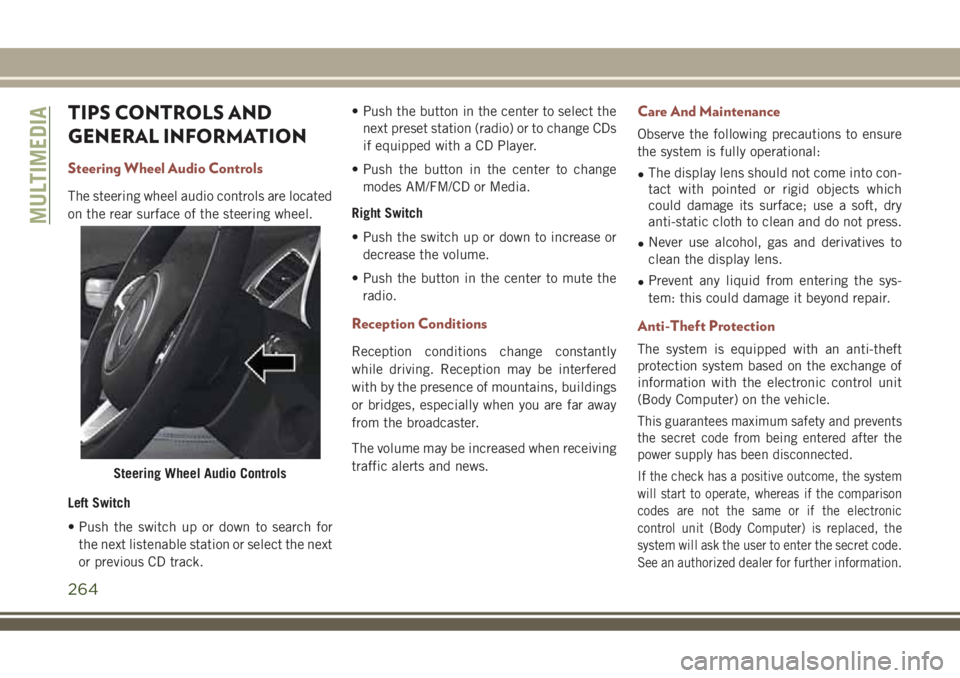
The steering wheel audio controls are located
on the rear surface of the steering wheel.
Left Switch
• Push the switch up or down to search for
the next listenable station or select the next
or previous CD track.• Push the button in the center to select the
next preset station (radio) or to change CDs
if equipped with a CD Player.
• Push the button in the center to change
modes AM/FM/CD or Media.
Right Switch
• Push the switch up or down to increase or
decrease the volume.
• Push the button in the center to mute the
radio.
Reception Conditions
Reception conditions change constantly
while driving. Reception may be interfered
with by the presence of mountains, buildings
or bridges, especially when you are far away
from the broadcaster.
The volume may be increased when receiving
traffic alerts and news.
Care And Maintenance
Observe the following precautions to ensure
the system is fully operational:
•The display lens should not come into con-
tact with pointed or rigid objects which
could damage its surface; use a soft, dry
anti-static cloth to clean and do not press.
•Never use alcohol, gas and derivatives to
clean the display lens.
•Prevent any liquid from entering the sys-
tem: this could damage it beyond repair.
Anti-Theft Protection
The system is equipped with an anti-theft
protection system based on the exchange of
information with the electronic control unit
(Body Computer) on the vehicle.
This guarantees maximum safety and prevents
the secret code from being entered after the
power supply has been disconnected.
If the check has a positive outcome, the system
will start to operate, whereas if the comparison
codes are not the same or if the electronic
control unit (Body Computer) is replaced, the
system will ask the user to enter the secret code.
See an authorized dealer for further information.Steering Wheel Audio Controls
MULTIMEDIA
264
Page 272 of 348

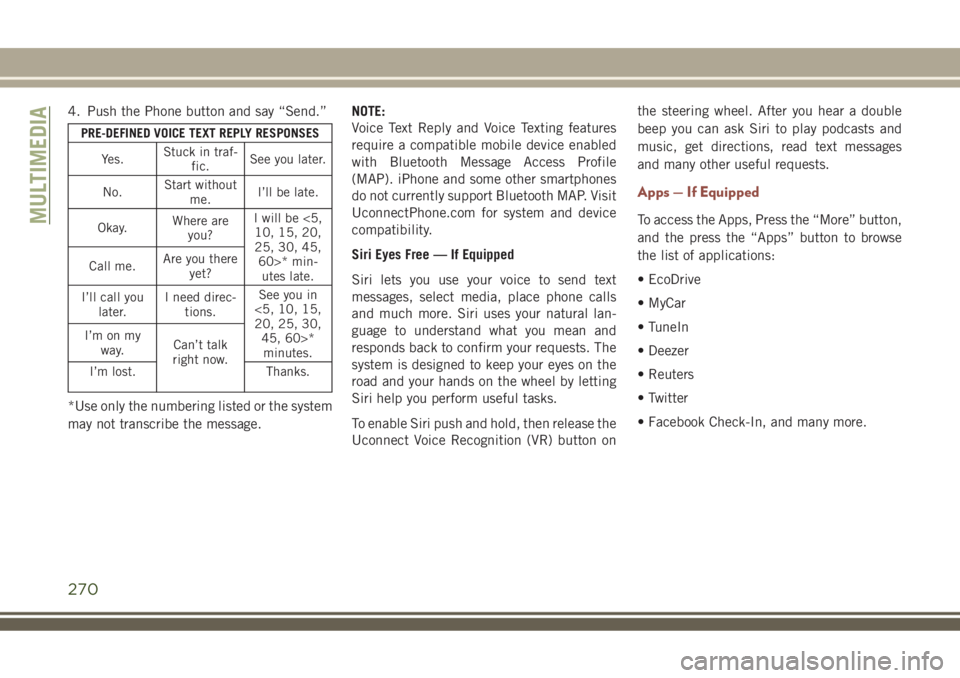
4. Push the Phone button and say “Send.”
PRE-DEFINED VOICE TEXT REPLY RESPONSES
Yes.Stuck in traf-
fic.See you later.
No.Start without
me.I’ll be late.
Okay.Where are
you?I will be <5,
10, 15, 20,
25, 30, 45,
60>* min-
utes late. Call me.Are you there
yet?
I’ll call you
later.I need direc-
tions.See you in
<5, 10, 15,
20, 25, 30,
45, 60>*
minutes. I’m on my
way.Can’t talk
right now.
I’m lost. Thanks.
*Use only the numbering listed or the system
may not transcribe the message.NOTE:
Voice Text Reply and Voice Texting features
require a compatible mobile device enabled
with Bluetooth Message Access Profile
(MAP). iPhone and some other smartphones
do not currently support Bluetooth MAP. Visit
UconnectPhone.com for system and device
compatibility.
Siri Eyes Free — If Equipped
Siri lets you use your voice to send text
messages, select media, place phone calls
and much more. Siri uses your natural lan-
guage to understand what you mean and
responds back to confirm your requests. The
system is designed to keep your eyes on the
road and your hands on the wheel by letting
Siri help you perform useful tasks.
To enable Siri push and hold, then release the
Uconnect Voice Recognition (VR) button onthe steering wheel. After you hear a double
beep you can ask Siri to play podcasts and
music, get directions, read text messages
and many other useful requests.
Apps — If Equipped
To access the Apps, Press the “More” button,
and the press the “Apps” button to browse
the list of applications:
• EcoDrive
• MyCar
• TuneIn
• Deezer
• Reuters
• Twitter
• Facebook Check-In, and many more.MULTIMEDIA
270
Page 276 of 348

WARNING!
ALWAYS drive safely with your hands on
the wheel. You have full responsibility and
assume all risks related to the use of the
Uconnect features and applications in this
vehicle. Only use Uconnect when it is safe
to do so. Failure to do so may result in an
accident involving serious injury or death.
• To access the Radio mode, press the “Ra-
dio” button on the touchscreen.
Selecting Radio Stations
• Press the desired radio band (AM, FM or
DAB) button on the touchscreen.
Seek Up/Seek Down
• Press the Seek up or down arrow buttons on
the touchscreen for less than two seconds
to seek through radio stations.
• Press and hold either arrow button on the
touchscreen for more than two seconds to
bypass stations without stopping. The radio
will stop at the next listenable station once
the arrow button on the touchscreen is
released.Direct Tune
• Tune directly to a radio station by pressing
the “Tune” button on the screen, and en-
tering the desired station number.
Store Radio Presets Manually
Your radio can store 36 total preset stations,
12 presets per band (AM, FM and DAB). They
are shown at the top of your radio screen. To
see the 12 preset stations per band, press the
arrow button on the touchscreen at the top
right of the screen to toggle between the two
sets of six presets.
To store a radio preset manually, follow the
steps below:
1. Tune to the desired station.
2. Press and hold the desired numbered but-
ton on the touchscreen for more than two
seconds or until you hear a confirmation
beep.
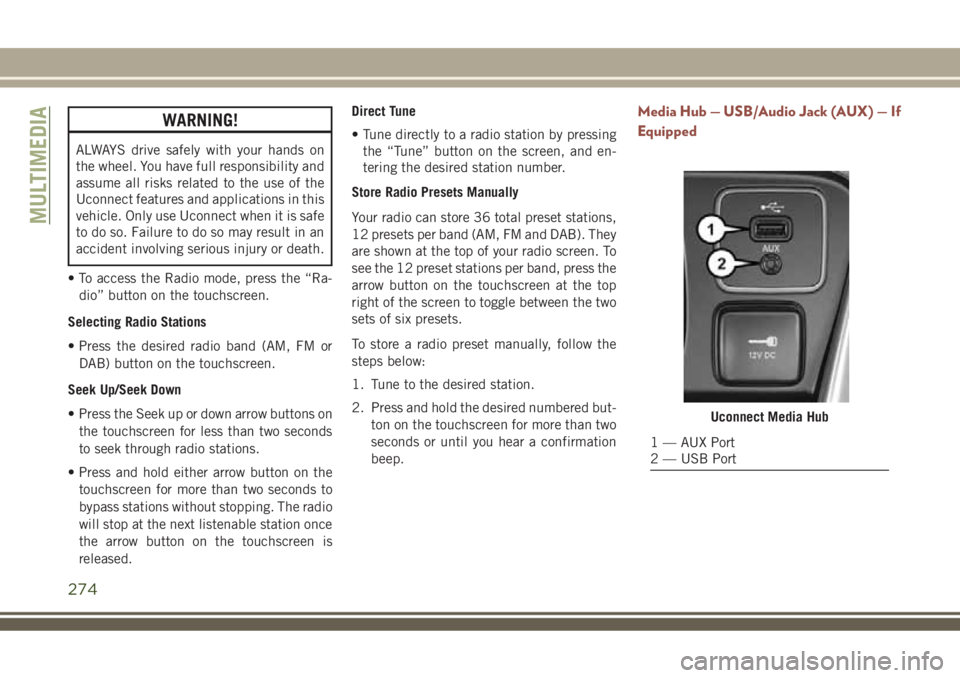
Media Hub — USB/Audio Jack (AUX) — If
Equipped
Uconnect Media Hub
1 — AUX Port
2 — USB Port
MULTIMEDIA
274
Page 281 of 348

UCONNECT 4C/4C NAV
WITH 8.4–INCH DISPLAY
Uconnect 4/4C NAV At A Glance
WARNING!
ALWAYS drive safely with your hands on
the wheel. You have full responsibility and
assume all risks related to the use of the
Uconnect features and applications in this
vehicle. Only use Uconnect when it is safe
to do so. Failure to do so may result in an
accident involving serious injury or death.
CAUTION!
Do not attach any object to touchscreen,
doing so can result in damage to the
touchscreen.
Setting The Time
• Model Uconnect 4/4C NAV synchronizes
time automatically via GPS, so it should not
require any time adjustment. If you do need
to set the time manually, follow the instruc-
tions below for Model Uconnect 4/4C NAV.• For Uconnect 4/4C NAV, turn the unit on,
and then press the time display at the top of
the screen. Press “Yes.”
• If the time is not displayed at the top of the
screen, press the “Settings” button on the
touchscreen. In the Settings screen, press
the “Clock” button on the touchscreen,
then check or uncheck this option.
• Press “+” or “–” next to Set Time Hours and
Set Time Minutes to adjust the time.
• If these features are not available, uncheck
the Sync Time box.
• Press “X” to save your settings and exit out
of the Clock Setting screen.
Background Themes — If Equipped
• Screen background themes are selectable
from a pre-loaded list of themes. If you’d
like to set a theme, follow the instructions
below.
• Press the “Settings” button on the touch-
screen.• Press the “Display” button on the touch-
screen.
• Then press “Set Theme” button on the
touchscreen and select a theme.
Audio Settings
• Press of the “Audio” button on the touch-
screen to activate the Audio settings screen
to adjust Balance\Fade, Equalizer, and
Speed Adjusted Volume.
• You can return to the Radio screen by
pressing the “X” located at the top right.
Balance/Fade
• Press the “Balance/Fade” button on the
touchscreen to Balance audio between the
front speakers or fade the audio between
the rear and front speakers.
• Pressing the “Front,” “Rear,” “Left,” or
“Right” buttons on the touchscreen or
press and drag the Speaker Icon to adjust
the Balance/Fade.
279
Page 284 of 348

WARNING!
ALWAYS drive safely with your hands on
the wheel. You have full responsibility and
assume all risks related to the use of the
Uconnect features and applications in this
vehicle. Only use Uconnect when it is safe
to do so. Failure to do so may result in an
accident involving serious injury or death.
• To access the Radio mode, press the “Ra-
dio” button on the touchscreen.
Selecting Radio Stations
• Press the desired radio band (AM, FM or
DAB) button on the touchscreen.
Seek Up/Seek Down
• Press the Seek up or down arrow buttons on
the touchscreen for less than two seconds
to seek through radio stations.
• Press and hold either arrow button on the
touchscreen for more than two seconds to
bypass stations without stopping. The radio
will stop at the next listenable station once
the arrow button on the touchscreen is
released.Direct Tune
• Tune directly to a radio station by pressing
the “Tune” button on the screen, and en-
tering the desired station number.
Store Radio Presets Manually
Your radio can store 36 total preset stations,
12 presets per band (AM, FM and DAB). They
are shown at the top of your radio screen. To
see the 12 preset stations per band, press the
arrow button on the touchscreen at the top
right of the screen to toggle between the two
sets of six presets.
To store a radio preset manually, follow the
steps below:
1. Tune to the desired station.
2. Press and hold the desired numbered but-
ton on the touchscreen for more than two
seconds or until you hear a confirmation
beep.
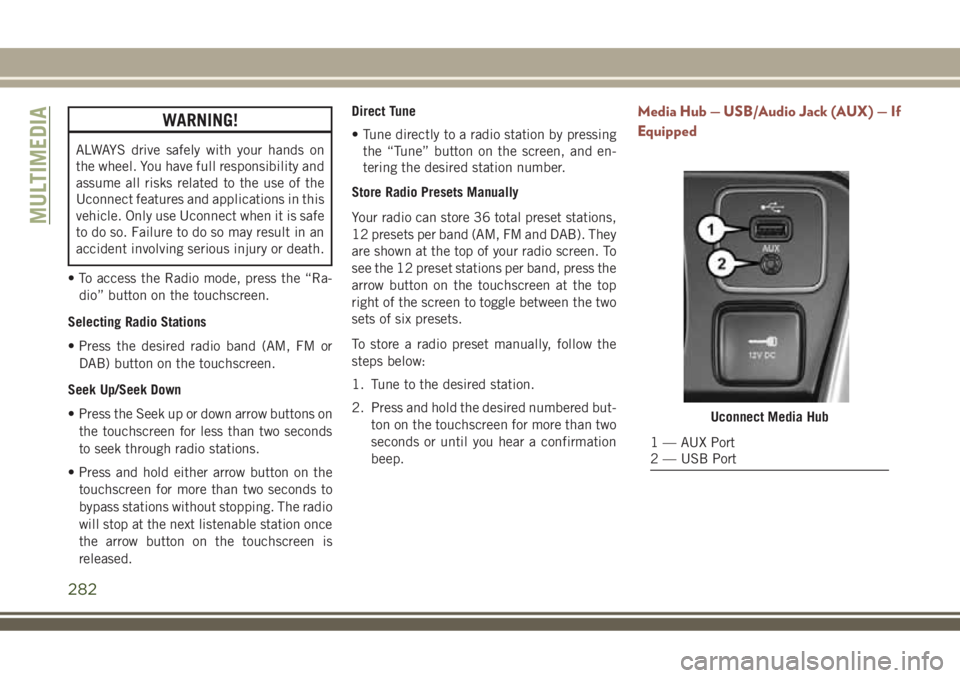
Media Hub — USB/Audio Jack (AUX) — If
Equipped
Uconnect Media Hub
1 — AUX Port
2 — USB Port
MULTIMEDIA
282
Page 311 of 348

Voice Text Reply
Uconnect announcesincomingtext mes-
sages. Push the Phone button
and say
“Listen.” (Must have compatible mobile
phone paired to Uconnect system.)
1. Once an incoming text message is read to
you, push the Phone button
. After
the beep, say: “Reply.”
2. Listen to the Uconnect prompts. After the
beep, repeat one of the pre-defined mes-
sages and follow the system prompts.
PRE-DEFINED VOICE TEXT REPLY RESPONSES
Yes.Stuck in traf-
fic.See you later.
No.Start without
me.I’ll be late.
Okay.Where are
you?I will be
minutes late.
Call me.Are you there
yet?
I’ll call you
later.I need direc-
tions.See you in
minutes. I’m on my
way.Can’t talk
right now.
I’m lost. Thanks.
TIP:Your mobile phone must have the full
implementation of theMessage Access Pro-
file (MAP)to take advantage of this feature.
For details about MAP, visit
UconnectPhone.com.
Apple iPhone iOS 6 or later supports reading
incomingtext messages only. To enable this
feature on your Apple iPhone, follow these
four simple steps:TIP:Voice Text Reply is not compatible with
iPhone, but if your vehicle is equipped with
Siri Eyes Free, you can use your voice to send
a text message.
Uconnect 4/4C NAV Phone
iPhone Notification Settings
1 — Select “Settings”
2 — Select “Bluetooth”
3 — Select The (i) For The Paired Ve-
hicle
4 — Turn On “Show Notifications”
309