2018 JEEP CHEROKEE stop start
[x] Cancel search: stop startPage 190 of 312

CAUTION!
Accessories plugged into the vehicle
power outlets draw power from the vehi-
cle’s battery, even when not in use (i.e.,
cellular devices, etc.). Eventually, if
plugged in long enough without engine
operation, the vehicle’s battery will dis-
charge sufficiently to degrade battery life
and/or prevent the engine from starting.
REFUELING IN EMERGENCY
Emergency Fuel Filler Door Release
If you are unable to open the fuel filler door,
use the fuel filler door emergency release.
1. Open the liftgate.
2. Remove access door located on right inte-rior trim panel for release cable with the
tip of your key.
3. Grab the release cable tether and pull up to release the fuel filler door.
IF YOUR ENGINE
OVERHEATS
In any of the following situations, you can
reduce the potential for overheating your en-
gine by taking the appropriate action.
• On the highways — slow down.
• In city traffic — while stopped, place the
transmission in NEUTRAL, but do not in-
crease engine idle speed.
CAUTION!
Driving with a hot cooling system could
damage your vehicle. If the temperature
gauge reads “H,” pull over and stop the
vehicle. Idle the vehicle with the air con-
ditioner turned off until the pointer drops
back into the normal range. If the pointer
remains on the “H” and you hear continu-
ous chimes, turn the engine off immedi-
ately and call for service. NOTE:
There are steps that you can take to slow
down an impending overheat condition:
• If your Air Conditioner (A/C) is on, turn it
off. The A/C system adds heat to the engine
cooling system and turning the A/C off can
help remove this heat.
• You can also turn the temperature control to maximum heat, the mode control to floor
and the blower control to high. This allows
the heater core to act as a supplement to
the radiator and aids in removing heat from
the engine cooling system.WARNING!
You or others can be badly burned by hot
engine coolant (antifreeze) or steam from
your radiator. If you see or hear steam
coming from under the hood, do not open
the hood until the radiator has had time to
cool. Never try to open a cooling system
pressure cap when the radiator or coolant
bottle is hot.
IN CASE OF EMERGENCY
188
Page 210 of 312

Checking Oil Level
To assure proper engine lubrication, the en-
gine oil must be maintained at the correct
level. Check the oil level at regular intervals,
such as every fuel stop. The best time to
check the engine oil level is about five min-
utes after a fully warmed up engine is shut
off.
Checking the oil while the vehicle is on level
ground will improve the accuracy of the oil
level readings.
There are three possible dipstick types,
• Crosshatched zone.
• Crosshatched zone marked SAFE.
• Crosshatched zone marked with MIN at thelow end of the range and MAX at the high
end of the range.
NOTE:
Always maintain the oil level within the cross-
hatch markings on the dipstick.
Adding 1 quart (1.0 liters) of oil when the
reading is at the low end of the dipstick range
will raise the oil level to the high end of the
range marking.
CAUTION!
Overfilling or underfilling the crankcase
will cause aeration or loss of oil pressure.
This could damage your engine.
Cooling System
WARNING!
• You or others can be badly burned by hot engine coolant (antifreeze) or steam
from your radiator. If you see or hear
steam coming from under the hood, do
not open the hood until the radiator has
had time to cool. Never open a cooling
system pressure cap when the radiator
or coolant bottle is hot.
• Keep hands, tools, clothing, and jewelry
away from the radiator cooling fan when
the hood is raised. The fan starts auto-
matically and may start at any time,
whether the engine is running or not.
• When working near the radiator cooling
fan, disconnect the fan motor lead or
turn the ignition to the OFF mode. The
WARNING!
fan is temperature controlled and can
start at any time the ignition is in the ON
mode.
Engine Coolant Checks
Check the engine coolant (antifreeze) protec-
tion every 12 months (before the onset of
freezing weather, where applicable). If the
engine coolant (antifreeze) is dirty, the sys-
tem should be drained, flushed, and refilled
with fresh PARAFLU
UPFormula OAT (Or-
ganic Additive Technology) or equivalent
meeting the requirements of FCA Material
Standard MS.90032. by an authorized
dealer. Check the front of the A/C condenser
for any accumulation of bugs, leaves, etc. If
dirty, clean by gently spraying water from a
garden hose vertically down the face of the
condenser.
Check the engine cooling system hoses for
brittle rubber, cracking, tears, cuts, and
tightness of the connection at the coolant
recovery bottle and radiator. Inspect the en-
SERVICING AND MAINTENANCE
208
Page 245 of 312

MULTIMEDIA
CYBERSECURITY...........245
TIPS CONTROLS AND GENERAL
INFORMATION .............246
Steering Wheel Audio Controls ......246
Reception Conditions ............246
Care And Maintenance ...........246
Anti-Theft Protection ............246
UCONNECT 3 WITH 5-INCH
DISPLAY..................247
Controls On The Front Panel .......247
Clock Setting .................248
Equalizer, Balance And Fade .......248
Radio Mode ..................249
Media Mode .................249
Bluetooth Source ..............252
UCONNECT 3C/3C NAV .......253
Uconnect 3C/3C NAV At A Glance . . .253
Drag & Drop Menu Bar...........255
Radio Mode ..................255
Media Mode .................256
UCONNECT SETTINGS ........256IPOD/USB/SD CARD/MEDIA
PLAYER CONTROL
..........257
Audio Jack (AUX)..............257
USB Port ...................257
SD Card ................... .258
Bluetooth Streaming Audio ........258
NAVIGATION...............258
Changing The Navigation Voice
Prompt Volume ...............258
Finding Points Of Interest .........259
Finding A Place By Spelling
The Name ...................259
One-Step Voice Destination Entry . . . .259
Setting Your Home Location ........259
Go Home ...................260
Adding A Stop ................260
Taking A Detour ...............260
UCONNECT PHONE ..........261
Operation...................261
Uconnect Phone Features .........263
Uconnect Phone (Bluetooth Hands
Free Calling) .................263 Pairing (Wirelessly Connecting)
Your Mobile Phone To The
Uconnect System
..............263
Common Phone Commands
(Examples) ..................266
Mute (Or Unmute) Microphone
During Call ..................266
Transfer Ongoing Call Between
Handset And Vehicle ............266
Phonebook ..................267
Voice Command Tips ............267
Changing The Volume ...........267
Using Do Not Disturb ...........267
Incoming Text Messages .........268
Voice Text Reply (Not Compatible
With iPhone) ................269
Helpful Tips And Common Questions
To Improve Bluetooth Performance
With Your Uconnect System ........270UCONNECT VOICE RECOGNITION
QUICK TIPS................271
Introducing Uconnect ...........271
Get Started .................272
MULTIMEDIA
243
Page 251 of 312

Radio Mode
Seek Previous/Next Buttons
Seek Up
Press and release the “Seek Up”button
on the touchscreen to tune the radio to the
next listenable station or channel.
During a Seek Up function, if the radio
reaches the starting station after passing
through the entire band two times, the radio
will stop at the station where it began.
Fast Seek Up
Press and hold the “Seek Up”button on
the touchscreen to advance the radio through
the available stations or channels at a faster
rate, the radio stops at the next available
station or channel when the button on the
touchscreen is released.
Seek Down
Press and release the “Seek Down”but-
ton on the touchscreen to tune the radio to
the next listenable station or channel. During a Seek Down function, if the radio
reaches the starting station after passing
through the entire band two times, the radio
will stop at the station where it began.
Fast Seek Down
Press and hold the “Seek Down”button
on the touchscreen to advance the radio
through the available stations or channel at a
faster rate, the radio stops at the next avail-
able station or channel when the button on
the touchscreen is released.
Store Radio Presets
The Radio stores up to 12 presets in each of
the Radio modes. There are four visible pre-
sets at the top of the radio screen. Pressing
the “All” button on the touchscreen on the
radio home screen will display all of the
preset stations for that mode.
To store a radio preset manually, follow the
steps below:
1. Tune to the desired station. 2. Press and hold the desired numbered but-
ton on the touchscreen for more than two
seconds or until you hear a confirmation
beep.
Media Mode
Audio Source Selection
Uconnect Media Mode
1 — SEEK
Down
2 — SEEK Up
3 — Additional
Functions4 — Info
5 — Pause/Play
6 — Source
7 — Browse
249
Page 274 of 312

Get Started
1. VisitUconnectPhone.com to check device
and feature compatibility and to find de-
vice pairing instructions.
2. Reduce background noise. Wind and pas- senger conversations are examples of
noise that may impact recognition.
3. Speak clearly at a normal pace and vol- ume while facing straight ahead.
4. Each time you give a Voice Command, you must first push either the VR or Phone
button, wait until afterthe beep, then say
your Voice Command.
5. You can interrupt the help message or system prompts by pushing the VR or
Phone button and saying a Voice Com-
mand from current category.
All you need to control your Uconnect system
with your voice are the buttons on your steer-
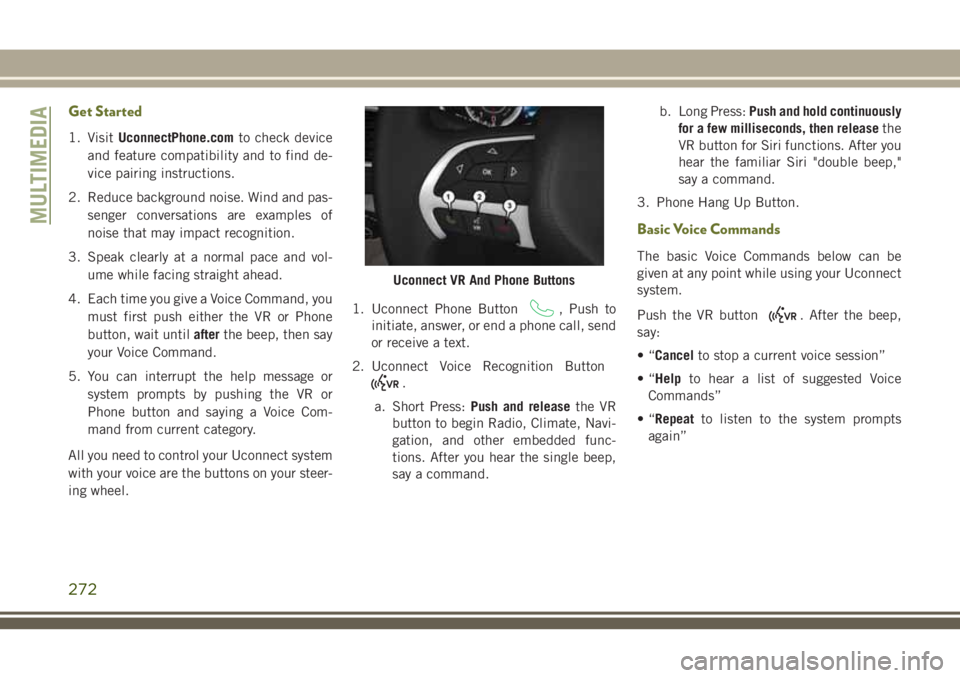
ing wheel. 1. Uconnect Phone Button
, Push to
initiate, answer, or end a phone call, send
or receive a text.
2. Uconnect Voice Recognition Button
.
a. Short Press: Push and release the VR
button to begin Radio, Climate, Navi-
gation, and other embedded func-
tions. After you hear the single beep,
say a command. b. Long Press:
Push and hold continuously
for a few milliseconds, then release the
VR button for Siri functions. After you
hear the familiar Siri "double beep,"
say a command.
3. Phone Hang Up Button.
Basic Voice Commands
The basic Voice Commands below can be
given at any point while using your Uconnect
system.
Push the VR button
. After the beep,
say:
•“ Cancel to stop a current voice session”
•“ Help to hear a list of suggested Voice
Commands”
•“ Repeat to listen to the system prompts
again”
Uconnect VR And Phone Buttons
MULTIMEDIA
272